- Home
- Product Categories
- Arduino Boards
- SparkFun Digital Sandbox


SparkFun Digital Sandbox
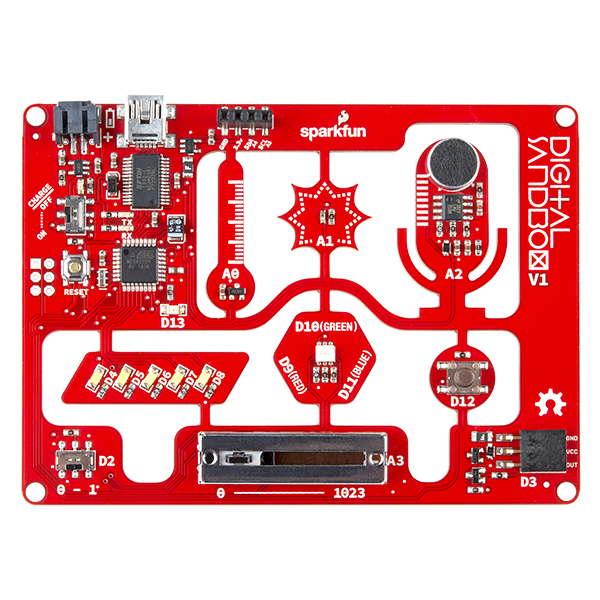
The Digital Sandbox (DS) is a learning platform that engages both the software and hardware worlds. It’s powered by a microcontroller that can interact with real-world inputs – like light or temperature sensors – while simultaneously controlling LEDs, motors, and other outputs. The Digital Sandbox is equipped with everything, on board, you will need to complete 13 experiments, including controlling an LED, measuring how loud things are, detecting what the temperature is, and more. Think of this as a SparkFun Inventor's Kit, all in one board!
By interfacing the Sandbox to your computer via a USB cable, the Sandbox can be programmed using the popular Arduino programming environment. To further simplify the experience, we’ve designed the Sandbox and its guide around a simple, “blocky” programming add-on to Arduino called Ardublock. Using ArduBlock – a simple, graphical version of the popular Arduino language – you will be able to program all the experiments with a simple graphical interface instead of writing code.
The full-color Digital Sandbox Guide (included) contains step-by-step instructions on how to connect each circuit with the included parts. Full example code is provided and explained, and even includes troubleshooting tips if something goes wrong. The kit does not require any soldering and is recommended for beginners ages 8 and up.
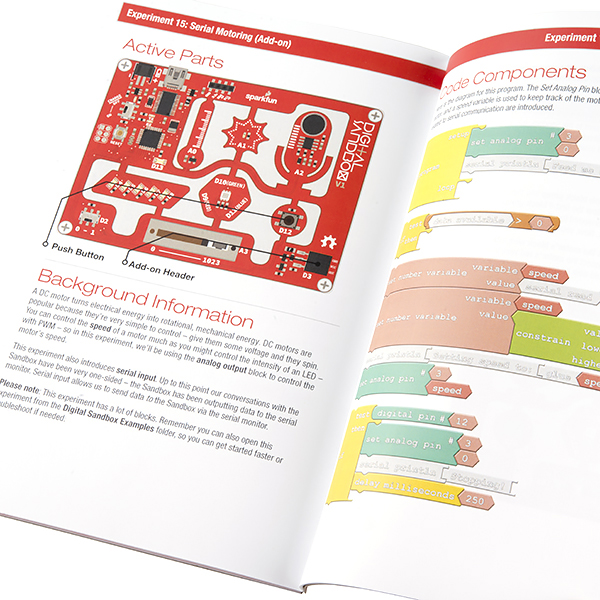
Note: There are three additional circuit experiments included in the DS Guide that will require the Digital Sandbox Add-On pack.
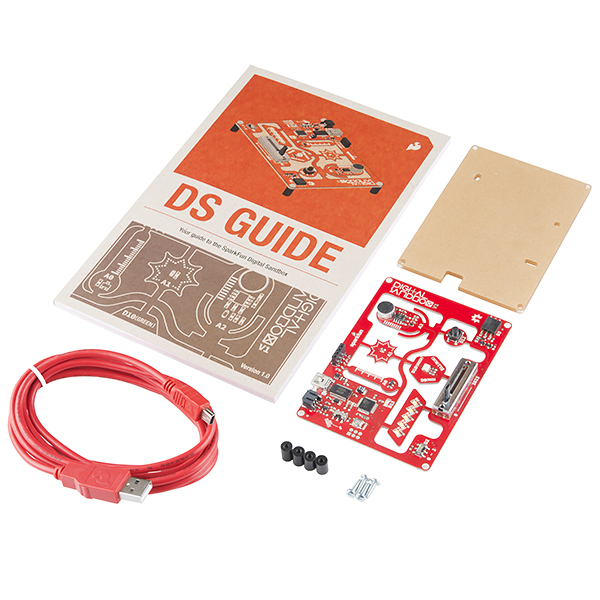
Included in Kit:
- 1x Digital Sandbox Board
- 1x Clear Acrylic Baseplate
- 1x USB Mini-B Cable - 6ft
- 1x Instruction Manual
- 4x Phillips Machine Screw - 4-40, 3/8"
- 4x Standoff - 4-40, 3/8"
Included on Board:
- LED Bar Graph
- Slide Switch
- Temperature Sensor
- Light Sensor
- RGB LED
- Slide Potentiometer
- Microphone
- Push Button
- 3-pin Add-On Header
- Schematic
- Eagle Files
- Digital Sandbox Guide
- Experiment Guide
- Experiment Guide (Arduino Companion)
- DS Guide (Separate Circuits)
- Virtual Digital Sandbox - Hour of Code
- ArduBlock & Digital Sandbox Examples:
- Arduino Addon Files (IDE 1.5+)
- GitHub (Example Code & Design Files)
- Product Video
- Circuit 1: Exploring Blink
- Circuit 2: Multi-Blink
- Circuit 3: Dimming (the Hard Way)
- Circuit 4: Dimming (the Easy Way)
- Circuit 5: Color Mixing
- Circuit 6: Number Storage with Variables
- Circuit 7: If This, Then That
- Circuit 8: The Reaction Tester
- Circuit 9: Serial Calculator
- Circuit 10: Do the Analog Slide
- Circuit 11: Automatic Night Light
- Circuit 12: Thermal Alert!
- Circuit 13: Sound Detecting
SparkFun Digital Sandbox Product Help and Resources
DigitalSandbox PicoBoard
August 15, 2014
This tutorial walks through how to upload code to your Digital Sandbox to emulate the functionality of the PicoBoard with Scratch.
Digital Sandbox Experiment Guide
July 31, 2014
Your guide to the Digital Sandbox! 16+ experiments that, using a graphical programming language, teach you to blink LEDs, monitor microphones, read temperature, and much more.
Digital Sandbox Arduino Companion
July 31, 2014
Let's take the same examples from the ArduBlock-based Digital Sandbox guide, and implement them using Arduino code.
0 of 1 found this helpful:
Arduino and Ardublock Compatibility
Ardublock is currently only compatible with Arduino versions 1.6.5 and previous. If you have issues compiling or uploading using the Ardublock download, try reverting to Arduino 1.6.5 or lower. Previous versions of Arduino can be found here.
Mac OS X download
If you are having trouble with installing the Arduino bundle in Mac OS X, give these steps a try.
- log in as admin and Disable gatekeeper in terminal sudo spctl--master-disable
- Install the FTDL driver for macosx 10.9 and later.
- Double click the combo package 1.69 and drag the arduino to the applications folder and authenticate as needed.
- Open the arduino app and select open if a warning comes up.
- Connect the board and change the port to USBSerial and also set board to digital sandbox.
Core Skill: DIY
Whether it's for assembling a kit, hacking an enclosure, or creating your own parts; the DIY skill is all about knowing how to use tools and the techniques associated with them.
Skill Level: Noob - Basic assembly is required. You may need to provide your own basic tools like a screwdriver, hammer or scissors. Power tools or custom parts are not required. Instructions will be included and easy to follow. Sewing may be required, but only with included patterns.
See all skill levels
Core Skill: Programming
If a board needs code or communicates somehow, you're going to need to know how to program or interface with it. The programming skill is all about communication and code.
Skill Level: Rookie - You will need a better fundamental understand of what code is, and how it works. You will be using beginner-level software and development tools like Arduino. You will be dealing directly with code, but numerous examples and libraries are available. Sensors or shields will communicate with serial or TTL.
See all skill levels
Core Skill: Electrical Prototyping
If it requires power, you need to know how much, what all the pins do, and how to hook it up. You may need to reference datasheets, schematics, and know the ins and outs of electronics.
Skill Level: Noob - You don't need to reference a datasheet, but you will need to know basic power requirements.
See all skill levels
Comments
Looking for answers to technical questions?
We welcome your comments and suggestions below. However, if you are looking for solutions to technical questions please see our Technical Assistance page.
Customer Reviews
4.5 out of 5
Based on 13 ratings:
13 of 14 found this helpful:
The perfect teaching tool!
We ordered 15 of these DS to use as teaching aids in our public library Maker space.
They are good looking and well labeled. It is very easy for students to find pin numbers and identify the embedded electronics.
They are very rugged with the acrylic plate and feet. very little worry of damage. I have no problem taking these to do offsite training. Just toss them in a shoe box and go.
It is all built in. No need for students to fuss with tons of wires, resistors, breadboards, potentiometers, LEDs, etc. etc. This really allows me to focus on teaching Arduino programming much faster than I would be able to do otherwise. When you have 15 students in a class, just the breadboard setup to teach blink can take 45 minutes.
Much cheaper than purchasing Arduino's with all the breadboards, wires, resistors, LED's. We do not have to purchase replacement LED's all the time when students forget a resistor
The Digital Sandbox is Arduino compatible so students have a large number of options to choose from when they go to purchase a board for their projects later.
SparkFun did a ton of work and created full experiment guides for use with both Ardublock and Arduino. I did not even have to write class curriculum. They did it for me!
Everyone who wants to teach Arduino should be using these! They have saved us countless hours of work and dollars in our tight budget.
3 of 4 found this helpful:
Great first microcontroller for kids.
I bought this board for my 7 year old to get her into coding. Prior to this she had worked with the hour of code site and this board was a perfect next step.
3 of 4 found this helpful:
great product
I have found the Sandbox to be a good intermediate step between drop-down menu type programming and Arduino programming.
2 of 3 found this helpful:
Best way to teach arduino to kids
My middle school students have chromebooks and I use codebender with the Digital Sandbox to teach arduino. It circumvents bread boarding so I can focus on the code. That turns out to be a more successful way to get girls involved. Once they gain some confidence with arduino, they get all kinds of ideas on things to build. Then I give them an inventors kit and show them how to build their own circuits. Best way to get kids to think like a maker. I used to start with an inventors kit and spent so much time on the tedious bread boarding that I would lose kids on the cusp (mostly the girls). Then I discovered the lilypad protosnap and wished for something similar, but with more inputs and outputs. Sparkfun read my mind and came out with the Digital Sandbox. Love it! Now I have 50/50 girls and boys.
2 of 3 found this helpful:
Seriously fun introduction to programming and microcontrollers!
I got this (plus the add-on kit) for a technician at my company who was interested in learning to program small uC's, which we use extensively in our products (scientific instruments). With no extra assistance, he set up the arduino tool chain, libraries, etc. and started programming on his kitchen table. And so did his 5-year old daughter, who was soon suggesting R-G-B patterns to light up the on-board LED's with her favorite colors! Now they are moving ahead to voice-activated blinky lights, reading pots and switches, etc. He hasn't tried the ArduBlock interface, as I recommended starting out with the text editor, since this will be more like the "real" programming interface he will encounter later. All in all, a really good (and fun!) learning tool, backed by all kinds of resources on Sparkfun and the Arduino websites.
1 of 2 found this helpful:
An awesome entry point for learners!
The sandbox, programming tool and introductory book are a great package for those new to Arduino, microcontrollers and programming.
1 of 2 found this helpful:
Nice little board
Nice product. ArduBlocks could use some help. It's pretty limited.
1 of 2 found this helpful:
Best thing we use with students!
I really like these as a classroom tool. They are the quickest way for students to get into "IoT", great for beginners as it builds confidence in themselves. Students can quickly get a program up and running, see how the codes work, etc.
1 of 3 found this helpful:
Great for Kids
As others have mentioned, the SparkFun Digital Sandbox is a great way to introduce kids to programming and Arduino. Since everything is already wired on the board, students can start making it do things right away.
I've been using Ardublock for my classes. Ardublock isn't perfect, but it allows students to get a feel for programming without all the aggravation of misplaced or missing semicolons and parentheses.
Once students see what they can do, they'll be ready to put in the time to learn wiring and syntax. The Digital Sandbox removes these early barriers to learning.
It's a fantastic tool!
I've been using this to teach a grade 6 student how to program and some basic electronics. It's made the jump from programming to real world easy and so very interesting.
Sparkfun Digital Sandbox will not upload:
One thing I just found that someone else may encounter is a problem uploading a sketch from the IDE. It worked one day and didn't work another. I suspected the usual (wrong board, wrong com port, cable, ....). What actually fixed the problem was sliding the charge slider from halfway to either full OFF or full ON. If charge slider switch it in the wrong position, the board will not allow uploads.
Hope that helps! I plan on buying more for anyone I teach!
Hey there,
Based on the schematic, the slider shouldn't affect the boards capacity to be used. I believe the slider is damaged (there is also a potential that you have a bad battery, but the board would still work in the "charge off" position). For further technical assistance, please create a post in our forums. Our technical support team will do their best to assist you.
Needs an update the latest Arduino release
Currently only works with an old version of the Arduino IDE. Which makes it confusing to get it up and running, why would I want to install an old version of the IDE just for this? Also, I left my kids computer in S mode so they can only install from the Microsoft store, which only has the current IDE version, so my kids can't use it and they are who I bought it for... Hey SparkFun, a little help?
Thank you for the feedback. We will look into the code and libraries and evaluate how we can port everything over to the latest version of Arduino.
Great for class
I teach 6th grade STEM. This year I'm began a new unit on microprocessors with the Digital Sandbox and the kids love it. After finding out about all of the inputs and outputs that were already part of the board the kids were off and running coming up with ideas for what they could create and do with it. We are now starting into the programming and the block format is perfect for teaching the logic of programming without getting bogged down in the syntax. I can see the one board for the class will not be enough and I'm in the process of ordering more. Great job folks.
There is no "blink" block in Ardublock anymore, apparently. So you can't officially complete Experiment 0 as that block doesn't exist. But there are other ways to do it with "set digital pin" etc.
Hi, I like this design very much and I want to have a try with this design. but I think the price is a little high for me. So I down load the design file, fabricate the PCB @elecrow and assemble one PCBA myself. Really sorry that I don't donate. I want to ask that is this a problem if I give the left PCBs to my customers free. Because the price for 10pcs PCB fabrication is same as 5 pcs PCB at elecrow.
Hi, I'm glad you like the design. Feel free to build your own and do whatever you want with them (sell them, give them away, build a tiny house, etc.). The files are all under the creative commons licence which basically means your version must be under a similar license and you must give us recognition for the original design. Also, keep in mind that our logo and name are trademarked. But for 5-10 copies, feel free give them away to customers.
I know that there is some licence. But I don't know the details for it. Thanks for your kindly reply
This is such a great idea. I have some younger kids who wanted to play around with arduino stuff but got fairly overwhelmed with the hardware side of things. This will let them explore it without having to worry about it. Also since you use blocky its even easier for them to get started. Nice job as always sparkfun.
Im just curious, what is the point of the Diode on the mic amp output. What type of diode is this??
It's a peak detector, along with the capacitors and the 100k resistor. The output will generally follow the amplitude envelop of the audio signal.
As it's not part of the feedback loop, I suspect it's just to clamp out negative voltages to help protect the microcontroller. The Eagle files contain no clue about the exact diode used - the schematic shows just a regular diode. A more typical diode might be a schottky, though in this use case it probably doesn't matter too much.
Can this be used to teach coding for the arduino, after the concepts have been mastered, or are you locked into using the graphical blocks coding method?
This is basically an Arduino with certain components already attached, so you can use any method to program it that you can to program a regular Arduino (Arduino IDE, AVR Studio, etc.).
How do you guys end up burning the bootloader onto these chips? Is it through the Arduino compiler or through Atmel Studio? Also do you program it with the Arduino as an ISP or do you use the AVR ISP MKII programmer?
This tutorial explains how we program production runs. We use an AVR ISP MKII.
The designing is very good.
I love this kit !!!!
Curious. S3 On/off switch on the schematic... Switching VCC between 5V and VBATT. Hows that on/off? What I miss?
S3 is on/off when the USB is disconnected. When USB is plugged in, you can't turn this puppy off.
well, technically you can turn it off by unplugging the USB ;-)
Just a thought having looked at the schematic, the design assumes sane output selection. While I love the concept here of getting a class straight into Arduino without having slow everybody down while you double and triple check all the wiring there are no limiting resistors on the pins intended as inputs so you can still set pinmode, press the switch and break a $70 board
While a big fan of learning by letting the smoke out I normally only stand back and watch when it's single LEDS and such that get binned afterwards.
I'm voting for the addition of a smattering of 125 ohm resistors on the next revision for a slightly less fraught class room experience.
I don't understand the concern, here. Input pins on an Atmega328P have a high impedance Schmitt-trigger buffer on them; so long as the input signal doesn't violate the supply limits (which isn't really possible, under normal classroom usage using the USB power), adding a 125-ohm resistor isn't going to do anything. The Schmitt-trigger buffer will also prevent them from loitering in the high-current crowbar zone in the case of an analog input in the nebulous voltage range, and a resistor wouldn't help with that anyway.
For that matter, setting any of the pins to an output and driving them high or low will also completely fail to damage any element of the board.
I'm concerned for the peripherals here. I speak from experience as a klutz who has a habit of destroying TSOP38238's. A cheap part, thankfully... Set your input pin to output with these, and the internal output transistor burns up in seconds. It kept happening because of libraries that surprised me by using pins I wasn't aware of, and having the wrong sketch loaded on a board. Surely setting A1 to output will kill the phototransistor? Does the MCP9700 tolerate having it's output pulled high/low by something else?
I thought that setting a pin to output, high and shorting to ground (or output, low shorted to Vcc) would damage the ATmega, as the data sheet says that the absolute maximum current per IO pin is 40mA? e.g. on this board setting PB4 as an output, low, and pressing the button?
This is exactly what I thought of the first time I saw the proto-snap boards. They have been a great learning experience for me, but this is now a much better path for beginners.
This was my thought as well - it seems that the ProtoSnap / LilyPad Development Board has all the advantages of this board (no wiring, etc), is $15 cheaper and when you are done learning, you can break it apart and create some e-textiles. The Digital Sandbox has more/different bells and whistles but I would think they would be fairly close if Sparkfun published a LilyPad ProtoSnap Guide. Comparisons aside, the Digital Sandbox is still very cool and I will definitely get one.
This board was actually designed to replace that one in an educational setting. Our EDU department was using the LilyPad dev board to teach classes, but it has a few major disadvantages. The USB-serial bridge isn't built-in, so that's a possible "pinch point" in the process. It didn't have all the things we wanted to use to explain stuff to people.
Most significantly, though, more than one student immediately started breaking the board apart before the lesson began. We wanted something that could be used and reused for many, many classes in an educational setting.
Costs more than a UNO and does less. To expensive for what it can do; $20.00 is a better price.
completely different products. an UNO doesn't have any onboard hardware.
Very cool!
Curious why you routed out the space between the different components? Just to have them stand out more? It does make it look better than a standard board. They almost look like a proto snap board, I'm guessing you didn't do a protosnap board because it adds to the complexity of the product (plus what happens for a newbie when the parts break off).
Are all the arduino pins used?
We wanted to route the board to give it something different to look at. Originally EDU was using proto snaps in the classrooms, but students kept snapping them apart. All of the arduino pins are used. There is a handy 4 pin header at the top that expands out the I2C port or two extra ADC channels (VCC and GND included).
This looks like a great kit for the beginner- I wish I had procrastinated just a couple of more days before ordering a bunch of beginner Sparkfun Arduino stuff. I might go for this anyway...great job on the interface, board design and accompanying documentation.
Looks great! Will this be combined with the add-on pack and a case for educators?
We are working up the LabPack (educator) version as I type - stay tuned!
Woohoo! Will it be a full set of 20 or can we buy individual kits like the SIK? I need a set of 6 for my classroom and would love to have them for the beginning of the school year.
The LabPack will be a full set though we are currently working on the quantities included and if we will include the add-ons. If you're looking to purchase 6 kits I would say your best bet is to purchase individual kits. Also, if you're not already in the system as an educator (20% discount), contact eservice@sparkfun.com to get setup!
Yeah, but does it come with sand or is that extra? How about a bucket and spade?
...all you need is the S.H.O.V.E.L. The faboulus Sparkfun spork
We haven't quite figured out how to make electronics with wet sand but the SHOVEL will be the corner stone of that kit if we ever get there ;)
That is some really creative routing! I love the microphone :)
Thanks! I wonder how many kids will recognize that style of microphone.
Everyone will recognize it as the iPhone Voice Memos icon... at least until iOS7 got rid of it!