- Home
- Product Categories
- Teensy
- Teensy Audio Board

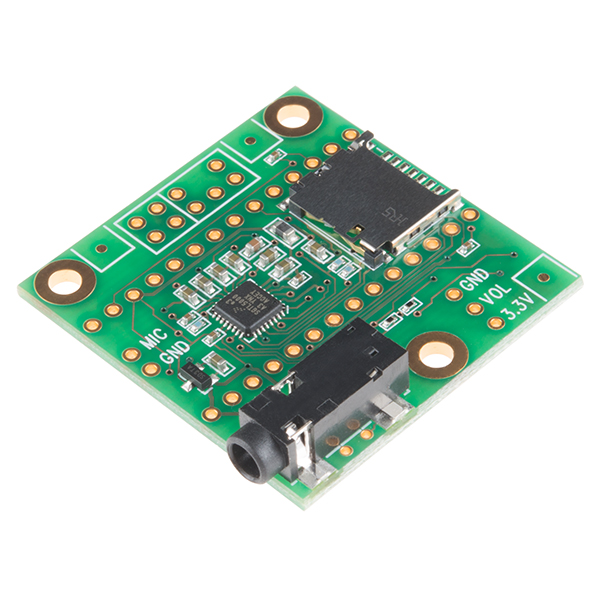
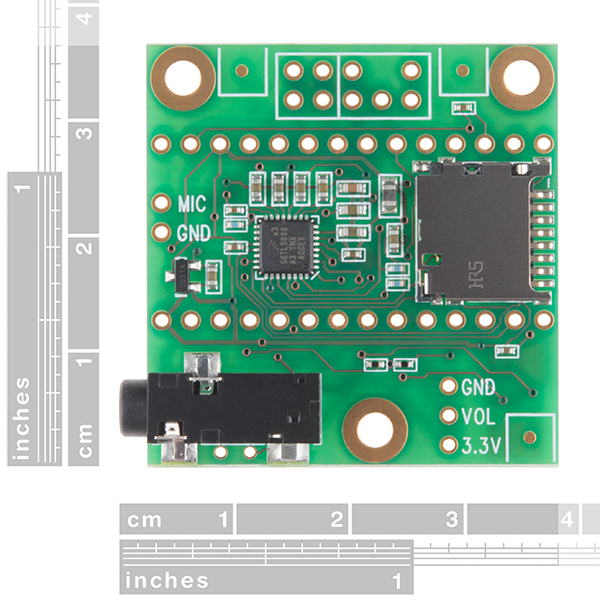
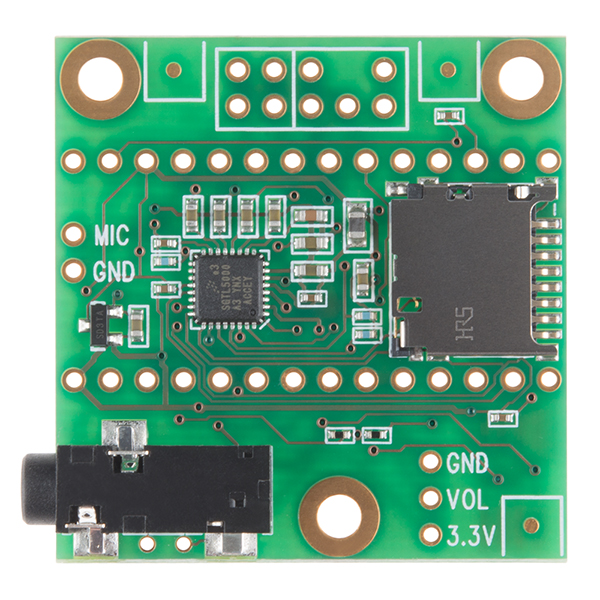
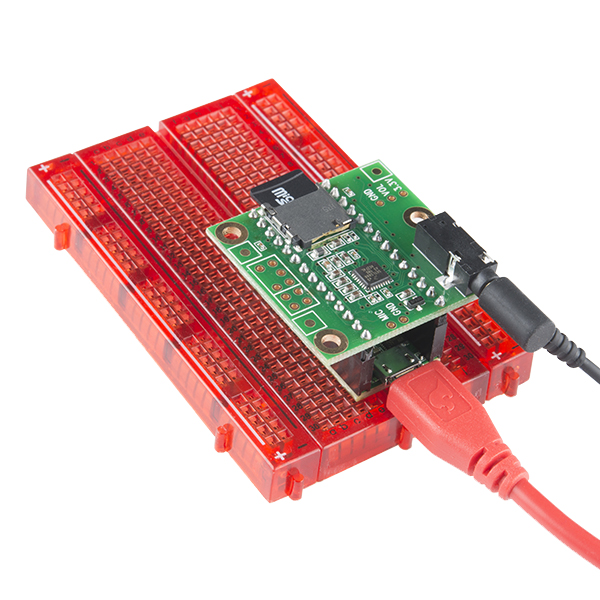
Teensy Audio Board
This is the Teensy Audio board add-on for the Teensy 3.x line development boards. This audio board provides you with an easy-to-use tool to add high quality 16 bit, 44.1 kHz sample rate audio to your Teensy project. With the audio library provided in the Documents section below you will be able to use both the input and output simultaneously in order to make a variety of great audio projects, incorporate synth waveforms, effects, and mix multiple sound streams and cd quality audio to your headphones or different line outs!
The Teensy Audio board utilizes the SGTL5000 stereo codec with headphone amp IC to decode and drive audio files and the Cortex-M4 DSP instructions from the Teensy dev board to provide power to a real-time FFT. Each board is also equipped with 3.5mm audio jack for headphones, a micro-SD card slot for storing audio files, and optional spaces for a 25k potentiometer (volume control) and flash memory chip. The two rows of 14x1 headers are not included to give you the freedom to choose how to connect your audio board with your Teensy.
- 16 bit, 44.1 kHz Sample Rate Audio
- Plays Uncompressed WAV and Raw Audio Files
- 4 Channel Software Mixer
- 3.5mm Audio Jack
- micro-SD Card Slot
Teensy Audio Board Product Help and Resources
TeensyView Hookup Guide
March 16, 2017
A guide to using the TeensyView OLED board to display text and graphics.
Proto Pedal Example: Programmable Digital Pedal
September 22, 2016
Building a pedal around the Teensy 3.2 and Teensy Audio shield. Changing the effect in the pedal is as easy as uploading a new sketch!
Core Skill: Soldering
This skill defines how difficult the soldering is on a particular product. It might be a couple simple solder joints, or require special reflow tools.
Skill Level: Noob - Some basic soldering is required, but it is limited to a just a few pins, basic through-hole soldering, and couple (if any) polarized components. A basic soldering iron is all you should need.
See all skill levels
Core Skill: Programming
If a board needs code or communicates somehow, you're going to need to know how to program or interface with it. The programming skill is all about communication and code.
Skill Level: Competent - The toolchain for programming is a bit more complex and will examples may not be explicitly provided for you. You will be required to have a fundamental knowledge of programming and be required to provide your own code. You may need to modify existing libraries or code to work with your specific hardware. Sensor and hardware interfaces will be SPI or I2C.
See all skill levels
Core Skill: Electrical Prototyping
If it requires power, you need to know how much, what all the pins do, and how to hook it up. You may need to reference datasheets, schematics, and know the ins and outs of electronics.
Skill Level: Rookie - You may be required to know a bit more about the component, such as orientation, or how to hook it up, in addition to power requirements. You will need to understand polarized components.
See all skill levels
Comments
Looking for answers to technical questions?
We welcome your comments and suggestions below. However, if you are looking for solutions to technical questions please see our Technical Assistance page.
Customer Reviews
5 out of 5
Based on 5 ratings:
1 of 1 found this helpful:
Sounds Great
I had it working a few minutes after opening the package. Teensyduino provides many examples to get started with and the Teensy website has more in depth information when the examples don't answer all your questions.
2 of 4 found this helpful:
Seriously. Awesome.
You have no reason not to buy this. NO reason. Paul (the inventor of the Teensy) is an awesome guy who answers pretty much every question anyone has. This little device does everything from breaking into locked devices to audio playing and sound effects, controlling lighting for your home, car - or actually controlling your home and car! The audio board is an amazing and very cheap add on that makes easy projects even easier. Buy it now!
works like a charm
I used the audio board to build the handpan project. Works great!
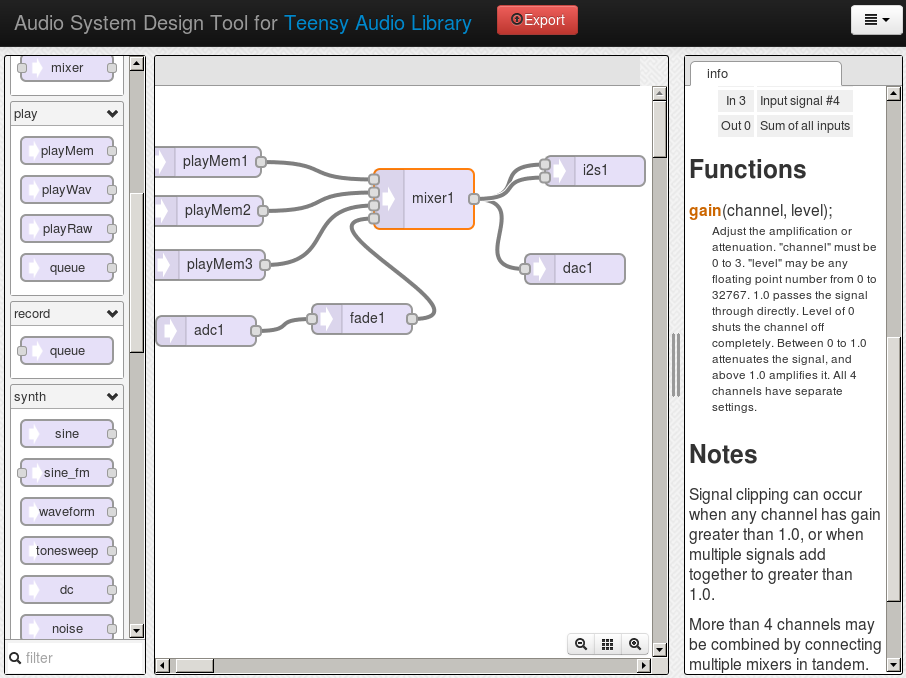
The ability to mix audio is the key for me.
I needed to create an instrument that could play 3 notes simultaneously. While the Teensy can play a single note ok (more or less) it can't be mixed with another note well. Using the online Audio system design tool and this board gives me excellent quality tone and the software Mixer blends multiple notes perfectly. I don't use pre-recorded music so the SD card socket is just baggage. I use a lot of these so dump the socket and cut the cost and I would be happier!
I'm having trouble communicating via I2C with this board. I have SDA on pin 18 and SCL on pin 19 and cannot get an acknowledge (ACK). I sent 0x14 and get NACK back. Only other connections are 3.3V and GND. I'm using a STM32F4 discovery board, not a Teensy. Any advice?
I'm having the exact same issue. I thought I blew the first one so I ordered another but same deal. I've triple checked the pins and cannot get an ACK. My bus pirate can't sniff any device addresses either...I'm at a loss.
For anybody struggling with this I finally figured it out. This chip holds itself in a reset state until it sees 8 MCLK cycles so you must send a proper MCLK to the chip before trying to communicate with it over I2C.
There is a typo - "441 kHz" should be "44.1 kHz"
Thanks, fixed
I have setup this device using my MCU as per the AN3663 but sending data on I2S_DIN to the chip gets no output on the headphone. I also tried with a loopback (I2S_SELECT bit-field of CHIP_SSS_CTRL) but DOUT does not show DIN.
Configuration is through I2c and I am able to read/ write registers. Look forward to any way to move forward.
I have one of these, and sure enough it works. Be careful when connecting it to get it the right way around! There is no obvious mark to indicate which way it connects, and the headers are symmetrical so it fits over the Teensy 3/3.1 as easily backwards as it dos the correct way. The microSD card slot should be facing the opposite way as the Teensy USB connector. This is correctly shown in the Sparkfun breadboard photo.
I just got one of these. I wanted to add the "optional" on-board 23LC1024 SPI SRAM, but I can't seem to find out whether the board footprint is SOIC or TSSOP. Which is it? The pjrc web site didn't have anything useful either. I guess I could order both types, but that sucks.
I'm interested in buying one of these. I've been checking the PeakMeterStereo code and wanted to know, if using the line in pins, using the AudioInputI2S class, will this use any pins of the Teensy? And if yes, which ones? Also, the specific sketch imports the SPI library, but I can't see where it's used. Is it used for the I2S? Will there be any conflict if I use that code along with some other code that uses the SPI library to control shift registers? (actually I want to build a VU meter...).
Thanks
I want to use an arduino to build an alarm clock with a customized wake sound. The sound file would be put on the card on a PC. I don't need recording or DSP ability. The sound file would be 15-30 minutes long. Considering that use, does this chip handle the reading/file buffering itself?
Yes. Use this example. https://github.com/PaulStoffregen/Audio/blob/master/examples/WavFilePlayer/WavFilePlayer.ino
Has anybody had success using these boards to record audio? E.g. voice? also what microphone hardware would be suitable?
The version 1.0 library has a recording example. Open it with File > Examples > Audio > Recorder.
https://github.com/PaulStoffregen/Audio/blob/master/examples/Recorder/Recorder.ino
I need to send pulses of tones from the right head phone to the left head phone. Is there a way to do that with this board?.
Well that's an interesting question. I wonder what you really mean? Taken literally, of course both the left and right headphone signals are output, so you can't input anything via the left headphone. You could get an input signal from the left line-in pin, or from the mic input.
But maybe by "send pulses of tones from right ... to left ...", maybe you mean creating tones independently on the left and right channel, varying their timing and intensity, so as to create a stereo effect that causes the listener to perceive spacial movement of a single audio source? If that's what you mean, then yes, certainly you could a complex arrangement of AudioSynthWaveform, AudioEffectFader and AudioMixer4 objects, and of course your Arduino sketch to control them, which creates really interesting timing and intensity varying effects.
But maybe you mean something else entirely?
If you really, actually meant using the left headphone as some sort of audio input device, well, I'm afraid this hardware won't help. Even if the headphones you're using actually are a dynamic speaker which can function "in reverse" to sense sound, the headphone output on this board is an amplifier which passes the signal only in 1 direction. There is a mono mic input and stereo line-in signals, meant for input of signals, so you'd somehow have to connect to those to actually get a signal input from the left to then use in somehow controlling the right.
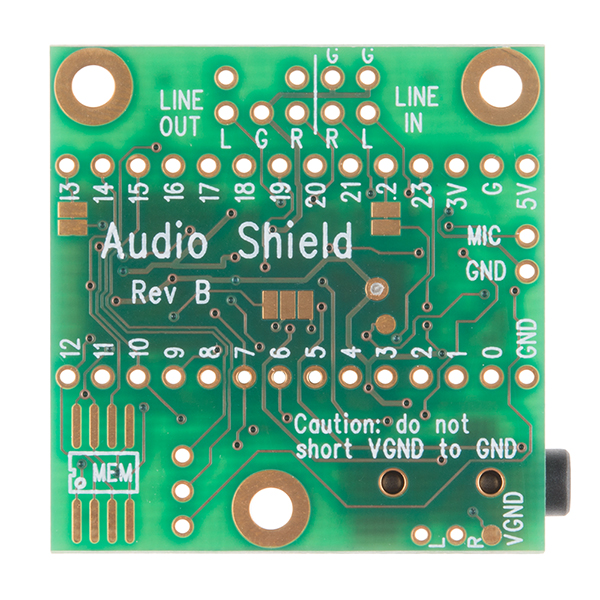
I am assuming that the mic-in header pins are connected to the SGTL5000 mic-in pins? The mic-in for the chip has programmable gain and bias. I don't see a schematic here or on the PJRC product page so cannot confirm that myself.
A schematic is available....
How do you get the data onto the SD card? Through the teensy mic or line in?
Netduino hook up ?
So...not polyphonic, is it? Seems to be one stereo track at a time -- although you can mix with an external source.
It is indeed polyphonic. Look at the library's SamplePlayer example.