- Home
- Product Categories
- Robotics Kits
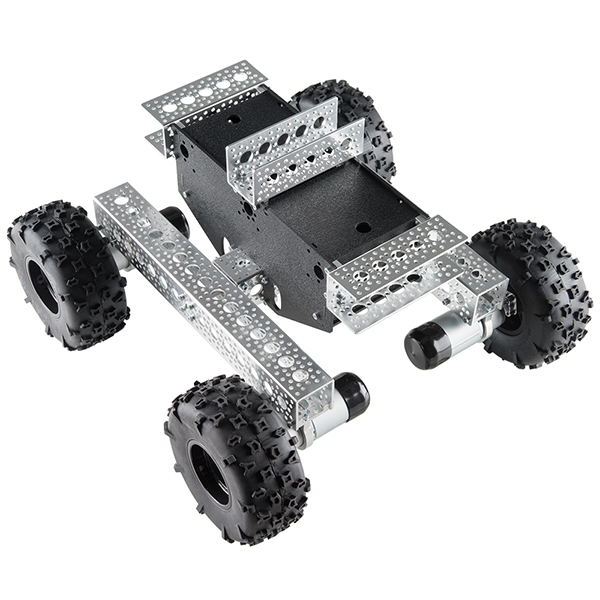
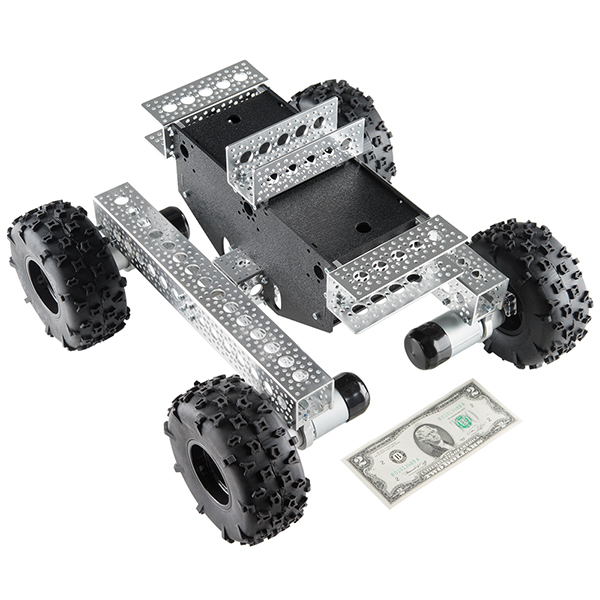
- Actobotics Kit - Nomad 4WD Off-Road Chassis

Actobotics Kit - Nomad 4WD Off-Road Chassis
This is the Nomad 4WD Off-Road Chassis kit from Actobotics, a remarkably easy to assemble robotic platform capable of taking you places normal chassis can't go. What makes this chassis kit great is not only its vast amount of attachment points for various add-ons, but also the fact that it is easily and fully configurable to fit your needs! Do you need the off-road wheels a different distance apart from one another? Do you need to switch out a motor due to damage or situational requirements? Do you need a different type of channel or panel attached to the main body for more attachment points? All of this can be done with a simple hex key and a few minutes.
This chassis is equipped with four 5" diameter by 2.25" wide heavy duty wheels, four super duty planetary gearmotors with full metal gears and a ball-bearing pivot suspension. Also included in the 4WD Off-Road Chassis kit is a large central ABS plastic body with two large access panels that open up to a cavity large enough for a 7.2V NiCAD/NiMH or other lipo battery and electronics to fit comfortably. This central body also has a multitude of 0.77" hub patterns, cutouts at the bottom to run motor wires through, and since it is made out of ABS plastic drilling holes for additional mounting options is a breeze.
Actobotics is a robotics building system based around extruded aluminum channels, gears, precision shafts, and ball bearings. Thanks to the two standardized hole patterns, nearly all Actobotics components can be intuitively connected together. The wide range of components makes building complex electromechanical prototypes or finished projects a reality.
Note: This comes as a kit and requires basic assembly.
- 1x 6" Aluminum Channel
- 2x 12" Aluminum Channel
- 3x 4.5" Aluminum Channel
- 4x Robot Wheels
- 4x Off-Road Tires
- 4x 313 RPM HD Precision Planetary Gear Motor
- 4x Wheel Adapter - Hex (12mm)
- 4x Round Grommet
- 5x Hub - Quad D Mount (90 Degree)
- 1x Shaft - D-Shaft (Stainless; 1/4"D x 8.00"L)
- 5x Side Mount Bracket
- 2x Set Screw Hub - 1/4" Bore
- 1x Bearing Mount - Quad Block (1/4" Bore)
- 2x Ball Bearing - Non-Flanged (8mm Bore, 22mm OD)
- 12x Shaft Spacer - 1/4"
- 3x Machine Screw - Socket Head (6-32 ; 1/4"; 25 pack)
- 4x Attachment Block
- 4x Motor Mount - Swivel Clamp (32mm)
- 4x Gearmotor End Cap
- 7x ABS Enclosure Panels
Actobotics Kit - Nomad 4WD Off-Road Chassis Product Help and Resources
**Troubleshooting/Common Issues**
Motor Driver?
We do not have a motor driver shield that is able to control all 4 motors. You would need to stack the two shields, reroute pins, and redefine pins in order to control all 4 motors. I recommend using a Go-Between Shield [ https://www.sparkfun.com/products/11002 ] to help in rerouting pins with the two shields stacked on the Arduino. The Ardumoto Motor Driver shield [ https://www.sparkfun.com/products/9815 ] might be an option but you would not be utilizing the full range of the motors. Testing it out with 2x of the 313 RPM HD precision planetary gear motors [ here are the specs https://www.servocity.com/html/313_rpm_hd_precision_planetary.html#.VtibK-bts2Q ] from the Nomad Kit I was able to control the motors. I was using a bench top power supply set at 12V/2A. The two motors were pulling about 1.2A with no load attached. Using a lower voltage, the motors were not as powerful.
A beefier motor driver to look at is the Monster Moto Shield [ [https://www.sparkfun.com/products/10182(https://www.sparkfun.com/products/10182) ] . This is if you were driving the motors hard. I have not tried using two monster motor shields but you would just need to redefine the pins and reroute the pins. Looking at the Eagle files and example code, it is just using 2 analog pins, 4 digital pins, and 2 PWM pins. You would still need to power the shields through VIN and GND. You would then need to write additional code to control the motors from the two shields.
If you want an even beefier motor driver, try looking at using two RoboClaw [ http://www.botmag.com/roboclaw-2x30a-motor-controller/ ]. It was recommended by a magazine => http://www.botmag.com/actobotics-nomad-project-part-ii/ .
Battery
You would need a RC LiPo battery [ like https://www.sparkfun.com/products/11855 or https://www.sparkfun.com/products/11856 ] to be able to power the motors. They used a 7.4V RC LiPo battery with a higher capacity in the magazine. RC LiPo batteries are high discharge batteries. There usually is no protection circuit with the RC LiPo batteries so you have to monitor the battery. If you reach a certain voltage level, the battery will not be able to recharge again. You would need a specific balance charger to charge the LiPo batteries. It's usually recommended that you use a separate power supply so that your microcontroller is not interrupted.
Motor Datasheet
Specs on the motors used in the Nomad Chassis can be found here: https://www.servocity.com/html/313_rpm_hd_precision_planetary.html#.VfMLGZets2Q
Core Skill: Robotics
This skill concerns mechanical and robotics knowledge. You may need to know how mechanical parts interact, how motors work, or how to use motor drivers and controllers.
Skill Level: Rookie - You will be required to know some basics about motors, basic motor drivers and how simple robotic motion can be accomplished.
See all skill levels
Core Skill: DIY
Whether it's for assembling a kit, hacking an enclosure, or creating your own parts; the DIY skill is all about knowing how to use tools and the techniques associated with them.
Skill Level: Rookie - Basic hand tools are required and instructions will allow more freedom. You may need to make your own decisions on design. If sewing is required, it will be free-form.
See all skill levels
Core Skill: Electrical Prototyping
If it requires power, you need to know how much, what all the pins do, and how to hook it up. You may need to reference datasheets, schematics, and know the ins and outs of electronics.
Skill Level: Rookie - You may be required to know a bit more about the component, such as orientation, or how to hook it up, in addition to power requirements. You will need to understand polarized components.
See all skill levels
Comments
Looking for answers to technical questions?
We welcome your comments and suggestions below. However, if you are looking for solutions to technical questions please see our Technical Assistance page.
Customer Reviews
4 out of 5
Based on 3 ratings:
2 of 3 found this helpful:
This is a beast!
I received my kit yesterday, it took about 2 hrs of work to assemble and it is a beast. Lots of room for batteries, lots of mount points pretty much everywhere for anything you wish to add.
Like all robot kits - ugly as sin.
I thought the black box area would be thin and useless , its not. :)
Issues I have are minor: Wiring suggestions for controllers limited, needs good suggestions for motor controllers, as its FOUR motors not two.
Otherwise, wicked.
--- edit additions -- So the robot has an issue with the engine pod that is free swinging the mounts bang on the main body during odd angles of attack on that side. Recommend some bumpers or event a stop to avoid this - pictures to follow later
2 of 4 found this helpful:
Good Kity but Lack of Motor controllers
This a great chassis... Unfortunately, I asked Sparkfun for the right Motor controller, and told me to follow the vendor recommendation, they provided me a link., for the right motor controller on servo city.
I was specking Sparkfun to carry the right motor controller for this Kit..
No manual of how to start it working
This kit is awesome, mainly for the size. I understand Sparkfun does not have motor drivers for this robot but they mention that they have used the L298N H bridge to move the motors and yet, no info on how it was set up is available on the website. I been trying to move it for two weeks with no results. I will appreciate if at least they can post explicitly in the website: a) The voltage and max current they are using. b) The frequency of the PWM signal input into the L298N c) A schematic of the circuit used for one motor.
The actual recommended motor controller is:
http://www.ionmc.com/RoboClaw-2x15A-Motor-Controller_p_10.html
Did anyone find a good motor controller for this yet?
Just a heads up, according to support the motor here is: https://www.servocity.com/html/313_rpm_hd_precision_planetary.html
So I am thinking this would be a good motor controller? https://www.dimensionengineering.com/products/sabertooth2x25
It's reminiscent of Sojourner's rocker-boogie system for navigating uneven terrain. Does this frame perform similarly?
Hmm... based on the product video, it looks like only the left set of wheels articulate, while the right side is fixed to the cross channel. Better than none at all but I was hoping for something like this: http://beatty-robotics.com/a-counter-rotating-differential/
Any possibility of getting motors with quadrature encoders built in. (or as an option for this)
not as an add-on, since they don't have rear shafts. however, you could certainly rig something up.
I'd love to see a comparison between this and the Wild Thumper chassis. Anyone else interested in seeing a face off? It'd be cool to see how each one handled the same terrain, turning, pushing, speed, mechanical customization, etc.
Will the T'Rex Motor Controller work OK with this chassis? After reading the T'Rex motor controller user guide, it seems like the stall current and h-bridge are rated in spec but the 9A PTC fuse may prevent it from working with the Planetary Gear Motors. Thoughts?
In the Product Video, they were saying there would be a workable demonstration video in about a week.
Well it's been 2 months since the original video and I cannot find this workable-video. I am new to this community, so maybe I am looking in the wrong place. Any tips would be appreciated.
I am a robotics n00b who is interested in this project... but this isn't something I could build using wifi/bluetooth without some tutorials.
This product has been in pre-order for the last three weeks I wonder what the deal is?
Would like to see a kit made that is bigger than the Actobitty but smaller than this one. The cost could be half way in-between. My Actobitty goes kind of slow (powering off 7.4 V LiPo) and I don't like the front caster. Also, the Arduino plastic bracket doesn't have enough friction so the Arduino tends to slide in it easily I bought the Actobitty before Sparkfun offered them. I think the non-Sparkfun place included a 60 rpm motor instead of the 90 rpm motor. Also they didn't include the hex wrenches. The service department at SerCy ignored me. Don't think that would have been an issue if I got it from Sparkfun. This one is cool but a little expensive for me. Maybe the same size as the Magician chassis (or even a little bigger) but with better components (motors). The negative comments on the Magician especially about the motors prevent me from going there. I guess nothing is stopping me from designing my own chassis. One thing I see on the Actobotics parts is that there isn't any flat plate offered than can span across the chassis. Are we just supposed to make one with ABS or aluminum sheet?
Hi guys can you tell me how does this item "Actobotics Kit - 4WD Off-Road Chassis" compare with the "Wild Thumper 6WD Chassis - Black (34:1 gear ratio)" is it more like a crawler? Cheers. Michel B
I second that! I have a 6wd Thumper, and would love to see what this could do in comparison.