- Home
- Product Categories
- SparkX
- Atto84 with Arduino Bootloader

Atto84 with Arduino Bootloader
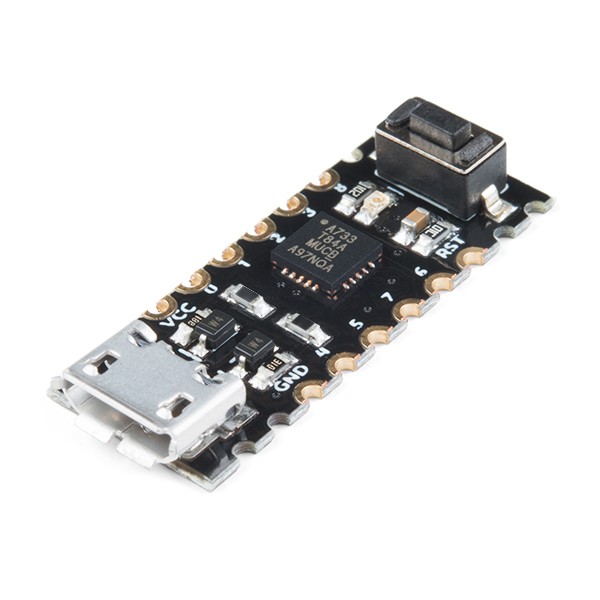
Arduino and Arduino compatible dev boards are an awesome tool for developing an idea quickly but, being development boards, they're often a little more bulky and full featured than you really need. Having a USB interface and a bootloader is so nice, though, so we put together the bare minimum Arduino compatible breakout for integration into your small projects. We call it the Atto84.
The Atto84 is essentially a breakout board for the absolutely minute WQFN ATtiny84, but we've done some work to make it easier to program. First off, we've added a micro-USB connector and a firmware-based USB driver for the ATtiny that allows you to program the chip over USB. In addition, we've created an Arduino board profile that combines this bootloader with an extremely full-featured ATtiny Arduino core.
Simply install the USB drivers on your computer, select the board profile from Arduino's Board Manager and upload code to this board like any other Arduino style development board.
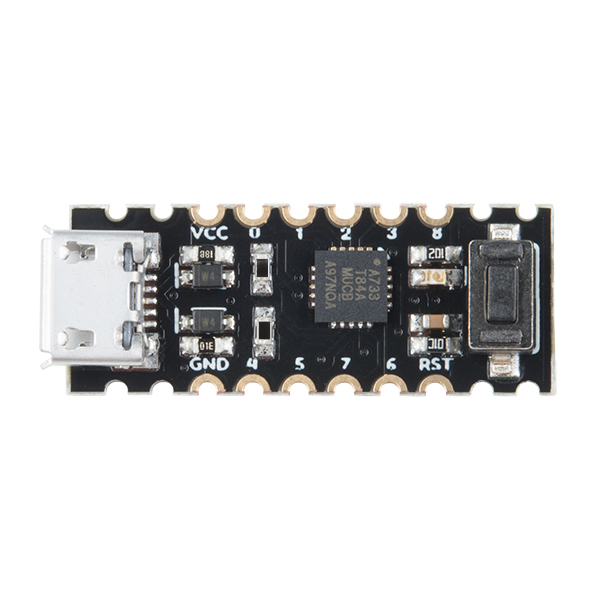
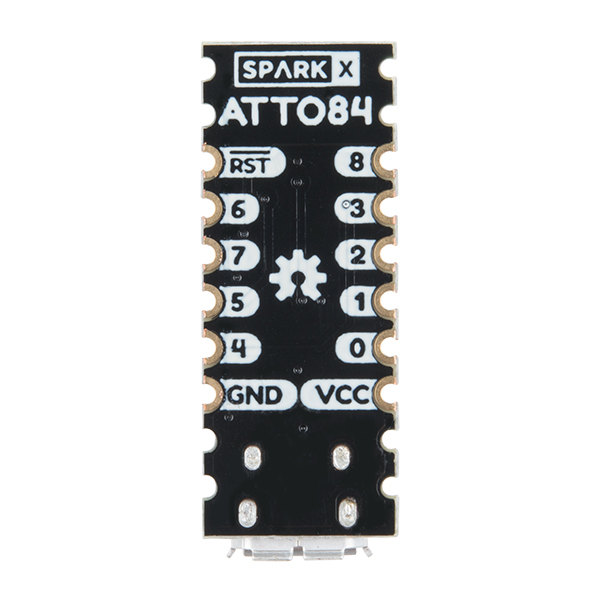
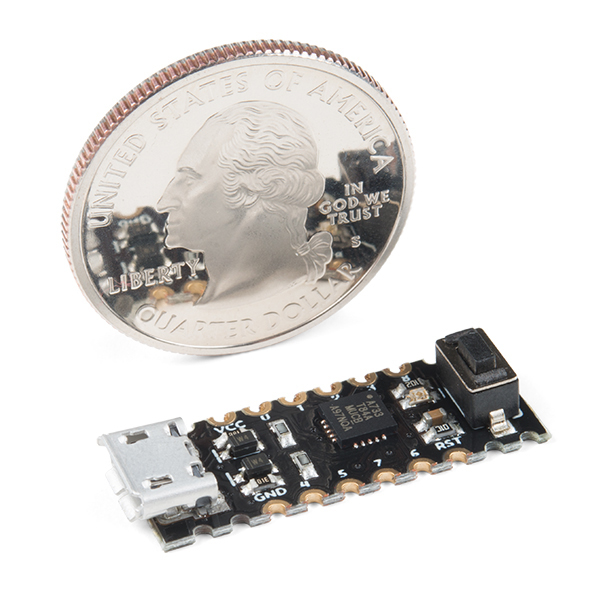
There are very tiny silkscreen pin labels on the top of the board (which correspond to the Arduino pin numbers, not the IC pin numbers) and larger labels on the bottom side of the board. A reset button allows you to put the board into bootloader mode for programming and an on-board LED attached to pin 8 makes for a handy status indicator for your project. Thin pcb construction and castellated headers make the Atto84 very low-profile but the addition of 0.1" pin headers turns it into a handy, breadboard-friendly, package.
Experimental Product: SparkX products are rapidly produced to bring you the most cutting edge technology as it becomes available. These products are tested but come with no guarantees. Live technical support is not available for SparkX products. Head on over to our forum for support or to ask a question.
- Only 28x11mm and 3.5mm tall!
- Upload Arduino code via USB
- 12 position, 0.4 x 0.1" DIP package
- Flat bottom and castellated headers for surface mounting
Atto84 with Arduino Bootloader Product Help and Resources
Atto84 Hookup Guide
June 26, 2018
A bare minimum Arduino compatible breakout using a ATtiny84 for integration into your small projects!
Comments
Looking for answers to technical questions?
We welcome your comments and suggestions below. However, if you are looking for solutions to technical questions please see our Technical Assistance page.
Customer Reviews
4 out of 5
Based on 5 ratings:
1 of 1 found this helpful:
Powerful, easy setup if you follow the instructions, works as advertised
Works well with the ardo IDE, the installtion is straightforward by the instructions.
The Tiny series of controllers can probably do what 90% of people do with the more elaborate microcontrollers.
Downsides: Fiddly castellated headers, personal pref here. 5 second wait time for programming and boot up gets old, it would be nice to have control over how long that takes. No obvious way to control the clock speed that I could find.
1 of 1 found this helpful:
Nice Little Board
It seems to work fine. It'll be handy for tiny projects with limited space.
I made an Eagle library if anyone wants to use the Atto84 in their projects. https://github.com/BipeFlyer/SparkFun-Eagle-Libraries/blob/master/Atto84.lbr
1 of 1 found this helpful:
Worked as well as I could expect
I bought a couple of these in order to write some ATTiny84 I2C demonstration code. Mostly worked perfect. When using USI the thing works great. Doing bit-banging I was able to get an I2C controller (master) working just fine, even dropping into AVR assembly I was unable to get peripheral (slave) mode working. Man, if these things ran at 12 MHz instead of 8 MHz, I probably could have pulled it off. No fault of these devices though.
Not sure why people have problems with the castellated connections. I just stuck some headers in a wireless breadboard and soldered them right on.
Yeah, the 5-second boot up is a bit too long (two seconds would probably have been sufficient). But it is what it is and that's not hard to get used to.
Would love to see a faster part (12 MHz or better). Then again, it's six bucks. Can't really expect it to perform like a Teensy.
1 of 3 found this helpful:
took a chance
I purchased 2 of these, both seem to be defective. They say no guarantees or support in the description, lesson learned. I hope you have better luck.
0 of 2 found this helpful:
spx-14804
I received 2 of these some time ago. I was surprised to see that it was castellated. I inquired about how to connect it and what to connect it to. To date I have received no reply. They remain unused.
I'm having trouble getting this to work with NeoPixel LEDs using the AdaFruit library. Nothing comes out on the pin, though everything else in the sketch seems to be working fine. Any suggestions?
...and, again, no mounting holes, so only useful for prototypes. :-( If at least you made the PCB a little larger, we could put it inside a little box which keeps it stuck in position; but with actual shape, this board is simply unusable in real projects.
I had to install IDE and drivers on two computers before I could get it to load code without getting an error. Now it works! However, I tried a simple blink program to blink the built-in led. No luck. The diagram in the Atto84 hookup guide shows the built-in led as pin 8. I finally probed out the board with an led and found the pins were labeled differently than I expected. Writing to pin 2 blinks the built-in led. Here is what I found: Pin2 actually is located at pin 8 in the diagram - Writing to Pin0,Pin1, and Pin3 did not match any pins on the board diagram - Writing Pin7 is Pin3 in the diagram, Pin8 is Pin2, Pin9 is Pin1, Pin10 is Pin0, Pin 4 is PIn6, Pin5 is Pin5, Pin6 is Pin 4. GND is GND and VCC is VCC (5V on USB). The board is tiny!
Thanks for the excellent answers here, PickledDog. You got to them before I could!
Do you have any power consumption data to share? Id guess around 5ma or less powered by 5v
Sounds about right. You're gonna have a constant 3mA draw from the USB D- 1.5K/Zener combo (which is unavoidable with 5V software USB), plus whatever the MCU uses. You would have to rip the USB parts off to go any lower, and they're kinda the whole point of this board :)
Having not worked with the ATtiny84 yet, I have a simple question. Is it possible to connect both an I2C device and an SPI device at the same time? Specifically, I would like to attach a Nunchuck (I2C) and and NRF24L01 (SPI). These make up a simple robot remote control.
Sadly, it can't. This family of Attiny chips implements SPI and I2C via a peripheral called USI (essentially the guts of a serial peripheral that provides everything you need, but doesn't implement any specific protocol). There's only one USI, so it can only implement one or the other. You can probably get away with bit-banging SPI for the nRF chip, though.
After looking at the data sheet for these, I had come to the same conclusion, but had to ask just in case. Thanks PickledDog!