- Home
- Product Categories
- Raspberry Pi HATs
- SparkFun Qwiic pHAT for Raspberry Pi


SparkFun Qwiic pHAT for Raspberry Pi
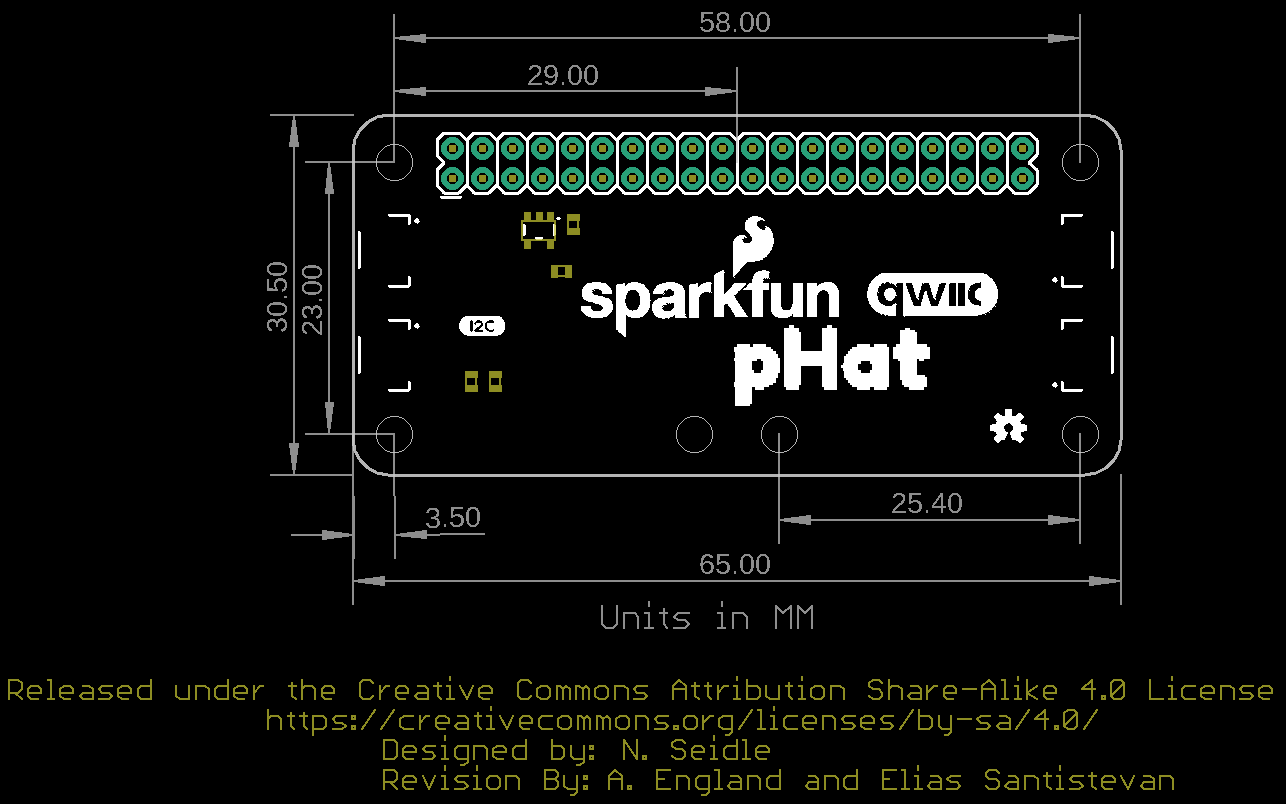
The SparkFun Qwiic pHAT for Raspberry Pi (based on the original Qwiic Hat) provides you with the quickest and easiest way to enter into SparkFun’s Qwiic ecosystem while still using that Raspberry Pi that you’ve come to know and love. The Qwiic pHAT connects the I2C bus (GND, 3.3V, SDA and SCL) on your Raspberry Pi to an array of Qwiic connectors on the HAT. Since the Qwiic system allows for daisy chaining boards with different addresses, you can stack as many sensors as you’d like to create a tower of sensing power!
The Qwiic pHAT has four Qwiic connect ports, all on the same I2C bus. This HAT is compatible with any Raspberry Pi that utilizes the standard 2x20 GPIO header. It is also compatible with the NVIDIA Jetson Nano as well as the Google Coral.
The SparkFun Qwiic Connect System is an ecosystem of I2C sensors, actuators, shields and cables that make prototyping faster and less prone to error. All Qwiic-enabled boards use a common 1mm pitch, 4-pin JST connector. This reduces the amount of required PCB space, and polarized connections mean you can’t hook it up wrong.
Note: When placing a Raspberry Pi and the pHat in an enclosure (like the Pi Tin), we noticed that the pHAT was not fully inserted in Pi's header pins. For a secure connection, you'll need to add a pair of 1x20 stackable headers to extend the pins to your cart.
- 4x Qwiic Connection Ports
SparkFun Qwiic pHAT for Raspberry Pi Product Help and Resources
Assembly Guide for SparkFun JetBot AI Kit V2.0
March 27, 2020
Assembly Guide for the SparkFun JetBot AI Kit v2.0. This tutorial includes photos & comments to assemble the two-layer chassis & additional components unique to the JetBot kit.
Qwiic pHAT for Raspberry Pi Hookup Guide
May 23, 2019
Get started interfacing your Qwiic enabled boards with your Raspberry Pi. The Qwiic pHAT connects the I2C bus (GND, 3.3V, SDA, and SCL) on your Raspberry Pi to an array of Qwiic connectors.
Core Skill: Electrical Prototyping
If it requires power, you need to know how much, what all the pins do, and how to hook it up. You may need to reference datasheets, schematics, and know the ins and outs of electronics.
Skill Level: Rookie - You may be required to know a bit more about the component, such as orientation, or how to hook it up, in addition to power requirements. You will need to understand polarized components.
See all skill levels
Comments
Looking for answers to technical questions?
We welcome your comments and suggestions below. However, if you are looking for solutions to technical questions please see our Technical Assistance page.
Customer Reviews
No reviews yet.
This is a good hat. Same size as the Pi Zero which is nice. I would like to see this with other pins broken out like DEV-14459. I also would like to additional mounting holes so that sensors can be mounted to the board using the same hole spacing as SEN-14348 and GPS-14414 (and many other sensors as well). I also would like to see this without the header already soldered in.
There was a mess up on the hole spacing... you can use the Qwiic pHAT v2 instead (hole spacing fixed).
We are working on options for pass through headers... so there may be an update to this design with pass through headers. Otherwise, take a look a the Qwiic SHIM and pHAT Stack as additional options.
Is this available without the header soldered in?
Currently, we do not have that option available. However, I'll put in a request... I think we would be open to offering a soldering kit for those who want an option to use things like stack-able headers.