Soldering 101
Solder is a metal alloy with a low melting point that is melted onto 2 metallic items and allowed to re-harden. A tool called a soldering iron is used to provide heat to the process. Some solder contains lead, while some does not. Most solder also contains flux (not to be confused with the capacitor of the same name), which helps reduce oxidation and allowing the solder to flow more easily and other such technical stuff. Basically it's good. International, as well as some local laws, are beginning to prohibit the sale of consumer products with lead in them, so while you can still buy lead solder (even here at SparkFun) all our boards are made with lead-free solder (still a bad idea to ingest or insert under your skin). Here are the steps that we use to solder a component:
- Step 1: Hold the soldering iron to component/board joint.
- Step 2: After a couple of seconds, push the solder wire into the component/board joint.
- Step 3: When solder has covered the joint well remove solder wire from component/board joint.
- Step 4: Remove iron from joint.
Your weapon - the soldering iron!
- Rule 1: You need to wet your sponge. This may seem counter-intuitive, but just do it. I hate seeing people ruin irons because they're too lazy to get the sponge wet. This wet sponge is used to clean the corrosion on the tip of the iron. A dry sponge does nothing but damage the tip. Every time you pull the iron from the stand, it's a good idea to swipe the tip on the sponge just to clean it off and get a nice silver tip - it will allow you to solder much more quickly and cleanly. If you prefer, you can also use a special brass sponge that does not need to be wet.

A blob of oxidized solder. No good!
-
Rule 2: The point on the iron-tips is NOT the hottest part. This takes some practice, but learn to use the side of the tip near the point. It's all about getting the heat to flow from the iron to the joint. If you sit in one spot for a long period of time and nothing is flowing, take a step back, clean your tip, add a bit of solder to the tip, and try soldering the joint again.
- Rule 3: The soldering iron is only there for heat, not solder. You use the iron to heat two things - the part and the board, and then you add solder to the two heated parts. You do not add a glob of solder to the tip and then rub this mess against the two things you're trying to solder together. Use the side of the iron (remember, not the point) to heat the two parts while adding solder from the opposite side.

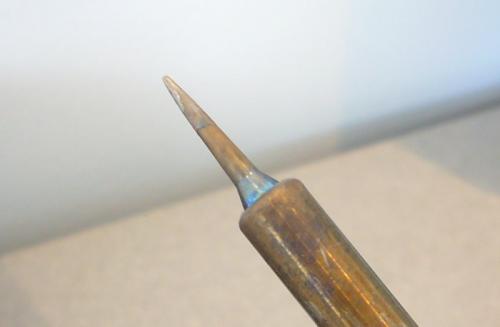
How you want the tip to look!
- Rule 4: A quick double swipe on the sponge and the tip is clean, shiny, and ready to go. Keep your tip clean and shiny. Clean it often. Wipe it on the sponge every time you take it out of the base. Feel free to add a bit of solder to the end of your cleaned tip to increase heat flow.
And now a quick example video...
Sample Question:
What is the purpose of soldering?
a. Playing with fire
b. Connecting two pieces of metal both physically and electrically
c. Wiping your soldering iron on a wet sponge
d. Making your circuit heat proof
Officially the answer is 'b' but for some people it is 'a' as well, although if you are getting flames you might be doing something wrong.
Quiz Question - Iron Anatomy
What part of the iron is used for proper soldering?