
HAB - The Balloon, Enclosure, Helium, and Cut-Down
A story of the electronics and logistics of launching a high altitude balloon.
High Altitude Balloon Page:
- HAB Intro
- Sensor system, Flight Computer and Radio System
- Still and Video cameras
- The Balloon, Enclosure, Helium, and Cut-Down
- Enclosure and Heater System
- Weights, Measures, and Costs
- Lessons Learned
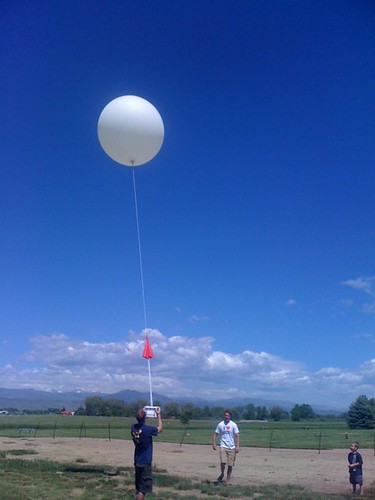
Balloon
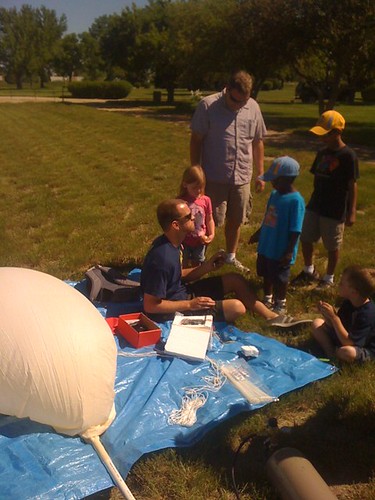
My niece and me getting the payload ready
We gotta get up there some how, right? There are some folks on Ebay that sell latex balloons for ~$25 + $15 for shipping and handling. I'm sure those balloons work very well, but they are often surplus (may break prematurely) and they often have a very large diameter fill (8' diameter gets you 7lbs of lift). For my purposes, I wanted a smaller payload (less than 3 lbs) so I really didn't need a giant balloon. Rather than use Ebay, David did a large amount of research and recommended Kaymont. They sell what are called 'sounding balloons' and they seem to be *the* company that supplies the US government with weather balloons. A word of warning, they don't have online checkout, and they're not really fast to answer emails. I ended up calling and ordering the KCI 1000 for $60 + ~$10 for shipping. I wanted the KCI 1200 but they were backordered. So plan ahead - they may not have your balloon size in stock.
I believe the KCI 1200 is sort of the standard for amateur high altitude ballooning, but I could be wrong. The 1200 has around 2.62lbs of lift. 1000 has around 2.33lbs. A third of a pound may not sound like a lot, but measure your masses often, and give yourself plenty of extra available lift - don't make your payload too close to the Recommended Free Lift specification for your given balloon.
Helium

How much helium do you need to fill one of these balloons? A standard cylinder of 110 cubic ft will do it. Neither David nor I used the entire cylinder, but we did run them down from ~2400psi to ~700psi.
We rented the cylinders from a local gas company called General Air in Boulder. Unfortunately it required us to setup a business account (thank you SparkFun!), but you should be able to procure a similar tank without a business account if you explain what you're doing. The folks at General Air were extremely helpful. They had crazy expensive 99.99% helium, but once I explained that it was just a weather balloon fill, they recommended the 98% grade for $85 for 110 cubic ft cylinder and $9.60 per month rental fee. Not too horrible.

SparkFun had an extra gas regulator sitting around which saved us ~$100 and David pieced together the balloon filler as seen in the photo. The filler was made up of a 1" diameter PVC tube with some pipe fittings - $15 from the hardware store. It worked excellently. Don't forget the teflon tape to seal the fittings and possibly an adjustable wrench on launch day. I don't think we needed the wrench but it was good to have just in case. The 1" PVC tube fit snugly inside the mouth of the KCI 1000 balloon and a few zip ties made sure the balloon stayed attached to the tube and didn't float away during filling.
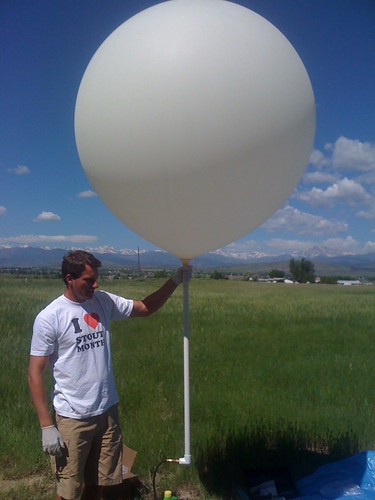
Everything online talks about using latex gloves so that you don't transfer oils from your hands to the latex of the balloon. I don't know if it's really necessary, but Fasen (in the picture) is a recently graduated doctor so a couple pairs of gloves were easy to procure. And zip ties! Bring tons of zip ties and a good set of wire cutters.
Parachute

We need a parachute of adequate size to bring the payload down safely, but quickly - we don't want the payload hanging out and floating half way across Kansas as it comes down. The parachute needs to be light weight, brightly colored, and needs to deploy automatically.
There are multiple online calculators (here and here) to help estimate the size of the parachute needed to bring it down at a given decent rate and payload weight. But because I was unsure of too many variables (payload weight specifically) I guessed and went with a 36" diameter chute and a 42" chute from Rocketchutes. $15 isn't horrible, but you could build your own if you wanted. I've also heard recommendations for The-Rocketman but their website seems to be a bit flaky at the moment.

A balloon and payload from California Near Space Project
In many of the photos I've seen online, the parachute had a spreader built in so that the chute remained partially open. It makes sense to help protect against a chute failure, but I didn't get the time to build one, let alone test one. Perhaps I'll include one on the next flight, especially after watching the release section of David's video, it looks really important to get the parachute open. But it's got at least 20 minutes to open, right?
Emergency Cut-down System
During the research phase of the project, I kept reading about the FAA requirements to have two methods for termination of the flight. If the balloon is of a certain type (latex) the the FAA recognizes bursting of the balloon as a valid means of termination. So that means we need another way to bring 'er down if things go sideways. Nichrome wire is this great stuff (found in toasters) that when exposed to a voltage/current, it heats up enough to slice through nylon rope like butter. So like a good engineer at SparkFun, I quickly laid out a PCB using the ATmega328 and a decent sized relay.

Here is the 'load controller'. A big relay attached to a microcontroller is handy if you need to turn on/off nichrome wire. It's called a load controller because it's capable of controlling larger loads (up to 5A at 30VDC). The Eagle files, schematic, and the source code are all open source under Creative Commons Share Alike v3.0 license. The board and source code are designed to operate both as a emergency cut-down system, and as a heater. There is a user setting that allows the code to operate differently. There are also some neat tricks so that if the system resets or gets into a weird state (from potential erroneous serial input), the system will always go back to its normal operating state - in this case, counting down a cut-down timer. If 5 hours elapse without a 'everything is ok' signal, the cut-down system will activate and cut the balloon down.

Here is the relay soldered to the back of the board. Did I screw up the footprint for the relay on my PCB? Yep. Did I make it work anyway? Yep. This error was corrected on the posted files.

The cut down system was designed to activate if a user defined amount of time had passed, or if a special serial string was received over the serial port. This would allow the main sensor board (that was receiving commands from the radio) to connect to the cut-down system and tell it to activate. This worked swimmingly during code writing and testing. Overall system usage was ~20mA, with the nichrome requiring ~1.5A for ~10 seconds to melt through the thin nylon rope. But once I hooked up the nichrome wire, things got a little problematic.

The first problem was that I couldn't solder to Nichrome! Whether the solder was the wrong mix, or the wrong temp, I'm not sure.

To get around this I used a twist and crimp/compression on the wire.

A little heat shrink held it all together. Hot glue would also work to hold things in place, but as the nichrome heats up, the hot glue will melt quickly away.

Here's what it looks like attached to the nylon rope. This too had problems. If the nichrome touched itself, it would short across that point causing the rest of the wire to not heat up. So test using loops that are stacked not quite so close to each other. The final kick in the stomach was discovering that the LiPo packs had current limiters built in. When the board would activate the relay, the nichrome wire would act as a resistor across the positive and negative terminals of the battery.
Because the resistance is very low, the nichrome wire would draw a lot of current and start to heat up. But the LiPo battery packs we carry have a safety circuit built into them. A multiple amp discharge from a LiPo battery can be dangerous. So the safety circuit will turn off the battery if the pack starts sourcing more than 1C (or around 2 amps). So if the nichrome uses less than this, the battery will remain on and be fine. But if the current rises above this threshold, the battery will shut off, turning off the control board. As the board comes back on from reset, the board will note that the time stamp (stored in EEPROM) has expired and will activate the relay, causing the system to shut down, and we go into the deadly world of a 'rolling reset'. To fix this, the load controller would need a battery (such as alkaline or RC battery pack) that could dump a lot of current without shutting off. I have not been able to test it yet, but the RC battery packs we carry should do the job very well. These packs are designed to source significant amounts of energy (9.2 amps!) without any damage to the pack.

Further complication came from the rigging. We know we need a cut-down mechanism, but which rope do we cut? The rope from the balloon needs to be cut, but the parachute ropes should remain intact. Ok, but in all the pictures of balloons I've found online, the parachute is always attached above the payload, ready to open. How do we keep the parachute elevated in a way that we can cut off the balloon if necessary?
The only solution I could come up with was to allow the parachute to hang off the side of the payload which violated every instinct I had. Maybe some sort of friction connection such as taping the parachute to the cord running up to the balloon? I really didn't want my cut-down system relying on a piece of rope to break free from the parachute. Perhaps we could run the nichrome with lead wires from the payload to above the parachute? The nichrome melts the nylon rope very well, but in testing, the rope sometimes melted and then adhered to the nichrome wire. In this scenario, if the nichrome wire does not cut the rope cleanly, you've got the payload attached to the balloon via the lead wires and things go topsy-turvy. Badness. Because of these problems and more, I decided to forgo the cut-down system. I am confident that it is only a matter of time before the UV rays of the sun breakdown and shred the latex of the balloon. Next launch will include a cut-down system.
Next page Enclosure and Heater System
High Altitude Balloon Page:
Great article, I ordered the 42" chute from rocket chutes, can you tell me or provide a picture on how to attached the top of the chute to the balloon? I don't believe there is a sewn on loop to make the connection
Do you need to cut the cord specifically? The balloon material is likely very thin and under enough stress that taping the nichrome wire to the side of the balloon and heating it would create a sizable hole in a hurry.
One thing you could do eliminate the extra battery needed for the cut-down supply would be to charge a super-cap from the LiPo battery during the flight, and let the supercap source the higher current needed for the nichrome wire.
I'm planning a launch myself and have also ordered a rocket chutes parachute. How did you attach the apex of the parachute to the balloon, since there is no attachment point?
I understand this was almost a year ago, but any help you can give is greatly appreciated. Great write-up, this has been a great resource for my project.
Thanks!
Many thanks for this intersting writeup of your endeavour!
Regarding the cut-down mechanism: why don't you go for insulated nichrome wire to avoid shorts?
Anyway, a good way to connect nichrome to normal wire can be found here: http://wiki.makerbot.com/plastruder-mk4-assembly#toc27
Here is a link that shows the cut down device and relative locations of parts:
http://balloons.space.edu/habp/project_6/images/f6train.jpg