
ProtoSnap - E-Sewing Kit Getting Started Guide
If you're looking to add a little zest to your wearables, it doesn't get much zestier than bright white LEDs. But, if you're new to the e-textiles game, electronics in general really, the thought of wiring (or sewing) circuits can feel like a hugely daunting task. Our ProtoSnap E-Sewing Kit is aimed at teaching some of the more basic, yet useful, circuit concepts, so you can confidently throw LEDs, switches, buttons, and batteries into anything you fancy.
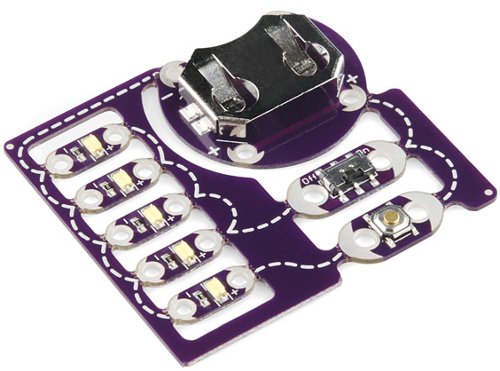
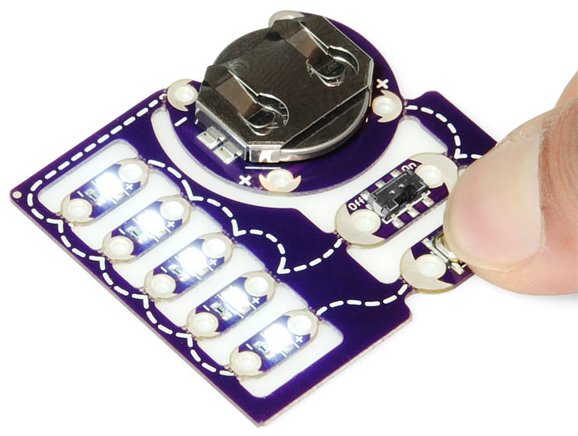
The E-Sewing Kit should arrive to you as what looks like one complete board. Every component is wired up together already, so if you toggle the switch and/or push-button just right you can illuminate all five of the LEDs. If you look closely, you'll notice that the big board is actually comprised of eight little individual boards. Each of these eight pieces can be broken off, serving as individual boards, so you can implement them into your project however you see fit. Let's delve a little deeper into each part.
LilyPad Coin Cell Battery Holder
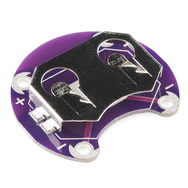
This is the force that drives the E-Sewing Kit. Just like your favorite toys, batteries are not included with the Kit, so you'll need to find a 20mm coin cell battery to insert into the holder. You should be able to find this type of battery just about anywhere you buy "normal" AA or AA batteries. Look for a CR2032 type of battery.
When you get to inserting the battery, make sure it's inserted with the correct polarity. The positive side is usually indicated with a "+", and it's usually got some other writing on it. The battery should be inserted so the positive side touches the top of the coin cell holder. If you do insert the battery backwards, don't fret, you shouldn't break anything...it just won't illuminate.
One last point here, if you look really closely to the Coin Cell LilyPad board, you'll notice a few "+"s and "-"s printed on the board. These label each of the LilyPads four petals. The petal is the place on a LilyPad where a connection should be made, whether you're sewing or soldering into it. Notice that each individual LilyPad board on the E-Sewing Kit has at least two petals, and if they have specific functions (like + and -) they're labeled. Just something to keep an eye on as we discuss the next few boards.
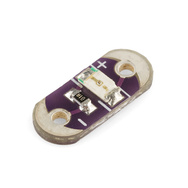
LilyPad LEDs
 These make the E-Sewing Kit really shine! LEDs are all over the place these days, it almost feels like electronics are required to have at least one blinky light. So no doubt you should want to add some to your other everyday items.
If you look closely at the LED boards, I'd like to draw your attention to a few things. There are two components on each LED board, one little black resistor, and one big white-yellowish LED. Obviously, the LEDs where the light comes out. The resistor is there, working behind the scenes, as a "current-limiter"; its job is to make sure the LED doesn't explode, and it does its job well.
Also notice, just like the Coin Cell board, each petal is labeled with either a "+" or a "-". You've probably also noticed a stitched line, that seems to connect all of the boards together. This meandering line is a representation of the real wiring that's going on in the E-Sewing Kit, it's there to show you how exactly all of this stuff is wired up. Notice that the "-" petal of the Coin Cell board is connected to the "-" petals of each of the LEDs? That's electronics for you...it's really just one big game of connect the dots. Not so bad, right? But the plus of the battery don't seem to be connected to the pluses of the LEDs? They look like they're first making a stop over at our next two boards.
LilyPad Slide Switch and Button Board
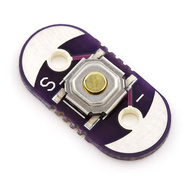
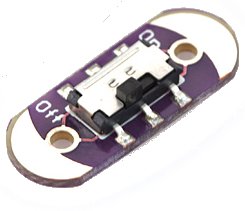
One of the basic rules of electronics is a circuit can't work unless it's a...circuit. There has to be a closed loop for current to flow. We use switches to manipulate open and closed circuits, bending electricity to our will!
While in their "off" state, each of the switches act as an open circuit (i.e. NOT closed). As you can tell from the stitched lines, the switches are connected in between each of the battery and LED's "+" petals; they're preventing both components from forming forming a happy, closed circuit.
However, if you slide the switch to "On", or actuate the button, the switches become a closed circuit. Imagine the wire extending through the switch, now the "+" of the battery is connected to the "+" of the LED, and the kit should be making some glorious, white light!
At this point you've probably become aware of the different functionality of each of the switches on the E-Sewing Kit. The button is a "momentary switch", meaning it's closed circuit-ness is fleeting, it only conducts when the button is actuated. The state of the Slide Switch is relatively permanent, until slid in the other direction the switch will remain either on or off.
Once you have gotten the hang of working with your E-Sewing kit, check out PART 2 of this tutorial to learn how to break it apart and sew it into your next project.
Ok, this is good. Now what do I do to break them apart and connect?
Great question! You just simply snap apart the parts and connect them with conductive thread. You can go to "Part 2" of this tutorial for more information. Have fun!