
Synapse SNAP-RF Hints
Synapse SNAP modules are unlike anything I've ever had the chance to play with before (word of caution: I freaking love these modules, and I can't hide it, but I'll try not to be too hyperbolic in this tutorial). If you smash together a microcontroller with an XBee, and then load it with a network operating system that mesh networks and interprets Python scripts, you'll be on the right track. Then, add in over-the-air programmability, and remote function calls from any similar module. Finally, give it access to Python scripts running on your computer, so you can set up web utilities, and do anything a normal Python script can (send email, tweet, check baseball scores, play music, and other Python scripts ad infinitum...).
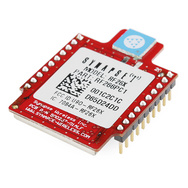
Looking to add any amount of awesome we can to our catalog, SparkFun has recently started carrying a couple of the Synapse SNAP modules. We've got the RF266, which has the same pinout as your standard XBee, making it XBee-breakout-board-compatible.
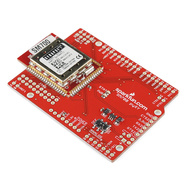
And there's the SM700 - a beefy SNAP module built on a 32-bit ARM7 processor, with 96kB of RAM, 46 GPIOs, 2 UARTs, and a 12-bit ADC. We mount it onto an Arduino-shield-compatible board, fully break it out, so you can get the most out of this nifty module.
As I've explored with SNAP, I've discovered a few points of confusion, and generally important topics that I'd like to emphasize in this tutorial. Don't consider this the end-all-be-all Synapse SNAP tutorial, but more of a hints/quickstart guide. Synapse provides tons of great resources for their SNAP modules, so if you're really looking for in-depth documentation, I'd definitely recommend checking both those and their forums out.
What is/are SNAP?
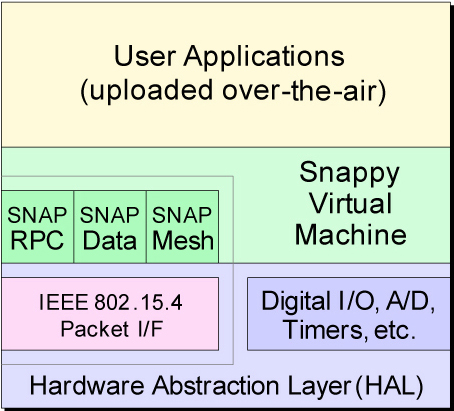
SNAP stands for Synapse Network Appliance Protocol, and it refers to the operating system running on Synapse's SNAP modules. It's what makes a run-of-the-mill, wireless-enabled microcontroller something (more) special. The operating system works behind the scenes to accomplish three tasks: IEEE 802.15.4 networking, hardware abstraction (controlling the i/o, low-level microcontroller stuff, etc.), and Python script (SNAPpy) interpretation.
Often I find myself comparing SNAP to Arduino (it's just so popular these days I really can't help it). Though the SNAP modules are definitely a step up from Arduino in terms of complexity, they also share some similarities. While Arduino boards can make embedded system prototyping super-quick and easy, Synapse modules exist to make embedded wireless prototyping equally painless. Both platforms support a variety of processors and architectures. Even when it comes to the most basic of functions (setting pins high/low, input/output, etc.) they're somehwhat similar.
But, then again, they're pretty wildly different; especially when it comes to firmware. SNAP scripts are written in a Python-like language, and everything they do is event-driven. As you play with them, you'll find that SNAPs really require a different approach to programming.
I'm going to write this tutorial from the perspective of going from the Arduino world to the SNAP world. So, basically, don't get too mad at me for comparing it to Arduino from time-to-time.
What you need:
Portal
Portal is the home base for Synapse SNAP modules. You'll use Portal to write SNAPpy scripts, and upload them to SNAP modules. You can also use it to view the complete mesh network, get detailed information on each module, and change their configuration parameters.
I usually groan when I'm forced to use proprietary development software - it's usually bulky (no I don't want to download your 1GB IDE!), and just generally feels sluggish - but Portal's different (you do have to sign up for their forum to download it, but that's mostly painless). It's only about 32MB, free (-as-in-beer), runs smoothly, is well laid-out, and is simple to use. I also think it subconsciously stirs up some unrelated, video-game-playing memories, which makes me like it even more.
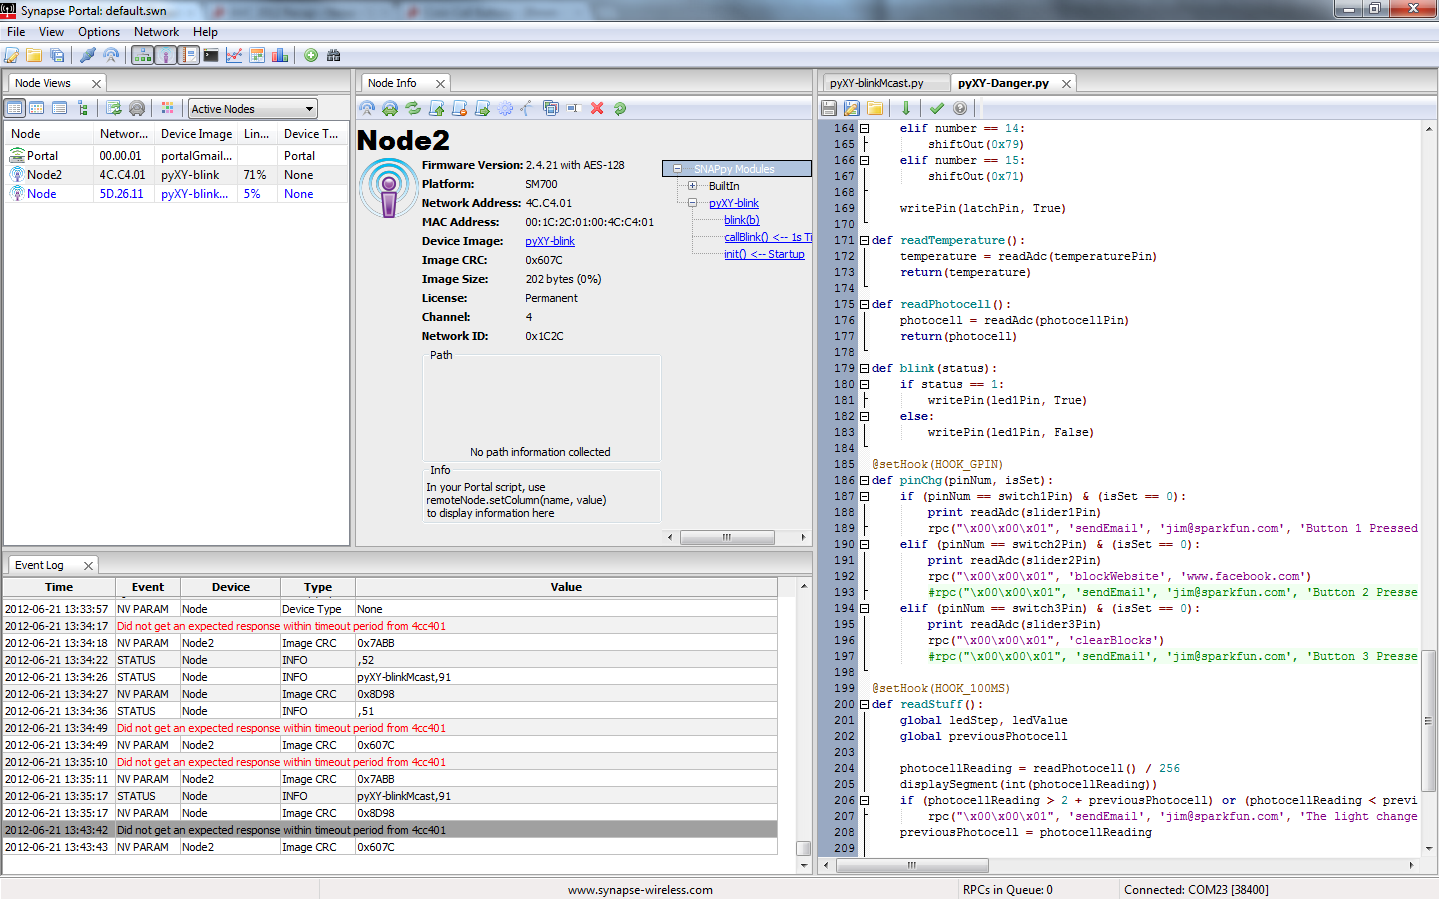
The UI's very customizable,you can drag-and-drop panes wherever you like. The windows I find most useful are:
- Node Views shows every node on a network, along with some brief info like link quality and address.
- Node Info, which shows a completely rundown of a node's configuration. You'll use this pane to upload scripts to nodes. You can also manually run procedures by clicking on them and filling out a few parameters (great for debugging).
- SNAPpy and Python scripts can be edited from within Portal. Obviously this is an essential part to any development environment.
- The Event Log is a great place to watch for debug messages and errors.
Synapse has a comprehensive manual for Portal, I'd recommend you check out. Go to the Help menu within Portal and select Portal Reference Manual to check it out.
SNAP Modules
Obviously, you'll need at least one SNAP module, but two or more would probably help with that whole wireless thing. Each Synapse module works as a standalone microcontroller, but you won't get much use out of its integrated transceiver unless you've got something else for the module to talk to.
We've currently just got the two SNAP modules: RF266 and the SM700 pyXY. If you think there's more we should be carrying, let us know!
So you've got a couple SNAP modules, but how do you pair them with Portal and your computer? You need a bridge...
A SNAP-to-Serial Bridge
To integrate a SNAP module with a computer running Portal, you need a bridge (usually UART-to-USB) to interface it with your computer. Once you have a bridge from your computer to a SNAP module, you can use that module to communicate with - not to mention upload code to - any other SNAP modules in range.
Every SNAP module has a UART, that's what you'll use to set up communication between SNAP and computer. Here are the methods I'd recommend for the modules we currently stock:
Bridging an RF266 to your computer: The RF266 is probably the cheaper option, and makes more sense to be the computer's piggy-back. It shares the same footprint as an XBee, so you can plug it into any XBee breakout board we carry. Like, oh, I don't know, maybe the XBee USB Explorer?

Insert the RF266 as in the picture above, the blue antenna should be heading away from the USB cable. Now, hit the Connect Serial Port button in Portal. After a few seconds of searching you'll probably be greeted with this:
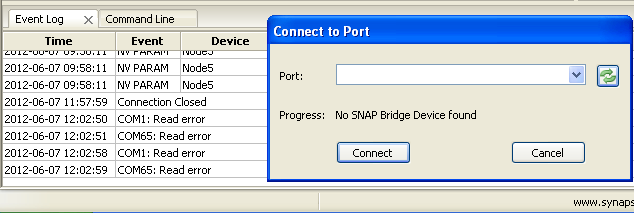
The RF266 comes with an AT Command Interpreter script on it which makes it act much like an XBee. Unfortunately, this script uses the UART and interferes with Portal's attempts to communicate with it. In order to use this module with Portal's serial port, you've got to erase the script:
- Go to Options, and select Erase SNAPpy Image
- Select the correct port number under the Port pull-down
- On the Platform pull-down select RF266
- Hit Erase
-
A Please restart your device... dialog will appear. You'll have to manually reset the module by shorting the RST pin to GND. This may take a few tries, you'll have to quickly touch RST to GND.
- This step is tricky; probably deserves more than a single bullet point. If you have trouble resetting the module, try starting the reset process with the module unplugged from the USB Explorer. Then, when prompted to reset the module, insert it evenly (and correctly).
If successful, Portal will ask if you want to erase another RF266. No thanks. Now try to connect to the same port. You should get some happy news in the form of "Found SNAP Bridge on COMX". If so, click Connect.
If you immediately get spammed with messages like this (you might not, my Windows XP system does, but my Windows 7 machine does not):
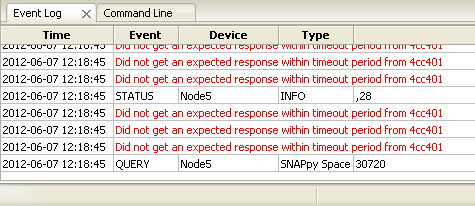
I'd recommend changing a few settings in the Preferences dialog, under the File menu. Something like this:

Disabling the automatic updates means you'll have to manually PING and refresh the nodes, but I prefer that to the endless timeout messages. Just get used to clicking the Refresh Node Information button in the Node Info window.
Bridging an SM700 pyXY to your computer: You can also bridge one of our SM700 pyXY modules to your computer, by connecting a 3.3V FTDI Basic up to the board's six-pin FTDI header (or any other 3.3V UART-to-USB/RS232 bridge).
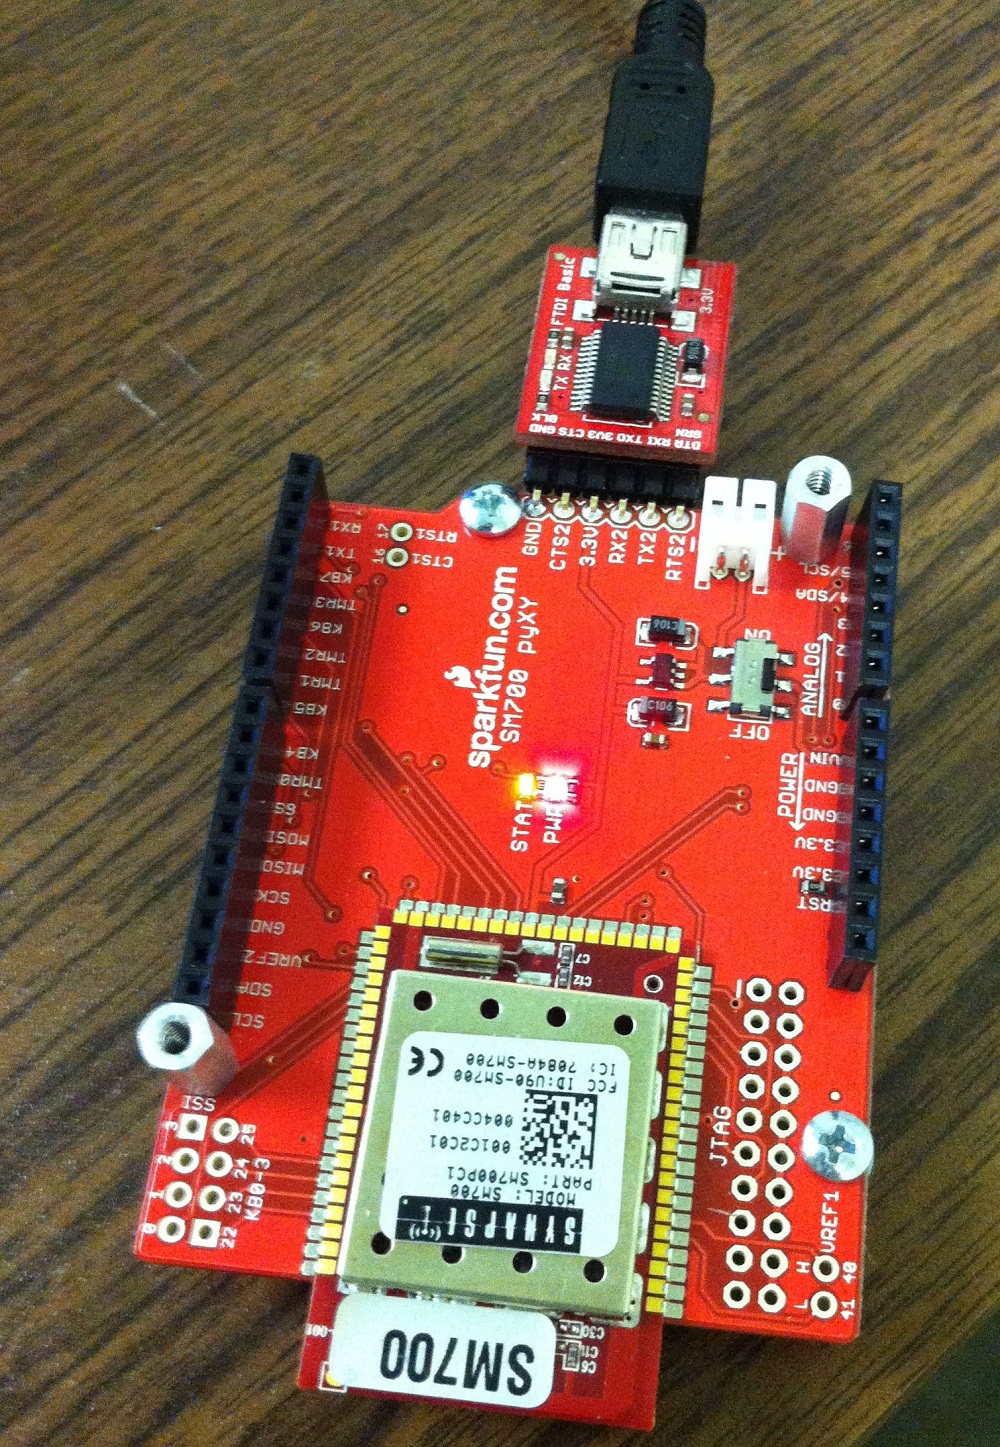
As with the RF266, you may need to erase any scripts on the module before you can use it via the serial port. Follow the same process as above, except select SM700 as the Platform on the Erase SNAPpy Image dialog. Again, you'll have to manually reset the board by shorting the RST pin to GND momentarily when prompted (sorry! Maybe a reset button for future board revisions?).
With a SNAP Bridge connected, you should be able to hit Broadcast PING and search out for other SNAP modules out there.
Quick SNAPpy Breakdown:
It's like Python...
If this is your first experience with Python, I'd like to apologize in advanced. Python rules. It's an addiction. But it also ruins other languages for you. Get too used to Python and you'll forget what a semicolon or curly bracket even looks like. Also, this:

If you're coming from Arduino, or similar C/C++/Java languages, it'll probably take a while to get used to Python. But, at least, there's a LOT of documentation out there to help you get started.
Here are a few hints to hopefully make your transition smoother:
- White space matters! Statements are terminated by end-of-lines, and code blocks are structured using indentations.
- No semicolons!
- But, there are regular colons. This is hard for me when switching between C and Python. Statements like if, else, while and procedure declarations should all be followed by a regular colon (:).
- No curly brackets!
- No need to define data types (dynamic typing). You can leave it to Python to figure out what kind of variable you need.
- Global variables are a little weird. You can declare global variables at the top of your script, but within individual procedures you need to declare that you're using that global variable.
...but not completely
You should keep in mind that the language that runs on SNAP modules - SNAPpy - is a subset of Python, not exactly Python. It has a few limitations that the standard Python does not. These one's really stuck out to me:
- No float variables. That means no decimals. You can usually creatively use ints to avoid floats, but if you really need exact data, you can send it over to your Portal base station (running actual Python) to run the numbers.
- No longs. 16-bit ints are the largest variable SNAPpy scripts support.
- No lists. I've usually gotten away with using tuples (a read-only, global set of data) when I've really need an "array" of stuff.
- No classes. You can't define your own data types in SNAPpy.
- For. Python's for statement is already a bit different from C's for (it's more of "for each x in y" than "for n times do this"), but SNAPpy scripts don't support any form of for. If you want a for loop, use do/while.
That's not all, but it's most of what I ran into. For a complete list, check out section 4 of the SNAP Reference Manual (under the Help menu in Portal).
Keep in mind that scripts that run in Portal are completely-and-totally Python. You have access to any Python library that exists. Using RPCs from your SNAP module to Portal, you still have access to the full power of Python.
Useful SNAPpy Functions:
Like Arduino, every pin on a Synapse module has a specific pin number. Consult the relevant datasheet, or in the case of the SM700 pyXY board, the pin numbers are silkscreened on the board.
These are the SNAPpy functions I found most useful when I started using Synapse modules:
Basic I/O functions:
- setPinDir(pin, isOutput) - This function sets a pin as either an input or output, it's the pinMode() of SNAP boards. pin is the module's pin number. Instead of OUTPUT or INPUT, though, you'll use True and False. Consult the name of the procedure's boolean parameter (e.g. isOutput) to figure out if you want it to be True or False. With this function True sets pin as an output, False sets it as an input.
- writePin(pin, isHigh) - If a pin is set as an output, you can use this function to set it as high or low (i.e. digitalWrite(). isHigh should be True to set it HIGH, or False to set it LOW.
- setPinPullup(pin, isEnabled) - If a pin is an input, you can use this function to enable internal pull-up resistors.
- readPin(pin) - Read the high/low status of a digital pin (digitalRead()!).
- readAdc(pin) - These are pretty self-explanatory...(analogRead()).
- pulsePin(pin, msWidth, isPositive) - This one's neat. I don't think there's a built-in, comparable Arduino function. This'll pulse a pin (either low to high, or vice-versa), for a set amount of time. And it won't block following functions (no delay) while it pulses.
Wireless/communication specific functions:
-
uniConnect(dst, src) - Synapse refers to this (and the next) procedure's function as making a switchboard connection. uniConnect establishes a unidirectional connection between two communication ports - from src, to dst. The communication port can be a few things, including:
- DS_UART0 and DS_UART1 - Most Synapse modules have two UARTs on them. If you need to connect the RX/TX pins to something, use one of these.
- DS_TRANSPARENT - This is the wireless serial communication node.
- DS_STDIO - Standard input/output. I usually pair this with the print command (see below) when STDIO is the source. You can use it with the HOOK_STDIN (see below again) when STDIO is the destination.
- crossConnect(dataSrc1, dataSrc2) - Similar to uniConnect, but crossConnect sets up a full-duplex connection between the two communication sources. Data coming into dataSrc1 will be moved to dataSrc2, and vice-versa.
-
rpc(dstAddr, function, arg1, arg2, ...) - The last two commands are useful when you need to move serial data wirelessly, but this and the next procedure are what really make SNAP modules neat. rpc stands for remote procedure call. In other words one module can tell another module to run a defined block of code.
- To call this function you need the address of a node, the name of the function and any arguments it might require (which can be none).
- For example, SNAP module x could tell SNAP module y to writePin or readADC. And, you're not limited to built-in procedures, any procedure in a SNAPpy script can be remotely called.
-
mcastRpc(group, ttl, function, args...) - This is similar to rpc, except it's directed at all nodes in a group. With mcastRpc, you can have all nodes on your network perform a defined procedure. The "rpc" in this command stands for "remote procedure call". With mcastRpc, you can make function calls remotely (from another SNAP device).
- mcastRpc sends an RPC out to all nodes in a network group (by default all nodes are on group 0x0001, but this can be modified). ttl defines the call's time-to-live, or how many hops the message can make before it dies. Finally, function is the name of the procedure you want to call, and if the function has anyarguments you add however many you need after the function name.
Other useful functions:
- initUart(uartNum, baudRate, dataBits, parity, stopBits) - If you're going to use a UART, don't forget to stick this function in the initialization part of your SNAPpy script. uartNum should be either 0 or 1. Set baudRate to whatever bit-per-second you require (9600, etc.) The last three parameters are optional, and default to 8 data bits, no parity and 1 stop bit.
- print "dataToSTDOUT"- print functions are always useful for debugging. The uniConnect and crossConnect functions above make this "function" really useful. Data printed is sent to STDOUT, using either of the connect functions you can route that to wireless serial (DS_TRANSPARENT) or a UART. You can print strings or variables with this function. By default every print is terminated by a newline, if you don't want a newline stick a comma (,) after what you're printing.
- monitorPin(pin) - If you configure a pin as an input, monitorPin can be used to generate an interrupt event whenever that pin's state changes. This function ties closely into the next section...
Hooks. Event-driven programming:
Aside from having to learn Python, probably the most major change in going from Arduino/C programming to SNAPpy is getting used to event-driven programming. There's no loop function in SNAPpy scripts (though there's sort of a setup), instead events trigger functions. The triggerable events of SNAPpy include startup, timer-driven interrupts (1ms, 10ms, 100ms and 1s), input pin transitions, and serial data inputs. Each of these events is given a specific "HOOK" identifier, as follows:
- HOOK_STARTUP - This hook is called when the device first boots up. It's just like setup() in Arduino.
- HOOK_GPIN - This is called whenever a monitored pin (using the monitorPin function) changes its state (high->low, or low->high). HOOK_GPIN passes two parameters when it's called: pinNum and isSet. Your function should have those as parameters, so it can figure out which pin made the call and whether it's currently high or low.
-
HOOK_1MS - This is the shortest of the time-based hooks. Every 1 ms the procedure attached to this hook will be called. A parameter named tick is passed by this hook, which is a rolling 16-bit integer incremented every millisecond (kind of like Arduino's millis function). All time hooks pass this parameter.
The other time-based hooks are: HOOK_10MS, HOOK_100MS, and HOOK_1S (I'll leave it as an exercise in pattern-matching to find out which is which). - HOOK_STDIN - Whenever data is received on STDIN (remember, you can use crossConnect and uniConnect, to define what exactly sends data to STDIN), this hook will trigger. It'll pass a parameter, data, with a buffer-full of received data.
- HOOK_STDOUT - I've not made much use of this hook. It'll trigger whenever output data is sent. For instance when the print function has been called, this hook will trigger.
- HOOK_RPC_SENT - Like the previous hook, this one will trigger when a procedure finishes. This hook will trigger when an outgoing RPC is completed.
To make use of a hook, you have to attach a procedure handler to it. To attach a procedure to a hook use @setHook(), and then define the procedure immediately after. For example, to create a function named blink() that's called every 1s, do something like this:
@setHook(HOOK_1S)
def blink():
       pulsePin(blinkPin, 500, True)     # pulse active high blinkPin for 500 ms
Some hooks pass parameters, which you may need to use to figure out exactly why the hook was called. For example, if you're monitoring 2 or more button inputs, you can use HOOK_GPIN to trigger an interrupt when a pin transition occurs. HOOK_GPIN passes two parameters - pinNum and isSet - to indicate which pin made the hook call, and whether it's high or low.
@setHook(HOOK_GPIN)
def pinChange(pinNum, isSet):
       if (pinNum == switch1Pin)
              if (isSet == 1):
                     writePin(led1Pin, True)
              else:
                     writePin(led1Pin, False)
       if (pinNum == switch2Pin):
              ...
As you program, keep in mind that with event-driven programming (really interrupt handlers in general) you should effort to make your interrupt routines as fast and efficient as possible.
Example SNAPpy Scripts:
Let's jump straight into some code. Whenever you're working with a new platform, it's essential that you know how to blink LEDs. So here's a little "Hello, world" script:
# Blink an LED once a second

from synapse.platforms import *

blinkPin = 10   # a pin with an LED attached, pyXY boards have an LED on pin 10
blinkFlag = 0

@setHook(HOOK_STARTUP)
def init():
    # Configure LED pin as an output
    setPinDir(blinkPin, True)
    # Pulse the LEDs once during start-up
    pulsePin(blinkPin, 1000, True)


@setHook(HOOK_1S)
def callBlink():
    global blinkFlag # Need to use the global blinkFlag variable

    if blinkFlag == 0:
        blink(0)    # turn LED off
        blinkFlag = 1
    else:
        blink(1)    # turn LED on
        blinkFlag = 0

def blink(b):
    if b == 1:
        writePin(blinkPin, True)    # write blinkPin high
    else:
        writePin(blinkPin, False)   # write blinkPin low
But, that's pretty boring. You're not making any use of the wireless capabilities of SNAP. So lets add a second SNAP module that makes a call to the first's blink procedure. This'll show how you can make use of mcastRpc.
# Send out a blink() mcastRpc every 1 second

from synapse.platforms import *

blinkFlag = 0

@setHook(HOOK_1S)
def callBlink():
    global blinkFlag

    if blinkFlag == 0:
        mcastRpc(1, 2, 'blink', 1)
        blinkFlag = 1

    else:
        mcastRpc(1, 2, 'blink', 0)
        blinkFlag = 0
Also, make one modification to the blink script: delete the entire HOOK_1S and the callblink procedure. That way there are no local calls to blink. This'll make the LED-blinking completely dependent upon the mcast'ing module. This is a great pair of scripts if you're doing some distance testing (speaking from experience here).
Oh, and an unrelated shoutout to Pygments for helping to generate that HTML-ized Python code. Good stuff.
Integrating with Python Scripts on your computer:
I think one last, really neat thing Portal has going for it is your computer running Portal counts as a SNAP node, and it can participate in the SNAP network. This means, provided you're computer's internet-connected, your in-range SNAP modules can access to the world-wide-web. So, you can use the modules to send emails, check/post to twitter, and perform a world of other internet-related actions. Anything a Python script can do, your SNAP modules can too.
You upload scripts to the Portal computer just like you would any other SNAP device. It should show up in the "Node Views" tab along with the rest of the nodes. Your Portal computer is assigned an address (defaults to 00.00.01) just like the rest of your modules. So your modules can make rpc's to that address.
One important difference between scripts running on your computer and those on your SNAP modules is scripts on your computer can run actual Python (not SNAPpy). So, first of all, that means you'll need to download and install Python. Head over here to grab Python; I'd recommend 2.7.3 over 3.x.x.
Once you've installed Python, you need to tell Portal where the libraries you just installed reside. Go to Options and then Configure Python Library Directory.... Then point that to the Lib directory in your new Python install. Then you'll have to restart Portal.
Now, try uploading this script to the Portal node:
#!/usr/bin/python

import smtplib

def sendEmail(to, subject, body):
    from_email = 'youremailhere@gmail.com'
    server = smtplib.SMTP('smtp.gmail.com', 587)
    server.set_debuglevel(1)
    server.ehlo()
    server.starttls()
    server.ehlo()
    server.login('youremailhere@gmail.com', 'yourpasswordhere')
    server.sendmail(['%s' % (from_email,)],
                    ['%s' % (to,)],
                    """From: Portal Base Station %s
To: %s
Subject: %s

%s
""" % (from_email, to, subject, body))
    server.close()
That script is designed to work for gmail. I'm sure it could be modified easily to work with other webmail services. You'll need to replace youremail@gmail.com, with your actual email a couple times (the ones beginning with from_email and server.login). And you'll also need to replace yourpassword with your actual password (yeah...plantext...bleh).
Now any module on your network can send emails! Just send an rpc like:
rpc("\x00\x00\x01", "sendEmail",
"techsupport@sparkfun.com",
"My SNAP Stuff Works",
"I DON'T know why I'm sending you an email. My SNAPs are working! (Blame Jim).")
Stick that in a HOOK_GPIO and you can remotely trigger emails by pressing a button!
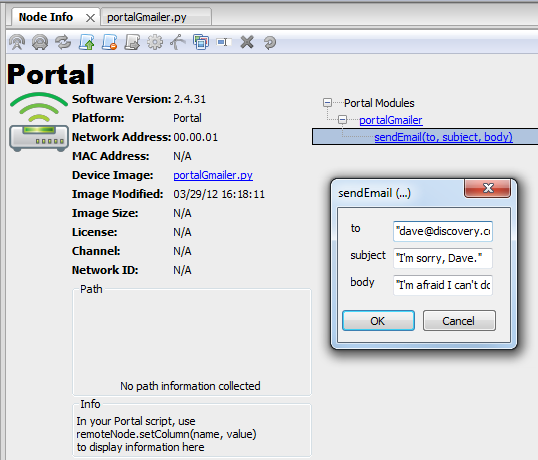
You can also try testing the function from within Portal. If you're on the Node Info screen (get there by double clicking a Node) for the Portal node, you can click on the sendEmail(to, subject, body) procedure and manually fill out all the parameters. Make sure you put double-quotes around each parameter.
That's all I got
So, thanks for reading my info-dump of Synapse SNAP stuff. Hopefully this is enough to get your brain-gears turning. I can't wait to see what awesome stuff you makers can do with SNAP. I think it's a really powerful platform.
Here are some other resources I'd recommend checking out:
- OpenSNAP.org: Synapse's home for open-source python scripts. You can both deposit and download code from here.
- Synapse Forums: The support staff at Synapse Wireless is very helpful. If there's a question left unanswered, give them a try.
- All of the documentation included with Portal. In Portal, under the Help menu. Check 'em out. In the least, check out the SNAP Reference Manual.
If you've got any questions, or if I've made any errors, or if you just want to tell me how awesome I am, please post in the comments below. Bye SparkFunions!
tl;dr ('cuz I know it's too long): I think SNAP is pretty swell. You should play with it if you get a chance!
Hi Jimbo,
Red alert cancelled!
I discovered that the erasure and reprogramming process will fail if any of the snap modules are connected to the PC via a usb hub.
I bypassed the hub and connected the SM700 directly to the PC usb port and then the process worked.
I've confirmed that this experience happens with both the SM700 and the RF266PC1 modules.
I hope that this info is helpful to everyone else out there.
Awesome info! Glad it's working for you :).
This is too cool! Awesome job, Jim!
I plugged my RF266 into my xbee explorer and it took me a little while to get things figured out. In particular, I wasn't thinking straight and just assumed the silkscreen on the explorer was correct. It means nothing for the RF266, so I made a little cheat sheet for it.
The lucky thing about it is that the RSSI LED on it is accessible with SNAPpy pin 20. Just using the built-in writePin(20,1) will turn it on. You can naturally turn it off with writePin(20,0)... both things that are nice when trying to figure out if a script is running or not.
Hi, I posted in the forum but I just received my rf266 and have a breakout board. I'm trying to get my id-12la rfid reader to work with it via uart.
I could use some help. I posted my code in the forum but I can't seem to get any serial data transmitted to the portal/bridge rf266, I'm wondering if I'm missing RST pins or some other aspects for reading serial data. I could use some help.
We currently have the id-12la working on a raspberry pi and it was running on an arduino but for our hacklab we'd like to totally get rid of the chips and go direct to synapse.
I'm having trouble getting two-way communications between 2 RF266's. It works from the Arduino shield to the USB dongle but not the other way. I can receive at 115,200 but have tried it as low as 19,200. The USB transmit blinks when I type into the terminal window but the DOUT LED never blinks on the Arduino shield. If I erase both Synapse, I can get Portal to ping from one Synapse to the other. Then I can see the LED light. Looking for some help here.
Great overview to help get people started! I would love to see you guys stock the RF300 series. They have much better indoor range - I use them throughout my building to remotely keep track of various test fixtures and sensors.
Got two RF266 and fantastic to get the description of how to make them work with Portal. Initially wouldn't erase with the Xbee USB Dongle, but switched to an old Maxstream USB (now Digi which shows how old it is) Xbee programming board. It has a reset on it. Worked first time. Got a 2nd RF266 plugged in and powered - and had them connect wirelessly. Wonderful.! Next phase try some programming with the ADC and check out the stability over outdoor temperatures. My wish list is for a12bitADC on a 900MHz/XBP footprint device with SNAP (including floating point) running on it as the 2.4Mhz has problems with distance in the real world - especially if there are trees and leaves. Also the 12bitADC with an accurate Vref/stable over temperature, is where value comes in for interfacing to real world measurements.
Hey, I wanted to ask you how did you manage to connect the RF266 wirelessly? I mean ,were you able to make a communication between them?
UPDATE: I succeeded in creating a communication betweem them! now, do you have any ideas what can i do with them?
Thanks buddy!
Just curious, has anyone attempted to connect the RF266 to their computer, but use a custom application instead of Portal? I don't have anything against Portal (yet ;-), but I will be writing my own app to interpret the data I receive from my project, so if I can just read the raw data from the 'serial port' then that's perfect. Looking at this quickstart, I see no reason why I can't, just thought I'd put it out there before I burn $80+, but it wouldn't be the 1st time lol.
Yes, I'm sending serial data to the PC and reading it in a Java App, and it works great. The nice part is that you can program the RF266 in a SNAPpy script (python) to send whatever serial strings you want and whatever is easiest to process on the other side.
What's the deal with the XBee USB Explorer and it's serial lines (in relation to the RF266)? I ask because of the following note on the USB Explorer product page:
"Note: A pull-up on DIN is required for this board to work properly. Thankfully, Series 1 and Series 2 XBee modules have their internal pull-up enabled by default. You will need to manually enable the pull-up on the 900MHz series."
Will I need to manually enable the pull-up? I don't think that I did, and it seems to work for me, at least for now.
You should really link to this page from the RF266 product page.
Yeah, should be "easy", however (http://organicmonkeymotion.net/blog/) with most of the gruesome details on the Synapse user forum (look for username Asterion).
All good, in the end.
I2C can be a little tricky with SNAPpy. I have been a satisfies Synapse Wireless customer since mid-early 2010. I do have some examples out there in the wild. (SVN, Synapse forums, etc)
I'm working on creating various sets of modules to import (Specifically for I2C devices) Expect an initial (read official) release within two weeks. I will edit this post for the URL and post on Synapse forums.
My initial batch is focused on RTCs, some accelerometers, I2C expanders, and other things that people are sending for modules to be build. I am close to having the BMP085 done, but you can not calculate the reading on a SNAPpy node, due to the signed 16 bit int. So I will have a portal and e10 script for the calculations.
I got the RF266PC1 modules working just fine but I cannot get the SM700 module to respond at all.
I think the SM700 is bricked.
Should I seek help at sparkfun or at synapse-wireless?
Uh oh...email our tech support team (techsupport@sparkfun.com). They'll be able to help you out.
The SNAP Reference Manual listed on Sparkfun for download is version K. I does not contain anything about the RF266PC1. Go to Synapse.com and download the latest SNAP Reference Manual ver. L dated 6-21-2012. It does have 3 pages on the RF266PC1 (pgs. 165-167). Synapse still doesn't have any helper/example scripts specifically for the RF266 in their Portal software, but they are planning on releasing a new version soon. Maybe it will have some scripts for the RF266.
Just received 2 of these from SparkFun. I want to be able to use them with Synapse Portal but have been unable to erase the AT script that comes pre-installed on them as described in SparkFun's tutorial Synapse SNAP-RF Hints. I tried everything suggested in the tutorial to do a reset about a hundred times but nothing works. I even connected a momentary switch between RST and GND. I am using XBee Explorers WRL-09819 and WRL-08687. Over on the Synapse forum there was some discussion that USB to Serial drivers cause problems like this. It sounds like others have successfully used XBee Explorers, though. I'm waiting to hear back from Synapse support. Anyone have any suggestions or ideas?
UPDATE: I resolved my problem of not being able to reset and erase my new RF266PC1's but thought I would post this followup in case someone else runs into this issue.
After several frustrating hours trying to get my 64 bit desktop (Intel Core i7-2600 CPU) computer to recognize the RF266's, I finally dug out my old 32 bit notebook and installed Portal. Using the same SparkFun Explorers and cabling, I was immediately able to reset the RF266's and erase the AT Commands script. Both RF266's can now connect to Portal just fine on the 32 bit notebook.
I should also say both my 64 bit desktop and 32 bit notebook are running fully updated Windows 7 and using the latest FTDI drivers for the SparkFun (USB - Serial) Explorers. Also using the latest Portal ver 2.4.31.
Then I connected them back up to my 64 bit desktop expecting them to connect now that the AT Commands script had been erased. Nothing - neither would connect - both timeout.
The issue seems to be that either Portal can't run on a 64 bit machine with my CPU or FTDI's 64 bit drivers don't work. I did go to FTDI's site and re-install their latest 64 bit driver, although it appeared to be the same one already installed. Didn't help.
So, it looks like I'm going to be running the RF266's on my old notebook for now.
I know this is a while later, but I am running on Windows 7 64 bit, with an intel i5-2500 CPU. I managed to reset the RF266 properly. I remember noticing something about when Portal was installing that it asks to make sure any Synapse device is unplugged (not sure if anyone else noticed this). But that could potentially do it.
I'm using RF266's on 64 bit Windows 7 just fine, so it must be something with your specific environment.
Wow, cool! Too bad I didn't read this a couple weeks ago, would have saved me learning most of what you covered the hard way.