
Enclosure Modification
Getting your project into a new home
We had some awesome feedback on this tutorial. Thank you to those that contributed!
So you have a killer project idea, you have all the parts in mind, the code lined up in your head and you are ready to get started. Perhaps you even have some of the board laid out. And now you think - “Hey, I don't want this just sitting on my desk all exposed. Maybe I can put it in a box of some kind!” Here's some tips on how to get your project in an enclosure with the least amount of headaches.
One thing to keep in mind during all of this: as in many things, there will be a lot of back and forth when you find a box that you think might work, then something else interferes (e.g. the height of your power jack). Keep your patience near by because it will be easier to work through the numbers now as apposed to later when you have a box in hand with a few holes in it and your unit wont fit.
Once you have all your hardware picked out, you will have an idea of the size your electronics are going to be. Hopefully you haven't sent your PCB off to be made yet. Now is the time to find an enclosure that all your widgets will fit in. We recommend an enclosure that is a little bigger then the outline of all your parts combined, a quarter to half an inch will do just fine.
A simple Internet search for 'electronics enclosures' will lead you to numerous manufacturers. Most of the online companies will have a 'dimensional drawing' or 'engineering drawing' link someplace on the product description page. Take a look through those and see what enclosure has the size you are looking for. Some things to keep in mind:
-
If you have buttons that need to be accessed through the case, find a shallow enclosure or tall buttons.
-
If there is a display you want to read but don't want a big hole in the lid, look for an enclosure with a clear top.
-
If environmental conditions may be a factor, find an enclosure that is rated for the conditions you expect your product to experience. Take a look at these IP Ratings. Many manufacturers follow the IP rating system for describing enclosures.
-
Maybe your project has lots of switches or external ports, try a box with tall side walls.
-
Another environmental note, if you plan on having buttons or connectors, keep in mind you'll want those rated for the conditions you are expecting as well (rain, dust etc.).
-
There are some sealed buttons and switches available for outdoor use, try searching your favorite parts supplier, they should have some.
-
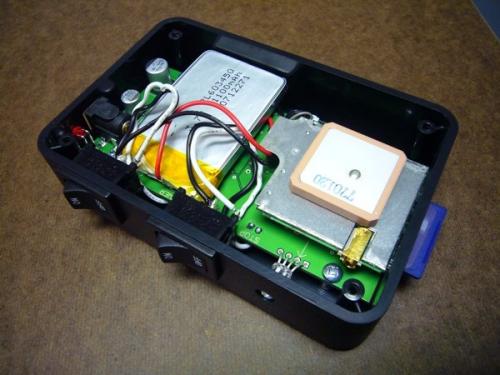
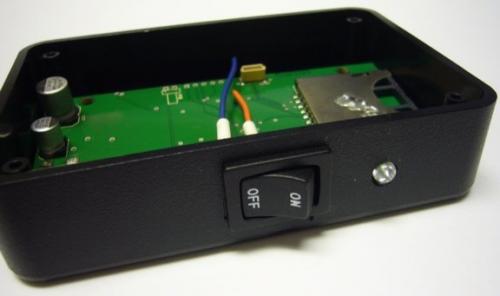
The GeoChron (above) was a tight fit but it was necessary in order to have external access to the SD card on one end (under the square, peach colored antenna) and the power jack on the other. If you have a component like an SD card, look for a box that has mounting bosses near the enclosure walls or you can extend your board to meet the wall. A 'mounting boss' is the little post that a screw can be screwed into in order to secure something within the enclosure. In the diagram below there are eight mounting bosses, four inner ones for the PCB and four outer ones for the lid. Another good tip is to have as many of your components as you can lined up on one wall of the enclosure. It is much easier to get holes on one wall to line up as opposed to holes on three walls.
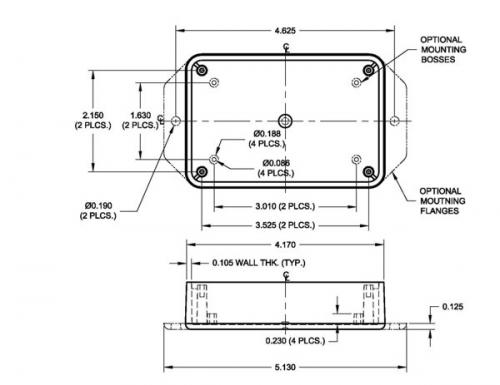
OK, now you have the perfect enclosure picked out. Grab yourself a copy of the dimensional drawings for the enclosure. If you're lucky, there may be a recommended PCB shape drawing included within the dimensional drawing document. Shown above is the drawing for the GeoChron Case. Hopefully at this stage you haven't had your boards made. It will make your life close to a million times easier (just like earth location dog tags, in those rare moments when you are lost in space) to have mounting holes on your board that match the mounting bosses of the enclosure. The best way to ensure good hole alignment is to follow the recommend PCB layout in the dimensional drawing.
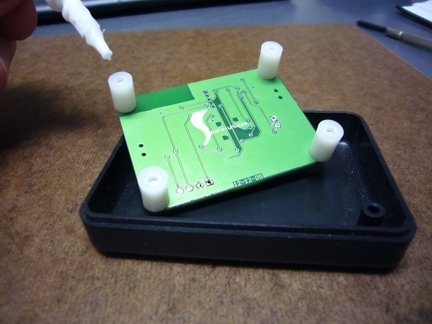
If you found a case that is what you are looking for size wise but the mounting bosses don't line up with the holes in your PCB, we have a little fix for you. Get yourself some plastic standoffs and screw them into the mounting holes you have. Now apply some super glue to the bottom side of the attached standoffs:
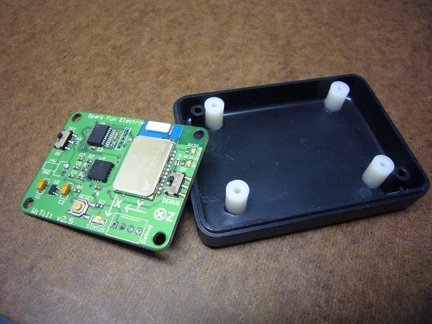
Place your board in the enclosure where you would like it, affixing the standoffs to the wall of your choice, most likely the bottom of the box:

Once the glue has dried, you should have more then semi-permanent mounting bosses in your enclosure.
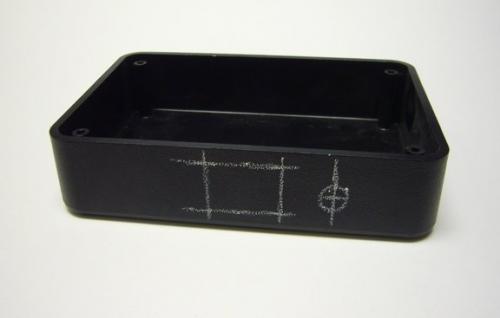
Next you are going to want to add some holes to your enclosure to access buttons, connectors, screens etc. To align and mark these holes, we need to start with a zero point. On the mechanical drawing sheet of the enclosure you picked, find the center axis of one of the mounting bosses (or one of the ones you glued in), and now look at your box from one side (start with the side that will have the most holes). Call this vertical line through the mounting boss your left to right (-x and +x) zero point. The top surface of that mounting boss is your up and down (-y and +y) zero point. Now we have a zero point on your board and the enclosure that are exactly the same.
Next, on your PCB, measure the distance from the X-zero (aka: the center axis of the mounting hole that corresponds to the mating boss in the enclosure) to the left and right edges of your components (if square) or the centers (if it's circular). If you want to be exact, you can measure from the edge of your mounting hole, just remember to add the radius of that hole to your finial measurements!
Now measure the height of the component edges or center from the bottom of your PCB, keeping in mind the bottom of the board will be sitting on the mounting bosses. Note: Most PCBs are 0.062 to 0.065” thick so you'll need to keep this in mind. It's good to create a rough boxy drawing (like the one below) to help keep all these measurements straight. It's OK to eyeball these measurements. If you do, it's a good idea to add a little clearance to your holes just to be safe. If your measurements are pretty spot on then you don't have to worry about it. If measuring was a little iffy, add (or subtract – as long as the hole gets bigger!) 1/16” to each side or diameter you measured.

Currently we have an enclosure, electronics, measurements and a cutting tool ready...let's mix up this stew. From your mechanical drawing you should be able to find the distance from the outer edge of your enclosure to the center axis of the mounting boss. As well, you can find the distance from the bottom of the enclosure to the top of the mounting boss. Sometimes this is tricky. You'll probably have to find two related measurements and subtract or add them. Now add the respective distances to your drawing as shown in the above sketch. You can see the x-axis is 0.335” up from the bottom of the enclosure and the y-axis is 0.605” to the right of the side wall. By adding these measurements to the measurements you took from the zero point, it is easy to mark your holes on the exterior of your enclosure from the side and bottom (effectively changing your zero point from the top of the mounting boss to an external corner of your enclosure, in the example case, the bottom left corner). Now is the time to transfer the sketched holes from your drawing to your enclosure. Some people like to use a wax/oil based pencil or to apply a paper based masking tape on the surface of the enclosure to mark on, this will help prevent unwanted damage from scratching out your guide lines on the surface of the box. As well this will enable you to approach the lines with a fine sanding tool or a pencil knife with greater ease.
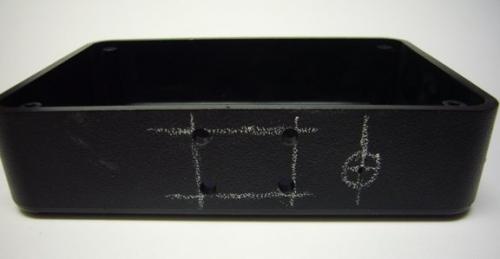
The next part gets to be tricky: Cutting. It's best to start cutting on the inside of your hole no matter what your tool of choice, this way you can get a feeling for how the material reacts to being operated on. If you have some square holes to make, try drilling holes in the corners of your outline first. This will leave you with nice, clean rounded corner finish. Before drilling, get your hands on a center punch (or even better, an automatic center punch, they are very inexpensive, ~$5.00) and mark your drill holes. These make a small divot that will keep the drill bit from walking around and scaring your surface. Drilling a very small pilot hole will create the same effect.
Additional reader feedback:
"One tool that I've found indispensable for making things in plastic enclosures is a step bit, aka unibit: http://irwin.com/irwin/consumer/jhtml/unibit/unibit.jhtml?link=unibit_3. It won't "grab" the plastic like a twist drill, (which can be dangerous, as well as wrecking your project) and it makes perfectly round holes, unlike a twist drill, which makes sort-of-round holes. A nibbling tool : http://www.adelnibbler.com/ is also great for making nice square holes- you can start with a round hole, put the head of the nibbler in, and chew out a square hole. Takes a bit of practice, and can be tedious, but the results are great."
We have found using a Dremel tool with a cutting disc works pretty well for cutting the edges of square holes.
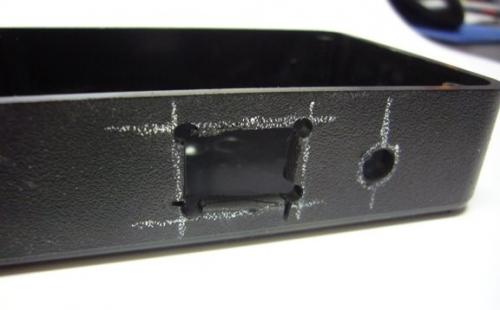
As you can see, circular components are much preferred...a drill cuts a nice even hole every time! If you have patience and intricate holes, drilling a hole and inserting a jewelers saw also works very well. Leaving a rough edge is a good idea so you don't take too much material out. Come back with a sanding bit or even a pencil knife to clean up the edges.
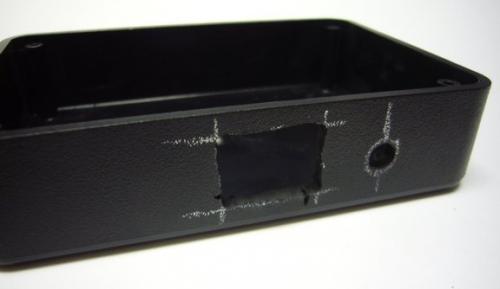
After all your holes are cut, there comes the moment of truth...toss your board in and see how it fits. If you have a few holes for a couple different components, chances are some of them will be off. Mark the edges that need a little more taken out and sand away. With some patience, your enclosure should come out clean and ready for your electronics!
As you can see through this example, chassis mount components are have a little more forgiveness if your holes are a little off. PCB mounted components don't have so much leeway.
If this is your first attempt, it might look a little rough but after a couple of projects this will be old hat...then you could write the next, advanced version of this tutorial. Of course, this is just our way of doing this, you may find some trick or tip that makes it easier for you.
By all means we'd love to hear your ideas and questions! Please report typos, comments, or recommendations to spark@sparkfun.com.
It would be great if they sold the enclosures in deeper form factors. Modifying one for a DeWalt Power pack was not simple and doesn't look as stable as a deeper enclosure could. Alternatively, two of the size here could be stacked to make a deeper mounting block, but then everything gets extra tricky!
If you ave access to a laser cutter or vinyl cutter, you can cut a mask as a guide. That'll allow you to test-fit your PCB a little before taping (or just sticking) the mask to the enclosure, giving you one more chance to get things closer before cutting holes. Once the mask is attached, you can use it just like you would your drawn marks, with greater confidence that the edge is where it should be.
Of course, with a laser cutter, if your enclosure is made of a laser-safe material, you might be able to just cut it directly with the cutter. Make sure you put something inside to absorb excess laser energy so you don't get marks on the far side of your enclosure (unlikely with large enclosures). Cardboard or MDF should be sufficient.
Furthermore, you might just make an enclosure from scratch with the laser cutter, but modifying a pre-made one can save time and effort, and provide access to materials a laser can't handle.