
Solder Paste Stenciling
Here's a quickie tutorial that I wish I would have learned in college - at least as a technical elective - in the Electrical Engineering program at the Univ. of Colorado... Instead, we got to learn the hard way!
We are constantly attempting to share what we've learned about surface mount soldering. This tutorial will show you what it takes to use a cheap-o solder paste stencil to apply solder paste. It's not that hard. There are some up-front costs, but it's easily within the means of the average hobbyist.
We are basically tipping our entire hand by disclosing our manufacturing processes. What do we get out of it? Nothing really. Please take this to heart and tell your friends about our site. We've sunk $1000s in equipment only to discover much of it was not needed. We hope to educate you enough to avoid our pitfalls.
The usual warnings apply. Solder paste may or may not kill you - just stop licking your hands and you should be ok. One way to tell you've got lead poisoning is dementia. So here at SparkFun, we really don't know if we're washing our hands enough...
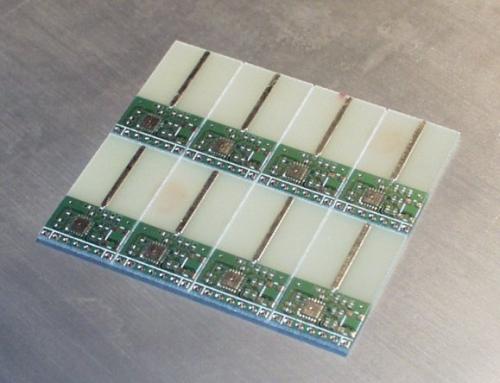
Here is what we will be stenciling today!
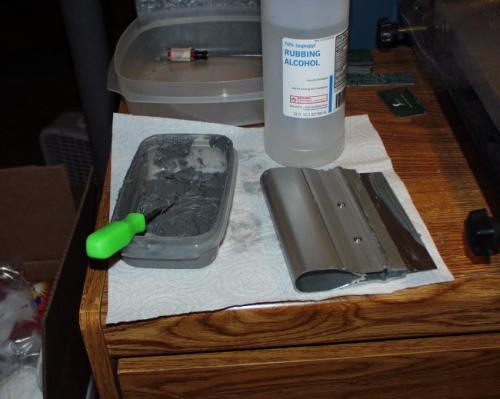
Tools you're going to need:
- Stencil
- PCB that matches the Stencil
- Solder Paste (Kester Easy 256)
- Wiper of some sort
- Flat spot/table
- Good lighting!
- Rubbing Alcohol
- Lots of paper towels
Optional Stuff:
- Tupperware container
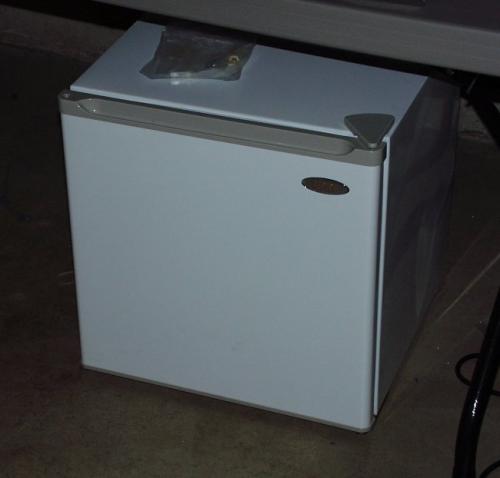
- Mini-fridge
- Screw driver or mixing tool
- Trashed PCBs for framing
SMD Reflow Tutorials:
Solder Paste -
Solder paste is a sticky grey substance that is somewhat liquid - well that's a paste now isn't it... Pretty much lead and tin mixed together with flux and some other magic ingredients. We use Easy 256 from Kester. Why? It's a No-Clean paste which means after you are done reflowing the board, you're done! No need to wash the board. Any solder paste will do.
One of the main problems is getting the paste. A 500g jar can cost from $50-$200 which is bad enough. The company you purchase it from will most likely charge you an arm and a leg for overnight shipping, cold packaging, and hazardous handling. Yep, lead is considered hazardous. Who knew? To top things off, I mentioned this "lead being hazardous" thing to my sister who works as an Emergency Room Nurse. She pointed out that there are no symptoms of lead poisoning - short of dementia. One has to be specifically blood tested for higher levels of lead. So I'm not sure if this means we're ok, or if we are actually poisoned and the preposterous nature of these tutorials are proof...

Kester Easy Profile 256 - Notice our paste is expired...
The solder paste suppliers insist on shipping cold packed overnight delivery because the solder paste can become 'unusable' if it's temperature is not closely maintained. Of course we didn't find this to be the case - but then again, we're not producing 10,000 units of a board. Just imagine if you screened and placed $40,000 worth of parts and PCBs only to find out the paste had gone bad. The batch might be lost. Who are you going to sue? Now you know why suppliers are so uptight, but we don't have to be...
We did notice that the paste will change over time without refrigeration. A syringe or tube of paste should be okay in an air tight container, in a cool place (basement), for multiple weeks. Buy your supply accordingly. It may make sense to buy a mini-fridge like we did from Tar-chet. $60 goes quite a ways these days.
There's some economics here that I refuse to calculate. But we save money by buying paste in larger quantities and then paying extra for storage (money for a fridge and energy costs). In the end, the paste lasts longer and I think it's cheaper in the long term. You could store the solder paste in your normal fridge but every other website says this is a bad idea. I'll agree because it costs me nothing. Remember the dementia thing?
Tools -
These are pretty basic. Do note that we are still looking for a good, cheap, replacement for our squeegee.
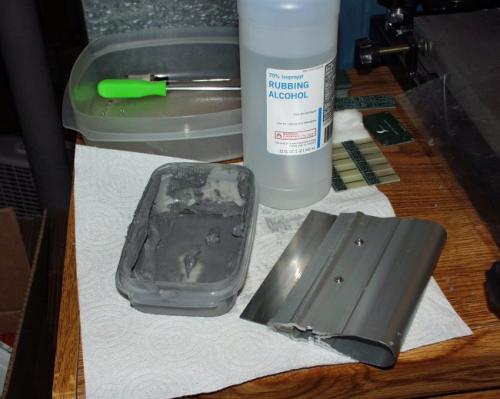
Mainly, you need a stir stick (screw driver), a whole bunch of paper towels, rubbing alcohol for clean-up, and some sort of a spatula/squeegee. I would recommend using a screw driver that you never plan on using again. For that matter, pretty much everything around the stenciling area gets grubby with dried paste after a few days of usage.
The $35 squeegee from Madell Tech came with our stencil printer (shown off to the right in the above picture). While the printer was a waste of $300, we do use the flat metal base - though you can use any flat surface. The problem with the printer is that it uses only framed stencils. Since we had no idea what we were doing initially, this sounded ok. We've never actually bought a framed stencil (>$150). Stencil printers will hold a framed stencil in place while the operator manipulates the position of the metal base (with PCB sitting on top) under the stencil with small dials all around the base. This would be ideal if we needed to stencil a large number of boards by hand, but for single units it actually really easy just to hold the stencil in place.
This squeegee has a replaceable thin metal blade that flexes nicely when you're applying paste. While I can't tell a difference, Ben claims the blade is wearing out - and this is common with higher end squeegees - but do you think I'll ever replace it? Probably not... As the blade wears out the aperture thicknesses become non-uniform : the blade digs into some holes while riding higher over others. A few stenciled PCBs and you'll see just how not-mission-critical this is. We've had really good results with 0603, 0.5mm pitch QFNs, and BGAs! If you can't readily find a solder paste squeegee, we've used razor blades with pretty good results.
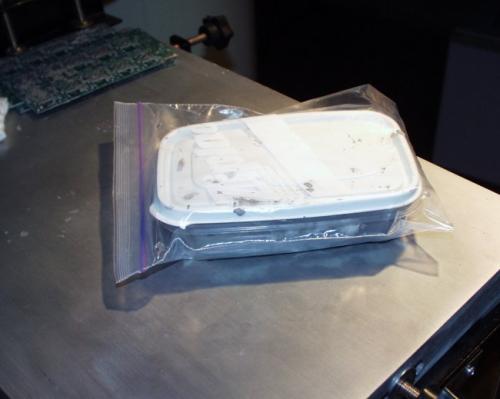
The solder paste is stored in the Tupperware container and that is in turn stored in a zip lock bag. This sealed package is stored in the fridge when not in use. Every time we use the paste, we give it a good stir with the screw driver. If the past seems dry or sticky, we add new paste from the large tube by shoving a (cleaner) screw driver in one end to forward the stopper. This goes against all recommendations so be warned - we are basically adding contaminants by mixing new paste with used paste. We also use the paste fairly chilled - we like the consistency to be thicker when stenciling. Again, the true aficionados claim it should be room temperature. Your guess is as good as ours - practice is the key here.
Here the squeegee is shown after its first use. Notice the nice layer on the paddle. It's primed and ready to go again!
The Stencil -
Pololu is a good place to get a cheap plastic stencil. They charge a $20 setup fee and $1 per inch after that. They use either a 3mil or 4mil sheet of mylar and can get some pretty good accuracy. Ok, read that again: $20 setup and $1 per inch. That means if your PCB is a 3x4 PCB and you've got the top paste gerber (*.gtp Protel) or bottom paste gerber (*.gbp) file, you can have a stencil for $32. $32! That's 1/5th the price of anyone else!
The stencil comes as a rolled piece of clear plastic. They can usually cut us a stencil same day or next day. USPS Priority from Nevada is 3 days. Not too shabby.
We use 4mil stencils for larger 0805-1206 parts and 3mil for tight pitch devices. Just ask Pololu for their recommendation. The thinner the stencil, the less paste will be applied. The thinner the paste, the lower the probability of jumpers and the higher probability of disconnects.
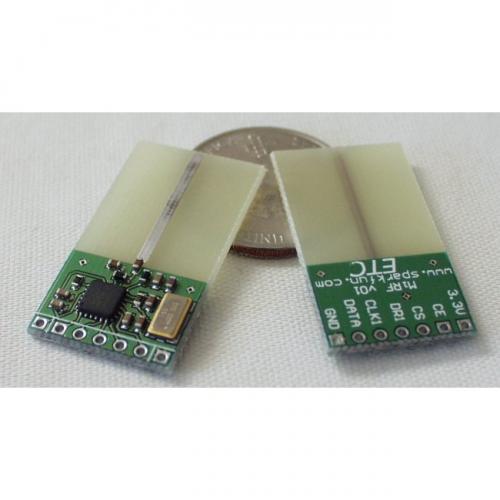
The clear Mylar laser cut solder paste stencil
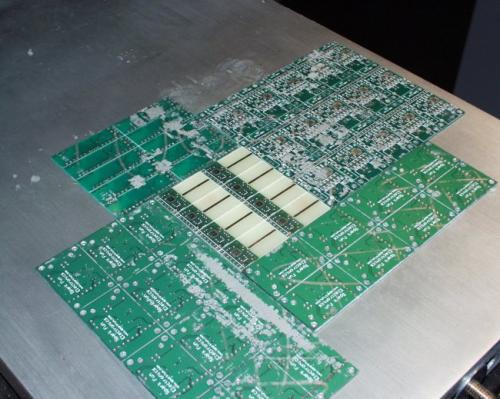
You may notice that there are multiples of designs and different designs on the same stencil. You can help offset the $20 setup fee by panelizing your different designs onto one stencil. While this may not help the hobbyist who works on only 1 or 2 layouts at a time, we cram 6 or 8 designs onto one sheet! It works - we promise.
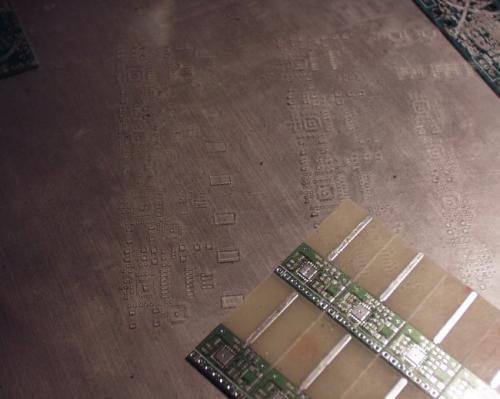
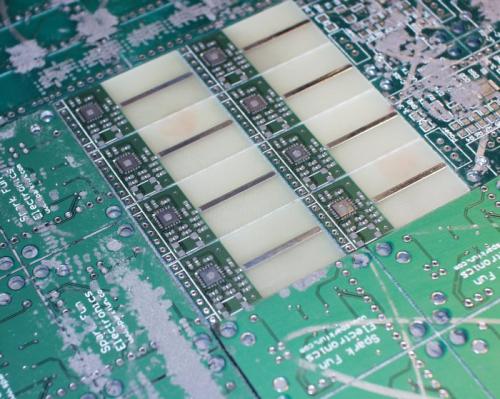
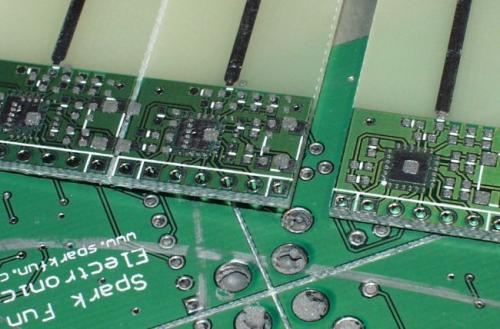
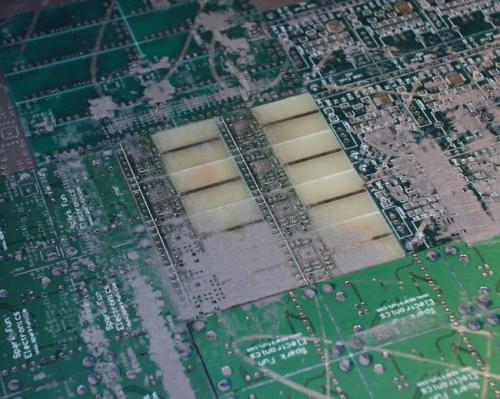
Under the stencil is a 2x4 panel of MiRFs. Uber-tight, 0603 with the QFN nRF2401A IC. We panelize the design and send that panel file to Gold Phoenix. We then send the top paste layer (we rarely put parts on the back of PCBs these days) to Pololu to have the stencil cut. The stencil always beats the PCB in the mail.
Paste Time! -
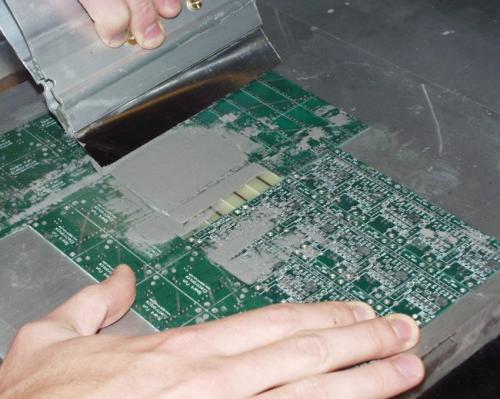
Enough talk - time to paste! First we must surround the boards we want to stencil with other boards of similar thickness. Since we only deal with 0.062" boards, this is a snap.
Why the extra boards? As you drag the squeegee across the stencil, the stencil must remain flat or else the stencil will flex/ripple and paste will squeeze into and around the apertures where it's not supposed to be! This way you can drag the squeegee across a completely flat service that is the puzzle array of PCBs. Any trashed PCBs will do - as you can see, we have plenty.
See the stencil? The design we need on this stencil is loosely lined up with the board in the middle.
Next, a good glob of newly mixed paste is plopped down. This seems like a lot, especially at $0.25 a gram, but don't worry, we are going to recover 95% of it! You only have to do this once - the squeegee will contain enough residual paste for 10-15 applications. We use it 3-4 times and then scrape the paste back into the Tupperware dish.
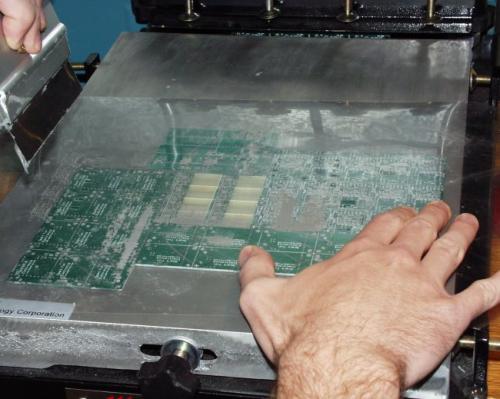
Now is when you line up the stencil. Do you need to be dead on? Pretty close. Can I redo it if necessary? Of course - if you mess up it's not the end of the world, we'll show you! Ben installed a flood light next to the stencil area which helped tremendously with alignment.
Again, note that the paste is actually on top the clear stencil (not on the PCB itself).
Once you've got the stencil right where you want it, pin it with your bad hand (I'm left handed so I use my right). Hold the stencil to the framing PCBs underneath. Remember, if the stencil slips, you get to start over.
You'll notice I am using a special 'paste squeegee'. I believe we paid around $50 for this little guy. You can spend upwards of $500 for some professional SMD squeegees. However, a savvy SFE client pointed out this great woodworking website:
http://www.leevalley.com/wood/page.aspx?c=1&p=49548&cat=1,310,41069
http://www.leevalley.com/wood/page.aspx?c=1&p=32670&cat=1,310,41069
http://www.leevalley.com/wood/page.aspx?c=1&p=32672&cat=1,310,41069
We have not used these mini-scrapers but they look very promising! We've also had some good luck with basic spackle spatulas from the hardware store.
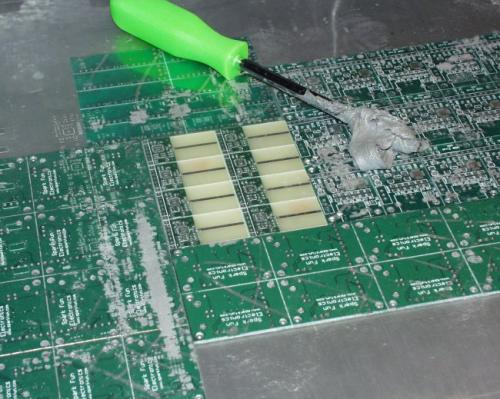
Swipe #1 - I put a thick layer over 6 of the boards, go back and make sure you have everything covered. Pinning hand stays still.
Here is swipe #2 - board is covered. Pinning hand stays still.
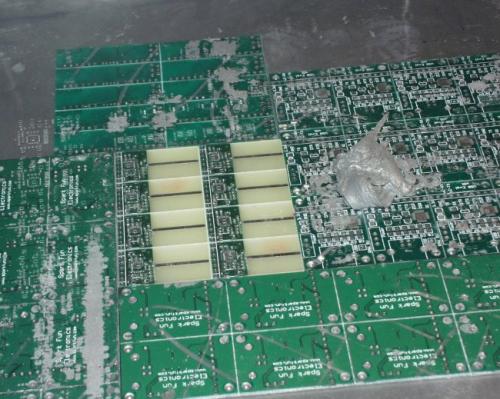
Swipe #3 - finally, we swipe with a more vertical hold on the squeegee removing most of the paste remaining on the stencil - while leaving paste in the apertures filled up to the thickness of the stencil. The stencil is nearly clean and a quick inspection shows that all the apertures are filled (I didn't miss any, I promise!).
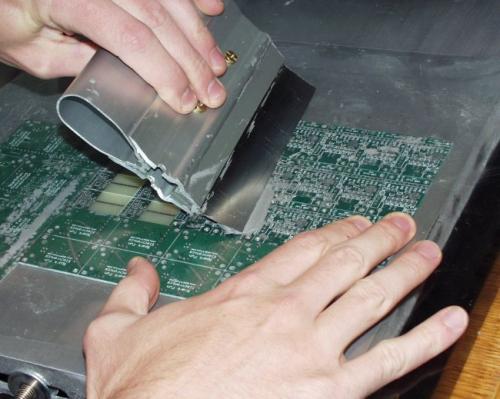
Your pinning hand should be holding the stencil firmly in place. Again, if the stencil slips, you get to start over.
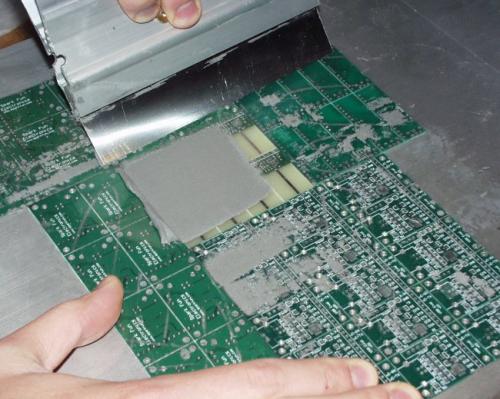
Now, keeping your pinning hand in place, pull the opposite side of the stencil up - lifting the stencil away from your board and towards the pinning hand. In this case it would be the left side of the stencil being lifted towards the right hand. Lift your pinning hand only after the stencil is lifted from the board being worked.
Ohhhh! Ahhh! Ok, so this is a picture of the second board I stenciled. The larger the board, the harder it is to keep opposite corners lined up (true framed stencils will fix that problem). So I screwed the pooch with the first board I stencil. What to do? Take a picture of course!
The first board that I stencil after coffee is on the left. Try #2 is on the right. Obviously the one on the left is so far off, it's not usable. All you have to do is wipe it off with a paper towel. No alcohol or scrubbing needed, just wiper 'er off good and start again by lining up the stencil. It can sit there for probably 45 minutes before the paste starts drying out and turning hard.
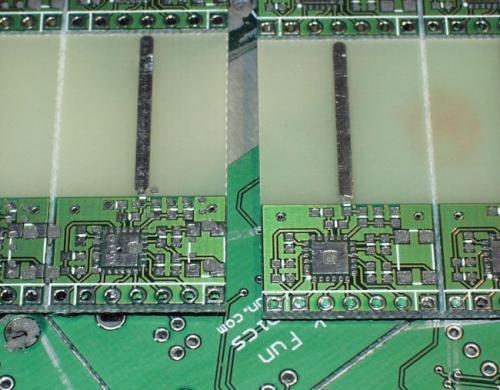
Oh, and the board on the right is probably the best I've ever done. You can be off considerably and still get it to work *very well*. The human eye can actually detect very small difference between the paste and the pad. Don't be too picky your first try - believe me, it will work!
There will be paste left on some parts of the stencil the second time around. You just have to be good at looking through the apertures and lining up the shinny pads. You can stop and clean the stencil, but this is not needed. Practice practice practice!
Cleaning the Stencil -
So you're done playing and it's time to clean up. Rubbing alcohol is your friend.
Place the stencil on a paper towel and wet another paper towel with a little bit of alcohol. Wipe one side clean - it's pretty easy. Some of the excess paste will slide through to the other side. Flip the stencil over and repeat.

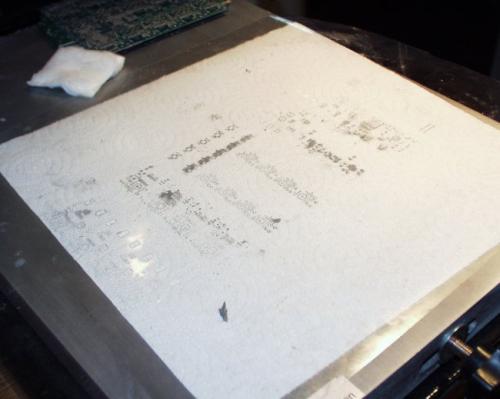
Clean stencil!
We store our stencils flat in a drawer. Don't leave alcohol on them for more than a minute or two or else the plastic Mylar will start to deform (very bad). Be gentle with the stencil and you can use it for >100 applications. We've nearly worn out a stencil but this was probably 100+ applications with nearly as many cleanings. The alcohol will thin the stencil over time.
Placing Components -
Eventually, you will have a PCB with solder paste. Carefully avoid touching the PCB as the solder paste is easily disturbed. Picking it up by the corners is usually the best option.
Unfortunately Jeff populated the MiRFs and cooked them on the Reflow Skillet before I could snap a photo. That's right, we populate the PCBs by hand! Anyone can populate even the smallest of parts with only a pair of tweezers.
Placing 0603 components packed tightly around a QFN IC is actually not that bad. It has taken everyone in the office some practice, but all you need are your parts and a print-off indicating where the parts go. Ben can drink a full pot of coffee and plop parts down with amazing speed - just don't take his magical tweezers.
You will find that you only have to be close to the correct placement. The surface tension of the liquid solder will actually pull smaller components into place and we've seen multi-pin devices rotate themselves into place. It's quite fun to watch the boards reflow!
So we hope to have shown you that solder paste stenciling is not that bad! You don't have to have immaculate precision or control. You can populate any board by hand with a pair tweezers and some practice.
The final step is to bake your cookies. On to the Reflow Skillet!
One tip I have learned, is that you can practice your stenciling using toothpaste! It's about the same consistency as solder paste. Once you know you've got your technique down, you can switch to the $$$ real stuff.
I use my PCB layout software to produce a stencil. Then I print to Toner Transfer, and etch a .005 brass shim stock that I can get from K&S at my local hobby store. Just a couple bucks for the .005, and it produces good stencils.
I set the grow radius for the pads to -6 . I find this helps keep the solder paste to a more controlled location and helps guard against bridging. Especially because I often reflow to a DIY PCB without a solder mask for protos.
Anybody have any tips for DIY solder mask? I've used the Testors Acrylic, but that covers over the pads, and so only works well for hand soldering. I've seen a Youtube video for a UV curable paint, but have not seen it for sale anywhere. SparkFun could get a large quantity and bottle it down?
I know this is a bit old, but for anyone else that may be interested, Pebeo Vitrea 160 makes a pretty good solder mask.
http://www.dickblick.com/products/pebeo-vitrea-160/
I have had good luck brushing it on but the best results are with an airbrush. I just use toner transfer to cover the pads where I don't want "soldermask," paint, bake and scrub the pads clean with acetone and a little elbow grease.
inspired by this thread, i did a 'DIY' stencil so i could test a pcb before ordering a real lasercut stencil. The step-by-step process i used is here:
1) convert my computer file of the PCB to one with outlines for the solder stencil.
2) print it out on label paper (half sheet in this case)
3) stick onto some appropriate 3mil film, i used some anti-stat plastic.. it was a bit softer/thinner than i wished, but all i had on hand... make sure that the label is bigger than the film.
4) stick label+film onto a backer, like 'white cardboard'.
5) with some serious magnification and an x-acto, cut out all the holes
6) soak the label from the top with 'goo gone' or 'goof off' to release the adhesive
7) clean off the film of any residual adhesive.
baddabing.. saves $30-40 if you only need to make a handful of boards.. should be good for 10-20 boards if you are careful cutting. Also gives you instant gratification.
-awr
New stencil vendor: http://www.oshstencils.com/index.php Fast and very cheap. I've been pleased with what I received.
wow, very cool. Thanks for the link. I can't wait to try them out. Board manufacturer (oshpark.com), check. Solder stencil manufacturer (oshstencils.com), check. Now all i need to do is build a solder oven.
Would be really slick if oshpark.com and oshstencils.com teamed up so you could order your pcbs and stencils all from the same place as a single project.
Kitchen appliances work great! [Relow Toaster] (https://www.sparkfun.com/tutorials/60), and [Reflow Skillet] (https://www.sparkfun.com/tutorials/59)
What brands do you recommend when choosing solder paste? any alternative to kester? Something cheaper?
For flat $35 you can have 12"x18" 4mil Mylar laser-cut, and shipped for free from CutYourWay.com All cutting time, materials, and shipping included.
Maybe throw a heat diffuser in the bottom of your skillet to get a more even distribution of heat. Like one of these: http://bellacopper.stores.yahoo.net/copheatdif.html
Great tutorial, however, I am suprised that you did not mention lead free paste. I use it all the time and have found no extra difficulties, and it is not much more expensive than standard leaded paste(I got a good deal on eBay), and no risk of brain damage. Also, wondering how much force you put on the squeege, are you pressing down on it with all your might, or just gliding across it. Thanks again for making these very informative tutorials.
Guys, do you solder all of your products by yourself? Especially for SMD parts? Or you make them assemblied in somewhere else?
The tutorial is old, but is very helpful regarding the whole process of pcb assembly using solder paste and glue.
Ooooo... New project for me: A "component printer" similar to a 3D printer mixed with an assembly machine that cuts a board, applies solder paste, and places all necessary components... Must begin...
Nice tutorial, I've been a big fan of SMD (and soldering paste) since I broke my first drill bits ;-)
Please note that we've advanced 5 years since this was written. We are not allowed to use soldering paste that contains lead anymore - except for some very special stuff for medical life saving and alike equipment.
One tip for replacing broken SMD chips that have SO-8 style pins (the chips that look like squashed bugs with legs spread out wide): Remove the old chip using a hot air gun, clean the pads and place the new chip. Now solder with normal soldering wire and a normal iron. Don't mind that you are soldering all pins together. Now use desoldering wire and run over the pins again with your soldering iron - this will remove the soldering wire between the pins but not between pins and pads.
You can also solder pin by pin with a very fine iron and thin wire (we call this stuff monkey hair) but that takes a lot of experience, time and (but not too much!) coffee. Some extra flux helps (I use a flux pen, resembles a thick marker but with flux instead of ink).
And please use gloves when handling soldering paste. This stuff is not healthy!!!
- Rob
I store my solder paste in a portable fridge.
Thank you for this great article. I followed this technique for the assembly of my prototypes.
I published an entry in my blog describing the process I followed and the results:
- http://ea4frb.blogspot.com
The entry is in spanish but images are self explanatory and there is a button to active the automatic translation.
Cheers,
EA4FRB
Just one question - How do ya'll arrange your parts for placement? After I have stenciled the board, I end up taking the piece of tape, opening up the number of parts that I need to place and dump them on a spot on my static mat. I then pick them up and place them one by one. I can't just pick them out of the tape, my tweezers are too big. Any better ideas for arranging your parts to make placement easier?
... continue previous message ...
Any advice on the best quality/value solder paste to buy and where to buy it --- for both dispenser application and for stencil application? Is $65 per 500g jar reasonable?
How much trouble is lead-free solder paste versus normal paste (as if they aren't both poison)?
Applying solder paste with a stencil seems messy, and seems to have substantial time overheads for setup, redo when needed, cleaning stencils, cleaning poisons from the work area, cleaning hands, arms, and clothes... etc.
Can someone who has ALSO applied solder paste manually with a "plunger type dispenser" or a "pressure-driven dispenser" [with foot-pedal] please compare the time and effort required? Also, please compare the likelihood of opens and shorts with these two methods.
Also, I was looking at pick-and-place machines and noticed they are all quite fast at applying solder paste dots all over a PCB (10,000+ dots per hour for even slow-poke machines). This makes sense because the head only needs to move 1mm or so to apply the next dot, rather than 1 meter or so to pick up the next component and return to the location on the PCB. So my other question is --- if you have a pick-and-place machine, why in the world would you not that machine apply your solder paste?
I have done both methods stencil and with solder paste plungers. By hand no machines in the mix. My overall thought is, if you are doing less than 100 boards, plunger all the way. Both options do require practice. Stenciling is far more messy and unnerving to do. The dispense control you get from syringes keeps messes low. I am comfortable doing it at the desk I sit at every day. Stenciling I don't really do anymore because I don't do mass production but I would never do it at my desk, paste tends to get all over the place.
With syringes the trick is really to push the tip straight down on the board, this makes the paste stick more to the board than the syringe tip. (Sticking to the tip was my biggest problem early on because I tended to come in at and angle.)
Continued...
After a bit of practice you learn the amount needed to prevent bridges and still get enough solder on. In the passive component realm I tend to stick to 1206 packages (More because I don't like placing smaller parts not because of the paste.) however I have soldered many SOIC and TQFP packages without a problem. Also large in part you can have a thin paste bridge on most parts and it will wick up to the part rather than create a solder bridge. However in small pitch packages it is best to alternate inside outside with your dabs this helps prevent bridging.
Loosely placed parts also tend to self align in the heating process. (Have to love liquid tension.) I have used this methodology with both just a hot air (I stress low air flow) rework station and with a toaster.
Continued...
I prefer hot air rework as you can see if you messed up on a per part basis. Paste syringes are also pretty cheap considering they say it expires in a year and I don't do hundreds of board inside that time and one syringe will go a long way. And no need for stencils. You also do not incur the cost of a stencil for a small number of boards. You also can get pretty fast at it (for a hobbyist) I recently did 10 boards that had 11 1206 parts 1 SOIC-8 package a switch (smd) and 2 12mm coin cell holders (Thru hole) paste and soldering in about an hour and a half.
There is my 2 cents.
bootstrap:<br />
<br />
or a board with 16 parts per board we make average 6000 per shift 8 hours.
The article by Nate on stencils is great
However.... rather than plastic stencils from Polulu why don't you try this SUPER COOL DIY kit from rena electronics:
http://www.renaelectronics.com/product_stencil.htm
You print your stencils out on an overhead, place it over the photosensitive steel plate, expose it to light, develop it like film and have a super cool steel stencil that will last forever. You can also have them made in (rust free) brass in case you want future archaeologists to reprint your circuit boards in the year 2525.
http://www.renaelectronics.com/picts/stencil/all-samples.jpg
** check out the 3-minute video narrated by an odd computer-voice girl**
http://www.renaelectronics.com/picts/howto/stencil/movie_0001.wmv
Slick....
Why not just apply the paste directly with a small screwdriver or dental pick and eliminate the stencil altogether? Sloppy, sure but wouldn't it work in a pinch?
BryanC:
I've been working with the Chipquick SMD 291AX syringe. The boards include 0201, MSOP10, QFN24, TQFP64, and LTCC70 packages. The boards are all professionally fabbed with solder masks and tinned pads.
The syringe works, but it is slow, tedious, and almost inevitably requires some hand rework after reflow to clean up solder bridges. It's extremely time consuming to apply the paste, and it never goes on quite evenly, leading to skewed parts and pins with solder blobs. I've had to rework several boards because the under-chip ground pad has either too much or too little solder, causing problems with pin adhesion as well as heat-dissipation issues.
If I can actually get useable stencils from these Pololu folks for $20-50 I'm going to be the proverbial Pig in Mud.
Cheers
If anybody is interested in a bit more detail regarding this tutorial, I followed it pretty precisely and got GREAT results for my first product.
I posted a ton of pictures along the way if you guys like the eye-candy.
http://blog.nilok.ca/2009/12/first-qube-ever/
Thanks for the reference to Pololu, but the shipping to Canada is about as much as the stencil! Does anyone know where to get them in Canada for a similar price?
Thanks :)
My past is somewhat dry and sticky...but no matter how hard i apply new paste, it just wont become wet and loose...
DIY milled framed brass stencil (with glue trick!):
http://it.youtube.com/watch?v=Mq-JrfIW24s
For the squeegees, I think you can find them in shops dedicated to serigraphy and screen-printing.
The Italian name for the tool is "racla" singular, "racle" plural.
The French one "racle" singular, "racles" plural.
See some examples here:
http://www.racle-poliuretano.it/
maybe you could cut the stencils yourselves with a small laser diode and an homemade xy cnc, something like this:
http://it.youtube.com/watch?v=jAjRxIl2_bA&feature=related
oops forgot to include a link to the pictures:
http://gallery.me.com/andrewwynn#100088&bgcolor=ltgrey&view=mosaic&sel=0
(click on the small icons on the right to browse).
Oh.. after making the 4" circle, i tried making a quick n dirty stencil for a 30mm circle project.. this time i simply applied some 2" wide kapton tape over the pcb, and cut out the pads.. took about 20 minutes.. VEEERRRY carefully removed the tape (actually i spread on paste on the first one) then moved the tape to a second board, and had two boards soldered with reflow heatplate in a matter of about 20 minutes including populating the boards (twice the performance of hand-soldering even with just two boards.. once i do a batch of 10 i expect 5x the performance!
I got my solder paste from stencils unlimited.. $25 for 200g. of course cost more in shipping than the paste.
-awr
Wow! Neat trick! I never thought of cutting my own stencil by hand. Can you post some pictures that show how the reflow turned out?
Why not make your own stencils at home too?
If you know how to make the pcb then you know how to make the stencil.
just search for copper foil in the search engine of your choice.
I haven't done it myself but I do know you can get 3/4 mil foil from a few gillion different places.
Why not his from mouser for small quantity silver solder paste?
557-7459
7459
Wahl Soldering Irons/Accessories SILVER SOLDER PASTE Page 2,081 In Stock
Click
to
View
1: $5.03
12: $4.29
"If the past seems dry or sticky, we add new paste from the large tube ..."
Is that to bring on dementia to help deal with a dry and sticky past?