
jenfoxbot
Member Since: October 13, 2015
Country: United States
Analog MEMS Microphone Breakout - SPH8878LR5H-1 Hookup Guide
March 17, 2022
Get started with sound monitoring using the SparkFun analog MEMS microphone breakout board with Arduino!
Raspberry Pi Zero Helmet Impact Force Monitor
March 8, 2018
How much impact can the human body handle? This tutorial will teach you how to build your very own impact force monitor using a helmet, Raspberry Pi Zero, and accelerometer!
Bark Back Interactive Pet Monitor
March 8, 2017
Monitor and interact with pets through this dog bark detector project based on the Raspberry Pi!
MEMS Microphone Hookup Guide
January 27, 2017
Get started with the SparkFun analog MEMS microphone breakout board with Arduino! Create a volume unit meter with the ADMP401 or ICS-40180 to react to sound before building your sound visualizer!
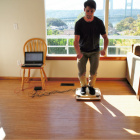
IoT Industrial Scale
October 10, 2016
What does a baby elephant weigh? How much impact force does a jump have? Answer these questions and more by building your very own IoT industrial scale using the SparkFun OpenScale.
Hazardous Gas Monitor
June 17, 2016
Build a portable gas monitor to check for dangerous levels of hazardous gases.
Photon Remote Temperature Sensor
March 1, 2016
Learn how to build your own Internet-connect, solar-powered temperature collection station using the Photon from Particle.
Sound Reactive EL Wire Costume
December 31, 2015
Learn how to make your EL wire costumes sound reactive in this project tutorial.
EL Wire Light-Up Dog Harness
October 30, 2015
Learn how to create a light-up dog harness using EL wire for when you need to take your four-legged friend for a walk in the dark.
-

Awesome, thanks for sharing that resource!
-

Great suggestions, thanks for sharing! :D
-

Hello! Hope you were able to figure this out! If not (and for other folks who may have the same question), the D7 pin is connected to the relay ground that controls the power to the CO (MQ7) sensor. In the schematic, it's the orange wire going to the MOSFET. Hope that helps!
-
Good question! Also thanks for following up. Yes, denting of the top platform board was an issue. Didn't see any denting in the hardwood when standing but it did get a bit dented after the jump test. The addition of metal plates above the load cell buttons is a great idea and would likely help a great deal, otherwise choose a plastic or metal top platform. Hope that helps and happy building!
-

Hello! Thanks for the clarification re: load cell vs. load sensor. In a somewhat related question to the previous comment, is it possible to connect 4 load cells to the amplifier board? For example, could I connect them in parallel and then calibrate w/ the resulting effective circuit resistance? Any info you could provide about using multiple load cells w/ one amplifier would be greatly appreciated. Thank you!
Update (8/30/16): Figured it out -- can connect multiple load cells in parallel!
-

Both variables are used in the parent source code written for the "Getting Started with the EL Sequencer" tutorial. As they aren't essential to this particular project, feel free to remove them in your version. Hope that helps!


