T³: Color Object Detection with OpenCV and Python
The newest version of EdiBot relies on contour finding in OpenCV to locate and chase yellow objects.

Instead of competing this year in AVC, I created an interactive demo for the Engineers' Lounge. OK, by "created," I mean "updated." The original EdiBot was made to show off the power of the Intel® Edison, and I made a few adjustments for EdiBot 2.0.
The idea behind EdiBot is simple: have a robot chase down the largest object of a single color in its field of view. To do that, I used the popular computer vision library, OpenCV.
Tracking a yellow ball with OpenCV
This is a good opportunity to talk about how I used OpenCV (in Python) to find blobs of saturated color. Note that much of this is based on the ball tracking code from Adrian Rosebrock's blog.
If you want to follow along, you will need to install OpenCV. The easiest way to do that in Linux is to use a package manager. Since I'm using Ubuntu:
sudo apt-get install libopencv-dev python-opencv
If the process says you need additional dependencies, check here.
I stripped away all the code that deals with driving motors and added a section that shows the images on the screen:
import cv2
# HSV color thresholds for YELLOW
THRESHOLD_LOW = (15, 210, 20);
THRESHOLD_HIGH = (35, 255, 255);
# Webcam parameters (your desired resolution)
CAMERA_WIDTH = 320
CAMERA_HEIGHT = 240
# Minimum required radius of enclosing circle of contour
MIN_RADIUS = 2
# Initialize camera and get actual resolution
cam = cv2.VideoCapture(0)
cam.set(cv2.cv.CV_CAP_PROP_FRAME_WIDTH, CAMERA_WIDTH)
cam.set(cv2.cv.CV_CAP_PROP_FRAME_HEIGHT, CAMERA_HEIGHT)
camWidth = cam.get(cv2.cv.CV_CAP_PROP_FRAME_WIDTH)
camHeight = cam.get(cv2.cv.CV_CAP_PROP_FRAME_HEIGHT)
print "Camera initialized: (" + str(camWidth) + ", " + str(camHeight) + ")"
# Main loop
while True:
# Get image from camera
ret_val, img = cam.read()
# Blur image to remove noise
img_filter = cv2.GaussianBlur(img.copy(), (3, 3), 0)
# Convert image from BGR to HSV
img_filter = cv2.cvtColor(img_filter, cv2.COLOR_BGR2HSV)
# Set pixels to white if in color range, others to black (binary bitmap)
img_binary = cv2.inRange(img_filter.copy(), THRESHOLD_LOW, THRESHOLD_HIGH)
# Dilate image to make white blobs larger
img_binary = cv2.dilate(img_binary, None, iterations = 1)
# Find center of object using contours instead of blob detection. From:
# http://www.pyimagesearch.com/2015/09/14/ball-tracking-with-opencv/
img_contours = img_binary.copy()
contours = cv2.findContours(img_contours, cv2.RETR_EXTERNAL, \
cv2.CHAIN_APPROX_SIMPLE)[-2]
# Find the largest contour and use it to compute the min enclosing circle
center = None
radius = 0
if len(contours) > 0:
c = max(contours, key=cv2.contourArea)
((x, y), radius) = cv2.minEnclosingCircle(c)
M = cv2.moments(c)
if M["m00"] > 0:
center = (int(M["m10"] / M["m00"]), int(M["m01"] / M["m00"]))
if radius < MIN_RADIUS:
center = None
# Print out the location and size (radius) of the largest detected contour
if center != None:
print str(center) + " " + str(radius)
# Draw a green circle around the largest enclosed contour
if center != None:
cv2.circle(img, center, int(round(radius)), (0, 255, 0))
# Show image windows
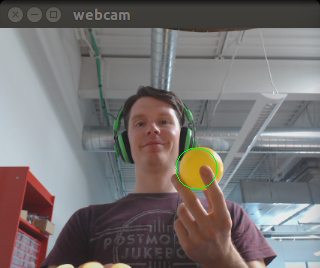
cv2.imshow('webcam', img)
cv2.imshow('binary', img_binary)
cv2.imshow('contours', img_contours)
cv2.waitKey(1)
Plug in a webcam, run the code in Python, and you should see three windows appear showing the different stages of image processing (note that the windows might be covering each other). The largest yellow object that appears will have its x, y coordinates and size (radius) printed in the console.

Different stages of object tracking
Let's look at the core of the code, the section in the while loop. The first thing we want to do is capture an image from the webcam and filter out everything but the color yellow. These four lines accomplish just that:
# Get image from camera
ret_val, img = cam.read()

# Blur image to remove noise
img_filter = cv2.GaussianBlur(img.copy(), (3, 3), 0)

# Convert image from BGR to HSV
img_filter = cv2.cvtColor(img_filter, cv2.COLOR_BGR2HSV)

# Set pixels to white if in color range, others to black (binary bitmap)
img_binary = cv2.inRange(img_filter.copy(), THRESHOLD_LOW, THRESHOLD_HIGH)

# Dilate image to make white blobs larger
img_binary = cv2.dilate(img_binary, None, iterations = 1)
Note that we first blur the image, which helps reduce noise. We then convert the entire image to HSV (Hue Saturation Value) color model so we can filter it on the next line. We call the inRange() function with low and high HSV thresholds. Anything between these thresholds (dark orange-yellow to bright pale green) is converted to a white pixel. Everything else is converted to a black pixel.
We then perform another filtering known as "dilation." This makes all the bright (white) areas larger and has the effect of removing more noise and combining disjointed white regions close to each other. This white/black "binary bitmap" is shown in the "binary" image window.
After we get a binary bitmap, we call the pseudo-magical findContours() function where OpenCV finds the edges of objects (i.e., the outline) in the image. Since we only have two colors, black and white, finding the edges should be an easy task.
img_contours = img_binary.copy()
contours = cv2.findContours(img_contours, cv2.RETR_EXTERNAL, \
    cv2.CHAIN_APPROX_SIMPLE)[-2]
Now that we have a list of contours, we can use them to find the largest one:
# Find the largest contour and use it to compute the min enclosing circle
center = None
radius = 0
if len(contours) > 0:
    c = max(contours, key=cv2.contourArea)
    ((x, y), radius) = cv2.minEnclosingCircle(c)
    M = cv2.moments(c)
    if M["m00"] > 0:
        center = (int(M["m10"] / M["m00"]), int(M["m01"] / M["m00"]))
        if radius < MIN_RADIUS:
            center = None
With the largest contour, we find the smallest circle that completely encloses it and find the center of mass based on the moments of the contour. We now know the x, y and radius of our object! In EdiBot, we figure out which third of the screen it is on and turn to face it. If the radius is too small, drive forward, and if it's too big, back up.
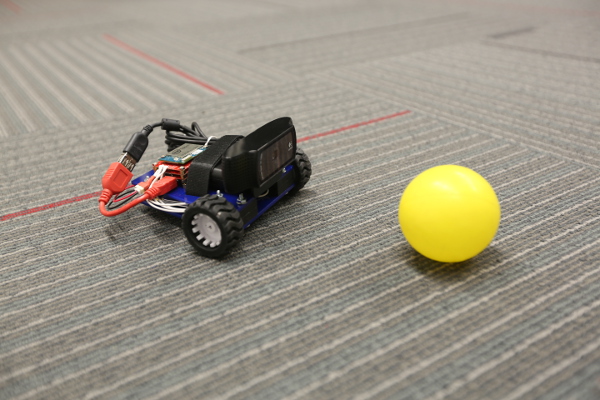
EdiBot 2.0 doing what it does best
The original EdiBot was on its last leg (wheel?) after three Maker Faires, and I figured it was time for an update. First and foremost, it received a complete chassis overhaul, and I replaced the Rover5 driver board (retired) and Edison Arduino Block with the Edison H-Bridge Block. The code was also updated with the new tracking code above, which no longer relied on SimpleCV.
If you want to build your own EdiBot 2.0, full instructions can be found on Hackster.


I have been a big fan of you and of Adrian Rosebrock for sometime.
I am glad to see that you know of him, his course in computer vision is really worth the little money he is asking for it.
I hope that at some future date you might want to contact him and tell him about this project, he might just include in his blog.
That sounds like a good idea, thanks :) I did learn a lot from his blog.
So you're running Python scripts on the Edison?
Yup. The Edison is running full Linux, so you can use just about any language you want. I initially wanted to use Node.js for this project, but I couldn't find any good wrappers for OpenCV.
Very cool, how would you adapt this to navigate the AVC course? Avoid the hay bale and barrel colors? Follow the road color?
Barrels are probably the easiest, since they're almost always red. Hay might be harder. I would recommend looking into stereoscopic vision to make that happen :)
Excellent article! It was nice talking to you at the AVC. Hope you get an opportunity to try Flask at some point. It's good stuff!
Thanks, and it was good chatting with you, too. I definitely plan to look into Flask.
Hey Shawn, what was the video resolution and the FPS it worked at?
For my desktop, I was shooting at 320x240, and getting 30-60 fps no problem. The poor Edison could only do 160x120 and get about 5-10 fps :)