Fashion Hacking: Infinity Mirror Heart Heels
Angela installs some custom infinity mirrors in novelty heart-themed shoes for Valentine's fun.

Many of you may know me from my soft and sewable projects with LilyPad, but lately I've been all about hacking shoes, which has been quite a different kind of build process from using conductive thread and fabrics. I am currently working on five pairs of shoes at the moment; here are two that I augmented for the upcoming holiday.
As Valentine's Day drew near, I was getting excited not for the candy or romance, but for one of my favorite Valentine's-themed dance parties in my local community. As a costumer and lover of statement pieces, I happened upon some wild-looking heart-themed wedge heels on eBay and immediately bought them as an option for my party outfit.
Check out these sweet heels I got! 💖 💖 💖 Trying to decide between side light NeoPixels or a skinny NeoPixel strip to embed in the empty hearts. This brings my LED shoe projects in progress count up to 4, oops! #shoeobsessed #omgshoes pic.twitter.com/ebOxhsgoTn
— Angela Sheehan (@the_gella) January 5, 2018
After posting them on Twitter, the suggestion I put infinity mirrors in the cut-outs was immediately made --- thanks @KatKelsch for inspiring this crazy project!
Not content to stop there (and slightly worried at the sheer height of these heels since I basically live in combat boots), I bought a second pair of heart heels with a large heart cutout that would be slightly easier to install infinity mirrors in than the small space of the black wedges. Although the shoes themselves were probably more likely to make me roll an ankle, I couldn't pass them up because they were just so wonderfully strange.
These shoes are unwearable in the best way! Putting infinity mirrors in the big heart. Hope I don't break an ankle trying to wear them, haha. pic.twitter.com/Sh9g63TGpi
— Angela Sheehan (@the_gella) February 6, 2018
Planning Around an Existing Design
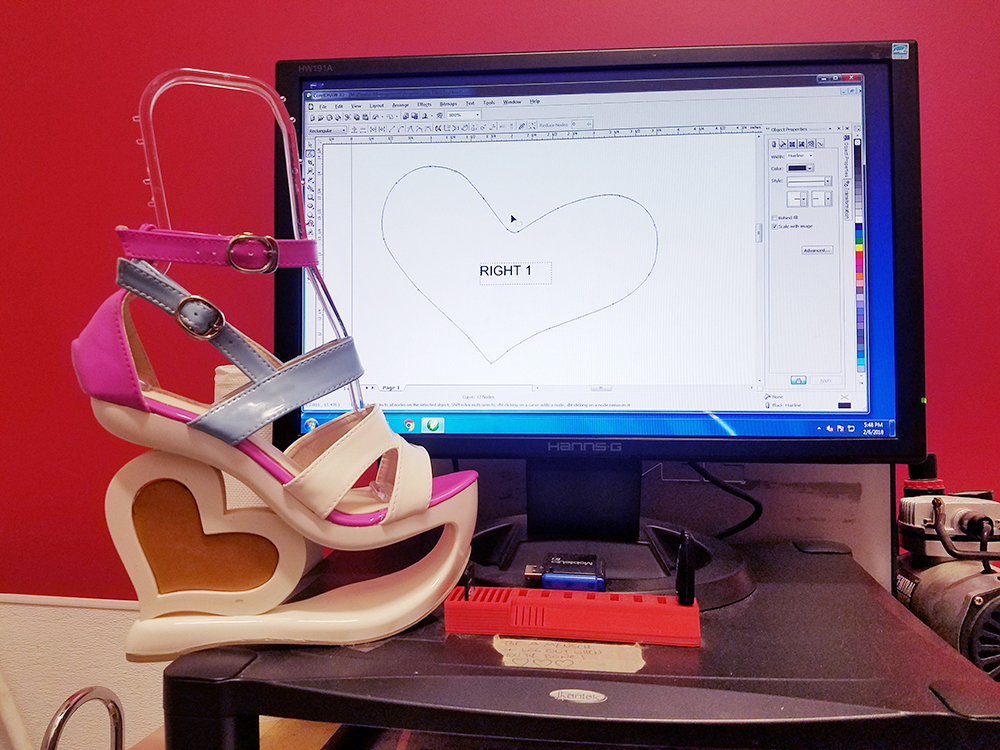
Now, let's take a look at how I built infinity mirrors in these molded wedges. The methods for both shoes were pretty similar, so I'll walk through them side by side. The bulk of the challenge with these two builds wasn't the electronics themselves but getting the installation just right to create a seamless look inside the heart cutouts of the shoes.
Infinity mirrors themselves are a relatively straightforward build --- a light source in between a semi-transparent (one-way) mirror and a standard mirror creates the infinite tunnel of light effect. I chose to build my mirrors with mirrored acrylic so I could quickly cut on our laser cutter in office, and some 5mm addressable LED strips so that I could add custom animations and color changes to the LEDs. Before I built the mirrors, I did some paper prototyping to create the cut files I would use on the laser cutter.
First I traced the heart cutouts with scrap paper and a pen, then scanned and traced in a graphics program to create a template for test cutting.
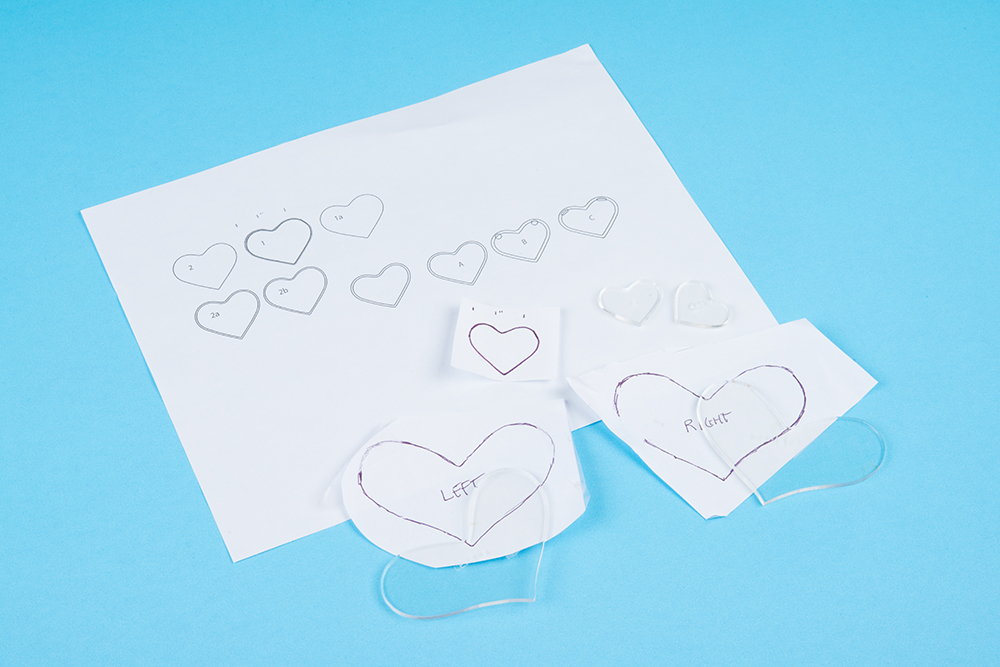
Some of my test cuts and paper prototypes for the black wedges (small hearts) and white wedges (large hearts)
Using scrap acrylic in the same thickness as my mirrored acrylic, I cut a few variations in sizes to account for inconsistencies in the mold that made each heart cutout a slightly different size. I engraved each iteration with a number to help keep track of the designs as I test fit. I ended up with a test cut that fit most of the six heart cutouts on the black wedges. The white wedges were a bit easier, since each one had one mirror, but these were two slightly different shapes as well.
Testing the fit of each iteration in the heart cutouts
The white shoes were a lot easier because I only needed one mirror for each shoe, but the heart design was slightly less forgiving since there wasn't as much of an inset. It was a fun puzzle to adjust the lines of the cuts ever so slightly on each iteration to make a near-perfect fit. Iteration number 14 ended up being the best fit --- how appropriate for a Valentine's Day project!
Adjusting the cut files at the laser-cutting station
Assembling the Infinity Mirrors
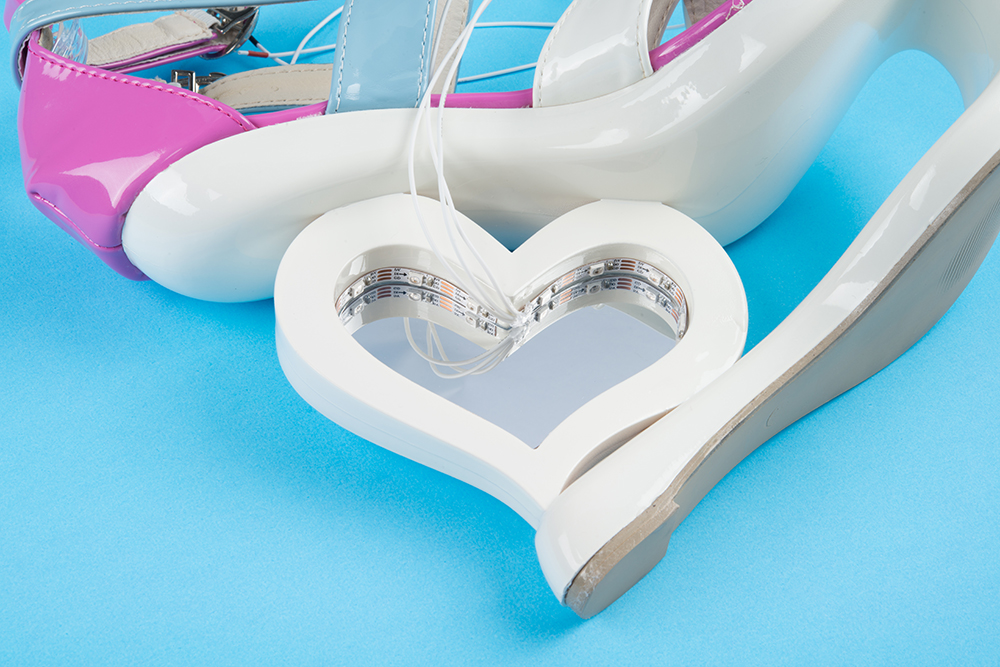
Once I had refined my designs, I cut the final mirrors out of the one-way mirror and standard mirrored acrylic. The build was relatively straightforward for the white wedges, as I had a large area to work with. First I glued the two-way mirror on the lateral side of the heart cutouts. Then I installed LED strips around the inside edge of the design and placed the mirrored acrylic in last.
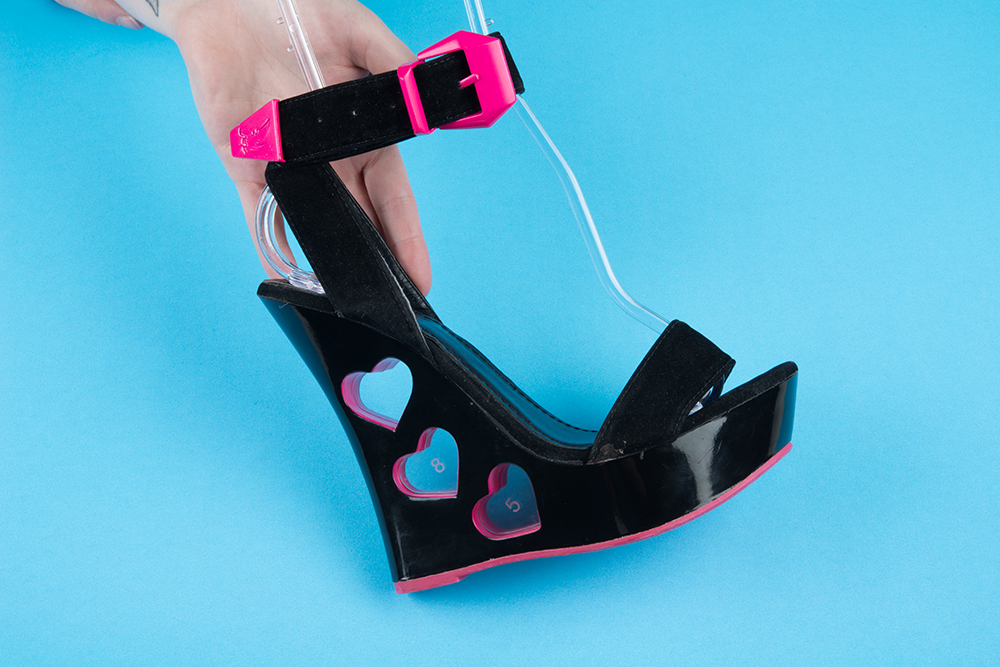
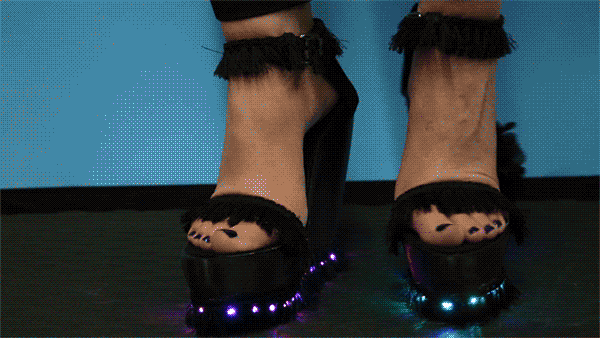
The black wedges presented a bit more of a challenge. The cutouts on these shoes were a lot smaller and the insets deeper. Instead of trying to work in such a small space, I cut acrylic frames to hold the LED strips and glued together a stack of one-way mirror --- LED strip --- mirrored acrylic to create stand-alone modules.
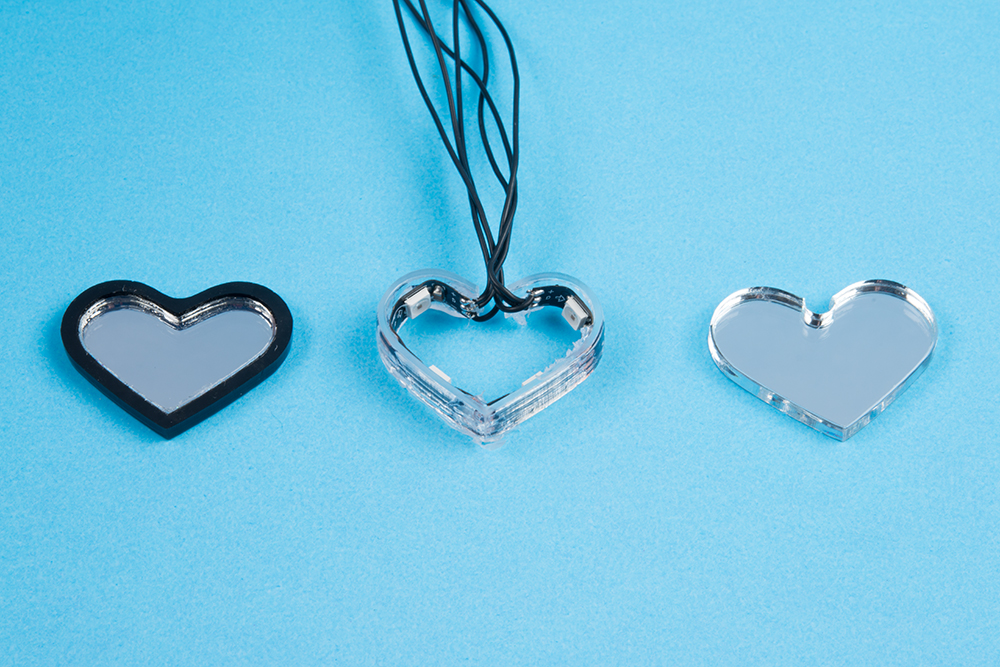
Final pieces of the infinity mirrors for the black wedges
I chained up the three infinity mirror modules with 5mm SK6812 addressable LED strips for a total of 12 individually addressable LEDs (four per heart). This allows lots of flexibility for patterns that can happen on each heart individually, or you can set the hearts aglow together. The size of the hearts could only accommodate four LEDs per heart cutout --- this was a compromise on density of the LEDs to flexibility of the strip and space. Initially I tried for five in my prototype, but ended up cutting the strip down for a better fit. I used 30AWG silicone-covered stranded core wire for additional flexibility in these small spaces. I used small pieces of heat shrink to help keep the wiring together to avoid snags and for easier installation on the shoe.

Finished mirror modules for the left wedge (top) and mirrors mid-assembly for the right shoe (bottom)
Before final install, I tested the modules and decided on the light patterns and colors I wanted to display.
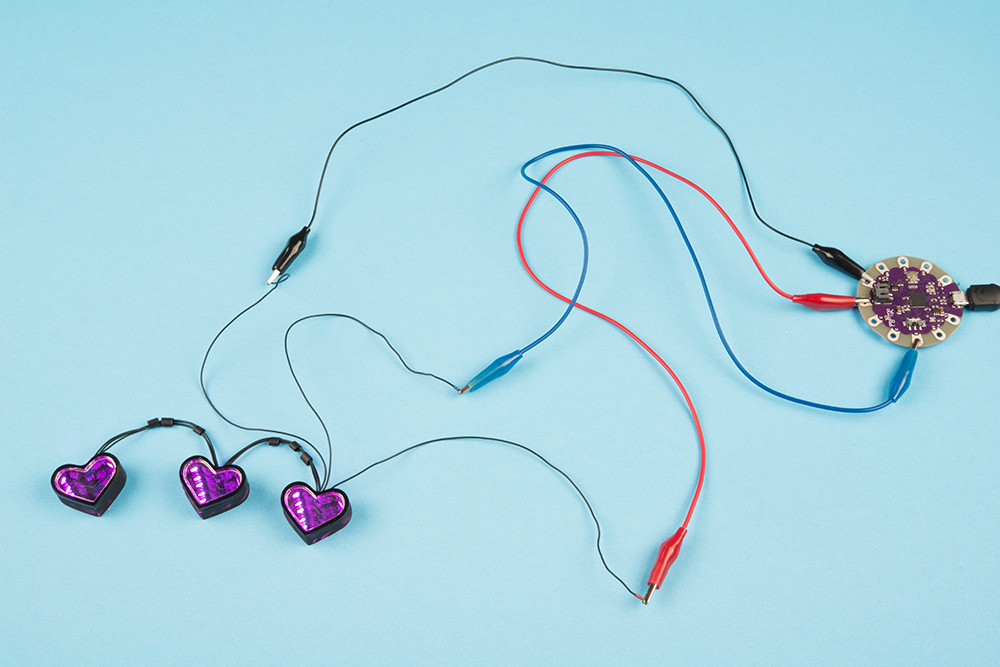
I tested with a LilyPad I had hanging around my desk since they are easy to clip to!
After the modules were placed into the heart cutouts, the wiring harnesses and modules were glued to the wedges. I added some paint to the interior of the cutouts and backs of the mirrors to help them blend into the black wedge. I'm also considering covering the wiring with an additional layer of material to protect and disguise them during wear.

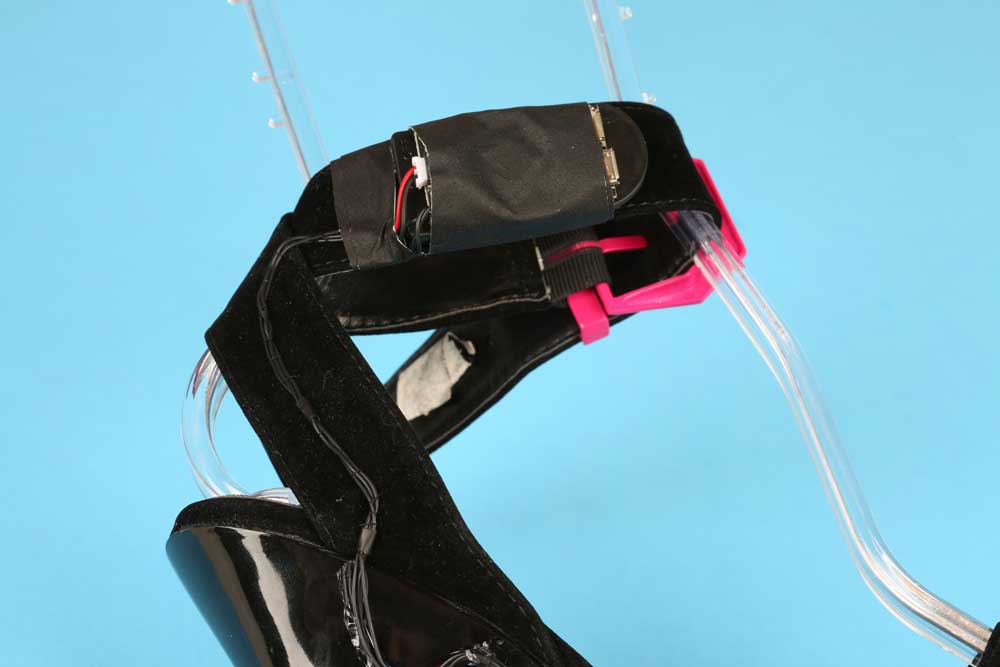
For the final install, I used some Qduino Minis as the final controllers. I've been using these boards a lot because of their built-in power switch and LiPo battery connector and charger; it cuts down on the amount of hardware I need to try to fit into small spaces.
For the black wedges I taped the Qduino to the medial ankle strap to keep them out of the way for preliminary wear testing and prototyping. Once I'm happy with the final design, I plan on covering the wiring on the strap with an additional piece of fabric to cover and protect it.
For the white wedges I had some space underneath the toe to hide some hardware. From above you can barely tell there is anything under there. These are still in the prototyping stage, so the boards and batteries are connected with Velcro to keep them removable.
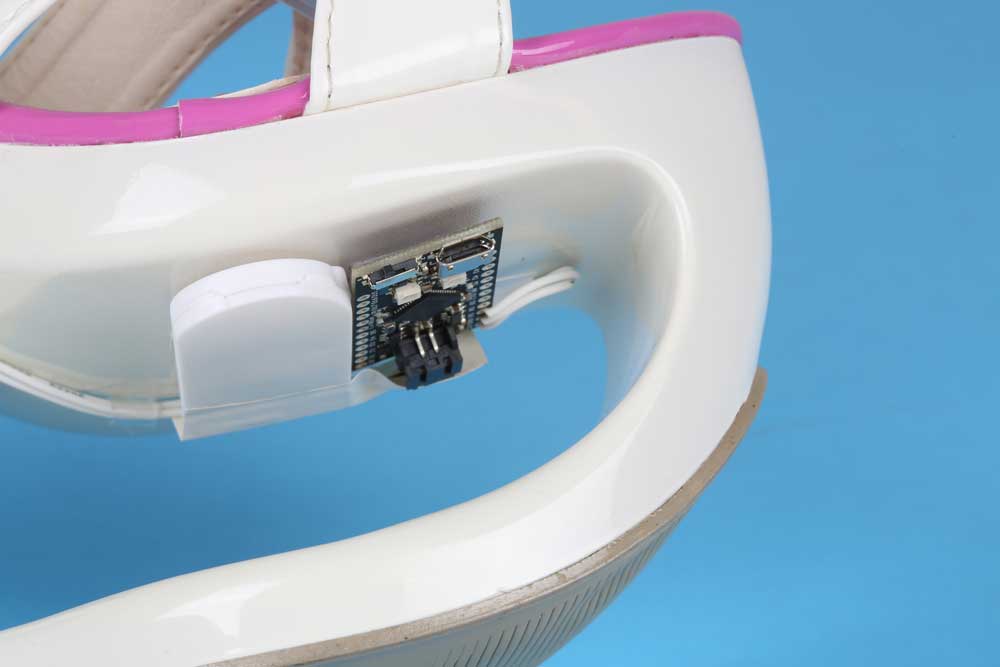
To create a quick enclosure to protect the 3.7V 350mAh LiPo batteries I used, I hollowed out some of our plastic coin cell battery holders and installed the batteries inside them with the connector threaded through the hole where the on/off switch was. Our fairy lights have white coin cell holders, which matched perfectly with my white wedges. For future wear and to accommodate larger batteries, I'll be 3D printing some custom battery enclosures.
Next Steps and Upgrades
The infinity mirrors are only the first stage of my vision for these shoes. I'm getting ready to experiment with different ways the shoes can react to the environment or wearer. While I didn't have time to prototype that part of the build before the holiday (and my night out), I left the controllers accessible for upgrades and any potential repairs if wear testing shows signs of strain on the project.
Some ideas I'm considering:
- Pressure sensing --- Using some Eeontex Pressure Sensing Fabric to react to shifting weight onto the footbed of the shoes while walking or dancing, inspired by these Firewalker Sneakers created by Becky Stern and Phillip Burgess.

Photo via Adafruit
- Audio-reactive --- Create a visualizer out of the LEDs that responds to the music at future events and parties I'll wear these to. This would be another fun challenge with the small spaces I'm working with on shoes.
- Motion sensing/reactive --- I love these 3D printed heels that Mary created inspired by Naomi Wu's 3D printed wedges that utilize LilyPad Accelerometers to sense and react to movement. Could be a fun thing to experiment with in my build as well.


Wow... How cool is that ...