
The thing that is nice about e-textiles is that it doesn't take a lot to get started. Of course, there are projects like the critical corset and the heart beat straight jacket that require many parts and tools to build, but you can also get going in the world of wearable electronics with nothing more than some conductive thread, LEDs, and a battery. This project from SparkFun customer Katie Dektar leans towards the simpler side, but is a great example of what you can do with just some basic electronics know-how, some e-textile supplies, and some skillful craftsmanship.
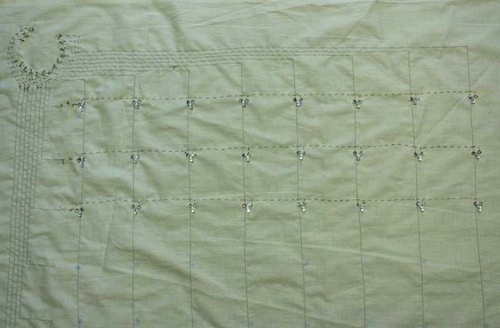
Katie started by laying out her light array on fabric using conductive thread and LEDs. She also implemented a LilyPad Arduino into the design and programmed it to make the lights flash in a dizzying pattern. She then enclosed the fabric with a homemade quilt.
The results are pretty cool! Warm, snuggly, and (best of all) filled with electronics goodness. This is a great project that is fairly simple and straightforward, but nicely designed and implemented. Read more about the project at her website. Nice work, Katie!


Next Step: one that has 15x the LEDs, like a really big LED Matrix. Then, hang on the wall and program a simple Snake (Like the ones on Nokia "Brick Phones") onto the LilyPad. Hours of fun!
Though even at 16x the LEDs it'd only be 32x32, and at 11 minutes per LED that's 5 work-weeks of sewing!
I just logged on to post that comment! You scooped me! An adaptation of the game centipede would be cool.
Dang, that's pretty cool. I really like the way she laid out the matrix of LEDs so cleanly with the stitching.
While I'm not into "E-Textiles" myself, I think it's a really cool setup that should be heavily encouraged. Think of the possibilities! New, more "E-Textile" friendly parts and techniques... "Printable" circuits that can then be ironed or sewn onto fabric. Perhaps even a "RepRap" style printer that can print flexible circuits directly onto a cloth backing.
Anything that gets people into this stuff is all good.
Not me, but some one I know has a sewing machine that you put in your thread's (holds 6 I think) and you use a computer to design words, designe, bitmap images and it does it for you, you can also upload (GIF) image files and it draws though.
Why do we kill ourselves on projects that take years & years when we could be blinking LEDs?
Hmmm... although... a small mains transformer and a 555 and mosfet, plus the conductive thread would make an excellent and incredibly effective (and possibly permanently damaging) anti-bedwetting device!
(You can tell I don't have kids :)
Although it might work better for pets. Hmmm... ;) Commercial opportunity there?
Actually that might not be a bad idea. You just have to come up with a way of protecting the bottom side of your blanket. We have one of those scat mats for our dogs to keep them off things we don't want them up on. They have a wire pressed into a plastic mat, dog or cat or human stands or sits on it and you get a good shock and want to move. It was the only way we could keep our boxers off my uncle bed when he was not in the bed. They thought it was their bed.
It ran on the same principle as the electric pews that I made for Halloween back in college.
Not for bedwetters though! (And no, that's not a problem I experience... yet...)
This reminds me of the Biliblankets that they used with my kids in the hospital when they where born. You might be able to do something cool with a Biliblanket if you could get a hold of one. The ones I remember has a lot very fine fiber optic woven into them, and connected to a very powerful blue light. I imagination you could replace the light source with something lower power and more “cosmetic”
Thousands of old ladies just soiled their depends. That is cool.
Hey Katie!
The project on your website with the 555 timer is awesome! How did you connect the chip itself to the cloth? I don't see any stitching or soldering or anything.
And the rabbit? The Velveteen Rabbit is afraid, very afraid. If you're going to connect a Frankenstein Switch to a figure, use bolts on the neck. Going through the toes like that is so... Abu Ghraib.
Front and back.
I connected it by pushing the legs through the fabric, bending them out at 90 degrees, and carefully stitching around each one. It was tedious!
What I am wondering is why she used standard LED's instead of the lillypad ones. wouldnt that have been easer.
I think the problem is you still have to stitch the conductive circles on the PCB mounted SMD LED or in the loops formed in the standard LEDs by hand.
The mechanics of forming the loops in the normal LED's leads in the easy part.
A few seconds to bend the LED leads with a pair of Needle Nose pliars. 11 minutes to connect the thing.
I got that I am just saying wouldnt it be more streamline (as in not lumpy)
and more secured
That's a good point. Also to consider is the "Light Cone" the LED puts out. With a bent up standard LED, the light is directed at 90 degrees from the viewing plane of the quilt, whereas with the SMD ones, the light shines in the 'correct' direction.
However, you have FAR more flexibility in LED type with the standard LED method.
I will agree with you on that, but this was just a single simple white led for this project, and are there tri-colored lillypad LED's
yes there are (to answer my own question) BUT there freeking expensive. http://www.sparkfun.com/products/8467 @ $8 (usd) a pop.
THAT BE $512 (usd) TO MAKE THE QUILT SHE MADE!!
Well, more like $458 if you buy 64 at once from the quantity discount. Not a huge difference though.
Better to just go the route that Katie did and just directly sew the LEDs. That'd bring the price down to $128 if the LEDs are purchased at SF, and ~$25 if they're bought on the auction-bay.
is there any type of sealed thread that you burn the out side off to connect (like headphone cables)
Very cool! How many LED's ?
8 by 8 grid so that means....64 LED's
How do you keep the stitches from shorting out at the intersections of the LED matrix?
"The vetical thread is just plain cotton thread, and the conductive trace is on the backside. By 'jumping' the row over the conductive column, I avoid short circuits."
So you're saying I should have looked at the web site. Ok. I will do that now.
Ah, Ok. The conductive thread is in the bobbin, and only goes to the bottom on the cloth. Clever!
Wow, this is... really labor intensive. While they make surface mount LEDs on tiny PCBs for this http://www.sparkfun.com/products/10044 Those don't really seem any easier to put in. You need... like... an LED with conductive cloth tabs you can pin down then machine sew at least the first connection.
You can machine sew right over a pin, right? Then pull the pin out after the LED is fixed to the cloth?
What if you also had a machine sewn 'jumper' you could pin over the intersections? Then have a tool you could 'fix' the connection with afterwards? Then you could just pin on the LEDs and Jumpers, machine sew the entire matrix, then quickly fix the intersections. The jumper could even be integrated into the LED's conductive tabs.
So many possibilities with this E-Textiles stuff!
Yeah, I thought it was bad enough trying to make LED matrices in perf-boards. Eleven minutes per LED is enough to make me seek out alternative projects.