- Home
- Product Categories
- Switch
- 5-way Tactile Switch

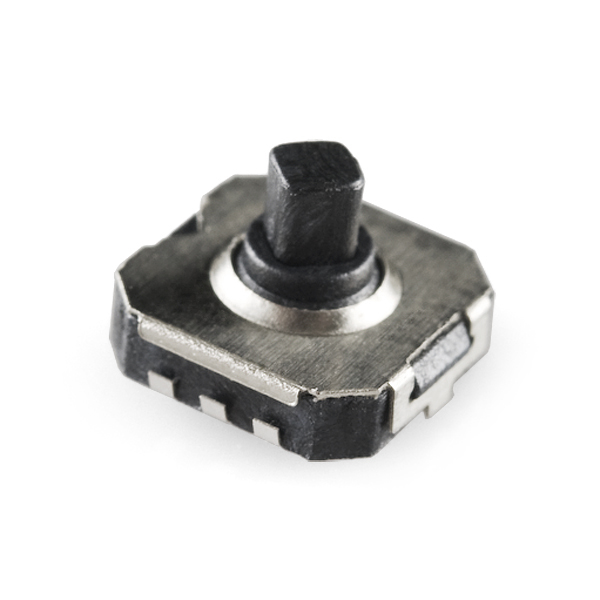
Sometimes you want a small input and a single button just won't cut it. A 5-way tactile switch allows for a joystick-like interface in a very small package. These are surface mount, but easily soldered.
5-way Tactile Switch Product Help and Resources
Resources and Going Further
This component is used on a few builds. Try looking at these products for examples:
Core Skill: Soldering
This skill defines how difficult the soldering is on a particular product. It might be a couple simple solder joints, or require special reflow tools.
Skill Level: Competent - You will encounter surface mount components and basic SMD soldering techniques are required.
See all skill levels
Core Skill: Electrical Prototyping
If it requires power, you need to know how much, what all the pins do, and how to hook it up. You may need to reference datasheets, schematics, and know the ins and outs of electronics.
Skill Level: Noob - You don't need to reference a datasheet, but you will need to know basic power requirements.
See all skill levels
Comments
Looking for answers to technical questions?
We welcome your comments and suggestions below. However, if you are looking for solutions to technical questions please see our Technical Assistance page.
Customer Reviews
No reviews yet.
Can this be soldered (directly or otherwise) to a LilyPad Protoboard? https://www.sparkfun.com/products/9102
No. Based on the information on the datasheet, the dimensions for the pads do not match the dimensions of the protoboard.
A few notes:
I didn't realize that the square portion of the post moves independently of it's round base. That square part clicks INTO it's round base when you use the center click. If you are putting a joystick on the this, don't put it over all of the squared top of the post. If you do, the center click (5th direction) will not work as the squared portion will not be able to slide into the base.
This is hand-wirable if you have small guage / flexible wire, thinner solder, a fine tip for your iron, a 3d printer to make a mount for it, and nerves of steal.
It's very easy to over click a direction (especially down) on this switch while soldering and mounting this. If you do, you'll lose the tactile click for one or more directions either immediately or after some use. If you take the time to avoid pushing down or to the side on the stick while building, the switch will stay clicky and functional for a long long time. I speak from the experience of mounting 12 of these so far.
All these warnings aside, this switch is the best in it's class in my opinion. Other brands I've tried in the past sometimes lost their click quickly but all of them had wobble on the stick. A little give is okay with other switches but, with microswitches, a little wobble means a huge amount of wobble after attaching a joystick.
Buy this switch if you want a 5-way switch that is small and reliable. Just take your time connecting and mounting it and you'll be very happy with the results.
I designed a Joystick Knob for this one! https://www.thingiverse.com/thing:3026984
This thing is TINY. And I totally missed that it needs to be oriented at a 45 degree angle. Oh well. I made some 3D printed nubbins for them: https://www.thingiverse.com/thing:2979298 . I haven't got my PCB yet, but you can actually solder these to a 0.1in perfboard.
I took a few photos of a method I use to make a joystick style for the switch. Note that the finished photo is out of order. Be sure to put the glue in the tube and hang the assembly with tube pointing down until the glue dries in order to prevent the glue from entering the switch. https://www.flickr.com/photos/156116715@N04/
A cap thingy that works well with this switch can be made from the insulation off #12 THHN wire which can be purchased from Lowe's possibly . It has a good tight fit. I strip off a piece about 7mm long and press it on the switch.
I'm I reading this correctly that it could not be moved at an ordinal direction to get, for example both the south and west pin to close?
It does connect both signals at once if you push it in a corner direction.
I spent many hours looking before and could never find rubber nubs for these kind of switches.
If nobody else knows where to get these it would be pretty cool if Sparkfun had a batch made.
You could probably make a nub thing out of polymorph. I presume you want a flattish disc with a mm or two space under it. You need a shape which prevents high side loads. If you want rubber sugru could be the shot. Oogoo might work but the stuff I've made is much softer than sugru.
BTW I've found laundry starch works fine to make oogoo. If you don't know what I'm taking about google it.
Any tips for soldering these onto the appropriate footprint? Is it best to put some solder onto the pads first? If so, just one pad or all of them?
Thanks, alec
Hey, if anyone is looking for a joystick that works for this switch I actually found a really good but bizarre fix:Tiger Pops.
Tiger Pop suckers have hollow plastic sticks that fit perfectly over the nub. I stuck the Tiger Pop stick onto it and molded some Sugru around the stick for a more aesthetic joystick appearance. So far so good. It shouldn't be much longer than an inch or the torque will make the joystick pop off.
Anyone have the Eagle files for this?
Has anyone found a cap/nub/key for this switch? If so, I'd love to know where you can get them. Thanks - k
The insulation off #12 THHN wire works really well with a good tight fit.
Just a suggestion, but I think SF should make a breakout board for these as well carry rubber nubs.
I brought one of these and found that the force needed to 'click' it was more than my purpose (tongue control) However when I dismantled the unit I found it had 2 metal contact inserts rather than one. Not sure if this was a 'feature' bu removing one get it a much softer range and perfect for my needs.
Also being a 5 way switch makes it very easy to convert to a resistive network for an analogue input
Is there a plastic "knob" available for this?
Any bigger package version of this switch available her or elsewhere?
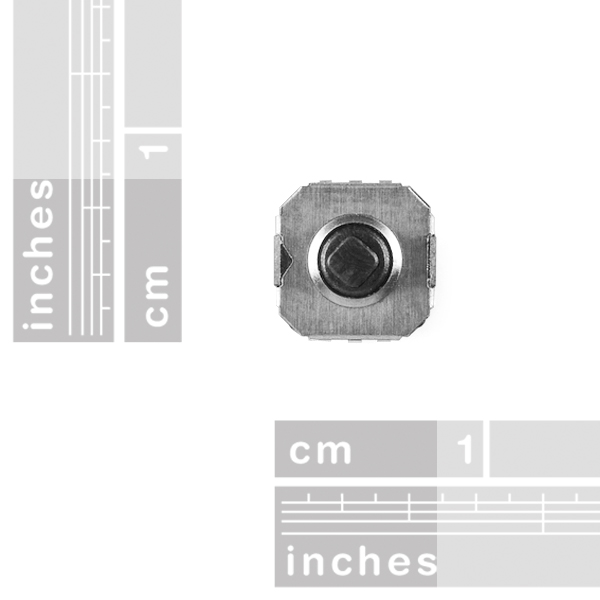
Probably not - they're all about the same size (~1cm each side). The idea is that the controls you design around it (plastic, magnesium alloy, etc.) are actually what give it the desired size. Any particular reason you'd want a bigger one?
I made an Eagle part for this. You can download it here: http://files.badlysprained.net/sneakypoo.lbr There's a couple of other parts in the library, just ignore them, didn't feel like creating a separate file just for this one part. I've verified that the footprint works as I've just finished soldering a board using it.
I have to say I'm disappointed in the quality of the switch though. The first few times I used the switch it clicked nicely but very very quickly it lost its "clickyness" and it doesn't give you any confidence that it's doing what it's supposed to. I dunno, maybe I got a bad batch.
Anyone know if the directions are locked? I.e. is it a 4- or 8-way stick?
For those interested I designed my own breakout board that works really well. The schematics and a example code for netduino can be found http://dev.bitbounce.ca/FogBugz/kiln/Repo/Netduino-Samples/Group/TactileButtonSample/Files
So I know this an Extremely simple question, but I am brand new to everything on this site. I cannot find anything on the net explaining how I use these. I am learning from an Arduino, I know how to use switches, potentiometers, rgb digital led strip C++ maniac. And I cannot figure out how to use these. Any help would be great.
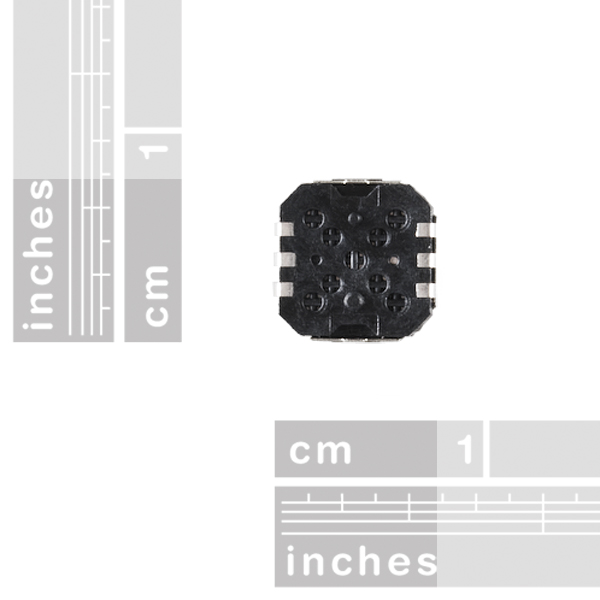
it just acts like a bunch of switches in one package. check the datasheet and look at the circuit diagram. pin 5 is your common pin, and all the others would be the other 'switches'.
each switch would connect to the arduino just like a single switch, but they share a common pin.
thank you, so how do I mount it? Again sorry for the noob questions but I gotta ask them.
that's much harder to answer. you'll need to learn SMD soldering and make your own board. check the tutorials section above, it should help you out a bit.
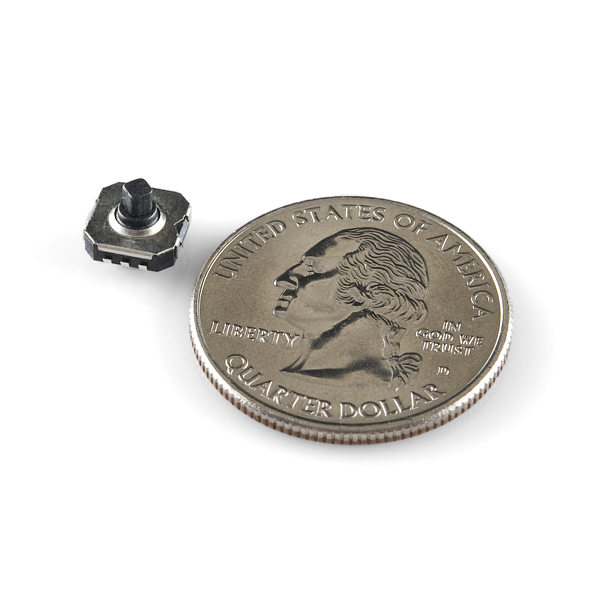
Word of warning: these are very tiny.
If you're not able to solder microscopic contacts you'll want to get a few so you can practice some hot plate soldering.
Is this in the SFE Eagle library? (I can't find it)
Damn lol. Every time I go to put through an order, these things are out of stock.
I was looking at DK at a part just like this! Now if you had a break out board for it I would love it! Needing to make a custom mouse replacement that can send key commands from a button to a pc.
Will this work with this breakout board:
https://www.sparkfun.com/commerce/product_info.php?products_id=717
?
Doesn't look like it. The pin pitch is quite different from that of SOT-23-6.
Hmm. I like the dimensions, but I notice the action is rotated 45 degrees from the case... I actually just launched Eagle to make sure it was easy to place a 45 degree footprint, which it is. Huh, never had to do THAT before, but it's easy.
Humm.. I tried to layout a part in Eagle after downloading the datasheet but after print-checkig it, turns out to large... I went back to check some of the dim's (like the spacing between the mount holes), and all seems ok. Not sure what I seem to be missing... I was wondering if anyone allready has the part made for Eagle..? It would save some time...
Thanks in advance..!!
Nice! This is exactly what I needed for my current project! :)