- Home
- Product Categories
- Headers
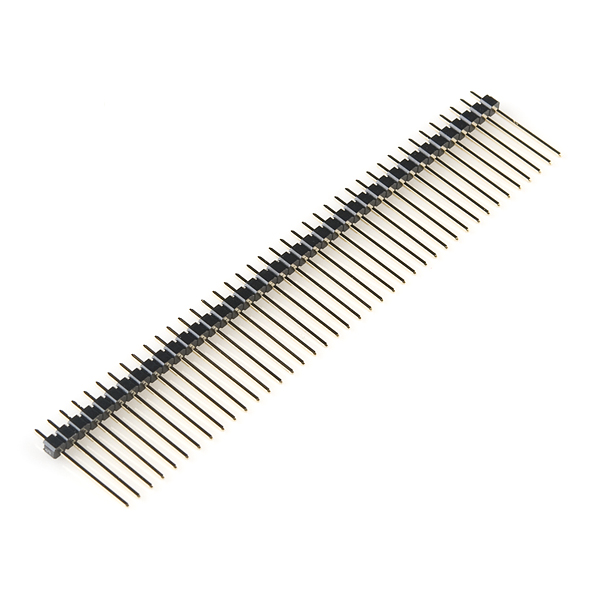
- Break Away Headers - Long

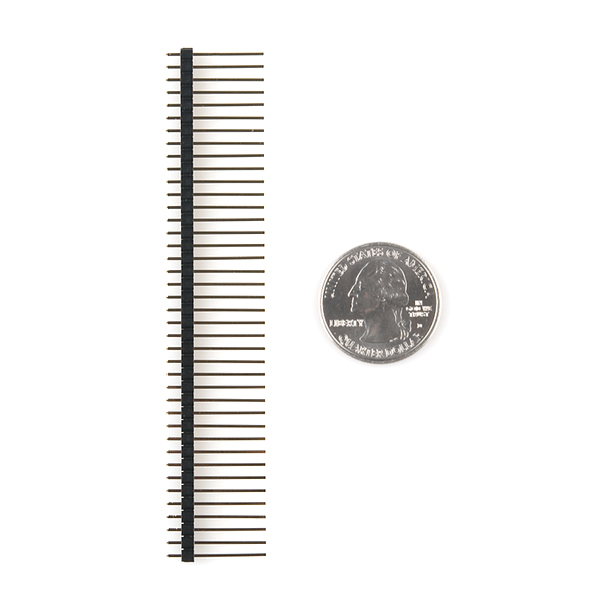
These are a longer version of our standard break away headers. They are 20mm long which allows you use them socket to socket. The plastic separator can be slid up or down to accommodate your needs.
You will get a row of 40 pins. They can be broken or snipped to length.
- Pin Style: Square Pins
- Number of Pins: 40
- Pin Spacing: 0.1" (2.54 mm)
- Pin Length: 20 mm
Break Away Headers - Long Product Help and Resources
MiniGen Hookup Guide
May 22, 2014
Using the MiniGen, SparkFun's Arduino Pro Mini signal generator shield
Core Skill: Soldering
This skill defines how difficult the soldering is on a particular product. It might be a couple simple solder joints, or require special reflow tools.
Skill Level: Noob - Some basic soldering is required, but it is limited to a just a few pins, basic through-hole soldering, and couple (if any) polarized components. A basic soldering iron is all you should need.
See all skill levels
Comments
Looking for answers to technical questions?
We welcome your comments and suggestions below. However, if you are looking for solutions to technical questions please see our Technical Assistance page.
Customer Reviews
5 out of 5
Based on 3 ratings:
1 of 1 found this helpful:
A little more header room.
Always have a wide selection of pins available. Never know when you'll need a little more header separation.
Breadboard Friendly
I use these headers in breadboards: break off the number you need, center the pins on the plastic, push the header into the breadboard, and you're ready to plug in your connectors.
Love it
I needed this to plug in two connectors without cutting them off. The only thing I was worried about is I wouldn't be able to slide the plastic on the pins half way. Well, it was easy with some needle nose pliers.
I use these as wire-wrap terminals. Wire-wrap IC sockets are expensive and hard to find these days.
Ahhhhh! Need headers! Hurry up and restock please!
long Male DIP headers?? I want to form an icsp header to straddle the center of a solderless breadboard. I have one using this part, but it requires a bit of vero board
Could these be used to repair an arduino ethernet shield that got its pins cut too close?
If you need to slide the plastic down be careful or you could end up sticking one or more of the pins into your finger. After doing that I put the piece I was working on short side down in the vice with the jaws just tight enough to hold it up straight. Then I took a piece of shim wood and placed it over the long pins using a small(!) hammer to tap on the wood. Works fine.
I've found these long pins work very well for creating male-to-male gender changers; just slide the separator right to the middle.
Great for connecting female jumper wires to a breadboard.
Please? Some more?
MOAR!!
When will these be in stock?
What about headers that are "long" on both sides of center? So that they can be stuck into an ordinary breadboard and still connect to servos for example.
Mine tend to be too short to be stuck into a breadboard.
That's what they can do, just move the plastic bit.
Or ...
http://www.pololu.com/catalog/product/1065
That is exactly what I am going to buy. Get the plastic bit in the middle and save almost 2 bucks!
Still not the same thing though. Pololu's are 14.5mm total length, Sparkfun's are 20mm. You can't push Pololu's through a one-sided copper perfboard and have it connect to a breadboard and have header connection on top of the board, even if you do adjust the plastic.
i see a use for these as nice breadboard/pcb electrodes for the MPR121 touch sensor. should be a lot cleaner then having wires sticking out of the breadboard...
Great for linking standard servo connectors to your breadboard!
Exactly.