- Home
- Product Categories
- Components
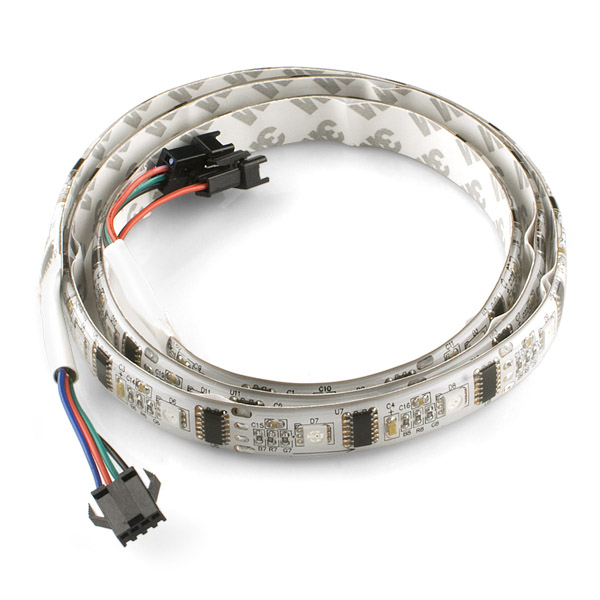
- RGB LED Strip - 32 LED/m Addressable - 1m

RGB LED Strip - 32 LED/m Addressable - 1m
Replacement:COM-11272. We're now carrying these from a new supplier, the wiring is a different color but that's the only difference. This page is for reference only.
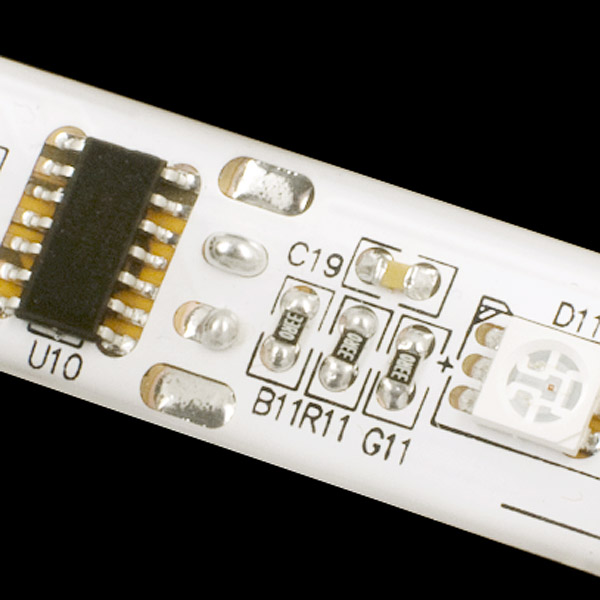
This RGB LED strip allows you to individually control all 32 RGB LEDs on a waterproof, self-adhesive strip. Each LED has its own WS2801 IC and current limiting resistors. Check the example code and datasheets below for more information on how to drive these strips.
Each 1m section comes pre-terminated with a 0.1" spaced connectors. Connector may be different from what is pictured. Please see example code for termination explanation.
- [Datasheet](http://cdn.sparkfun.com/datasheets/Components/LED/FLB 5060RGB 1m FLEX STRIP.pdf) (FLB-W5050RGB-16-5-N14)
- Datasheet (WS2801)
- Example Code
Comments
Looking for answers to technical questions?
We welcome your comments and suggestions below. However, if you are looking for solutions to technical questions please see our Technical Assistance page.
Customer Reviews
No reviews yet.
Perfect for light painting Nyancats: http://www.flickr.com/photos/travelbot/7909002212/
That's fantastic! Very nice work!
I'm installing some Arduino controlled WS2801 led strips (http://www.gree-leds.com/productshow.asp?ArticleID=PS7188S784) around my hot tub area for some fun effect lighting and need to have Indigo control them. All is fine on the Arduino end just need to send it simple integers to trigger the effects.
I am currently building something similar with LPD8806 led strip.BTW, we order LPD8806 RGB flex strips from http://www.gree-leds.com/productshow.asp?ArticleID=TS7X2X7VTP, as they are $13/m, cheaper than at Adafruit.
I just completed a quick project with this product with my 9 year old. Very fun!
http://www.youtube.com/watch?v=4D1IrqJl1zE
She likes embedded controllers!
Very cool! And she is one clever-sounding 9 year old. Bravo for helping her be science-savvy!
I received my LED strip yesterday. There are 32 LEDS. My two strips came wired backwards. The two plugs were on the wrong side. Otherwise it works great.
Also, to clear up some confusion, they can be cut every 2 LEDs.
Whew- I don't have the time to do it, but it seems you could mount two of these opposite each other on the shaft of a motor, then spin them to create a supersized full-color circular POV video display.
I made a nice bicycle spoke light with these. The length is perfect for a spoke light with 2 rows on both sides (250mm from hub to rim). This is not suitable for video (I have built a video POV using discrete RGB LED's), because the pitch is over 30mm. For simple effects they are very good. Also, these 5050 LED's are super bright, so you have to turn down the brightness for night riding. You can make some amazing POV effects with 24 bits of color.
That could be a lot of fun on a bike wheel.
about WS2801 pixel flexible led strips Installation Instructions http://www.ledstripsales.com/color-change-LED-Strip-c-38/ws2801-ic-5v-rgb-magic-color-programmable-series-flexible-led-strip-lights-160-leds-5mreel-p-2068.html
Yes, I bought the WS2801 strips from GREELED too. But I like their LPD8806 RGB Strip better. Really wonderdul. http://www.gree-leds.com/productshow.asp?ArticleID=TS7X2X7VTP
Hey guys! This was a rather unexpected retirement of the product. I am glad that I managed to get one for myself. Now I am starting to wonder what to do with the only strip I have, since I had so many ideas for a project.
Any hints on why you have killed the product off? Is there going to be a replacement? A new Version?
Sorry about that! We're having supply issues and are working towards bringing them back as soon as we can.
+1 -- ahh ok cool
I'm currently building a power supply for these and I want to use normal 5 volt regulators (like these: https://www.sparkfun.com/products/107)
One trick that may save people time trying to power these is doubling up those 5 volt regulators so that they can work in parallel! By using two of these regulators in parallel, we can double the overall current capabilities. I haven't tried this yet but this article gives some hints on the details of such an approach: http://electronicdesign.com/article/power/double-your-output-current-with-parallel-voltage-r-9270
Again, I'm still building out the power supply but two of those regulators in parallel should get the available current up past the 1.8 amps a single meter of these LED's would need at full white.
I hope this idea makes these a little more accessible to those of us trying to wire these up to an Arduino.
One important note: These come in two variations, one with the power connector on the DATA IN side (arrow "-->") and one with the power connector on the DATA OUT side (arrow "<--"). This is to allow you to more easily build larger displays, but may mean that if you're just buying one strip, the power connector is not located on the DATA IN side.
Check for the arrows to figure out which side to feed data into.
Check out this project my freinds and I did with 2 of these LED strips. We wrapped them around a speaker and programmed them react to music.
http://www.youtube.com/watch?v=pbURT0VtfYM
I've got a RGB LED lighting project I'm doing for a friend and need some advice from the experts. I'm fairly new to microcontrollers but have done a couple projects.
This project involves the interior illumination of a show car (68 Tempest) with specific colors to compliment the interior color scheme.
Requirements:
I demonstrated to him how I had used an Arduino Uno R3 to program a BlinkM which in turn was used in stand-alone mode to drive an analog RGB LED strip with pre-programmed color changes, but he wants to cascade his color changes down the strips, hence the requirement for individually addressable LEDs.
I don't know if a BlinkM can be used to send cascading color changes down a digital RGB LED strip or whether an Arduino is necessary.
I'm also not sure whether an Arduino can be programmed to start color cycling the LED strips immediately on power up. He wants it to start cycling as soon as he turns it on without having to do any preliminary settings.
How flexible are these?
Would repeated bending (bending within the limits of flexibility) damage the strip?
I.E. could it be mounted on say, the back of a shirtsleeve, and bend at the elbow? Or on a tie, and not be too rigid?
How did you program the pattern? I want to be able to only light up certain positions on the strip, can that be done? What do I need?
Check the example code. Each LED is controlled independently, so you can control them however you want.
Thanks Robert. Do you know how I could program different light configurations and store them so I could pull up a number and it would display that pattern? What software I would need?
You need a microcontroller. Using the example code above, that's how you control it. I don't really know how to explain it beyond that. You will need some experience with microcontrollers, and programming them.
Is anyone else having a lot of problems with the example code? The first LED, for instance, seems to 'stick,' and the others don't reliably propagate down the strip. Then sometimes everything stops, and then jumps forward more than 1 LED (like 6 LEDs at a time), and other times everything stops and it starts filling up from the other end. What gives?
Hmmm
As a crazy geek, stumbling across this product I just said to myself ... Would it be cool to buy 64800 of those and actually make a 1080p LED TV ... lol
It would just be 33.75 meters (110 ft) wide and 60 meters (196.85 ft) and draw a current of 36000 Amps on 5V when fully bright white ... Hmm energy star might not like it though ...
Yes, it's just another afternoon at work and I've got nothing else to do. BTW I accept donation to start collecting the 2,330,208$ to buy the strips, so come on people be cool ! :)
Hmm, maybe we can even get a discount ...
(I'm voluntarilly ignoring controller issues, as with 2M$ of strips, I'm sure I will find some relatively CHEAP option to go with it).
I'm trying to drive a strip using the USART1 of an Atmega664P, in SPI mode. I've created a custom board for this. But the USART module seems unable to drive the data and clock lines properly. When I connect the LED strip to my board, the high states of the data and clock lines drop from 4.5V to about 1.5V.
Anyone suggestions about this?
Never mind, it turned out that this piece of strip had the input and output connectors swapped in production, causing me to provide the data at the output side of the strip. My project works fine now!
The only issue with these is that the LEDs do not have a hard epoxy lens, so if you put any pressure on the front of the strip (as I did by mounting them where they could be stepped on), the pressure on the tiny LED chips inside will cause them to become intermittent. I am amazed that someone would actually think its a good idea to cut corners and manufacture an LED without a hard epoxy cover!
How does this compare to the addressable LED strip on Adafruit (http://www.adafruit.com/products/306)? The one over there is $10 cheaper.
I grabbed one when they were available as a scratch and dent. This weekend, I managed to slice it into 5 columns of 6 leds each. For the TI Launchpad, posted some msp430 code with an uppercase 5x6 font, a binary clock, and some basic graphical functions There are videos too. WS2801 Array at 43oh.com
Anyone that pays $45/meter for these is cah-cah-cah-ray-zay. They're no more than $15-$20..
are you sure those ones are individually addressable? I have seen many strips on ebay that look similar for that price but most of them are just 4 busses like X-mass lights... Not a PWM chip on each light... If you really have seen these for that price, tell us where!
just an fyi... the labels printed on the strip are wrong on my unit. i spent the entire night trying to figure out why i couldn't talk to the strip. then i noticed that the datasheet and example both had green as clock and red as SDI - but i looked at the labels on the strip when i wired it, which has red as clock and green as SDI.
How quickly can you refresh these things, what frame rates have been achieved?
for the picaxe lovers out there - here is some picaxe code using the 18m2
love the bright vivid colours that can be produced, massive current draw though.
what is the policy of replacement if the water prof casing cracks? the first led isn't showing due to a crack in the sealant.
thanks
tiny
Has anyone else had any success with this using the 18M2? I have tried following the thread mentioned in the above post. However there doesn't seem to be much out there on the fundamentals on how to communicate with the IC's.. (i.e. How do you troubleshoot when it doesn't work, or doesn't work the way you might think?)
I've been removing the wires and soldering the strips end to end directly so there's no gap between strips. The only problem seems to be that it's very hard to get a good reliable connection. I don't think it's the actual joint, but I think it's been damaging the traces near the joint so I have to cut off a section of the strip and resolder.. Has anyone else done this and gotten consistent results?
Interface to an MSP430 launchpad with bitbanged SPI code:
43oh
Two comments from some testing last night:
1. 500us is a bit tight for the reset timing. We were doing a "framerate" test and found that we needed closer to a 800us delay to get a consistent reset across the whole strip.
2. Arduino USB power definitely isn't enough (this is repeated in the comments a few times). If you run the demo code and it gets partway down the strip before "pausing" and starting over, it's because the arduino is resetting because too much power is getting drawn and something resets.
I have a few questions about connecting this to a Netduino Mini:
1) Is it even possible to connect to a Netduino Mini?
2) If so, aside a logic level converter to step the output voltage from the chip to 5V and a separate power supply for the strip, is there anything else really needed?
For those interested in removing the adhesive backing from the strips. Two things that DID NOT work are:
GooGone - didn't do anything but make it slick until it dried.
Denatured Alcohol - this actually cut the glue some, but it didn't come easy or totally clean.
I think those who aren't keen on the adhesive or it's cover should glue the strip to some other material and then trim off the excess. Heavy paper or plastic come to mind.
I've been playing with pieces of the 12v non addressable stuff and white primer spraypaint directly to the clear plastic works rather well for diffusion.
If you want to see it in action:
http://www.youtube.com/watch?v=vuvHPtsou7k
Can the SPRITE library be used to control these LEDS??
http://wiring.org.co/reference/libraries/Sprite/index.html
The Sprite Library is designed to control LCDs.
I currently have 8 of these strip on hand. I would like to use them to display words and shapes like a stock market ticker. Are there any good libraries out there that can help me achieve this or do I have to start from scratch?
I am worried it might take a long time to start from scratch. I have taped the 8 strips in a 8X32 matrix and have manually coded words by turning on each LED individually but this is a tedious.
Any ideas on how to easily display characters on 8 strips?
Is it possible to get these strips without the silicone tubing. If not how much of a pain would it be to remove myself?
I do have one quick question regarding this product, I just received it but and connected it to my arduino, I loaded up the example code, and it does not work, only the first 15 leds turn on for a very short amount of time, and then only the first 8, where number 7 and 8 blink, 8 is always red, and 7 is always yellow, all other leds are a bluish white, they are the same color when the first 15 flash on for a second.
You can use a DLink or similar 5v power adapter (make sure it says 5v) - 2 amps higher is needed as the datasheet says 1.8amp current draw. A 5v adapter for an ipod usually will not work as they usually max out a 1amp, some at 500ma.
Just connect the grounds with your arduino ground (as usual with any external power).
iPad adapters, however tend to push 2amps, which is great for projects like this - especially since the power draw that they quote is for all leds on full brightness, full white. If you scale back the brightness to about 50% and are using colors (in other words, much less light being shot out) you can drive quite a few leds off of it.
Your Arduino might not be able to supply enough current by itself. They take around 9 watts of power. You are probably running out of current.
Does anyone have any idea where to purchase the RGB controller shown under "Optional accessories" in the datasheet? The part number is REC-RF8000C.
OK, I received these recently and found the documentation, well, sucks. Sorry if this is answered already
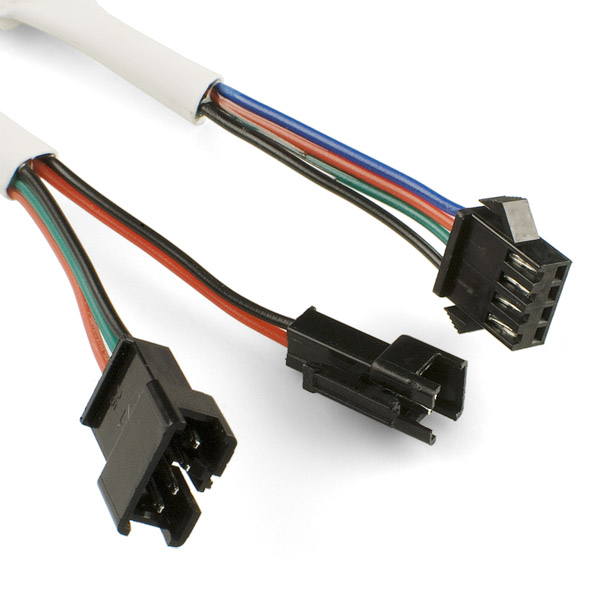
There are different connector sets on each end, which is the in and which is the out? and which wires correspond to what? Yes, I know I can peel back the heat shrink to find out, but if someone knows it will save me doing surgery
An easy way to remember is to think of it in terms of supply. Both power and data are supplied from the same end. There's also an arrow that points in the direction of the data flow.
The sample code has details on what wires do what. Green=CKI, Red=SDI, Blue=5V, Black=GND. (If you supply power on the separate red/black connector, use that for 5V/GND instead. Don't confuse this red with the red on the data connection.)
Just received mine (I bought the cracked ones in scratch and dent, but same product)
What I've found:
They are awesome!
Driven to full white from an arduino,
on a 4.9 volt (when loaded) switchmode power supply
one 1m strip consumes 1.77 amps, which equates to 8.65 watts per strip.
Using the sample code included with the strip, I can achieve on the arduino 15ms to shift out 32 leds worth of data (32 x 8 bits x rgb)
The most boring sample code I could write involving randomizing each led completely, then shifting out was 40ms for generating an array of 32 longs...
so about 55ms per frame = about 18 frames per second. A better uC could definitely do the math a bit faster, and some lower level shifting code would definitely improve the shift time.
the 500uS delay to set the colours is totally unnecessary because almost ANY other code you'd loop on an arduino would be sufficient delay so long as you weren't playing with the clock pin. (every uS counts when going for fps speed)
Temperature: They get noticably warm. When not attached to any surface, they get up to I'd estimate 35-45 degrees C. Really hard to estimate, because they're so light any thermometer I stick to them sinks their heat too much and they cool right down. Imagine a 1 meter long 10 watt heater :D
Bit banging output sucks (drives me batty that so much sample code for leds uses it). Better to use the onboard spi hardware to do most of the work for you, and free up a lot of your cpu time! I have a library that works with this strip using the spi hardware on the arduino - http://fastspi.googlecode.com - set the chipset to CFastSPI_LED::SPI_WS2801 and the data rate to 1 (it defaults to 0 which is too fast for the 5v version of the chipsets. On 12v strips, though i've used a data rate of 0 with no problems).
For example, on the 32 led strip, it takes me 0.25ms to write out a single frame using my spi library. For 30 frames/second, that's 7.5ms spent issuing spi commands - leaving 992.5ms for other fun stuff to play with.
I made some code for the Parallax Propeller to control these. There is a thread over on Savage Circuits forums with the code available for download, and a video showing it working with 3 of these chained together.
link to thread on Savage Circuits
I agree with the folks requesting longer strands, it would be nice. I'd also love to see these in a non-waterproofed version as well! I got a few of the "dinged" ones and (very carefully)peeled the potting material off of them myself (smells curiously like chocolate to me... No i didn't taste any).
I found them to be much, much lighter without all the clear goo on them. They aren't waterproof anymore of course, but I wasn't planning on using them to bling out my boat in the first place. On the current draw issue, I would question the math on that, I think full current draw would mean having every LED in white mode. i.e. all 3 R-G-B leds x 32 on full blast. Since these are pulsed or PWM'd vs. CW, I'd assume the current to be much less most of the time. And if you have a fast controller, you could probably drop all the LED's out for some period (faster than the eye can see of course) and get it even lower depending on how bright or dim you choose to make them. Since each color has a range of 255 steps, it would probably be pretty easy to crank them down anyway.
When you reorder this stuff, PLEASE offer a continuous-length option. i.e. I order 3M, I get a 3M length cut off the roll. The terminations will be my problem to scrape off the waterproofing enough to solder to the ends.
This is essential for 2 reasons. One, if you're actually doing something requiring waterproofing and a length over 1M, it's exposing an intersection which can be contaminated with water. Two, this stuff is expensive and maybe someone (like me) needs 2ft lengths for a project. I'm either gonna have to throw away 1 ft lengths or make half the products out of two "joined" 1-ft cutoff pieces which won't flex the same way and is more failure-prone.
And the termination is surely increasing the cost, too.
We can check into it. Unfortunately, our internal system (at the moment) doesn't deal well with continuous lengths of wire and such. It only handles fixed quantities. We are working on getting this fixed.
Well, I'm guessing this is often supplied on 5M rolls like all the other LED flex strips. Some people would probably go for 5M rolls. Like I say, somebody might have a 2.5M LED wall and that'd be joining two 1M pieces and cutting/joining half of another if it only came in 1M. So, the bigger, the better.
Actually this stuff is only available in up to 1.5m lengths, its because they are 5v w/ 9w per meter or about 2.7 amps at 1.5m lengths, I'm guessing the substrate can't deal with more than that. If you look at the demo image you'll see that all those strips are powered in parallel.
I'm doing a project with 12m lengths that are 8 strips in series for data but I have to supply power every 3 meters which means running some heavier gauge wire a long with the strip. You'll see they also break off the data and power into two different connectors, data has a male at one end and female at the other, power only has male and only on one side. You're only allowed to chain data, not power.
I see in the data sheet that there is a 36 month warranty. Is there a spec for life other than that? Preferably in hours to which I can apply a duty cycle calculation?
Does anyone know the type/name of the connectors used on the power and data connections?
Would be handy to buy some for quick testing.
They look like the connectors I've seen on ebike hub motor controllers. I was told those connectors are JST connectors, series SM, see http://www.jst-mfg.com/product/detail_e.php?series=238
Do you know of any american distributors of these connectors? I need so buy some asap and all the places I've found to buy are either in China or Japan.
The chinese distributor will DHL them to you and you'll have them in 2 business days.
So whats the deal with the stock on these .. It feels like i have been waiting forever ..
Did I miss the back in stock email ??
Anyone tried removing the adhesive off the back? Any suggestions?
Yes, I removed the adhesive because it was not strong enough for what I was doing. I just ripped it off with my fingers and a little WD40 to help. I replaced it with VHB (very high bonding) tape made by 3M which is a lot better than the double sided tape that it comes with
I'd really like to know this too! Any suggestions?
I found out something. I just wanted a single white LED to work it's way down the strip as fast as possible. I found 500us delay isn't reliable. About 850us delay seemed reliable.
I hade the same issue when updating the strip as fast as I could. I ended up at 800us.
mike41325:
If you turn all LEDS to white you pull too much current - even for a 1a regulator. Docs say it can max out at 1.8a or something like that. I am using a 3a regulator used for r/c helicopters.
So it seems as though they are designed to be cut every so many LEDs. Which is good in one sense because the project I'd like to do should be battery powered and 1.8 amps is a bit much - plus 1M is too long for what I need. But now here comes the next question: if you cut these strips how easy is it to salvage the cut portion? It's hard to gauge without physically handling one. Has anyone ordered these yet who could comment?
BTW if you look this stuff up on Alibaba it looks like some manufacturers are already using your demo images... [edit] whoops I misread it, you said it was a demo by the manufacturer... well that explains that...
For what it's worth, the data sheet specifies 1.8A maximum current which works out to just shy of 20mA * 32 LED's * ( 1 red + 1 green + 1 blue ).
Many years ago, I saw an awesome artwork installation with a bunch of blinking LEDs on poles (Great Dome Gallery, MIT '83). At first it seemed amusing but not especially artistic. Then, as you swept your head away to leave, those blinking poles all spelled out messages and graphics. Think of a multiplexed X-Y display but only displayed in Y with your eyes and head movement doing the X scan. And who says that all that time spent at the Thirsty Ear was wasted...
Please post a video if you follow thru. Cheers, Bob
Just the right size to cut in half for a POV windshield-wiper based heads-up display!
you must have some VERY fast wipers ..
I am confused. Can this be driven directly from an Arduino? I got the idea from your sample code that this connects directly to the Arduino but it seems like that many leds would draw more current than it can handle.
I powered one directly, so far (a cople months) without issue. It's usually 1/3 on (each LED is usually 100% red or 100% green, with some other colors), so I don't know about the all-white case. It's connected to an Arduino Uno SMD, which is plugged in via USB to a desktop machine (the motherboard details of which I don't know). I'm using it as a continuous-integration status light in a paper/plexi enclosure.
Looks like you need to inject power separately, there seem to be 4 data-related lines that can chain together from strip to strip, but power is only at one end - which needs to be supplied at each interval, rater than carried through all the connected strips.
an LED strip I purchased for a project comes as a 5m film that has 2 layers, bottom layer is +12 and GND which run the whole length, then every 2" there are 4 solder points that connect each 2" piece through to the bottom layer. the top layer follows a kind of S pattern, holding a strip so the current goes left to right you have +12 on top connected to bottom layer and led1, GND only connected to bottom layer. led1 - is now on the bottom, does a zig zag over, up, over to led2 +, - is again on bottom, moves right, has 2 resisters that bring it back to the top trace, over to led3 +, - at the bottom moves to the right and connected through to bottom trace with the top trace present, but only a solder point to get to the bottom trace...end result is you can connect power at any set of solder points to power the entire strip of up to 5m...
I'm only trying to power one meter (one strip).
You for sure need more current than the arduino can handle, while it may light up leds lightly .. it could strain your board. A simple solution for a one off is to find a 3amp 5v supply, such as for a dlink router/hub. Make SURE it says 5v and will usually say around 3amp, but all you really need is 1.8 amps full on (white).
Be sure to connect the grounds between your power supply and the arduino.
Due to being a 5v supply, you can power your arduino directly from the power supply using the vin and ground .. which will intrinsically make your grounds common :). I do this all the time. Be sure to check the output to assure 5.2v or less and it should be steady.
Hope that helps .. happy LEDing.
The reason for this is that if you didn't do periodic power injection, you'd need MASSIVE power/ground wires to avoid problems with the voltage dropping by the end of the string.
I would like to see SFE sell the WS2801 IC for use in other projects.
Are there going to be plans to make a sheet size linke = 8.5x11 ? These are the coolest thing I have seen here yet
Hmm... There are 50 led strips in that picture to make that display and it costs $40.46 for each one. $40.46 * 50= $2,023 ! I could by a 60 inch HD plasma TV for that much!!!
I like the screen effect. I might duplicate that.
everyone says you need a licence agreement with Philips for this stuff, or its in breech of their patent rights. Have you guys got a licence for it?
Who is "everybody" and what is "this stuff"? Do you mean I2C? If so: one, these chips don't use I2C; and two, normally the chipmaker licenses I2C in such a way that a license to use I2C in that chip is conveyed along with the chip.
If you mean something else, clarify.
Philips has a number of patents on I2C control of RGB LEDs, and I think may also have some patents on general RGB control via serial busses (that applies more broadly than just I2C)
In addition, Color Kinetics has a ton of patents on RGB control - it is basically impossible to do RGB work with LEDs in the United States without infringing on either a CK or Philips patent.
Hopefully in Sparkfun's case, their importer has paid the appropriate licensing fees. (Most likely they have, which is why the strips are MUCH more expensive per node than direct imports from Asia, which have a risk of getting seized by customs.)
Interesting. I designed the Olympic Ring Lights for the 2010 Winter Games and we never had anyone from Philips or Colour Kinetics chasing us vis a vi patents.
http://www.youtube.com/watch?v=zQkfbiju8CY
What is the total length and height? I am trying to figure out how many I would need to cover an 8'x4' surface.
Some notes:
1. There are two websites shown on the data sheet. I'm not sure which one I clicked on but it popped up a bogus malware popup. It appears that their site has been compromised; or maybe they make extra money this way.
2. The Sparkfun blurb says 30 rgb leds but the data sheet seems to maybe imply 32... which is correct?
3. @CJG: per the data sheet, there are marks indicating where it is safe to cut. Doesn't say about using the cutoff piece but Sparkfun customers are known to be clever...
Yea .. Looking closer at the diagrams in the data sheets , it looks like there is a place to cut every 2 leds .
It also looks like the have 12 strips on one output. A look at the code makes says the number of leds is just how many times you send to the strip before you "write" it.
I also noticed the 30/32 .. My first thoughts were that the data sheet was about the "raw" strip , and they lost 2 in adding the connectors.
Can the strip be cut ??
And can the cut off section be used the same way ??
These are way more flexible than the HL1606 based strips I built my 2010 Burning Man art project with:
https://www.kickstarter.com/projects/2094837721/solar-power-for-animated-led-beacon-installation-a
&
https://www.kickstarter.com/projects/2094837721/solar-power-for-animated-led-beacon-installation-a/posts
With the HL1606 you can only do 3-bit color (RGBCMYW) individually addressed. You can get more color range in gradients which is pretty but quite limited. Can't wait to try some of these out!
Lol what is that in the demo pic? About $1500 worth of strips? Would be nice.
I count 48, so 50 @ 40 is $2000 or so.
LOL, that's not many pixels for $2K. At that point you might want to consider spending less and getting a 60" 1080p LED/LCD monitor for your graphics display? Yeah, I know - there's still something cool about it.
Thank You! I suggested you carry this a while ago and now you are, great!
Crazy, I was just looking on a lot of Christmas lighting forums and everyone was discussing these. Most items discussed were 3 LEDs per node or ICs that no one could find the specs on.
Do you plan to selling these in 5 meter versions? It seems that is the preferred size for decorating Mega Light Trees and other displays. For example: mega tree on youtube
Well can you make a 5 or 10 meter strip like
this one in the pictures above but also make
it water protected.
Interesting question. The strips are fully sealed, but the connectors may not be rated IP66. I would use the connectors out doors with some electrical tape or more aggressively seal it with silicon.
They also make heatshrink with a water sealant inside, so when you shrink it around the wires, it makes a watertight seal.
My multi-pack of Sparkfun heat-shrink tubing contains some pieces with the aforementioned glue.
Sounds like something you guys should sell, Rob!
Nate looks like I owe you a pint. I bought 5m strips (not going to disclose the price :) from Shenzhen but didn't have time to figure out the code but thanx to you I know what to do now :)
cheers mate!
If anyone could point me to a reliable source on the 5M strips I would be really appreciative. I'm currently disputing a transaction on Alibaba/AliExpress because the seller sent me a completely non-addressable RGB strip (no WS2801's or any other IC at all, the whole strip always lights the same color... not what I want or need). I agree though that Sparkfun should source the WS2801 chips themselves (or the similar WS2803, same basic idea with more PWM outputs...)
My pleasure! Now I just have to catch up with you in a pub somewhere ;)
give me a holler whenever you are in neck of my woods :)
Does that symbol in the first picture have a name?
Are there going to be any white LED strips?
The symbol was a demo by our mfg with what you 'could' do with a lot of strips. It really is that bright. I had to write the example firmware with the test strip upside down on my desk - it hurt my eyes after awhile.
This product is RGB. Turn on all LEDs and you get white.