- Home
- Product Categories
- Arduino Shields
- SparkFun Music Instrument Shield


SparkFun Music Instrument Shield
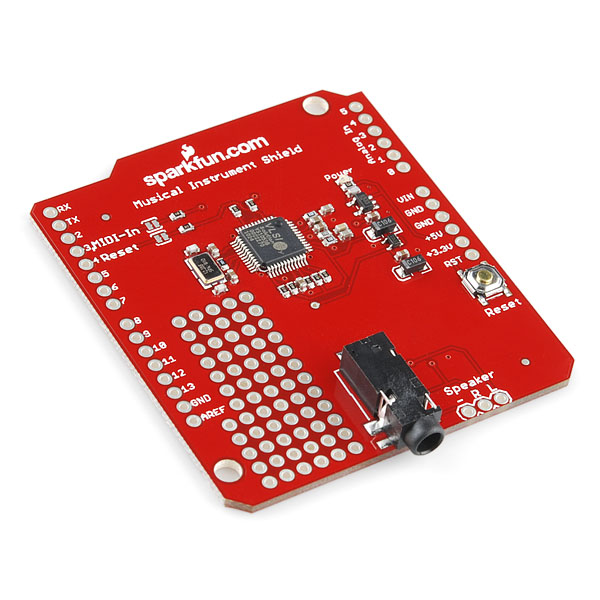
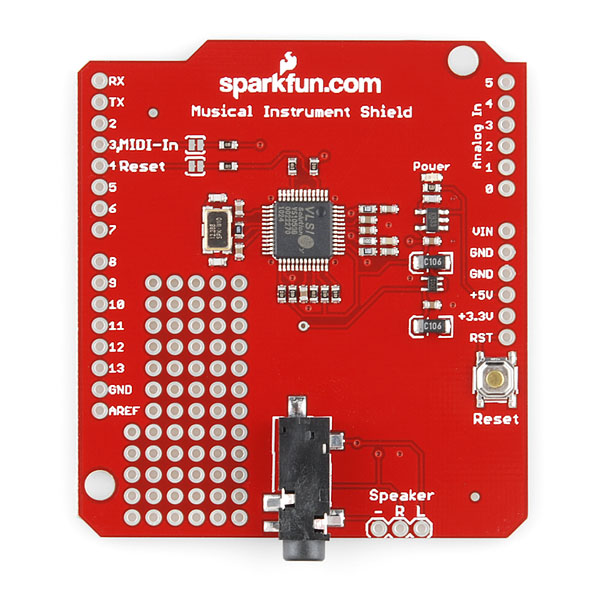
Do you ever wish your Arduino was more musically talented? Or maybe your project could use some cool sound effects. The SparkFun Musical Instrument Shield is an easy way to add great sounding MIDI sound to your next Arduino project. This board is built around the VS1053 MP3 and MIDI codec IC, wired in MIDI mode. Simply connect a speaker/stereo/pair of headphones to the 1/8" stereo jack on the shied and pass the proper serial commands to the IC and you'll be playing music in no time!
The VS1053 contains two large tonebanks including various piano, woodwinds, brass, synth, SFX and percussion sounds. The shield is also capable of playing several tones simultaneously (maximum polyphony of up to 31 sounds!). Take a look at our example code to get an idea of how easy it is to add musical zest to your next Arduino gadget.
In this version, we're using a better regulator, corrected the speaker connectors, and have the reset pin pulled high. We've also included solder jumpers for pin 3 and 4 so they're selectable.
- Schematic
- Eagle Files
- Quickstart Guide
- Example Code
- Datasheet (VS1053)
- Illumitune Project (tutorial) (video)
- GitHub
SparkFun Music Instrument Shield Product Help and Resources
Additional Example Tutorials
Additional tutorials can be found at the following links:
Core Skill: Soldering
This skill defines how difficult the soldering is on a particular product. It might be a couple simple solder joints, or require special reflow tools.
Skill Level: Rookie - The number of pins increases, and you will have to determine polarity of components and some of the components might be a bit trickier or close together. You might need solder wick or flux.
See all skill levels
Core Skill: Programming
If a board needs code or communicates somehow, you're going to need to know how to program or interface with it. The programming skill is all about communication and code.
Skill Level: Rookie - You will need a better fundamental understand of what code is, and how it works. You will be using beginner-level software and development tools like Arduino. You will be dealing directly with code, but numerous examples and libraries are available. Sensors or shields will communicate with serial or TTL.
See all skill levels
Core Skill: Electrical Prototyping
If it requires power, you need to know how much, what all the pins do, and how to hook it up. You may need to reference datasheets, schematics, and know the ins and outs of electronics.
Skill Level: Rookie - You may be required to know a bit more about the component, such as orientation, or how to hook it up, in addition to power requirements. You will need to understand polarized components.
See all skill levels
Comments
Looking for answers to technical questions?
We welcome your comments and suggestions below. However, if you are looking for solutions to technical questions please see our Technical Assistance page.
Customer Reviews
3.8 out of 5
Based on 8 ratings:
1 of 1 found this helpful:
Fun board for various projects
This is a pretty easy to use board if you start from the example code and tutorial. The datasheet link on the tutorial is dead, but sparkfun has it hosted here (https://www.sparkfun.com/datasheets/Components/SMD/vs1053.pdf). The datasheet has the instrument list. The tutorial has methods of sustaining notes, changing banks, etc. I've used this board to create a piano-playing staircase. The IR proximity sensors make a great way to implement notes. Proximity can be used for the attack of the note. I'm currently building a digital keyboard.
Finally hooked it up!
Wow, I ordered this thing back in November 2013, and I'm finally getting around to hooking it up (it's August 2016).
It's pretty sweet!
Pratique, mais de qualité sonore moyenne
Bonjour, Branchement très simple, mais les sons sont de qualités moyenne, avec un léger souffle. Cordialement, MP
[Hello, simple connection, but the sounds are average qualities, with a light breeze. Regards, MP]
Worst designed shield ever!
Based on the statement "We’ve also included solder jumpers for pins 3 and 4 so they’re selectable." one could assume that other digital pins could be used instead. I had 10 pcb's made up with pins 8 & 9 as the MIDI-In & Reset. But the shield has no way to hook them up! Each of the 13 digital pins should have a trace to pads .2" inward AND the solder jumpers should be regular sized (not surface mount sized) to make it simple to wire the traces to the desired shield holes. The speaker pads should have the ground pad in the middle so that some sound is guaranteed in each speaker if you misconnect. The shield is too long and hits the two connectors on the Arduino is you try to push it down for minimum height. The Reset Button should be moved so that the IOREF pin on a Mega can pass on through. The shield layout needs to be redone!
Sorry to hear about the issues with the shield.
I've passed on your input towards our review team for them to check out for the next revision..
Very good invention
It worked just from the beginning. It's got many features and possible uses. I'm very satisfied with the quality of samples and the sound this shield produces!
Incompatibility w/ SparkFun MIDI Shield
One problem is that the M.I.S. (DEV-10587) uses UNO Pins D3 and D4 for RX and RESET. The SparkFun MIDI Shield (DEV-12898) uses these pins for switch inputs (if installed). This means that piggybacking both shields can result in the switches shorting the data output lines to ground -- not good!
One option is to open up SJ1 and SJ2, and re-route the signals to other pins -- but there are no convenient pads to do this with.
A better workaround is the following: cut header pins 2, 3, 4 on the 12898, jumper the switches to unused i/o lines, e.g., D10, D11, D12, then stack the 12898 above 10587.
BTW -- Not clear which shield came first, but the latter should have paid attention to this.
Sounds Good .......
Footprint is becoming pase' Small DIL like : https://www.sparkfun.com/products/16832 Would be nice .... with USB for UART connection ( MIDI ) and power : )
VS1053 chip on shield crashes when receiving input from Yamaha DTXPRESS synthesizer. (DTX apparently working ok when connecting to a PC VST.) Shield works fine when receiving input from Arduino UART sending a stream from a sketch. BUT looping MIDI from DTX to Arduino UART input to output (full duplex) then to shield also crashes chip. (Same loopthrough from DTX to UART to PC VST works fine.)
One problem I ran into is that we can’t use this board together with the SparkFun MIDI Shield (DEV-12898), as the DEV-10587 uses UNO Pins D3 and D4 for RX and RESET. The MIDI Shield uses these pins for switch inputs (if installed). This means that piggybacking both shields can result in the switches shorting the data output lines to ground – not good!
One option is to open up SJ1 and SJ2, and re-route the signals to other pins – but there are no convenient pads to do this with.
BTW – Not clear which shield came first, but the latter designer should have paid attention to this.
The example code has a wee bug in it. If you're trying to send pitch bend messages you get weird behavior. Pitch bend messages are 3-bytes long, but the talkMIDI() function only sends the third byte for messages where the command is less than or equal to 0xB0. Change the line:
to
and this should send pitch bend properly.
Can anyone tell me if I can load my own samples into this thing? I have a custom instrument, with 32 notes, that I would love to play polyphonically. Thanks in advance!
Revision: I am looking at the datasheet, and it says the chip has a "user-loadable Ogg Vorbis encoder". That sure sounds like it can be loaded with my samples, unless I'm missing something.
The “user-loadable Ogg Vorbis encoder” is for recording Ogg Vorbis to an SD card if I recall correctly.
Hi Everyone, A word of advice on the musical instrument shield speaker connection: The way the board is wired the sleeve connection on the 1/8 TRS stereo jack is connected to a pin called GBUF on the VS1053. According to the datasheet this pin should not be connected to ground. http://www.vlsi.fi/fileadmin/app_notes/vs10XXan_output.pdf This means if you are plugging the shield into a stereo, another embedded device, or computer etc that has its sleeve connected to ground (which is common) then you may be hurting your musical instrument shield and degrading the audio performance. If you are connecting to headphones or non amplified speakers then there will be no problem because these are isolated from ground.
I made a simple fix to enable connecting the sleeve to ground for my application. There are many different ways to make this fix. This is just one. Cut the PCB trace going from GBUF to the TRS jack. Solder a wire from GND to pin 1 of JP3. Now you have a ground referenced audio output. Be aware that the output pins LEFT and RIGHT now have DC bias relative to the TRS sleeve on them which will need to be handled appropriately depending on what you are connecting your shield to. For example if you want the RIGHT and LEFT signals to have zero bias voltage insert a large capacitor in series with each signal to block the DC. If you are feeding the outputs of the shield into another 3.3V or 5 V device it may be best to make a direct connection because there will be approx 1.8V bias on the pins.
What does GBUF do and why is it bad to connect it to ground? To make a long story short, audio signals are AC and have a zero average value (DC). It is important to drive loudspeakers, some amplifiers, and headphones with zero average waveforms otherwise they will not sound right or may get damaged. Since the VS1053 is powered by monopolar power supplies it will have a DC bias on its audio output pins. The DC bias (average DC) is typically 1/2 the chip voltage. This is done so that both positive and negative waveforms can be accurately played out of the chip. A clever way to zero out this DC bias when connecting to headphones or speakers is to use a reference voltage that has a value of this bias voltage. GBUF is that reference. If you then measure the voltage across the LEFT and GBUF or RIGHT and GBUF outputs the average voltage will be zero.
GBUF is created inside the chip using some form of amplifier, kind of like an op amp. There is probably a little bit of signal processing inside that sets GBUF to precisely the average voltages of RIGHT and LEFT. If you connect GBUF to ground you short circuit the internal amplifier in the chip to ground. This can cause all sorts of havoc inside the chip. At best it will distort the output amplifiers because there will be excess currents flowing. At worst the chip will overheat and become damaged.
I hope this will help people out with their projects. Fixing this made noticeable improvements to the music quality of my project. Happy tinkering.
Aleks
Where can I hear samples of the various musical instruments that outputs from this device? I am particularly interested in the saxophone sounds. I've searched and searched, but can't find examples of the sounds.
please, can I use Music Instrument Shield for playin mp3 or MIDI from Raspberry Pi ??
HI,
Have you had any luck with this shield and your Raspberry Pi?
I'm asking, since I would also be interested in that.
Regards,
Brian.
Does this music instrument shield works with Arduino MEGA?????
It did for me!
I'm confused, what is the specific message to send pitch bend commands? Can I use this to create a theremin type sound?
Does this device support breath controller input CC#2 or does it ignore it?
Can you play the midi in stereo / control which speaker the sound comes out of? Meaning, soundA out of the left speaker, soundB out of the right speaker, and soundC out of both? Thanks!
Hi, I want to build an organ but I have some questions. If I use arduino and other IC to send MIDI data to this shield, will it work? Thanks Mike
Hi,
Have you had any luck in building your organ?
I am interested in doing the same, so that is why I am asking.
Brian.
Anyone getting incredibly weak volume coming from the L and R outputs on this shield? It's so faint that when I hook it up to an 8ohm 0.5 watt speaker, I have to hold it against my ear to hear anything at all. The headphone jack seems to be working fine though. I've set the midi volume to 120 and the velocity to 90 so it's not that.
Is this normal or is there a problem with my shield?
I have the same issue. It means that I have to crank up the volume on my amp to hear the output, but it's then swamped in noise. I've tried the GBUF rework suggested by Member #441670, which seems to have reduced the output further. Any pointers appreciated, I'm a bit rusty on analogue electronics!
This music instrument shield is a real help for those who want to improve the quality sound of their favorite music. I bought recently a dac converter and I'm very pleased with the way that music sounds now.
How many piano keys can be used with this shield? I have a 37-key toy electric keyboard that I would like to hook-up to it.
This shield is really designed only for the musical output, not reading inputs. So how you read your keys is up to you, but we do have a few parts that might help.
Has anyone gotten the sustain command to work? I'm using the MP3 enabled version of this board I've tried sending the MIDI command, using the example code provided by microtherion here: Real Time MIDI Code, talkMIDI(0xB0, 0x40, 0x7F);
and its not sustaining.
EDIT: Nevermind, I got it working.
Just posted some basic code on bitbucket to pipe MIDI straight to this shield from the MIDI Shield, using a Leonardo and a little pin re-wiring (moving the buttons to 8,9,10, to avoid conflict). Makes a cheap (~$75), no-frills, hackable midi sound module.
Hello! I've uploaded the sketch with few modifications suggested in the comment section. Serial monito indicates Arduino is running it fine. However I don't have audio output yet and oscilloscope shows only static noise. Is there something I should check? thank you! :)
Seems a little odd that this isn't compatible with the MIDI Shield (DEV-09595) out of the box, since these shields are clearly a useful combination. Couldn't you just move pins 3 and 4 to pins 8 and 9 to allow these to work together without rewiring or a go-between shield?
I just picked one of these up. The datasheet indicates the VS1053 has reverb capability when in MIDI mode. It can apparently be set to Auto or Off or to a variable Delay. Running the example code, it sounds like reverb is off. Can you suggest how to use reverb in MIDI mode? Thanks!
I was also looking for more details. The specs manual is not really useful but I found this post that helped me figure out how to at least deal with the individual channels reverb parameters:
where 0x0c and 0x5b are the MIDI commands, and 0xFF is the value (0x0 to 0xFF) for the parameter.
Source: http://www.vsdsp-forum.com/phpbb/viewtopic.php?t=471&p=1827
Hi I have been trying to access the guitar sound son the vs1053 chip. I have chosen 0x00 the default bank and tried using the patch change command to access the instrument, however I have been unable to do so (it keeps defaulting to piano sounds ). Has anyone else had any such issues with any instruments.
Make sure you are sending the correct channel. I had this same bug where I was changing the bank on channel 0, but trying to play notes on channel 1.
I've used this shield for an electronic MIDI bagpipe. If you want to hear how it sounds take a look at http://xulioc.wordpress.com/2012/04/15/openpipe-breakout-arduino-musical-shield/
Help. I have yet to sucessfully uploaded a sketch - I tried the examples provided, modified as per the posts, but no go. Does anyone have a sketch running on 1.0 they would like to share? I am not yet up to speed on SoftwareSerial. Thanks in advance for help offered.
I'm also having trouble running IDE 1.0.1. Never got the damn thing to play one note! I will try the fix in the above post (chris.egervary). Failing that, I will install a legacy version of the IDE. Fingers crossed.
I tried the fix in chris egervary's post above. Pleased to say that it worked like a charm! Just to recap: 1. Replace references to "NewSoftSerial" with "SoftwareSerial" 2. Replace "mySerial.print(cmd,BYTE)" with "mySeral.write(cmd)"
I was having a problem with this part making lots of white noise. After trying multiple things to reduce this problem, I eventually noticed that the power light was staying on even after my external power source was off. I set the reset pin to INPUT mode and the noise went away. Both examples show this pin being set to OUTPUT mode but even when I hooked it up the normal way, directly to the Arduino, I was getting this noise. Hopefully this saves some people the headaches I had.
so I'm using arduino 1.0-rc1 and ran into a problem with the example codes - heres the solution:
first - in order to include the serial library rather than
include NewSoftSerial mySerial(2, 3);
you need to use
include SoftwareSerial mySerial(2, 3);
second - mySerial.print(cmd,BYTE) becomes mySerial.write(cmd)
and this format needs to be used for all instances of mySerial
Thank you! - I'm a little disappointed that SparkFun is has not updated this and a number of their examples to address the Arduino 1.0 IDE. Other (unnamed) competitive vendors are doing a much better job supporting their shield product examples.
Hi,
can anyone please tell me the latency of the chip from getting the command, until it plays wav/flac/ogg files from flash?
greetings,
Simon
I am working on a (patent pending) musical toy prototype using this vs1053 MIDI breakout. You can hear various sound samples of the MIDI instruments on the VS1053 to get a feel for what it sounds like. Happy creating!
http://www.youtube.com/watch?v=KiCoMHCS9Iw
just a suggestion for the next revision, you could add a 5-pin DIN connector footprint to the proto area so you could hook an external midi source to the chip.
I know this board is polyphonic, but 1 instrument at a time correct?
midi can send signals for 16 channels and each channel can play a different instrument. Right now I have this working so a drum beat plays on channel 2 and a melody plays on channel 1 at the same time:
// channel 1
talkMIDI(0xB0, 0x07, 127); //0xB0 is channel message, set channel volume
talkMIDI(0xB0, 0, 0x79); //Bank select melodic
// channel 2
talkMIDI(0xB1, 0x07, 127); //0xB0 is channel message, set channel volume
talkMIDI(0xB1, 0, 0x78); //Bank select drums
talkMIDI(0xC1, 5, 0); // set instrument to # 5
// then to trigger the notes:
noteOn(0, ThisNote, 127]); // play channel 1
noteOn(1, ThisDrum, 127]); // play channel 2
This did take some time to wrap my head around because I have never worked with midi at this level of detail. Cheers!
Have you been able to get good control of the output timing? I was able to produce some basic algorithmic music, but I'd love to be able to program in more "feel" to the canned drum parts, for instance. I've converted a midi beat into an array of noteOn/noteOff signals with associated "tick" timing, but my programming skills are lacking when it comes to triggering those on time as they arise. For instance, I want to trigger kick and hi-hat at or around tick 0, snare at tick 96, hi-hat at tick 150, etc., with each tick only 5-10 ms, depending on tempo. Has anyone done or seen something similar? Many thanks for any advice.
Btw, your SongPainter project is great!
I think what you can do is play one note, than change instruments, and play another instrument etc.
Max is 31 notes, but I don't believe it is limited to a single instrument.
Anyone have an mp3 file that plays the instruments?
Now that I have it running, I could make a demo mp3; lets see if I can get around to it in the next few days.
The IC comes preloaded with TONS of instruments! Take a look at the datasheet.
Anyone seen a good tutorial or guide on how to get this up and running? The example code(s) are nice, but they don't really show the full functionality of the board.
Thanks!
nevermind. I'll RTFM. :)
Nevermind again. Datasheet was not very helpful.
Nevermind. It was very helpful
Can someone summarize the differences between this VS1053 and the VS1103? The VS1103 seems to have a bit "more" of the same but the VS1053 appears more popular.
VS1053 has MP3 support when VS1103 can only play PCM and ADPCM.
VS1053 has very poor quality MIDI instruments in soundbank and I think VS1103 is the same.
FWIW, I have tried the VS1103, and the MIDI samples are pretty good. The sound is very close to a vintage SoundBlaster card (Yamaha OPL3).
I would consider the midi samples quite fair - actually better than the quicktime midi defaults (my opinion). If you only play short notes (< 100 ms) on the VS1053 they do sound bad because many of them have a longer attack and decay time. Set the note length to 150 to 300 ms to hear the actual capability. I was quite surprised how nice they sounded when plugged into a pair of YAMAHA studio monitors. And this VS1053 chip has stereo stage positioning that I like as well.
I have the old version which makes a lot of noise when I power it up until the sketch starts running (just a few seconds). Can I fix this by pulling the reset pin high (like this version)?