- Home
- Product Categories
- Pressure
- SparkFun Altitude/Pressure Sensor Breakout - MPL3115A2

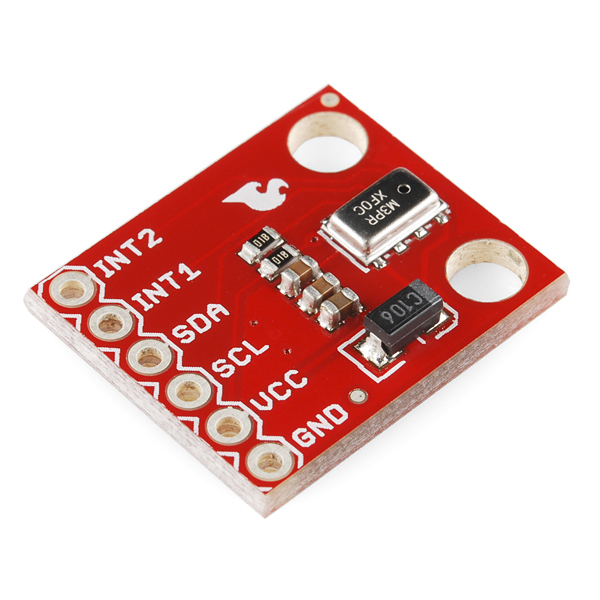
SparkFun Altitude/Pressure Sensor Breakout - MPL3115A2
Life has its ups and downs, so why not measure them? The MPL3115A2 is a MEMS pressure sensor that provides Altitude data to within 30cm (with oversampling enabled). The sensor outputs are digitized by a high resolution 24-bit ADC and transmitted over I2C, meaning it's easy to interface with most controllers. Pressure output can be resolved with output in fractions of a Pascal, and Altitude can be resolved in fractions of a meter. The device also provides 12-bit temperature measurements in degrees Celsius.
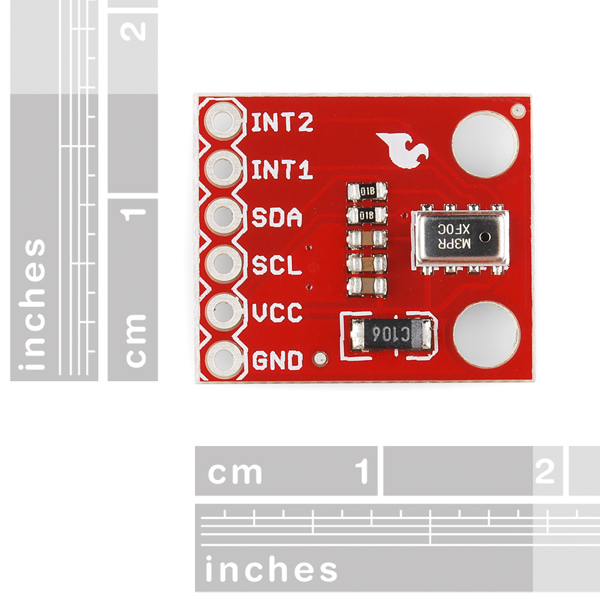
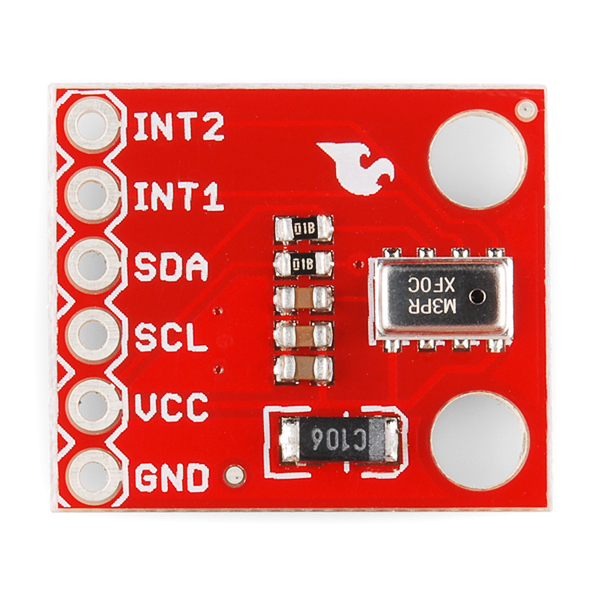
This breakout board makes it easy to prototype using this tiny device by breaking out the necessary pins to a standard 0.1" spaced header. The board also has all of the passive components needed to get the device functioning, so you can simply connect it to something that talks I2C and get to work!
- 1.95V to 3.6V Supply Voltage, internally regulated by LDO
- 1.6V to 3.6V Digital Interface Supply Voltage
- Fully Compensated internally
- Direct Reading, Compensated
- Pressure: 20-bit measurement (Pascals)
- Altitude: 20-bit measurement (meters)
- Temperature: 12-bit measurement (degrees Celsius)
- Programmable Events
- Autonomous Data Acquisition
- Resolution down to 1 ft. / 30 cm
- 32 Sample FIFO
- Ability to log data up to 12 days using the FIFO
- 1 second to 9 hour data acquisition rate
- I2C digital output interface (operates up to 400 kHz)
- Schematic
- Eagle Files
- Hookup Guide
- Datasheet (MPL3115A2)
- GitHub (Design Files & Example Code)
- GitHub (Library)
SparkFun Altitude/Pressure Sensor Breakout - MPL3115A2 Product Help and Resources
MPL3115A2 Pressure Sensor Hookup Guide
December 5, 2013
Getting started with the MPL3115A2 Pressure Sensor.
Core Skill: Soldering
This skill defines how difficult the soldering is on a particular product. It might be a couple simple solder joints, or require special reflow tools.
Skill Level: Noob - Some basic soldering is required, but it is limited to a just a few pins, basic through-hole soldering, and couple (if any) polarized components. A basic soldering iron is all you should need.
See all skill levels
Core Skill: Programming
If a board needs code or communicates somehow, you're going to need to know how to program or interface with it. The programming skill is all about communication and code.
Skill Level: Competent - The toolchain for programming is a bit more complex and will examples may not be explicitly provided for you. You will be required to have a fundamental knowledge of programming and be required to provide your own code. You may need to modify existing libraries or code to work with your specific hardware. Sensor and hardware interfaces will be SPI or I2C.
See all skill levels
Core Skill: Electrical Prototyping
If it requires power, you need to know how much, what all the pins do, and how to hook it up. You may need to reference datasheets, schematics, and know the ins and outs of electronics.
Skill Level: Noob - You don't need to reference a datasheet, but you will need to know basic power requirements.
See all skill levels
Comments
Looking for answers to technical questions?
We welcome your comments and suggestions below. However, if you are looking for solutions to technical questions please see our Technical Assistance page.
Customer Reviews
4 out of 5
Based on 15 ratings:
1 of 1 found this helpful:
Works great.
The part worked good mounted on a msp430 launchpad. Used it to deploy a parachute on a water bottle rocket. Parachute deployed upon descent and it gave me the altitude.
3 of 3 found this helpful:
Easy to work with!
I'm developing a telemetry system and I've gone through some parts now and I can say this one is a good buy in terms of work with. Easy to configure but limited regarding of internal sampling configuration (custom sampling frequencies are done using one shot). I've gave a "Good" grade because I still haven't measure output (pressure/altitude) variance, offset, linearity, etc.
P.S.: If you are doing an engineering project don't forget to calibrate these things. Most are "factory calibrated" but that is the same as if they aren't. Calibration is one of the most expensive component of a sensor.
4 of 5 found this helpful:
Doesn't work with the Raspberry Pi
Not a knock against this board, but it doesn't work with the Raspberry Pi. Wish I'd done my homework and figured that out first.
It's a limitation of the Pi itself, which doesn't support repeated start over the I2C bus. The BMP180 is the sensor you need if you want to use it with a Raspberry Pi.
1 of 2 found this helpful:
Works Fine, A bit of a ALT issue.
I am trying to figure out the experimental heights for a few of my projects, and it workers perfectly fine for that, it is off by about 2 degrees Celsius with temperature which isn't too big of an issue, the pressure reads fine, but the altitude is totally screwed up. I'm only 400 feet about sea level and it keeps giving me a number around 500-900 feet, and always changes.... I left it running for 2 days once, it started at 550 feet above sea level, and jumped up to 900, and came back down to around 600. And every time I turn it back on, it keeps starting with a different height. I don't know what is causing this. I am considering buying another one to see if I got a defected one.The changing height is a liability on my project, and slows me down.
I would of loved to give this 5 stars, but I would be a liar if I did.
Hi, Sorry to hear about your issue. Please contact our Tech Support team for assistance. We can help do a little trouble shooting and assist if a replacement is needed. https://www.sparkfun.com/technical_assistance
Worked as specified
Arduino software worked out of the box and was quite easy to modify
Good, Altitude isn't accurate.
The sensor is alright, I was going to use this to record the height that my model rocket would have flown, but it is a bit off. I am 1,137 feet high at my workbench, and the sensor reads about 1158.32. Also the sensor usually varies from about two feet when not in motion.
Great sensor
It was easy to hook up and get running following the instructions given, and the data is fascinating. I used it in a lesson for college freshmen about modeling measurements as signal plus noise plus bias. We were a letter to easily recognize the motion of the sensor up and down about 2 - 3 ft in the pressure measurements against the noise and background changes.
Good Board
I received the board with two caps soldered together giving poor readings. A quick (free) replacement later and I was back in business. Using the 330 Ohm inline resistors I got readings accurate to a few feet of my location (remember to convert from altimeter pressure to absolute station pressure if using weather readings). Overall, a good board and accurate to a few Pa from my own experience.
Question about Altitude
After I hooked it up with my Arduino MEGA 2560, the temperature reading was very close to what I expected. However, the altitude was reading about 100 feet less than the GPS altitude. I was using the GPS altitude as my standard because think it's more accurate. Any ideas? All and all, I think it's a good product.
Altitude output extremely unreliable
I've purchased 3 of these sensors. The first one was connected to 5V for a few minutes, and the second had been in storage for a long time so I thought maybe I had damaged them. When the sensors were at rest, their output altitude could drift by up to 30 feet in 4 minutes (although their temperature readings were just fine).
I purchased a third one nine days ago, but this sensor is no better. In 4 minutes its output drifted +30 feet, and in 10 minutes it drifted by over 80 feet.
I wondered if maybe this was an artifact of the MPL3115A2 chip, so I purchased the same sensor with a different breakout board from Adafruit. I ran both sensors concurrently and here is a graph of the resulting outputs: https://live.staticflickr.com/65535/50080620812_20222b1e08_b.jpg The Adafruit version shows some variation but is far more consistent than the brand new SparkFun board I used.
I've been chasing down this problem for over a month. Here is the SparkFun forum thread I started for it: https://forum.sparkfun.com/viewtopic.php?f=74&t=53015&p=216413#p216413
Overall I'm extremely disappointed because the board just can't do the one thing it's supposed to do.
Works Great!
Bought this for a small project and hooked it up to a Spark Fun Pro Micro, had to fiddle around with the example code before I got it to work for my needs but it outputs the correct temperature and altitude and is sensitive enough for my application. Would recommend to anyone looking for a relatively cheap and small pressure/altitude/temperature sensor.
MPL3115A2
I am planning to fabricate an integrated Barometer/Altimeter and Thermometer unit. A;ll of these functions are in this unit and it just needs I2C and off you go. I took right off, I used a 6 pin header for interface and wirewrap. The chip and allare on a Protoboard and I use a laptop for now to analyze the data. I need a little timeto figure out the various tweaks for altitude etc. Fun project!
0 of 1 found this helpful:
Installed in project, seems to work well, still doing testing.
0 of 1 found this helpful:
Works fine
Exactly what it says on the tin.
Good so far
works fine, haven't hooked it up to my weather station yet. Stay tuned
Dose anyone know where the equation for altitude from pressure on page 14 of the data sheet came from? When I ask the sensor for the pressure and then calculate the altitude using on-line calculators I get my altitude. When I use the equation (or let the sensor use the equation I get the same result but its way off from my actual altitude 196m (sensor) vs. 262m (from map)
dasd a<DA sad A<SD asd a %3c
Hello Sparkfun folks,
Working on building an altimeter that collects the highest reading and displays it on a seven segment display for students in a middle school science class who are building soda bottle rockets. I've got pretty much everything going well but when I got this set up with the example Altimeter code provided by Sparkfun I'm getting some off readings. My temperature is actually close to perfect (reading 63.5 F which is only 1 degree off from my thermometer in my room) but my altitude is reading in a range from -120 to -70 without me moving the sensor at all. My actual altitude is around 400.
Any suggestions as to what might be going on? I've heard some people say I should run some sort of calibration code but I can't seem to find an example of that and I don't think I could write that myself.
Thanks!
Hello all,
I recently bought this sensor for my Arduino UNO. I am a beginner with these stuff, so some questions: 1) According to the hookup guide I need some 330ohm resistors for the I2C lines. How do they calculated the exact resistor amount to reduce 5V to 3.3V? I will like some theory here. 2) Do I need these resistors if I am only connecting this sensor in the UNO (I don't have other breakout boards)? or I will burn the breakout without them?
Thanks
I have two of these pressure sensors with each connected to a Particle Photon, the sensors are placed next to each other, I have one sensor reading 2249 Pascals and another reading 2087 Pascals. Can someone please suggest the reason for this huge difference in readings of about 162 Pascals. This equates to about 123 ft altitude difference between the two sensors.
If you plan to use this with a Raspberry Pi, be warned that this chip doesn't play nice with Raspberry Pi's I2C bus. This is due to it's use of "repeated start" in the I2C protocol (which Raspberry Pi can't handle without bit-banging).
The problem with the Pi has been fixed. Repeated start now works.
I am not sure how I feel about this thing. With the SparkFun sketch, it says my altitude is 517 feet and the barometer is 30.21 InHg. My GPS altitude is 780 feet and google maps says I am at 790 feet and a local airport says the barometer is 30.23. It looks like the barometer is working but the altimeter is way off. Also, as stated by the datasheet this thing is pretty sensitive to sunlight. I got large fluctuations when using it. Is there a reference adjustment for this similar to how pilots set the altimeter based on the barometer?
Pressure(Pa):99479.75 Temp(f):73.40 Altimeter setting InHg:30.21 with sketch set to 780 feet Altitude(ft):517.55 Temp(f):73.29
Near KLPR; Lorain County Regional Airport http://www.flightstats.com/go/Airport/weather.do?airportCode=KLPR
I found a sketch that calibrates the sensor. Be sure to get your altitude with a GPS and input it in the first line. I used Google Maps as a starting value and was able to get pretty good results with my altitude reading!
Print out: Altitude(ft):783.92 Temp(f):73.51 with my altitude being 780 feet. I can even see the values changing by raising it off my desk!
http://www.henrylahr.com/?p=99
SFE, I know it might be a bit much to ask for considering the software is free, but could we get an altitude calibration sketch added with the examples?
Edit: Erg! I am unable to switch from Altimeter to Barometer mode even with .setmodeStandby and .setmodeActive. I just get a pressure reading of 988.07. Edit2: I did a little more reading. When you switch modes, place a delay of 550ms before your first sensor read or you will get weird numbers! It is working correct now!
I've been trying to use that code you posted about but I can't see where I need to input my known altitude. Can you be more specific about where to input it? Is there a value that I'm supposed to replace?
Hi. I'm using intel edison and spark-fun's MPL3115A2.
And I connect this sensor to sparkfun's I2C breakout block(https://www.sparkfun.com/products/13034) for connecting intel edison.
now when I upload SparkFunAltimeter.ino, I can get some values but it is a little weird like this :
Altitude(m):-999.00Pressure(Pa):-999.00 Temp(c):-999.00 Altitude(m):-999.00Pressure(Pa):-999.00 Temp(c):-999.00 Altitude(m):-999.00Pressure(Pa):-999.00 Temp(c):-999.00 Altitude(m):-999.00Pressure(Pa):-999.00 Temp(c):-999.00 Altitude(m):-999.00Pressure(Pa):-999.00 Temp(c):-999.00 Altitude(m):-999.00Pressure(Pa):-999.00 Temp(c):-999.00 Altitude(m):-999.00Pressure(Pa):-999.00 Temp(c):-999.00 Altitude(m):-999.00Pressure(Pa):-999.00 Temp(c):-999.00 Altitude(m):-999.00Pressure(Pa):-999.00 Temp(c):-999.00
Should I check some part of this code? I've never changed this code.
actually I am really beginner for arduino code.. anyone who know how can solve that problem? Please give me any help.
Thank you in advance.
Regard.
JaeHyuk
So I got this chip for a demosat project and I can't get accurate readings from it. sometimes the values will be close other times its completely wrong and all of my wiring is correct. A lot of people have been commenting asking how to calibrate this but no one seems to be able to give any usable advice. DOES ANYONE KNOW HOW TO CALIBRATE THIS CHIP AND GET IT TO REPORT ACCURATELY!?!
Hello,
I am having trouble using this MPL3115A2 with an Arduino Fio v2 (https://www.sparkfun.com/products/10116). I have hooked it up as instructed (without resistors since it's a 3.3V board) and installed the library. The example of the library gives me obviously wrong measurements for temperature and pressure (way overestimated). I tried with a Arduino Uno and it work perfectly with the exact same parameters (setOversampleRate(x), for instance) so it's not a problem of calibration. I'm therefore guessing thats something's wrong with the I2C protocol, but I can't figure out what. Can anyone help me ?
Thanks, Rémi
How much does this weight?
Hello!
I'm having a lot of problems with getting any accurate readings. It seemed to be working somewhat using the Arduino UNO but still says I'm below sea level by about 400ft (not true). However, I needed to switch over to a Mini and have failed to get any readings at all that make any sense. I'm not quite sure how to debug - but, I've soldered wire to A4 and A5 in the middle of the mini and it appears to be cleanly connected. Right now, it is reading:
Altitude(ft):-5068.69 Temp(f):194.90
Switching back to the UNO the room temp appears to be correct, but the altitude not so much.
Can anyone give some tips as to how to get to the source of the issue here? Any known issues with using this sensor with the mini? I'm using the code sample that has been posted with it untouched.
Thank you. Claudia
Sounds like a problem with setOversampleRate(x). I had almost the exact same output when first using this sensor and the solution I found was to set it to 7.
I want to use MPL3115A2 with arduino YUN, So is it work properly in this case too?
I was having quite a time trying to get this to work with my Pi. Eventually I found that there is a mod that has to be enabled.
The short version:
The long version:
http://ciaduck.blogspot.com/2014/12/mpl3115a2-sensor-with-raspberry-pi.html
Hello!
I wired this up easily and it seems to be functioning - but the altitude reading is probably 500 feet off or so from where I know I am. I've perused the comments below but didn't find a consensus on whether this is expected or if it indicates some kind of error. Also - it may be that it needs calibration? Any input / help welcome!
Thanks!
You will need to do a calibration on the sensor. Changes in temp and other things like UV light seem to affect the senors output quite a bit. There was a calibration routine somewhere on this page that can adjust the sensors settings to your alt, but I can't seem to find it.
How accurate is it and does it have any problem with high altitude? I want to use it on a 3 stage rocket to measure the altitude and unattach the parts
EDIT—What I posted earlier seems to be inaccurate. See the table in this document: http://cache.freescale.com/files/sensors/doc/app_note/AN4528.pdf?fr=gdc
It looks like it will go beyond its measurement range at about 5500 feet. It should be relatively accurate to within 1 to 2 feet in that range, but I'd encourage anyone who really wants to know to read the document.
I am using this with the Arduino and the sample code provided. When I first turn the on the Arduino and MPL3115A2, the device gives me a few valid data points then gives me nothing but -1 or 0xff. I have it set up to read Altitude. I used the Hookup Guide to connect it to the Arduino. Is this expected behavior? If not, does anyone have an idea as to what is going on?
.
.
.
Anyone got schematic on how to hook up this sensor and the RHT03 with a display? It would be great to make it portable. Thanks
Any suggestions on how to get this part into Fritzing?
SparkFun, why is this not in the fritzing app? https://github.com/sparkfun/MPL3115A2_Breakout/blob/master/fritzing/SparkFun%20SEN-11084%20Pressure%20Sensor%20-%20MPL3115A2%20Breakout.fzpz
It isn't in the app because we are currently working on creating many of our parts that will eventually be imported into the SparkFun library of parts. Until then however, you can download the Fritzing diagram for this part from GitHub, and import it into your parts in Fritzing. It should work just as well for you then!
The product page is missing the open hardware logo.
Fixed. Thanks for pointing out problems and making things a little better.
I have connected this device to an Arduino Uno Rev3. It works perfectly. But when I disconnect from the USB port of my mac and connect again it displays a wrong value, something like -170.xx
I have connected to I2C also a RTC DS1307, and they work perfectly after loading the sketch. The sketch is based on the linked Arduino example, with minor modifications: I have kept the functions for bcd conversion, setDate, getDate, toggelOneSHot, readPressure, I2Cread/write, setModeBarometer, setOverSampleRate (set to 128).
set setup is: // setup MPL3115A2 setModeBarometer(); // Measure pressure in Pascals from 20 to 110 kPa setOversampleRate(128); // Set Oversample to the recommended 128 if(IIC_Read(WHO_AM_I) == 196) display.println("MPL3115A2 online!"); else display.println("No response - check connections"); display.display(); //update display delay(3000); display.clearDisplay(); // delete old values }
Any idea why when reconnecting it does not work, but no message "No response - check connections" ? (BTW this message is correctly displayed if I disconnect either SLA or SDA pin).
Daniele
Not sure if you solved it but I actually just built the exact same set up - UnoR3 + ds1307 + MPL3115A2 (and an open log). I used different code but it works like a charm for me. I can see if I can post a link if you are interested.
Amature question, but is there any way that I can change the analog inputs in the code from A4, A5 to A2, A3? If so how?
A4 and A5 are the i2c pins, so you cant really change them. sorry.
i have this module connected up to an arduino uno. 3.3VDC and using pins 4-5 and the example altimeter code. but i get incorrect readings for the pressure and altitude the temperature seems about right though.
this is the output Altitude(m):-25.25 Pressure(Pa):262043.00 Temp(c):23.75
my current altitude is approximately +40m is there are value i need to change or is my sensor faulty?
I am looking for a altitude sensor to use in a model rocket that will experience 90g of acceleration. Will this sensor function in high acceleration applications? If not is there a specific type of altimeter I should look for?
I plan on using this sensor for the same purpose. I don't think the readings would be affected much by the force of acceleration. You'll just need to make sure that your sensor has access to the pressure outside by making a small hole in body tube someplace.
I just uploaded a library to use this sensor with an mbed device. I'll probably be using it with an LPC11U24 since the chip is only 7x7 in the 48-pin package. I was using a PIC32, but the smallest package I can solder for this chip is 10x10, which takes up a lot of board space. Plus I like the fact that the mbed compiler is online and you can switch to a desktop toolchain rather easily.
If I understand the specs of this thing correctly, the max sample rate is 1 second. That won't give you much resolution on the climb to altitude. If, however, all you're wanting to do is use it to fire the parachute ejection charge - you might be ok - depending upon the rate of descent. I'd appreciate knowing what you come up with, and how it works! My approach is to measure acceleration during the climb (to get velocity and to detect the moment of max altitude), and use barometric pressure (sampled at 100ms or so) as the ejection charge trigger during descent.
I just uploaded a library for this sensor for use with http://www.mbed.org devices. It was inspired by the Arduino example on this page. You can find it on the mBed website here.
I'm currently thinking about buying this sensor for a project. Does anyone know if this device needs any sort of calibration? If not, how does it manage to get such an accurate reading as stated in the product description?
Hi, my temperature is coming out right, but the altitude say -30 feet. Could I have a bad sensor?
Are you below sea level?
Hi, I'm interested in using this sensor in a tracker device. I have a big doubt, this device would be used outdoors so it is going to be closed in a nylon case (waterproof). Would this sensor give accurate reading inside a case? I’m not sure if atmospheric pressure could be measured in this way. Thanks in advance
Depends on how waterproof the case really is.
If its waterproof than its also air-proof which means there can be no change of air pressure within your case.
There CAN be a change in air pressure. External pressure upon the nylon case can influence the pressure inside the nylon case.
Is there anybody who hooked up this sensors together:
All of them are 3.3V I2C, HTU21D and TSL2561 have an option to disable pull-up resistors, but looks like MPL3115A2 hasn't got this option. Can I use MPL3115A2 pull-up resistors and disable them on HTU21D and TSL2561? Will I fry something with this setup?
Solved. Everything works, nothing was fried.
Pressure(Pa):-999.00 Temp(f):-1766.20 Pressure(Pa):-999.00 Temp(f):-1766.20 I keep getting this. I have Triple Checked every connection. I don't know how to fix this?
I also faced this problem. And solution was quite simple, I removed recommended 10k resistors and connect SDA and SCL directly to A4 and A5. Look what they suggest in hookup guide
You saved my life on a project of mine, I have been looking for an answer for a month and tried everything. I love you Member #505632 <3 I'm naming the weather balloon I am using this for after you.
Has anyone tried using this sensor with a Digispark or another microcontroller that uses the ATtiny85 processor? I am struggling to get the source code to compile, I have tried changing the Wire.h references to TinyWireM.h but I have had no luck.
Is anyone able to help me out?
Thanks in advance!
The 1kohm pull-ups installed on this breakout are quite strong. I'm running this through the PCA9306 level translator which already has 1kohm pull-ups for the 3.3V lines and given there is an MPU-6050 on the same I2C bus the combined pull-up (1kohm + 1kohm + 10kohm parallel) seems to be too high for the MPU-6050 which refuses to work when this breakout is attached to the bus..
I'm guessing I could just go ahead and unsolder the pull-up resistors on this one to reduce the overall pull-up of the SDA/SCL lines?
Interestingly the HMC5883L has no resistors installed at all, instead relying on external pull-ups often provided by the master. The pull-up policy seems to be a bit chaotic when it comes to these breakouts. :)
Hi, I'm currently trying to run the the example codes on my Arduino Mega 2560 but the output in the Serial Monitor is constantly giving me the maximum negative value: "Pressure(Pa):-999.00 Temp(f):-1766.20", "Pressure(Pa):-999.00 Temp(f):-1766.20 Altimeter setting InHg:nan", or "Altitude(ft):-3277.56 Temp(f):-1766.20" when I am running the library codes, and "æfxxxàxæê&¿õËPäeËj1"... when I am using the Example Code. I have made sure to connect Vcc to 3.3V, Ground to Ground and SDA directly to A4 and SCL directly to A5. Any help would be much appreciated! Thank you.
-999 indicates that the I2C communication has timed out. The max timeout is 600ms when waiting for an initial I2C response and 100ms when reading the data from the sensor. If you're seeing -999 it's probably because something is not wired correctly. Double check your connections.
I just updated the tutorial with this info. Sorry it wasn't in there before.
I have check my connections multiple times, first running wires just through the holes, then wrapped wires around the holes and finally soldered the breakout board to headers and then used a breadboard to make my connections. I have made sure that each wire I am using was conducting my doing a simple analog read from 5V and 3.3V into an analog port (4) and I have changed them up. When looking at just the 3.3V output I'm reading about 3.18V (653 / 1023). I can try another ardunio but I'm not convinced that that will help at this point. When doing a straight analogRead(A4) when everything else is connected I am just seeing the supply voltage. I will go double check now but after soldering I had checked to make sure that solder wasn't connecting to pins together and it didn't seem to be the case.
Hmm. You'll need to solder wires or headers to the board. Inserting or wrapping wires around the holes won't provide a sufficient connection. Be sure that SDA->A4 and SCL->A5 go to the correct pins. Be sure you have 3.3V and GND connected.
Please drop techsupport@sparkfun.com an email as well. They are super helpful and can troubleshoot things in much more detail.
Looks like the problem was that for the Mega, SDA is on pin 20 and SCL is on pin 21. (Facepalm)
Hi, could you please tell me how you were able to adjust the code to work with the Mega??? I'm working on a project that uses the Mega board to communicate with this sensor. I've connected it to pins 20 and 21 but still get weird readings.......
-999 indicates a timeout error. In several places, there is a counting loop containing a 1ms delay. The timeout is too quick. When the count reaches the limit, -999 is issued. Increase the count by several hundred. Look at the Weather Shield example's MPL3115A2.cpp.
Unfortunately when I went into the MPL3115A2.cpp and changed the delays to 100 and then 300 after a few seconds I would still get the timeout error (-999.00 pressure).
My comment refers to the example code for the Breakout Board (above) which does not use the cpp, but has similar code. In the cpp for the Weather Shield, some of the limits are up to 600, I believe. I put a Serial.println ("E1"), etc. on each loop to figure out which ones were timing out and experimented with the values.
Hi, From the datasheet: The Altitude data is arranged as 20-bit 2’s complement value in meters. The data is stored as meters with the 16 bits of OUT_P_MSB and OUT_P_CSB and with fractions of a meter stored in bits 7-4 of OUT_P_LSB. Be aware that the fractional bits are not signed, therefore, they are not represented in 2’s complement. Does somebody know how this is to be understood? Should I take the fractional part (LSB/256 units) and add it to the signed integral part? Or should I take the fractional part (LSB/256 units), multiply it by the sign of the integral part, then add the two? I don't have the part here so I cannot just try.. Thank you Regards Soren
Have you had a chance to look at our example code? Here's the line you should look at. Aaron does a pretty good job of explaining how everything gets converted back to pascals.
Thank you. But 2 lines further down he "gets rid of the decimal portion". If a sign conversion of the decimal part is necessary, of course he will not bother to do it, but I want to keep the decimal part and am still unsure if I need to do a sign conversion or not. But okay, looking again, float tempcsb = (lsb>>4)/16.0; float altitude = (float)( (msb << 8) | csb) + tempcsb; tells me not to sign convert the altitude decimals, but just scale them and add them to the signed integral part.
Unlike other I2C devices, this device requires that the write operation before read will not be terminated with a stop command. Otherwise you will read only address 0....
I can't get the Arduino example to compile. It gets stuck at Wire.endTransmission(false);
The error messages are
I'm using V1.0.5. Where am I going wrong?
Do you have a different I2C library installed? You will probably need to uninstall it. The example code relies on the built-in Wire.h of Arduino.
Thanks Nate, I uninstalled/re-installed V1.0.5. That worked.
Excellent. Thanks for coming back to let us know your solution!
Please advise what is the best male header pin that I should use to solder for breadboard use. Thanks
The 40-pin straight male headers work great with the MPL3115A2 breakout and a breadboard.
Does anyone know how much this product weighs? (preferably in grams)
Is it possible to assign a new i2c address to this device? I would like to have a few of these connected to the same arduino and didn't see these when I bought the BMP085.
Unfortunately it is not possible to alter the I2C address on the MPL3115A2. As an alternative, these devices are very low power; you might be able to power down different units on the same bus.
What's Git all about? I work at home OFF LINE. NO BROADBAND. I have to PAY for wifi usage. Who needs that just to download an example.
We are simply putting our files on to GitHub to make version tracking easier. It shouldn't take you any longer to download them from that site instead of ours. FWIW, git doesn't need to be connected online to do version tracking on your personal machine, so it shouldn't affect your wifi usage at all if you do decide to use it to track your own changes and updates. You certainly don't need to though to access and use our examples.
Is it possible to read out both pressure and altitude? I need both values
Note that there is only one sensor on this chip, which measure absolute pressure. The chip does some math on that number to estimate the altitude. You can get both numbers, but because they're both based on the same number (and either will change if the other changes), you may not get exactly what you were thinking of.
Hi! I was wondering, is there a way to get data out of this sensor faster than 1Hz? I've programmed the example from page 12 of the datasheet (I chose interrupt driven acquisition). My sample rate seems to be limited by the ST bits in register CTRL_REG2 (0x27) because I can increase it by setting those differently, but I can't get it below 1 second. What do I need to change if I want to sample at the rate given by the over-sampling bits in CTRL_REG1 (0x26)? I can post my code here if you like. Your help is much appreciated :)
Never mind, I got it :) When switching the part to 'active mode' it starts acquiring samples at the rate specified by the ST-bits in ctrl_reg2, which has a 1 second minimum. To issue an immediate acquisition, leave the device in 'standby' and issue a 'one shot measurement' by setting the OST-bit in crtl_reg1. It then samples as fast as the over sampling setting allows. Set the bit again each time you need a sample. If using the interrupt line, it's set-and-forget, which is nice :)
Hi! When establishing a handshake and reading from 0x0C I’m getting return in value 0, not 196. I would expect -1 or FF in case I2C is not established. I can not get any other data from the device. Only 0. Any suggestions?
I've found a solution. The secret is: Wire.endTransmission(false); when reading I2C!
For those out there using this device, I just learned from Freescale that the sensor die is sensitive to light. If you are having issues with accuracy or drifting measurements that don't correlate with the weather, light may be affecting the readings. The datasheet for this part does not say anything about this but the one for the MPL115A does mention it: "The sensor die is sensitive to light exposure. Direct light exposure through the port hole can lead to varied accuracy of pressure measurement. Avoid such exposure to the port during normal operation." I was very frustrated trying to use this sensor before I learned about this because the measurements seemed to be all over the place at times. Now I put a small piece of foam over the port to block out light but still allow the air to reach the sensor. I am now reliably getting +/- 1 foot accuracies which is totally amazing. Once you know how to use this part properly it is really awesome.
i am using Arduino DUE Board and the sketch available for due is not working.help me out....
So it looks like this is a problem with the beta version of the Arduino IDE supporting the Due, not the breakout board. There is some talk in the Arduino forums about i2c not being fully implemented on the Due. I can successfully test the MPL breakout on other platforms, but the Due fails. Bottom-line, the Arduino software you are using for the Due is in beta, so you can't assume everything will work.
EDIT: There might be a way to get it working by modifying the sketch (although I am not sure exactly what the problem is). Also, since the sketch works with all of the other Arduino boards, I assume this bug for the Due will be fixed in Due time.
my project deadline is coming ahead.kindly find some solution for this devil and help me out.
I would love to help you out and want you to succeed, but I as well have deadlines for other projects that probably take precedent over a problem like this (considering this is a bug with a beta version of the Arduino IDE and has nothing to do with the MPL BOB).
I would suggest either waiting for the IDE to come out of beta, attempt to fix the issue yourself and submit your results to Arduino, or move to another platform. Bottom-line, don't use beta programs for mission/time critical projects.
and how much this "waiting" will be?i cant replace my arduino DUE board with other ,i think i m failed.
i would be very thankful to you if you help me out within one week.plz.
Only if you make an attempt to debug as well. :) Send me an email with what you tried and we can work together on it. aaron@sparkfun.com
Sent
Hi guys, this is my first post here so go easy on me!
I am building this circuit from scratch since my college didnt allow me to buy the breakout board so these are my problems:
1) I tried to design the circuit as in the schematic above and I was able to build it all even the MPL311 library (I had zero experience with Eagle before this lol)but I couldnt comprehend the arrow pointing at VCC so I made a circuit with all the physical connections. Now I keep getting inconsistency errors no matter how much I trouble shoot it. So is it the arrow? and if yes where can I find it?
2) I am using a DSPic30F for this project and unfortunately I cant find C example codes and I cant use C++, so is there by any chance a C-version of the Arduino example above?
Again, sorry for the inconvenience lads this is my first post.
1) Yea, make sure the orientation of the sensor is correct. Pin1 looks like the hole in the IC, but it's on the opposite side. Just be sure to double check the datasheet. The first few boards we built had this mistake.
2) We tend to now write only Arduino code/AVR. I'm don't know of any I2C libraries with PICs, but I am sure there are some examples out there; there are plenty for AVR.
EDIT: FYI, a logic analyzer is a great tool to help debug I2C, I use it all the time.
Just got mine and wired it all up with an Arduino uno R3 and a 16x2 display, worked great with the example code above. One question I have is every time I have turned it on it is 10-20 meters higher than it was the last time, so I checked the local weather and the barometer has been steady, I kept testing but now I am getting my local altitude 400 higher than it actually is, not a big deal as I am using it in a zero'd out configuration but even then if I let it sit on the desk it slowly counts up, anyone have any ideas why this might be or how to re calibrate it? Thanks.
How does an altimeter based on pressure ever accurately report the altitude? Since pressure is changing minute to minute in the real world it seems like it would be constantly incorrect. Even if you went down to the beach at noon and calibrated it at sea level for 0ft of elevation, an hour later the weather changes a bit and your measurements are incorrect.
Unless I'm missing something, isn't the only way to accurately measure altitude via GPS (assuming at least 4 satellites)?
Local weather stations provide an adjustment you can apply to pressure altitude to get actual altitude. This is generally referred to as the "altimeter setting" and is given in inches of mercury relative to standard sea level pressure (29.92"). Each inch is 1000 feet difference between the two. Minute-to-minute barometric pressure change is generally very small. You can look at the history of hourly altimeter settings to get an idea; it's rare that a SPECI would be issued due to fast pressure change.
You need to set the barometric offset to your local pressure to get accurate altitude. The local pressure does change, but shouldn't amount to more than an order of 10m or so over a passing pressure front (maybe more if you are in a hurricane). So with the default barometric setting, you should be kinda close to your altitude (within an order of 10m) without calibration. The nice thing about this sensor is the precision. Given a properly calibrated sensor, you can realize resolutions of 1.5Pa or 0.3m. If you are needing to measure altitude on time scales much less than passing weather systems and you calibrate for local pressure, then the sensor can be very accurate.
In converse, if you want to use this sensor as a barometric pressure sensor and have its reading correspond to those of local weather reports, the sensor readings must be scaled based on your local elevation. I found the equation here to be useful. In software I defined the local ELEVATION (in feet) and then used the following formula:
When you read out the pressure value from the sensor, add the elevation_offset and divide by 100 (mBar) or 3386 (inHg) - you should arrive at about the same value as local weather stations.
Atmospheric calculator at http://www.newbyte.co.il/
Is it possible to connect the I2C signal connections on the breakout board directly to the Arduino 5V logic pins? Or, is a logic level translation required?
You can connect this to a 5V Arduino as long as you're sure to power it with the 3.3V supply. Because the pullup resistors on this board go to 3.3V, the I2C lines will never see 5V, so no level-translation is necessary.
isn't this still asking for trouble? This seems it might be ok if this is the ONLY thing on the i2c bus or power EVERYTHING on the i2c bus from 3v3, but as soon as one device powered via 5v, and another powered via 3v3 end up on the same bus I smell magic smoke!
You're correct; you don't want to mix 3.3V and 5V parts on the same bus. I don't think Sparkfun carries any 5V I2C parts at this point, so it's not a problem we've seen here.
Disable the Arduino's internal pull-up resistors! It's usually enabled by the Wire.h library.
Looks like its good to about 17,000 ft. based on the table at this site: http://www.engineeringtoolbox.com/air-altitude-pressure-d_462.html
The calibrated range is 50 to 110kPa but the specs say it is operational down to 20 kPa. That would mean it would work to about 35,000 feet or so. However, I imagine the accuracy is not as good at the extent of the measurement range. For those who might be interested, I am using this part with good success on a miniature rocket altimeter which I call AltStick.
The max sample rate is 1 second... How do you get decent resolution on the boost phase of the flight? Or are you only using it during descent - to trigger the ejection charge, etc.?
How low can this measure? Or what is the maximum altitude that can be accurately measured?
In the data sheet it says it's reads pressure ranging from 50 - 110kPa. Using the formula provided on page 14 in the datasheet for pressure to altitude conversion you can use the 50kPa to find what the maximum is.