- Home
- Product Categories
- WiFi
- SparkFun Electric Imp Breakout


SparkFun Electric Imp Breakout
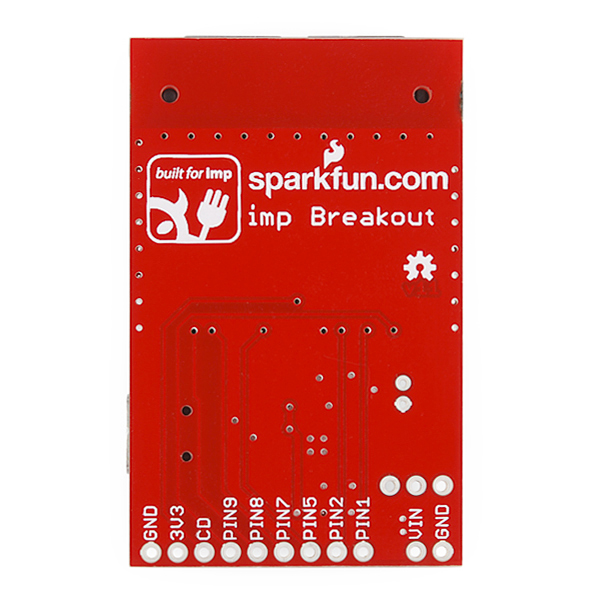
If you aren't familiar with the Electric Imp, it essentially provides an easy, integrated way to connect almost any hardware device both to other devices and to internet services. The Electric Imp Breakout Board allows you to explore the capabilities of the Imp by providing standard 0.1" headers to solder to as well as the necessary CryptAuthEE IC to identify your prototype to the Imp Cloud service!
This is just the development board, so you'll need to buy the Imp separately, check the related items below!
Note: If you want to use the mini-USB or battery inputs for power, you will need to populate the 3-pin jumper and set it to either 'BAT' or 'USB'. Otherwise, you can just simply power the board using VIN and GND without the use of a jumper.
SparkFun Electric Imp Breakout Product Help and Resources
Are You Okay? Widget
May 23, 2014
Use an Electric Imp and accelerometer to create an "Are You OK" widget. A cozy piece of technology your friend or loved one can nudge to let you know they're OK from half-a-world away.
Core Skill: Soldering
This skill defines how difficult the soldering is on a particular product. It might be a couple simple solder joints, or require special reflow tools.
Skill Level: Noob - Some basic soldering is required, but it is limited to a just a few pins, basic through-hole soldering, and couple (if any) polarized components. A basic soldering iron is all you should need.
See all skill levels
Comments
Looking for answers to technical questions?
We welcome your comments and suggestions below. However, if you are looking for solutions to technical questions please see our Technical Assistance page.
Customer Reviews
No reviews yet.
This board has a design flaw. My little brother purchased (3) and all of them do not make good contact on pin 1 unless you push in on the white imp module (after the card is seated). I just tested the (1) board I purchased from Amazon (supplied by Sparkfun) and it has the same problem. I performed the following test to confirm. Use electric imp Wiki example to output a PWM on pin 1 of the April board. The signal only appears on April board pin 1 when you press in on the White Imp Module. I am an electrical engineer and this is a design defect not operator error. I hope Sparkfun fixes it because I can only imagine how frustrating this must be for people new to electronics like my little brother.
I have the same problem, couldn't even light up a led (which works fine on all other pins). Electric Imp confirms the issue:
I had no issue with this board that I just purchased. Followed this tutorial https://learn.sparkfun.com/tutorials/electric-imp-breakout-hookup-guide/example-1-io-control and had it up and running in five minutes.
Can someone point me in the right direction. Disclaimer: I'm a n00b. I want to create a mini hub that looks similar to the electric IMP breakout board. I want to be able to attach a micro SD card reader and have space to attach a USB joystick and only use one USB cable to the computer. The computer will need to be able to see and read the SD card and see the joystick at the same time. Any ideas? Here is a picture of my idea to better illustrate what I'm trying to accomplish.
https://www.dropbox.com/s/65h8zv7hjg7bb0o/Micro%20HUB%20diagram.png?dl=0
Honestly, I'd check out your local computer store/Amazon/etc. A USB card reader requires special hardware to be done properly, as well as the USB hub part. If you really want to build your own, start with looking at USB hub ICs, then read up on SD cards. SD cards can be read/written to in two ways. The first is over SPI and can be done fairly easily, but is slow. The second uses the SD protocol which requires licensing. Once you interface to the SD card you will need to turn that information into a USB device which is another hurdle. In other words see what's already out there and good luck.
Can someone explain me what Mosfet Q1 does, please? Thanks
It's there for reverse polarity protection.
If you plug a battery in the right way, the body diode will conduct and drive the FET into saturation. But if you plug the battery in backwards, the diode blocks current, so the FET can't turn on, and the rest of the circuit will be protected.
The IMP forum is reporting an issue with this board when using Pins 1 and 2 for I2C. Looks like something to do with the socket that is being used. Any revisions in the works to fix this. Seems the socket pushes the imp up so pin 1 does not make proper contact: http://forums.electricimp.com/discussion/comment/9993
I have this problem withe version of the board I have. Theysuggest jamming paper into the socket to push the IMP into better contact.
Are there any voltage/current restrictions on the USB input? Specifically, can I use a 5V/2A wall-wart to drive both the Imp and a SparkFun thermal printer via the VIN/GND pins?
Kudos to Hugo and Co.! I'm upgrading a project I did 3 or 4 years ago that had multiple ambient light sensors connected to an old-school Make Controller over UTP cable. The controller then broadcast the lights' statuses over UDP to indicate room usage via a Mac desktop menu bar app. With the Imp, which took me all of 5 minutes to get communicating to our web service, I had a prototype up and running with no extra parts: No central MCU, no more cables, no PoE... It was great. Super easy to use, easy to commission and connect to your WiFi. WAY less work than an AVR with a WiFly. Xbee was a consideraton and I do love those modules, but getting their chatter onto WiFi isn't this simple. Thanks, Hugo!
For the laypeople among us, how exactly should we 'populate' a jumper so that mini-USB power supply will work?
The 'dirty' way would be to just take a piece of wire (perhaps a clipping off of a leaded component you cut off after soldering) and push it through either the VIN and BAT holes, or through the VIN and USB holes, then solder it down.
If you want to make it a little more flexible (switch between battery/USB without having to desolder/resolder), pick up something like (Break Away Headers - Straight)[https://www.sparkfun.com/products/116] and (Jumper - 2 Pin)[https://www.sparkfun.com/products/9044]. Take a strip of 3 of the headers, solder that onto the board, then just move the 2-pin jumper around as needed. There's plenty of other options (I'd be partial to putting a female header on instead), but that's the general idea.
TCO: Imp v. XBee
I have a multipoint networking project that requires Internet-based control. Two approaches were compared: (A) XBee Series 2 system [https://www.sparkfun.com/products/10414] with ConnectPort X2 [https://www.sparkfun.com/products/10569] or (B) Imp-based system.
Each ecosystem has unique advantages/disadvantages. But consider total hardware cost:
The break-even point is 6 modules. For fewer than 6 modules, the Imp is cheaper than the XBee Series 2 (regular, not "Pro"). Above 6, the Imp becomes more expensive.
Example:
Some comments at SparkFun have complained that Imp is a closed system that will likely charge customers/developers for future use of their cloud. But Digi does the same with its iDigi Device cloud system for the XBee (above 5 devices = a fee). Final cost will also be influenced by whether the XBee Pro or non-Pro modules are used.
You should also probably consider some other things:
The imp system can work anywhere with WiFi, ie all 20 imps could be at different sites. To do this with the Xbee requires multiple X2 boxes, making it much more expensive. Obviously, this is dependent on the topology of your installations (if you need a mesh, then obviously Xbee is the only way to go!)
No gateway = no additional box for someone to screw with, and no additional wall-wart either
The imp system can do local processing at a node level, and this code can be upgraded for devices in the field very easily. The X2 has some features like this, but not quite as flexible I believe.
The imp has much richer I/O; whilst the Xbee has more pins, the imp's pins are much more flexible - analog, digital, 2x i2c, 3x uart, 2x spi, etc. You can even do audio sampling and (next sw release) playback with no additional hardware beyond buffering.
If you're not making a commercial product here, ie you're just connecting 20 nodes and pushing the data to cosm or whatever, you can use the (free) imp developer account.
Data rates/power/etc are hard to compare - the imp is much higher power (~75mW EIRP) and is a much higher data rate (1Mbps upwards) but also takes more electrical power... and that doesn't guarantee range. This type of thing is very application dependent.
Definitely worth trying both solutions out for size, though. The imp is stronger in some areas, the Xbee in other areas.
This thing is awesome
If you have an electric imp and the breakout board, then here is a box you can print to house it and the small breadboard: http://www.thingiverse.com/thing:63392
Where can I get the water level sensor so I can measure if a plant needs water or not? It was a long pcb type of item you would shove in the dirt.
There's a reference design here: http://devwiki.electricimp.com/doku.php?id=flora ...or you can hook up a vegetronix sensor, eg this one http://www.vegetronix.com/Products/VG400/ ...to an analog input on the imp.
Hey guys, I'm new with these, could some one tell me how to populate 3-pin or power the VIN and GND. Gracias :)
For people who are building or modifying this design, I wanted to mention that the Eagle files and the board are slightly different. The Eagle files call for a 0402 sized capacitor (C4) and a 0402 sized resistor (R1) but on the board they are both 0603 sized.
Total newbie question: What's the best way to power this from a wall wart? Would something like the DC Barrel Jack Adapter fit onto this board? https://www.sparkfun.com/products/10811
Thanks!
Sure, you could wire one of the barrel jack adapters into the VIN/GND pins.
I'd probably recommend using one of the USB wall-warts with a mini-B USB cable plugged into it. Since the board's already got that USB connector on there.
I had an issue with my board. Pin 1 seems to have a poor connection inside the SD connector. I posted over on forums.electricimp.com and Hugo helped me diagnose it. See here: http://forums.electricimp.com/discussion/414/imp-and-a-thermistor-is-not-reading-adc-properly-#Item_4 I beat my head against the wall for a few hours until I figured it out. This is the best wireless way to go IMO. I had my turkey smoking temperature up reading on COSM in just a little while. Used some meat digital thermometer probes (thermistors), read with the Imp and posted to COSM. Really nice setup.
Hi Hugo,
same problem as some others on your forums: blinking off-red-orange
the imp shows up in the WLAN network:
it's MAC address is listed as DHCP client,
gets an IP address,
can ping from the same subnet (laptop)
using BlinkUp to config WLAN, there is ONE green blink, than it goes on off-red-orange forever
using BlinkUp to "Clear Wireless Configuration" there are THREE green blinks, than it goes on off-red-orange forever
WLAN is open (no password)
BlinkUp app is on IPhone4 MC603B, IOS 6.0 (10A403)
can access http://imp.electricimp.com/
Any ideas?
forums.electricimp.com are a better place to get support - did you want to post there? Sounds like a router incompatibility, we've seen this with AT&T 2wire boxes and have a workaround coming soon.
Posted there (too).
Guess as router incompatibility you refer to the WiFi access point?
Will try with other APs ...
For completeness: we worked out the issue was the DNS relay provided by the router upsetting lwIP, and will have a fix in the next release.
Got great support to troubleshoot the issues. Many thanks, really appreciate!
btw, well done, Hugo. you did a great job. you have been busy answering all questions for it.
comparing Cortex-M3+wifi($30) and breakout board ($20) will make anyone think twice. may b Sparkfun compared it to SD-MMC breakout ($10). So, the price seems reasonable as it add up a few components but I am more tempted to buy 1 more imp instead of breakout board. has anyone tried before without breakout board?
Bryan
How come the two power pins are not 0.1 spacing?
Very odd. Is there a reason for this?
Sure they're not 0.1 spacing but with one pin missing? That's what we did on the April design so it could be used in a breadboard easily.
Is there a datasheet to explain all of the pins?
The imp pins and pinmix is detailed on devwiki.electricimp.com
The other pins on the board are: GND/VCC - input power, ~3.5 -> 17v input. 3v3 - 3.3v output. You can take ~100mA from this pin detect - card detect, you'll need to stuff the pull-up to use it.
The "Product Video" link just sends me back to this page.
probably fixed soon, but here you go (from the electric imp product - related, below) http://youtu.be/xjRWDRrwqfo?t=2m37s
I have two questions about this board, what is the voltage range we can apply at Vin? Also, I'm assuming that BATT is the enables the input coming from the unpopulated (JST?) connector, I just wanted to make sure if a LiPo battery would power up the module. Thanks in advance, and great board, a bit expensive but its worth it as a quick start prototype =]
You should be able to get the full input range of the TPS62172, so max Vin of 17V.
Yup, that's a PTH JST footprint on there. It's definitely designed with a LiPo power source in mind.
Do you plan on developing the Hanna like board for distribution? http://electricimp.com/developers/devkits.php
I like the break out board for the "from scratch" projects, but if it lands at the right price point the Hanna looks like it could be a great educational toolkit with little assembly.
$19.95 is just too much for this board. electricimp.com sold the same board with $7 when it first came out. Sparkfun - you are simply taking advantage of the monopoly. We are hoping to see more competitors to appear.
Sparkfun also has a business to run. What costs $7 to make costs WAY more to sell. Have to pay rent, wages, taxes, et al.
My idea for this looks like PWM to 4 small motors and propellers, and a new class of quadcopter.
AR Drone works like this, but without bouncing through an internet server. Watch out for latency, but with a decent autopilot it shouldn't be a problem.
I'm a little confused as to why the 'Schematic' link above takes you to an entirely different schematic than the 'Eagle Files', even though the Eagle schematic has the same revision number (v11)... for one, the power supply in the design files is a simple LDO, whereas on the published .pdf schematic it is a DC-DC Switching supply. Also, the EAGLE file schematic doesn't contain the USB connector. I'm fine if the EAGLE files are a WIP version, but they should at least have a little better revision control IMHO.
Whoops, sorry about that. The correct files are up now.
Ouch. Twenty bucks for damn ATSHA204? It's exactly what I've expected! Anyone from Russia? Lets get group order directly from mouser.com or one of the local distributors. PCB itself costs something about 1.5$ (15$/10, shipping included) for batch order from China. We could cut the shipping costs for imps as well. Drop me an email to idle@msx.ru .
The ATSHA204-T in the 3 pin SOT23-3 is $0.77 each at DigiKey. P/N:ATSHA204-TSU-TCT-ND.
Yes, but international shipping adds extra 30$ for mouser and 120$ for digikey. ATSHA204 is the only part that not available in local retail stores.
Maybe consider buying a bunch and ebaying what you don't use?
I am planning on a bulk order of all components needed to build the imp boards to avoid the $20 shipping charge for a $0.77 component (~$2 for postage is better then $20). Check my profile for contact details if you are interested.
$20 is a little high for some one offs... are you going to create/carry the ~$7 basic proto board that the Electric Imp website talks about (the "April"?)
their board is selling at near cost just so they can get it out the door to promote the electric imp. we don't have that luxury unfortunately. buy theirs for $7, add one of ours to an existing order for $20, or make your own with batch PCB, and the eagle files above.
When you consider how much of an investment it would be to get a similar setup like this, it's not a bad deal. A $30 Uno, $35 WiFly module plus xbee socket/breakout boards needed and you still don't have half the capabilities of the Imp like an Internet bootloader, server-side number crunching etc. I'm sure people scoffed at the price of the WiFly module too until the official Arduino WiFi Shield came out at $90 a pop. Three cheers for Sparkfun! And thanks for cranking these out so soon!
I see what you are saying, but in the end I might opt for a raspberry pi + wifi dongle ($40+$12). It is bigger and a lot more power hungry, but you get full control (no dubious connections to the mother ship), remote access (ssh), more computational power, more GPIOs, your programming language of choice (personally I am a lot more comfortable with java than c or...squirrel).
Well, $40 + $12 + power adaptor + microSD (though you may have those lying about, along with the wifi dongle)
You will, however, need a mothership for it to connect to if you're planning on putting it in places where you can't open holes in the firewall and you want to be able to send stuff to it (vs have it report outward, eg drop values into cosm).
You can get an amazon EC2 micro instance free... but at that point then it's generally beyond the level of hassle that most people want to deal with. "Mothership included" is useful to some people.
Agreed. $25 + 7 per the Imp site is a great deal and I would gladly order some now. $30 + 20 is merely competitive with more conventional wifi shields/card and I will hold off and see how things go.
I agree, way too expensive. All of a sudden the Electronic Imp looks a lot less interesting. Too bad!!
Our $7 board was obviously sold directly, but it was not sold at anywhere near a loss; Sparkfun sell though other distributors too, so they have more margins to bake into product cost which accounts for some of the differential.
Obviously you can make your own board too :)
this is pretty darn accurate.
Are there any plans for another release of $7 boards? I joined the electric imp mailing list a few days back but haven't heard a peep.
Thanks for your answer. The fact is that I see potential for evil in this product: just like buying DRM protected media and locked phones, you do not really own what you are paying for. I could have been "bribed" into using a couple of these because they seemed cheap and easy to use. At 30 + 20 dollars, it is not cheap any more and making my own board is (relatively) not easy any more.
Potential for evil is possibly a little strong, even though the logo has horns on it :)
I could be wrong, but I think this IS the April. It looks pretty identical.