- Home
- Product Categories
- LilyPad
- LilyTwinkle ProtoSnap

LilyTwinkle ProtoSnap
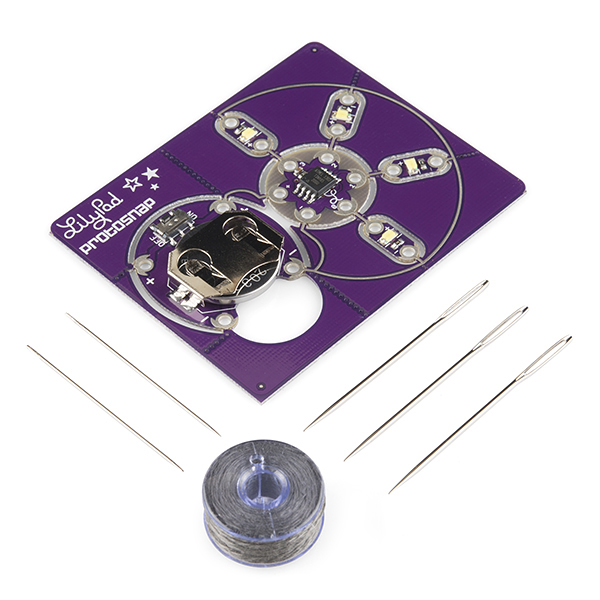
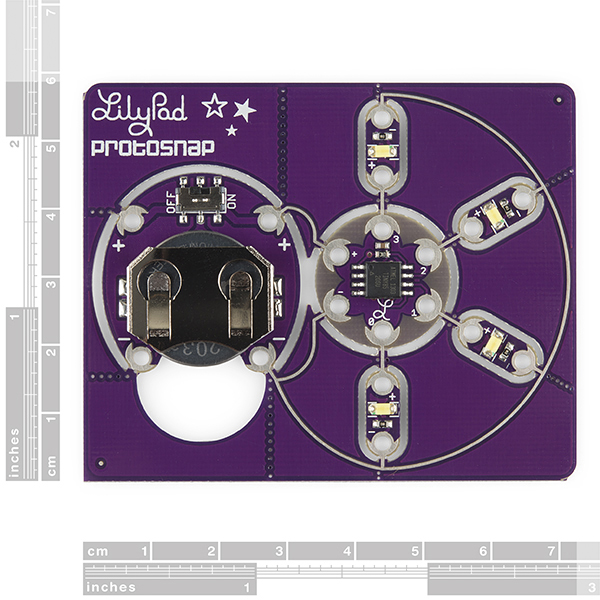
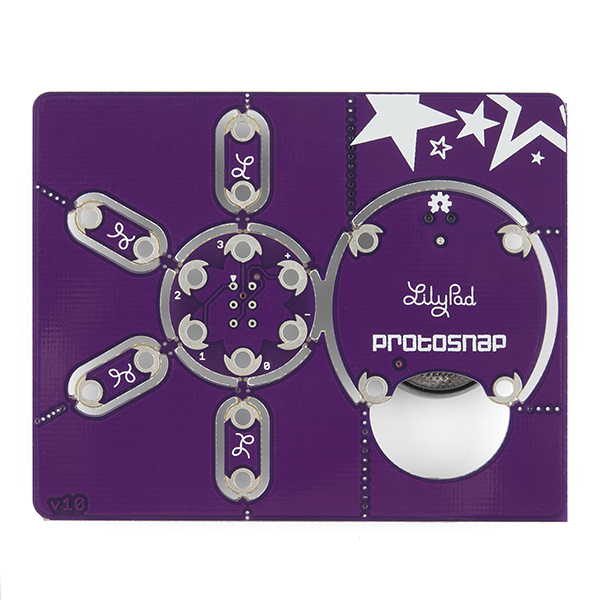
The ProtoSnap series is a new way to prototype your project without a breadboard. Everything is wired together on a single board, which makes it easy to explore the possibilities of the components before snapping them apart and building them into your project.
The ProtoSnap LilyTwinkle board is a very simple way to jump right into e-textiles. By including the LilyTwinkle, a coin cell battery holder (with built-in switch), and four white LEDs the ProtoSnap LilyTwinkle board easily allows you to add some sparkle to any project. To make your e-textile experience all the more enjoyable we have added a needle set and 30 feet of conductive thread!
Note: A portion of this sale is given back to Dr. Leah Buechley for continued development and education of e-textiles and also to Arduino LLC to help fund continued development of new tools and new IDE features.
Included on the Board:
Also Included:
LilyTwinkle ProtoSnap Product Help and Resources
Tiny AVR Programmer Hookup Guide
October 28, 2013
A how-to on the Tiny AVR Programmer. How to install drivers, hook it up, and program your favorite Tiny AVRs using AVRDUDE!
Light Up Pennant with E-Textiles
September 17, 2015
Show your school spirit, geek pride, or fandom with a light up pennant using the LilyTwinkle or LilyPad Arduino.
Getting Started with LilyPad
October 27, 2017
An introduction to the LilyPad ecosystem - a set of sewable electronic pieces designed to help you build soft, sewable, interactive e-textile projects.
Re-Programming the LilyTiny / LilyTwinkle
September 11, 2014
A quick tutorial showing how to reprogram the ATtiny85 IC found on the LilyTiny or LilyTwinkle boards.
Twinkling Trick or Treat Bag
October 2, 2014
Make a light up goodie bag with conductive thread, LEDs, and the LilyTwinkle!
Firmware
The code used for the LilyTwinkle can be found in the LilyTiny/LilyTwinkle GitHub Repo here => https://github.com/sparkfun/LilyTiny_LilyTwinkle/blob/master/Firmware/LilyTwinkle/LilyTwinkle.ino .
Core Skill: DIY
Whether it's for assembling a kit, hacking an enclosure, or creating your own parts; the DIY skill is all about knowing how to use tools and the techniques associated with them.
Skill Level: Noob - Basic assembly is required. You may need to provide your own basic tools like a screwdriver, hammer or scissors. Power tools or custom parts are not required. Instructions will be included and easy to follow. Sewing may be required, but only with included patterns.
See all skill levels
Core Skill: Electrical Prototyping
If it requires power, you need to know how much, what all the pins do, and how to hook it up. You may need to reference datasheets, schematics, and know the ins and outs of electronics.
Skill Level: Rookie - You may be required to know a bit more about the component, such as orientation, or how to hook it up, in addition to power requirements. You will need to understand polarized components.
See all skill levels
Comments
Looking for answers to technical questions?
We welcome your comments and suggestions below. However, if you are looking for solutions to technical questions please see our Technical Assistance page.
Customer Reviews
5 out of 5
Based on 1 ratings:
Amaze-balls
Yeah, it's pretty radical. I used this to add blinking lights to a winter hat for my daughter as a first e-textiles project, and it was seamless. The battery lasted several hours (an entire "Zoo Lights" trip at the Denver Zoo) with 8 leds hooked up (4 white and 4 blue). The pattern is subtle, sometimes, not terribly fast, and dozens of people did a "double-take" and stopped to ask me about it. It's also not terribly difficult to reprogram using an Arduino Uno (or Red Board, or USBTiny ISP, etc.), so you can definitely get a lot of miles out of the ATtiny85 on board. Purple is best.
-------------------- Tech Support Tips/Troubleshooting/Common Issues --------------------
Reprogramming the ATTiny85 on the LilyTwinkle
You can reprogram the ATtiny85 on the board if you have a AVR Programmer and adapter. Try looking at these instructions for more information [ https://learn.sparkfun.com/tutorials/re-programming-the-lilytiny--lilytwinkle ].
What modifications would one make to a garment's care instructions when modifying it to include stuff like this?
In other words, if you take a T-shirt, and then sew one of these sets into it to add a twinkling light effect to whatever the T shirt design is, then what would the care instructions tag be?
I'm guessing:
Remove battery before washing. Machine wash warm, gentle cycle, air-dry - do not tumble, do not dry clean ?
Very close. DEFINITELY remove battery, and I'd also change it to hand-wash. If you're machine-sewing your traces, the stitching will be secure enough for machine washing, but it's rough on the components, and will put too much strain on the connections between traces and components, which have to be hand-sewn.
PS- Would LOVE to see what you're making!
One of the comments for the white LEDs say "You can definitely run these without a LilyPad. But note that the forward voltage on these white LEDs is 3.3V, so your power supply will need to be higher than that."
How does the ProtoSnap - LilyTwinkle work with a 3V coin cell battery if the LEDs require more than 3.3V power supply?
That comment is not entirely accurate. An LED's forward voltage is far more of a curve than that of, say, a zener diode.
Specifically, if you check out the datasheet for the white LED used in on the LilyPad board and scroll down to page 3, you'll find a current vs voltage graph there. You can see there that it'll work at 3V, but instead of about 20mA current you get 10mA current. According to the graph next to it, the relative luminous intensity vs current one, you'll see that they claim it will basically be about half as bright.
( As an aside, the datasheet for the battery itself claims it'll hover a bit above 3V for the first bit of the discharge curve anyway, and sits a fair bit below that afterward, further affecting the above. Suffice it to say, it'll light up - just less bright than it would if you actually applied 3.3V directly tot he LED. )
Thanks. So I need to first find the current I want and then find the forward voltage in the datasheet graph. Then I can calculate the resistor value. Since the resistor on the LED board is known to be 100 ohm, I will have to find which current and voltage pair that give a 100 ohm resistor. Correct?
3 mA give approximately 2.7 V forward voltage according to my interpretation of the diagram. This give (3-2.7) V / 3 mA = 100 ohm resistor.
So this means that when the battery (actually the AVR output pins) are at 3V, the LEDs get 3 mA given this LED datasheet and the 100 ohm resistor.
Correct?
Considering the unit is meant to be used as-is, pre-programmed, what can you "proto" with this? They could have at least made the ICSP headers friendlier to access...
The "Proto" in "Protosnap" is meant to convey that you can fully test out your circuit before snapping it apart to be sewn into a project; something that's difficult to do otherwise. And sorry that the ISP pins aren't easier to use; it was a tradeoff against getting the board this small. Tip: sewing the board in chip-side down makes the programming pads easier to access, and using a pogo adapter makes it a piece of pie. Cake. Your choice.
Just a note, the E-Textile Basics link in the Documents section doesn't work.
It works here, are you still having issues?