- Home
- Product Categories
- AVR
- Tiny AVR Programmer

Tiny AVR Programmer
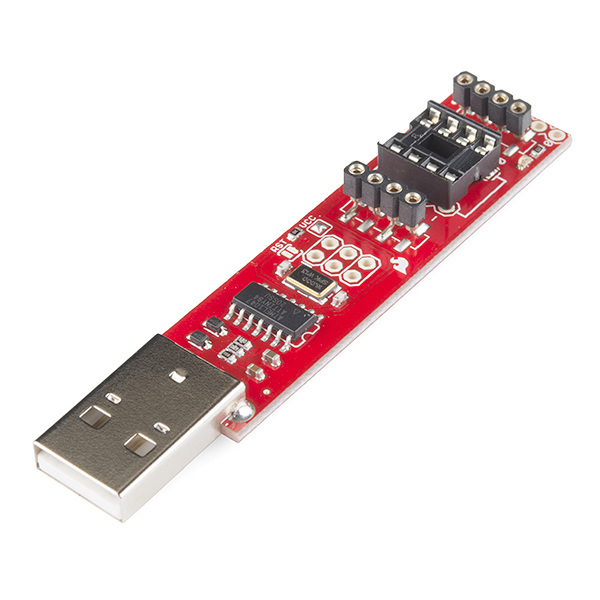
The ATtiny45 and 85 are a couple of really cool little MCUs but did you know you can program them in Arduino? That's right, now you can shrink your Arduino projects down to "tiny size" by moving your code straight over to these small but capable ICs. The standard method for programming the ATtiny ICs involves a breadboard, lots of jumper wires and a hardware programmer, but David Mellis over at MIT Media Lab has simplified the process by laying out this handy USB programmer.
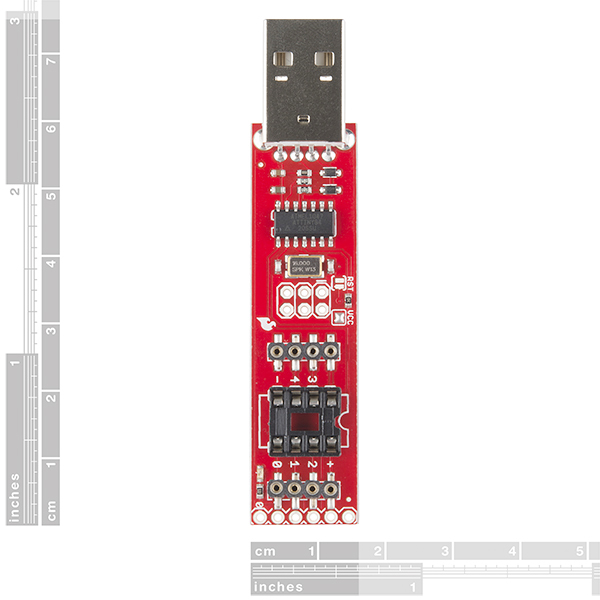
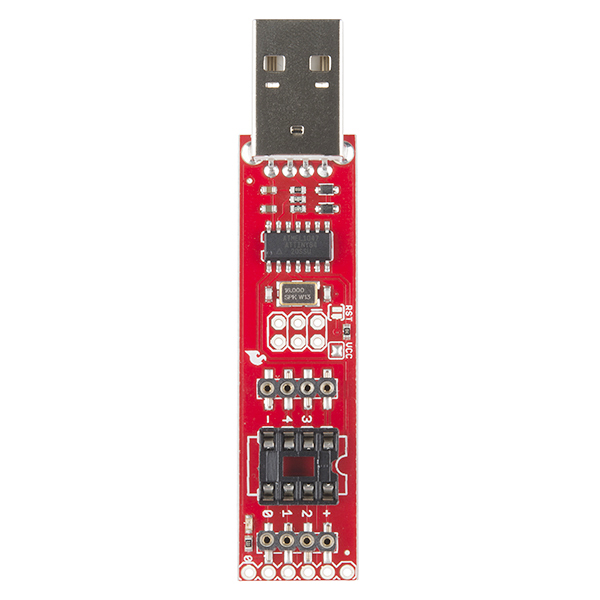
The Tiny AVR Programmer plugs directly into your USB port and provides a programming socket for the ATTiny45 and 85. Just slot an ATtiny with a DIP footprint into the socket, plug the programmer into your USB port and start up the Arduino IDE. After installing the proper board definitions, you simply program it the same way you would any other Arduino board. The programmer even breaks out the IC pins to female headers so you can easily prototype around the ATtiny without pulling and plugging it over and over. There are two ISP headers that have also been broken out so you can use the programmer or solder in a 6-pin header for other AVR microcontrollers!
Note: You'll need to install the USBTinyISP drivers if you don't have them yet, you can find them in the documents tab!
Tiny AVR Programmer Product Help and Resources
Tiny AVR Programmer Hookup Guide
October 28, 2013
A how-to on the Tiny AVR Programmer. How to install drivers, hook it up, and program your favorite Tiny AVRs using AVRDUDE!
Re-Programming the LilyTiny / LilyTwinkle
September 11, 2014
A quick tutorial showing how to reprogram the ATtiny85 IC found on the LilyTiny or LilyTwinkle boards.
Installing a Bootloader on the MicroView
August 22, 2014
Fix your bootloader-less MicroView! This tutorial covers how to: disassemble the MicroView, wire it up to an assortment of programmers, program the bootloader, and test it out.
Installing an Arduino Bootloader
December 4, 2013
This tutorial will teach you what a bootloader is and why you would need to install or reinstall it. We will also go over the process of burning a bootloader by flashing a hex file to an Arduino microcontroller.
Driver installation issues?
Some users have trouble with the driver we provide for the Tiny AVR Programmer. Adafruit's driver will sometimes work in those cases. You can grab Adafruit's driver here as well as a PDF document that walks you through the installation process.
Naming
If you are using another AVRDude programming software, other than Arduino, you may need to name the Tiny AVR Programmer. One suggested name is "PROGRAMMER = -c usbtiny”.
2 of 3 found this helpful:
Driver Download Problems
You might have problems downloading some files for the Tiny AVR Programmer using the Chrome browser.
The site ahead contains harmful programs

Attackers on cdn.sparkfun.com might attempt to trick you into installing programs that harm
your browsing experience (for example, by changing your homepage or showing extra ads on sites you visit).
There are no malicious files in the zip file.
Try downloading it with Firefox or another internet browser.
Core Skill: Soldering
This skill defines how difficult the soldering is on a particular product. It might be a couple simple solder joints, or require special reflow tools.
Skill Level: Noob - Some basic soldering is required, but it is limited to a just a few pins, basic through-hole soldering, and couple (if any) polarized components. A basic soldering iron is all you should need.
See all skill levels
Core Skill: Programming
If a board needs code or communicates somehow, you're going to need to know how to program or interface with it. The programming skill is all about communication and code.
Skill Level: Rookie - You will need a better fundamental understand of what code is, and how it works. You will be using beginner-level software and development tools like Arduino. You will be dealing directly with code, but numerous examples and libraries are available. Sensors or shields will communicate with serial or TTL.
See all skill levels
Core Skill: Electrical Prototyping
If it requires power, you need to know how much, what all the pins do, and how to hook it up. You may need to reference datasheets, schematics, and know the ins and outs of electronics.
Skill Level: Noob - You don't need to reference a datasheet, but you will need to know basic power requirements.
See all skill levels
Comments
Looking for answers to technical questions?
We welcome your comments and suggestions below. However, if you are looking for solutions to technical questions please see our Technical Assistance page.
Customer Reviews
4.5 out of 5
Based on 107 ratings:
4 of 4 found this helpful:
Programming an ATTiny84 with the Tiny Programmer
Super handy. Buy a chip extractor to go with it.
If you want to program an ATTiny84 with this, here are the pin connections:
ATTiny84  --->   Tiny Programmer

1  ---> +
14 ---> -- (minus sign)
4  ---> (unlabeled)
7  ---> 0
8  ---> 1
9  ---> 2
( find more info here )
1 of 1 found this helpful:
Beautiful gadget... howver seems like new arduino version does not like it so much...
I believe the update screws up the tiny avr process.. I had my attinys working.. updated to the new one… now they dont work.. Back to the previous one and it is back on… KNowing my newbieness…it is probably just me but still the error is
Arduino: 1.6.1 (Windows 7), Board: “ATtiny85 (internal 8 MHz clock)”
Selected board depends on ‘arduino’ core (not installed).
This report would have more information with “Show verbose output during compilation” enabled in File > Preferences.
so I guess for now Ill stick with the previous version…
2 of 2 found this helpful:
One LED-removal away from being great
Unfortunately, the LED connected to MISO means that you can't keep this thing in your circuit while debugging I2C and other serial protocols that require you to pull MISO back and forth. Desoldering that LED makes this a great little tool, but it's a pain to do for such a tiny component.
1 of 1 found this helpful:
fast and furious
Greetings from Germany. I bought this item and it arrived in Cologne in less then 2 weeks, great! I used the shipping time to prepare my Arduino IDE and alter the blink-sketch, so when the programmer arrived, I put it into the USB-Port, installed the drivers, one click and the LED startet blinking. You get what you see and it does what it should do, so there is no reason to grumble. Nevertheless I wonder why did they not solder in the pins for the ISP-headers. I think it would not rise the price that much and would prevent me from messing around with the valuable PCB. Driver-installation on win 8 is really a pain in the ... Here in german language: Treiberinstallation für deutsches win 8.1: win-Taste+C: öffnet Charms-Menue (rechte Seite) - EInstellungen - PC-Einstellungen ändern - Update/Wiederherstellung - Wiederherstellung - Jetzt neu starten - Problembehandlung - Erweiterte Optionen - Starteinstellungen - Neustart dann die 7 wählen, der PC startet und endlich kann man die Treiber installieren
DIese Abfolge am besten ausdrucken, damit man sich nicht verirrt.
1 of 1 found this helpful:
Easy to use, even for a complete beginner
Easy to use, even for a complete beginner. Reindeer to microprocessors and programming. This allows me to upload a little sketch, remove the microprocessor, and use a separate circuit.
Very small, it works very well
2 of 2 found this helpful:
Handy (if not necessary) device!
Hardware: Great simple programmer with plenty of options! The female headers hold jumpers quite well. Nice that other programming pin options are offered. Good form factor: won't hog USB space from another port next to it and fairly sturdy (with no intermittent connection issues).
Software - Drivers: I know that the drivers aren't the product, but without them the product doesn't function. First, is anyone else using Chrome getting a security error when trying to download the drivers? I keep getting the red danger page stating "The site ahead contains harmful programs. Attackers on cdn.sparkfun.com might attempt to trick you into installing programs that harm your browsing experience (for example, by changing your homepage or showing extra ads on sites you visit)." I know Sparkfun isn't evil, so I just used another browser to remedy this. Now my homepage is Sparkfun.com....jk. Drivers work with Arduino 1.6.1 (with Tiny add-on) and Win7.
Software - Arduino: There are frequency options for the Tiny85, but changing from the 1MHz internal clock does nothing. I tried using the 8MHz internal even when the Tiny AVR Guide warns me that things will slow down. It seems that the scaling settings for correct timing get changed but not the clock selection or prescaler. I've checked a few things to verify the clock not changing. Might have to dig in to figure out clock selection or directly write to the clock registers.
4 of 4 found this helpful:
Handy programmer, but flawed
This is a very handy programmer. Works great for general ISP programming as well. One drawback on the design are the female header pins for prototyping. They are of the machined type headers and components or wires do not hold very well in them. So they are mostly useless for prototyping. They should have been female header like they use on the Arduino boards.
Hi, Thanks for the feedback. I would like to see this revised to run standard female headers as well. I will share your feedback with the engineers for the next time this gets a revision. Thank you
2 of 2 found this helpful:
Very reliable tool for programming ATTiny85s - I2C Application
This tool just works!! One caveat I found relative to I2c: If you leave the ATTiny85 plugged into the board while trying to debug I2C, the board holds the SDA signal on Pin 5 HIGH during the acknowledge clock cycle which results in not being able to detect an Acknowledge (LOW) from a slave device. The SDA pin during the acknowledge clock cycle is configured as an Input. The ATTiny85 worked just fine when removed from the programmer.
1 of 1 found this helpful:
Tiny AVR Programmer works very well
I am using the Tiny AVR Programmer and it is working fine. The documentation/tutorial is a little old and I suggest that you use the links they made available for getting the files via github.
3 of 3 found this helpful:
Good Programmer, bad tutorial
I finally was able to use the programmer but the tutorial is kind of misleading. It needs to be updated for windows 10 or even Ubuntu as it is free and user friendly. Also update to Arduino 1.8.x or the web editor. I feel the tutorial is part of the product as no manual is included with the programmer.
1 of 1 found this helpful:
Works great
This seems to work flawlessly, even when I have a hard time getting my other programmers to "play nice" with the ATTiny85.
1 of 1 found this helpful:
RE: No signed x64 drivers
To Member #6938: use the links to the driver on the product page, not the hookup guide (they are different for 64 bit). If that still doesn't work, try this link (it worked for me): https://mightyohm.com/blog/2010/09/fixed-usbtinyisp-drivers-for-64-bit-windows-7/
2 of 3 found this helpful:
Beware!
The schematic shown is for REV 14, however I was sent REV 13, board I designed to match the pinouts at JP10, doesn't match now I'm forced to connect each pin individually to program each my board. Grrrr.
Hi, From my records, we haven't revised these in years. I'm not sure why your board doesn't match what you expected. I'm very sorry for the issue.
1 of 2 found this helpful:
Good, but finicky
I wish this came assembled and in an enclosure. One small bump and the USB connector is likely be easily ripped off.
Simple
The AVR programmer is simple and easy to use. The price seems a tad high for what it is but it works and it works well.
Really cool !
Simple and light. Used to begin C/assembly without arduino IDE. Maybe a little difficult for beginners but with a lot of documentation on internet (perfect for programming the sunday in sofa ^^).
A very well designed product
What I like about this programmer is that it programs without requiring a preloaded bootstrap loader. It is also small and self-contained (does not need a separate power supply). Naturally, the Arduino IDE port is a great asset as well. I bought 25 of them and handed them out for free when I gave an invited lecture to high-school students recently. It was very appreciated! I´m just worried that they may ask me to give this lecture to many more classes... /Robert
Excellent AVR Programmer
I used it at first to program some ATtiny85 ICs but soon added a 3x2 male header and with six male-to-female jumpers, I now program my 328P ICs on the motherboard. Great value.
Works as advertised. Driver installation was easy but not seamless. Directly plugging in to a usb port causes unwanted mechanical strain. I recommend using with a usb extension cable.
Otherwise an excellent tool.
0 of 2 found this helpful:
Seem to work fine but...........
Publicity should make it clear that this device cannot accommodate surface mount I.C's
It works perfectly!
Now I have a quick and easy way to program ATtiny85, using the Arduino IDE 1.6.6. I have followed Hookup Guide.
Worked like a champ!
I used it to create a one-off simple game timer. It worked flawlessly, once I got both the correct and current software for both this device and the Arduino IDE. My Mac did not show it as an attached USB device, but the on-board LED let me know the two were conversing. Off I go now to do some more stuff with these terrific little ATtiny85s!!
perfect for what I need it for, works GREAT!
programs ATTINY85, super easy to set up and use, no more messy jumper wires from my Arduino Uno, plug and go!
This is an excellent value
I've used it on Windows and Mac so far. Well integrated into Arduino IDE. AND It's inexpensive.
Works awesome!
Would have been nice to have a link to the drivers.
I love mine
Thanks to this board, the ATtiny85 has become my favorite chip for projects. I only wish I knew half the features this board offers.
A word of caution, and some praise for durability: I have melted 3 ATtiny85s by plugging them in backwards. Each time I just desoldered the melted socket, soldered on a new one, and went back to work. I love that this board could take that kind of clumsy abuse.
Tiny AVR Programmer is Great
This programmer is great. If you need to utilize all of the 8K of flash on the ATtiny85, definitely buy this. It allows you to program the ATtiny85 without needing a bootloader, saving around 2K of flash.
great little device
A great little device. Works great programming my ATtiny85 chips. Super easy and quick. A wonderful tool in my pile of electronics.
Sweet little thing
Wow this baby works great and is so small.
Great programmer!
Very quick to set up and easy to use. Had my ATtiny85 controlling an LED array in no time.
So much more convenient than using an Arduino Uno as an ISP Even my SOIC ZIF adapter fits on it ( http://c.shld.net/rpx/i/s/i/mp/38124/prod_3367361926?hei=245&wid=245&op_sharpen=1&qlt=85)
My only complaint was shipping - it took forever to get here.
Wonderful and quick
I love that you can quickly and easily flash an ATTiny45 on this thing. It's so nice not having to wire up a breadboard to flash the chip. This is about as convenient as you can get. Got it working very quickly on Mac OS X with avr dude
Outstanding item
Love it, simple as that. Worth every penny of the twenty bucks.
Tiny AVR Programmer
When I ordered this I was having problems with my Macbook Air attaching to some Chinese Arduino's. When this programmer came in I resigned myself to having to slog through debugging usb communications on the Mac. Imagine my surprise when It worked the very FIRST TIME! Awesome sauce! Bravo on this product. I'm very happy.
Giving this a 5 for ATTiny85
Super easy to use with the latest Arduino.cc IDE and the sparkfun link to the driver for ATTiny85. Working great on win8.1 and win10.
Have not got it to work with an Atmega328p yet. Could be the chip I'm using has already been fused to 16 MHz. Not a biggie as I could always plug the chip into an UNO and re-fuse it. ;)
I like this easy device for 8 pin at85. I approve this review. LOL.
Great for most projects where you only need a couple of inputs and outputs.
Great programmer!
Easy to use and (thus far) works perfectly!
Rigidity is the only flaw.
If you want this thing to last, and you will, because it's so much more useful than any other incarnation of AVR programmers - install additional headers first and then cover the entire stick in epoxy. Put a little loop of scotch tape around the chip socket to make sure glue doesn't get into it and cover RST/VCC jumpers with a cutout from a pencil eraser if you ever plan on messing with the bootloader. The rest can use a layer of epoxy as thick as the USB plug.
Works for what I need
Would be nice if this had a USB-B port so this could be connected by a cable, as currently I have to use it in an awkward position on my PC. Otherwise works well. Proto headers are a nice touch
Cool little device!
It works as advertised. It is nice that we can program little ATtinys!
Works Great!
It works exactly as expected and I love it. Makes simple projects even easier.
In the box with my ATtiny85 chips...
Like I said in the title...
No I2C if chip used on programmer ?
I got this to program ATTiny85s and I expected to use the breakout headers to program it in-circuit with jumpers to the breadboard circuit for rapid prototyping. The circuit used I2C with an external EEPROM. The circuit did not work with the chip installed on the programmer, but with the chip in-circuit without the programmer it worked correctly. I believe this may be due to this programmer not being able to allow I2C communication when the chip is installed on the programmer unfortunately - I suspect this due to a comment left by a previous customer. I am forced to move the chip back and forth to the programmer to use it correctly. If I knew this I probably wouldn't have bought it. Can you please fix this problem? Thanks.
It is so simple now !
I was using the Arduino and a basic breadboard for programming ATTiny85, but now, with this Tiny AVR, which works perfectly with Arduino studio, it is easiest, faster & reliable.
Awesome little tool
Great little tool for programming an attiny85 chip with. Have used it for small scale police cars!
Worked great the first day but now im having issues.
When i first received the Tiny AVR programmer i was able to program an Attiny85 in a breakout board without any issues. It was a blank IC from Digikey now i got a new shipment of ICs from Digikey and im able to burn the bootloader on to them without any issues but every time i try to upload a program through arduino i get a content mismatch error.
Works very well. . .thank you!
It's easy to use and very effective. I think it's pretty near excellent. I've been working on a project with several folks and each of us has been prototyping with our own Tiny AVR Programmer.
A couple of things to watch out for. Be sure all the pins of your ATTiny are very securely inserted. It's very sensitive.
And if the USB port is not working, just slightly giggle it around a bit.
Your guide is pretty good. I'm working on a blogpost that covers a few small issues that can confuse beginners and also how to use ATTiny85s with servo motors, which can be challenging! I will share when I finish.
Briliant
Absolutely awesome little programmer!
Handy little programmer
I am still new to Arduino, only having built a few projects, but having used an Uno, mega and nano, I quickly learned that the boards' size is rather ungainly (and expensive!) to leave in a simple project. The attiny85 is a great size and easy to use with this programmer. Just download a few drivers, which sparkfun provides a link to, follow their instructions and you are blinking LEDs in minutes. You can use the tiny85 by itself or gang them together to take the code-load off of another microcontroller. I am using 85's from China for less than $.50 each! Definitely a game changer for me. Thanks sparkfun!
Sweet
No longer need to plug in jumper wires from my Uno to a breadboard. Plus I can use the programmer to build the project circuit instead of shuttling the ATting 85 back and forth between breadboards.
The port isn't recognized by the Arduino IDE.
Well, to my surprise, this device doesn't need to have a port assigned to get it functioning. I was a little caught off guard by that. I think I can now work with this every way I wanted.
<<So far, this product was a complete waste of money. I haven't been able to get the Arduino IDE to recognize the port on my Mac. I've gone through several solutions for the issue based on similar issues people have had with other Arduino products. Still nothing. There was a page on Sparkfun too, but it's a dead link.>>
Hello!
Sorry about the troubles with the Tiny AVR programmer. Have you contacted our technical support department available @ techsupport@sparkfun.com - they're usually quite good at assisting with issues like this.
Works as advertised
Works perfectly. Breakouts very handy. Worth the $ for flashing these great little micros.
Good but I broke one
OK Sparkfun's automated email asked me to review this device. I like it for programming LilyTiny and LilyTwinkle which I enjoy to use. In this regard, I use what I call the funny looking "cadelabra" connectors. So I broke one of those as they seem to be made of a brittle metal (all 4 broke off). So I had to get a replacement.
A great programmer for the ATtiny 85 chip!
The product works as expected and is easy to setup and get started on programming the ATtiny chip!
The first programmer that actually worked on the ATTiny85
This is the first device that has effectively programmed the ATTiny85 pu after about 20+ attempts with other programmers and Uno as programmer.. Drivers and functions are very intuitive.
Fastest approach to programming an AVR
This is an incredible device. After hours of playing around with an Atmel ICE, AVRISP MK 2 and configuring the associated drivers and such I came across this programmer on Sparkfun and ordered a couple. I put a Tiny85 in the socket, followed the directions to update the Arduino IDE and I was able to immediately start working on my project.
Great Tiny AVR programmer
This is a very handy product. The setup is fast and easy. I would recommend this to anyone working with the AT tiny 45 & 85.
Once you get it installed, it is wonderful
Since you won't read all of the following, quickly I will say this is a wonderful product, I highly recommend you get one and play with the little 8 pin arduinos'. But, use their installation instructions only as a guide. they are dated and if you follow them exactly, you will go insane!!
A really great programmer!
For many years I have developed AVR based projects using Atmel chips and the STK500 development system (with the Studio software). This combination was clumsy and highly error prone. On the other hand, the Tiny AVR programmer, together with the AVR tool chain, AVRDUDE, and Notepad++, are simple and reliable. 8-pin ATtiny projects can be done entirely on the Tiny AVR programmer, while projects involving larger chips (e.g. AT644P) can be done using programmer's 6-pin SPI interface. I don't expect to return to the STK500 and Studio very soon.
Love it! Works Great
Great Device
I really like the convenience of the device. Worked great initially. I had to reinstall my OS (Linux Mint) and now it is not being recognized by Arduino IDE. I know it is a problem with the OS not creating the /dev/ttyUSB0, but since there isn't much information for Linux, other than "it just works", it is a problem troubleshooting.
Works as intended. Hook Up Guide is still accurate
I have used this to program ATtiny85 directly from the Arduino IDE without using error prone jumpers. Also have burned bootloaders into AVR devices.
Great for the ATtny84
I got this for the ATtiny84 14 pin micro controller so I could easily program it with the Arduino IDE. It was a little difficult determining how to jumper the two devices together, but once I got it figured out, programming was supper fast and easy.
Nice device
Works right out of the red box
Nice device
Works right out of the red box
Small and relatively easy to use.
Once you navigate the kinda sketchy setup waters, this device works fast and easy. I built a pocket sized kit in a little tin. My kit includes a small breadboard and this programmer amongst some other items. All I need is a computer and access to the cloud and I can play anywhere. https://www.dropbox.com/sh/vh80oomb55xxywo/AAAxm-rastaS8oSuOKx31n8La?dl=0
So convenient!
Much more practical than the in-breadboard programmer I used to use, and I love that I can still use this in that fashion if I want to save myself from repeated MCU plugging. Getting a test program up and running on an ATtiny25 was quick and easy with the Sparkfun tutorials.
I do feel a little nervous plugging it in without a sturdy plastic case to distribute the load around the USB solder points, but it's held up so far and will probably be fine as long as it gets plugged in straight.
Great little programmer
Works well with Avrdudess.
Works great..and not just for ATtiny85
I was able to use for ATtiny84 using the cool header
Excellent product
Directions were easy to follow. Worked correctly first time. I was up and running in 20 minutes.
Tips on Linux (Debian)
Such a useful product. Thanks. Only one small hint if you are on Linux and receive "permission denied" on the usb-port during upload. This is easy to fix with a udev-rule. When plugging in the Tiny AVR, it's product id is captured in the /var/log/messages log. In this case it's "1781". Then add a rules-file for libusb, e.g. name this as "99-tiny-avr.rules" (as sudo/root) in /etc/udev/rules.d/ with following content:
SUBSYSTEM=="usb", ATTRS{idVendor}=="1781", MODE:="0666"
SUBSYSTEM=="usb_device", ATTRS{idVendor}=="1781", MODE:="0666"
Reboot and your done.
Great to have in your toolbox!
Fantastic little programmer. I am using it on a Mac. I did not have to install any drivers. I followed the instructions to install and download the Arduino IDE and I was programming in 10 minutes. Programmed the first time around. Well worth the money.
Works perfectly for my purposes
So far I'm very happy with it. With a couple of minor additions it'll do everything I need it to do.
I added a right-angle header to the end and made a set of cables for it: one to interface fir the 1x6 connector on the SparkFun ISP P Adapter, one with a 2x3 dupont end for boards with an ISP header, and one with 1x1 dupont ends for non-standard boards. I also designed and 3D printed a cover for it.
Great Attiny85 programmer
Easy to use. Does a great job in loading the arduino bootloader and app into the Attiny85-20.
I was making a siren sound with the Attiny85 and a lot of noise was present in the sound output. I found that if I loaded the Arduino bootloader into the Attiny85 with this programmer, the background noise went away.
I highly recommend this programmer.
Works great but be careful with the headers
It works quite well, and it is very handy to be able to leave the chip in the programmer and use the headers that breakout the chip's pins to connect it to your prototype board where you are testing out your sensors and such.
Note, however, that those headers are not through-hole. it turns out it doesn't take much force at all to rip them right off the board. This is made worse because the holes on those headers are a tight fight for the common DuPont connector breadboard jumper cables, making it easy if you are trying to hit a hole that already has connections on either side and so are having trouble getting a perfectly straight shot to bend the header which will greatly weaken it or break it.
I'd like to see a revised model that is just like this one except with through-hole versions of these headers.
If you do break these headers, all is not lost. On the the end there are holes for connecting to the pins used for programming. Solder a male header in those, with the pins on the bottom. Then when prototyping put the chip on your solderless breadboard instead of the socket on the programmer, stick the programmer in your breadboard, and run jumpers from it to the correct pins on the chip. It is then functionally equivalent to prototyping on the programmer.
well designed
Works good
Worked in a flash
I had already gotten the files for attiny before I received this programmer because I’d tried to make my own shield. So much easier to be able to plug this directly into the computer.
Almost GREAT!
I love this programmer, but removing the resistor or LED is [probably] necessary for I2C to work. Make all the things TINY!
The programmer works perfectly!
Programmed up my Tiny25 chips without the hassle of using current USBAsp programmers. Now, if it could program Tiny5/10 chips...I would be very happy!!
tiny avr programmer
Hi, The programmer works fine - with the exception that, the USB connector does not always connect properly: it arrived slightly bent. But if I fiddle with it in when it is plugged in to the computer it eventually makes proper contact - just takes a little more time. Thanks, Doug
Does the job well
I plugged it in, and everything worked. Very straightforward. And good value for money. 5 stars
Awesome device
Thank you for creating this alongside with the comprehensive guide. It is very handy in programming bare chips!
Great programmer, but...
I have used this programmer many times to program ATtiny85 processors. Unfortunately the set of pins on either side of the MCU socket are a bit delicate and some inadvertent mishandling broke one set of pins . The damage may be repairable but right now the programmer is not usable. Great programmer just be careful with it.
Makes it easy
The programmer worked great. I have very little experience and found other methods confusing to program the ATtiny85. This programmer took very little time to get my ATtiny85 programmed. Highly recommended.
Great little device, does exactly what I wanted, I am very happy with it and the on-line instructions required on getting it going initially.
Awesome little programmer.
Very convenient and easy to use. headers make prototyping simple. The pins on the back make it simple to program other AVRs, just make sure to use right angle pins or it won't plug into a laptop.
Great little device for programming Attiny MCUs
The Tiny AVR Programmer is an excellent device for programming and testing Atmel 8-pin MCUs. It beats Arduino boards which need leads as well as a 10 uF capacitor by lengths... Great work from Sparkfun!
This is an inexpensive way to get into embedded programming.
Thanks SparkFun for the excellent tutorials for getting started programming attiny chips with this device. Below is a video of some music I programmed to play from the attiny. As a testament to the robustness of the tiny avr programmer, if you look closely you'll see a crater in the middle of the chip socket. Yep, I put one in backwards and it got quite hot. The chip was toast of course, but the tiny avr programmer still works! (I later ordered a spare programmer given the price is so reasonable).
About 30 seconds long, a little Bach. A link to the C source is on the youtube page.
https://youtu.be/NhVUl-SrlMY
Nice device
I'm still using Windows XP. The Tiny Programmer works fine with Arduino 1.0.6 but I could not get it to work with Arduino 1.6.1 or 1.6.3 even though I followed the Sparkfun and High Low Tech. tutorials and downloaded the files for 1.6.1.
Every time I attempted to upload a sketch I received the error message "id.exe has encountered a problem and needs to close".
If anyone has a suggestion, I'll try it.
This is really good one
I had used Arduino to program the tiny one but since I used this Tiny AVR programmer, it makes my live more easier. Thanks Sparkfun for having this product
couldn't get it to work as instructed
Tried in vain to get this thing to work on the newest release of arduino. (1.6?) Used the old arduino programmer and it worked. Wish there were better instructions for beginners.
Exactly what I needed.
As this was going to be my first time dabbling into AVRs, I didn't want something that required too much wiring. This little guy does the trick. The instructions and support given here made it well worth the money over cheaper solutions.
Getting it to work with Windows 8.1 is a pain, what with having to boot windows into a non-signed driver mode, but other than that minor, infrequent annoyance, this has been a pleasure!
Perfect for me
Win7 works great, fast easy way to program chips. See 'comments' for my photos on adding legs to the socket to help with breadboard and in project usability.
Bit of a learning curve ...
Easily programs the attiny 85, both on board or breadboarded, but having difficulties doing a breadboarded 328 using Arduino IDE 1.6.4 following the hookup guide. Will persevere!
Getting a verification error
I've tried to use this programmer with Arduino IDE and I get, "avrdude: verification error, first mismatch is at 0x0080." The board is set as ATtiny 45, 1 Mhz clock. The programmer is set to USB tiny ISP. I can program the same chips just fine using an Arduino UNO as programmer. Just bought this programmer. Could it be bad out of the box?
Hi, Make sure you follow the directions in the hook up guide, there are some steps and add ons that you must follow to get this operating in the Arduino IDE - https://learn.sparkfun.com/tutorials/tiny-avr-programmer-hookup-guide/?_ga=1.214497687.1851504437.1417041706
Worked perfect
This worked as expected. The windows 8 driver issue was a bit of a pain.
Great Product
Works great with my ATtiny85 bought from sparkfun.com. I'm using the Arduino IDE to program the chip. I installed the IDE following the hookup guide also on sparkfun.
This device is incompatible with Windows 8 / 8.1 / 10! [FIXED!]
FIX: The links to the drivers are for an old Adafruit code base. The folk over at Adafruit have a signed Windows 8 - 10 driver on their site; https://learn.adafruit.com/usbtinyisp/download
It works and is verified with the 64 bit Windows 8 / 10
I just bought this product, I waited 3 weeks. I guess I live on another planet. I have an old macbook pro (11) with high sierra. I downloaded arduino 1.8.15. The 2.0 beta will not work with this OS. What worked for me is to use the package from damellis. I tried to plug the board directly into my USB port to none available. I bought an USB extension cable. Did not burn any bootloader... I used the blink sketch and changed the pin to 0 and pushed the arrow. TADA! I just need to repeat the process and try another attiny85 and see if i was not just lucky.
2 month later, I was not just lucky. I used AttinyCore from SpenceKonde and bootloaded 1 ATTiny85 and 1 ATTINY45. Damellis will not work with Wire.h and too many libraries use Wire.h
Works fine. From windows 10, Arduino 1.8.8, if you get the following error during upload, it is likely that you're not using the correct programmer option. From the Arduino programming software, be sure to select, Be sure you select "Tools>Programmer>USBtinyISP". I didn't see this in the initial documentation and spent a few hours finding this nuance.
An error occurred while uploading the sketch avrdude: usbdev_open(): did not find any USB device "usb" (0x03eb:0x2104)
""
I recently purchased the Tiny AVR Programmer. I am running into issues though after uploading my code to the Attiny85. It is supposed to show up at my I2C network, but doesn't. Looks like the Pin0, which is used for I2C, is also used for the LED that's located on the Tiny AVR Programmer. How can I ran I2C on a ATtiny, without removing it every single time I have uploaded to it? Is there, for example, a way to disable the LED that's connected to Pin0 so that Pin0 becomes available for I2C communication?
Has anyone had difficulty in getting the Tiny AVR to work with an iMac? It will not display the USB port (only BT) when trying to configure. I'm running Arduino 1.6 on El Capitan 10.11.6. A genuine Arduino UNO EVB works fine on the same USB port. According to the Tiny AVR installation instructions, noooo drivers need to be installed. I created the /hardware folder in the Sketches as per the instructions, and moved the downloaded 'attiny' folder there. No worky... Thanks!
It's a great product, but combined with OS X it is driving me crazy. Had it working a few months ago, then didn't use it for some time. Now I've been googling all around to find out how I can get an USB tty to show up in Arduino for this. I've tried a lot of things already, various drivers that may or may not be the correct ones, reboot, shutdown, start, connect directly to USB port, connect via hub... It just won't work.
Trying on El Capitan. An Arduino Uno works fine on the very same system. I'm at a loss here, I would expect to find some useful information on the links of this article, but alas. If anyone has a pointer to a helpful URL, please let me know.
Hi there! Did you ever resolve this issue? I'm having the same difficulty, exactly: El Capitan, UNO works fine, the IDE can't find the Tiny AVR programmer on the USB port, Thanks!
Is it true that you cannot use I2C communications when the chip is installed and the USB is connected to the PC? I saw in a review that a customer could not use I2C this way? Thanks.
This is just a programmer so you're supposed to remove the chip after you flash your code. The programmer does occupy some of the I/O pins on the chip while it's in the programmer and I would expect some functions to not work until the chip is removed.
Then you should NOT advertise: "The programmer even breaks out the IC pins to female headers so you can easily prototype around the ATtiny without pulling and plugging it over and over. " That is the SOLE reason I purchased it. If it doesn't work like you advertised then I'll ask for a refund.
Is there a way to use the Tiny AVR Programmer to program the surface mount ATTINY85's?
Quick Questions... Will this work with any of the ATTINY85's? I noticed there were a lot of different 85's on Atmel's website, and I just wanted some confirmation. Thank you!
In what case do you need to be concerned about bootloaders? Thanks!
A note for Linux users: If avrdude returns "initialization failed" while trying to program a chip, you might need to add a udev rule as outlined here[1]. Running as root did not work for me, but the udev rule fixed my issue.
[1] https://learn.adafruit.com/usbtinyisp/avrdude
Had a very hard time inserting the break-away headers (PRT-00116) into the prototyping pins. They really don't act like they were made for one another. I never did really get them fully inserted. On some attempts the pins were pushed through the break-away header and not further into the prototyping pins.
Still having issues with this using drivers here.
This has a small problem. You are going to push the far end to insert it. But since the jumper connector is surface mounted, there is little holding it on, so it will break off (and damage the pins).
You should add some kind of glue to support it our use thru-hole parts that won't break off. You need the thru-holes anyway for the 8 pin socket.
Using a USB hub cable with the programmer, it might not work properly if the cable is damaged. You might get this error:
Try using a dedicated mini-B USB cable or a different USB cable to prevent this error.
Below are steps for burning a bootloader to a bare ATmega328p using the Tiny AVR Programmer[1]. They're all documented elsewhere, but I had some trouble collecting all the required docs.
Preparing to burn the bootloader:
After burning the bootloader with the 8MHz internal clock, the external crystal may be removed.
Uploading a sketch:
The normal sketch upload button does not work (errors like "avrdude: ser_open(): can't open device").
Thank you very much for this. I know you posted it sometime back, but I'm just getting around to testing this out. I spent about three days struggling with it. I wasn't even sure it was possible, but I finally got it with the information you provided. Just to add to the thread I used the bootloader as described, I had a 16mhz resonator, but I didn't have the 10k pullup resistor on RST. Once bootloaded, I used this atmega library from github: https://github.com/MCUdude/MiniCore that I had previously installed. It seems fine, the trick getting that to work was this bit: "Sketch > Upload using Programmer" I owe you a beer! Thanks again.
I accidentally shorted the + and - pins together for a full 3 seconds. What damage to the programmer or the attiny85 should I expect?
Depends... Most importantly was there power on those pins? If not you should be fine. If so it is hard to say. Things will start to heat up, and most ICs tend to have some sort of protection, but you'll just have to try it and see at that point. If you don't hear anything pop, see magic blue smoke escaping, or see a melted component on the board you might be ok.
Yes there was power. However, the were no pops, smoke, or melting. I hope its ok!
Worked a week ago but now the (Windows) IDE says: "avrdude: Error: Could not find USBtiny device (0x1781/0xc9f)"
I have tried to plug it into both USB 2.0 and 3.0 ports, reinstall the driver, and restart my PC to no avail.
Not really interested in Arduino, but can this program an ATTiny13? I'd like to program these little micros before stuffing them in a PCB that lacks the space for the six pin programing header
Hello, I bought this programmer and I am not sure how to program larger chips. Should I use the 2x3 header or the 6 at the end? I have been using the 2x3 header but I feel like that is used to reprogram the onboard attiny84. Any help is appreciated.
I replaced the chip socket with one with longer legs. I needed .400" legs to clear components on another board, but with longer legs it can plug into a breadboard, or the end resultant board. Now I can leave plugged into USB, program, test, repeat. This after moving the chip back and forth a hundred times, using jumpers was cumbersome.
Photo1
Photo2
Photo3
I looked at the schematic. What's the two 3.3V zener diodes for? To make the D+ and D- operates at 3.3V? Thanks!
Debian 8 .0 required a udev rule to get this device to work for me:
Important: after creating the rule and restarting udev, unplug and re-plugin the device.
Has anyone here programmed an Attiny84 (an external one) using this? Also is the programmer compatible with atmel studio?
I had several inconsistent issues with this product on my Windows 7 64 system and running Arduino 1.0.6,,,, until I read Member #341993 comments. Thank you Member #341993, it works perfectly now.
Break away headers don't fit the female headers on this board. The pins make contact but fall out easily. Jumper wires worked perfectly though.
Fix the driver for this Win 8....not signed?
There are signed Windows 8 drivers available through Adafruit: https://learn.adafruit.com/usbtinyisp/drivers
A recent review noted that there are no drivers for Windows 10 - which isn't technically out yet; ye on the cutting edge of technology: it's but one edge of a double-edged sword.
Use the following from the hookup guide to temporarily bypass that warning and install anyway.
https://learn.sparkfun.com/tutorials/disabling-driver-signature-on-windows-8
An adapter board for the attiny84 that could plug into the inline strips that are .8" apart sure would be nice. This programmer makes using the attiny85 very easy. It would be great to have the same convenience for the attiny84.
The linked schematic and eagle files dont match with the shipped product (product says v13, schematics say v12)... but this https://github.com/sparkfun/Tiny-AVR-Programmer/tree/e9ce5eee6c851359ce4a9d7fdec24ce809564be4 seems to be what was shipped (eg the github a few revs ago.)
While creating a udev rule for use on Linux, I had to use the following:
SUBSYSTEM=="usb", ATTR{product}=="FabISP", ATTR{idProduct}=="0c9f", ATTRS{idVendor}=="1781", MODE="0660", GROUP="dialout"
Note that the product entry is now "FabISP" rather than "USBTiny".
I had endless problem with mine on Windows 7 64bit on an HP dm4. It worked sometimes and not others. I'd get a mismatch error. I have spent a lot of time debugging and trying things. I downloaded Xloader to load hex files for my Nano based projects and on a whim decide to try using it with the usbtiny. It seemed to work reliably. So I moved the avrdude.exe and .conf file from the Xloader dir to the Arduino tools/avr/bin and /etc dirs. Now it seems to work reliably from the Arduino dev environment, The create date of the working avrdude is March 18, 2012 and it is 1,922,788 bytes. I cannot find a version number easily. I loaded this into a Arduino 1.06 install. I hope this helps folks.
endless problems with Windows??????? <sarcasm> ;)
Thank you so much! I had exactly your setup (Windows 7 64bit + Arduino 1.06) and was receiving those same errors. The programs still ran on the attiny85, but error messages are never good and I don't like ignoring them. Your fix worked perfectly. Good on ya for spending the time to figure it out so that others don't have to.
Has anyone got this working with a Mac on Arduino 1.5? I've spent too long, and I can't get it to work.
(1) The Sparkfun supplied boards.txt file doesn't appear to be correct for 1.5. (2) Arduino doesn't recognise the programmer as attached to the computer, even though the device is enumerated. (3) Dropping back to 1.0.5 has worked, but this doesn't seem like the right think to rely on in the long term.
Friends don't let friends use Macs.
It should work, using the files here: https://github.com/damellis/attiny/tree/ide-1.5.x
I'm running Arduino IDE 1.0.5 on a Mac Book Air. I successfully programmed an ATtiny 85 with the tiny AVR programmer (burned fuses for 8 MHz, uploaded sketch, prototyped circuit successfully), but when I tried to upload the sketch again, to make a change in a threshold value, I got this error: avrdude: Error: Could not find USBtiny device (0x1781/0xc9f) The on-board LED on the tiny AVR programmer lights, so the tiny AVR programmer is working, at that level. Can anyone suggest diagnostics I should try?
In the https://learn.sparkfun.com/tutorials/tiny-avr-programmer-hookup-guide/ it says USBTinyProgrammer will show up as the device for the Programmer when you first plug it in to a USB port. On my Bootcamped Win 8.0 Macbook Air It was something completely different, nothing like the image in the guide. But it still installed just fine.
warning NOOB question: I found a hex file online that adds the fuses at the end: http://elm-chan.org/works/sd8p/rc/sd8psrc.zip >> "sd8p_oc.hex" . i get an error trying to write to the chip. is there a command to have it accept the fuses from the hex file? or am i just doing it wrong? here is the output: "http://forum.arduino.cc/index.php?action=dlattach;topic=259074.0;attach=91116;image"
Can I use this to program the attiny2313?
Yes, you obviously won't be able to plug it into the controller, but you can still connect the 6 pins needed and program the chip.
I have been testing using this programmer as an ISP programmer for ATmega328. I have been able to burn fuses and a HEX file (using AVRDUDE), and load simple blink sketches (using Arduino IDE). However, when I've tried loading a more complex sketch, the program doesn't run correctly when the ATmega328 is plugged into an Arduino. I am able to get the sketch to run properly on the chip when I use another Arduino as ISP using tutorial on Arduino site. I am assuming, I need to set some configuration settings/files up properly.
Configuration:
TinyAVRProgrammer ICSP port connected to ATmega328p RST,SCK,MISO,MOSI,VCC,GND pins
TinyAVRProgrammer connected to PC (Windows 7) via USB
Arduino IDE Tools->Board->Arduino Nano w/ ATmega328 (note: have also tried Arduino UNO)
Arduino IDE Tools->Programmer->USBtinyISP
Arduino IDE File->Upload Using Programmer
No compile or upload errors are reported. Arduino IDE reports Upload Complete.
I would like to use this programmer to load onto chip directly rather than using Arduino as ISP and having to hook it up, remove the Arduino chip, etc.
The program (sketch) has code for using SD card, LCD/touchscreen, and wireless communication if that is at all helpful. The specific part not working is the LCD does not show the image. The same sketch works fine using the Arduino FTDI to load via the TX/RX pins.
Any help would be appreciated.
Thanks Krist
can you use serial communication with this? UART
Does this work with macs?
Could i use it to program an ATtiny13, too? I am playing around only with small analog electronics (very basic) and would use it only for very limited tasks, so ATtiny13 would be enough. Greetings
...anyone have luck loading the tone() library onto a ATtiny85? i found a couple of tutorials on adding enhanced cores to be available in the arduino IDE: https://code.google.com/p/arduino-tiny/
but they don't show how to modify the boards.txt file to upload with the Tiny AVR programmer.
Works great! I've used it to program not only the ATtiny85, but the ATMEGA328P as well, via ICSP port.
The only thing that threw me for a loop was that it doesn't give a /dev/ device filename, even though the Mac OS X sees it on the USB bus.
Arduino 1.5.x gave me some issues complaining about not being able to connect to a usb port at first, but choosing USBtinyISP works fine, just need to make sure no actual PORT is selected.
Only wished it was better protected. On receiving mine, wrapped it up from the USB port to the first row of sockets with kapton tape to protect the chips from shorts.
I am having some trouble with programming mega328 (see my recent post). I realize you have a Mac OS, but perhaps your config will help guide me to my problem.
Thanks Krist
This Tiny AVR Programmer makes programming the ATtiny85 chip for my project so much easier. I love it! However, I recently ran into a problem. I just tried loading some new sketches using Arduino IDE v1.0.5 on a Win7 64-bit machine and I get a verification error. I have used this machine and software many times before without problems. IT appears from my searches that this indicates some kind of communication breakdown between the programmer and the computer. The onboard LED does show communication activity. I have tried two different chips. I have tried burning bootloader in case fuses had been changed. I tried reloading the drivers and core files.
Any ideas about how to fix? Is this a problem on the board or have my chips failed?
here is the verbose upload output:
avrdude: Version 5.11, compiled on Sep 2 2011 at 19:38:36 Copyright (c) 2000-2005 Brian Dean, http://www.bdmicro.com/ Copyright (c) 2007-2009 Joerg Wunsch
avrdude: usbdev_open(): Found USBtinyISP, bus:device: bus-0:\.\libusb0-0001--0x1781-0x0c9f AVR Part : ATtiny85 Chip Erase delay : 4500 us PAGEL : P00 BS2 : P00 RESET disposition : possible i/o RETRY pulse : SCK serial program mode : yes parallel program mode : yes Timeout : 200 StabDelay : 100 CmdexeDelay : 25 SyncLoops : 32 ByteDelay : 0 PollIndex : 3 PollValue : 0x53 Memory Detail :
avrdude: programmer operation not supported
avrdude: Using SCK period of 10 usec CMD: [ac 53 00 00] [00 00 53 00] avrdude: AVR device initialized and ready to accept instructions
Reading | CMD: [30 00 00 00] [00 30 00 1e] CMD: [30 00 01 00] [00 30 00 93]
##########CMD: [30 00 02 00] [00 30 00 0b]
############################ | 100% 0.01s
avrdude: Device signature = 0x1e930b avrdude: NOTE: FLASH memory has been specified, an erase cycle will be performed To disable this feature, specify the -D option. CMD: [a0 01 fc 00] [00 a0 01 ff] CMD: [a0 01 fd 00] [00 a0 01 ff] CMD: [a0 01 fe 00] [00 a0 01 ff] CMD: [a0 01 ff 00] [00 a0 01 ff] avrdude: erasing chip CMD: [ac 80 00 00] [00 ac 80 00] avrdude: Using SCK period of 10 usec CMD: [ac 53 00 00] [00 ac 53 00] avrdude: reading input file "C:\Users\Krist\AppData\Local\Temp\build282759822894877516.tmp\ATtiny85_Blink.cpp.hex" avrdude: writing flash (844 bytes):
Writing | CMD: [4c 00 00 00] [20 4c 00 00]
CMD: [4c 00 20 00] [f7 4c 00 20]
CMD: [4c 00 40 00] [24 4c 00 40]
CMD: [4c 00 60 00] [01 4c 00 60]
CMD: [4c 00 80 00] [00 4c 00 80]
CMD: [4c 00 a0 00] [3f 4c 00 a0]
CMD: [4c 00 c0 00] [00 4c 00 c0]
CMD: [4c 00 e0 00] [40 4c 00 e0]
CMD: [4c 01 00 00] [bf 4c 01 00]
CMD: [4c 01 20 00] [91 4c 01 20]
CMD: [4c 01 40 00] [93 4c 01 40]
CMD: [4c 01 60 00] [c0 4c 01 60]
CMD: [4c 01 80 00] [97 4c 01 80]
CMD: [4c 01 a0 00] [00 4c 01 a0]
| 100% 1.84s
avrdude: 844 bytes of flash written avrdude: verifying flash memory against C:\Users\Krist\AppData\Local\Temp\build282759822894877516.tmp\ATtiny85_Blink.cpp.hex: avrdude: load data flash data from input file C:\Users\Krist\AppData\Local\Temp\build282759822894877516.tmp\ATtiny85_Blink.cpp.hex: avrdude: input file C:\Users\Krist\AppData\Local\Temp\build282759822894877516.tmp\ATtiny85_Blink.cpp.hex contains 844 bytes avrdude: reading on-chip flash data:
Reading | ################################################## | 100% 1.11s
avrdude: verifying ... avrdude: verification error, first mismatch at byte 0x0080 0x57 != 0xe1 avrdude: verification error; content mismatch
avrdude done. Thank you.
there was nothing wrong with the programmer...complete rebuild of computer fixed whatever software glitch existed.
Uploading seems to be impossible with a USB3 port on at least on newer Mac laptops that only have USB3. This seems to be a common problem with USBTinyISP products. Discussion on Adafruit forum about this: https://www.adafruit.com/forums/viewtopic.php?f=20&t=30755 This can be usually fixed with connecting the board through a USB2 hub.
It might be a good idea to add to the tutorial that you can set the fuses of a ATtiny85 to 8 MHz by selecting the "internal 8 MHz clock option" and then using "burn bootloader" from the Arduino IDE.
How do you configure the ATTiny85 to use it's 16mHz internal clock with the Tiny AVR Programmer?
Do i need USB drivers when I run the Arduino IDE on Ubuntu 64 Bit?
RTFM ... sorry for the question. The answer is NO: https://learn.sparkfun.com/tutorials/tiny-avr-programmer-hookup-guide/driver-installation :-)
You guys would be my heroes if you'd make a bigger version that could program 14 and 20 pin ATtiny chips. I'm using the ISP header on this to do that now. But if you'd make one device that could do it all, I'd happily buy it.
To keep the cost down we don't plan on increasing the size of the PCB. But you can program 14 and 20 pin ATtinys - you just have to wire from the 6-pin connector on the end to the ICSP pins on the micros.
Is the ISP header used to program external devices, or to load code from an external programmer onto the ATTINY84 on the PCB? Or both?
Both. As-is for external devices, short the RST jumpers for ATTTiny84. Though I can't think of a reason to reprogram the 84. It works very nicely as is.
I've used this both for ATTiny85s and to reprogram the LCD serial pack with firmware that actually works. In that case I used avrdude in command line mode to download a prebuilt hex file. Great product.
Could you possibly give a link for that LCD serial backpack firmware? Thanks
Neat. Thanks,
The extra pins to the side make it easy if you use a crystal (for exact timing). I often solder them onto the side, but I have an application that doesn't need that much precision, so I could changes the fuse settings back more easily.
To do the HV stuff, you need an AVR Dragon. That is what I used before.
I entirely made an adapter for the programmer that I got from Adafruit. As for the HV fuses....I made an adapter for the Arduino HV Rescue shield to fit the ATtinys. But that was a few years ago...not even sure I still have it.
I wish it had a High Voltage programming capability to reset fuses (in case other methods of programming are disabled)
Shouldn't it say somewhere, that this replaces PGM-11460...
It now says that in the "Previous Versions" section on the right of the page above the skill sets.
I completely missed that... Thanks!
The tie points on this aren't as secure as I'd like them to be. I think this thing would be much easier to use if it used the wire wrap through-headers to just attach it to a breadboard. I can use a M-F USB extender cable for flexible connection to a computer.
I don't even need the headers soldered in, throw the long head headers in the bag and I can solder it myself.
Buy the 8-pin wire wrap socket below (PRT-08112) and some solder wick. Problem solved. They can't make products to suit every taste or need, but they try their best. The rest is left to 'maker' ingenuity, and if you can't manage that, well...
I like how on the schematic, it says "3x2 connector can be". Also kind of wondering how they get the code into the ATtiny84.
They (not SparkFun) make ZIF sockets for SMT ICs that you can use to program bare chips before they're soldered in place.
This board already uses through-hole parts, so why continue with the SMT machine pin headers? Wouldn't the through-hole version be more resistant against mechanical stress?
I've been using mine for months with no connector issues. It's plenty tough.
It's cheaper to use the SMT version since they can be autopopulated by the pick and place machine.
That being said, they're already leaving the 2x3 ICSP header unpopulated. They could have done the same with the two 1x4s. Maybe toss them in the package to be populated by the user if they want them. Or hell, leave them out and make them separately orderable.
That said, the DIP-8 socket is already through-hole. they could easily make the 1x4s through-hole, insert all four headers in the board, flip it over, and solder them all real quick, all at once. And that's assuming they're doing the through-hole soldering by hand instead of using a wave-soldering machine. (which is really cool to watch in-use, btw)