- Home
- Product Categories
- Misc. Dev Tools
- SparkFun PicoBoard

SparkFun PicoBoard
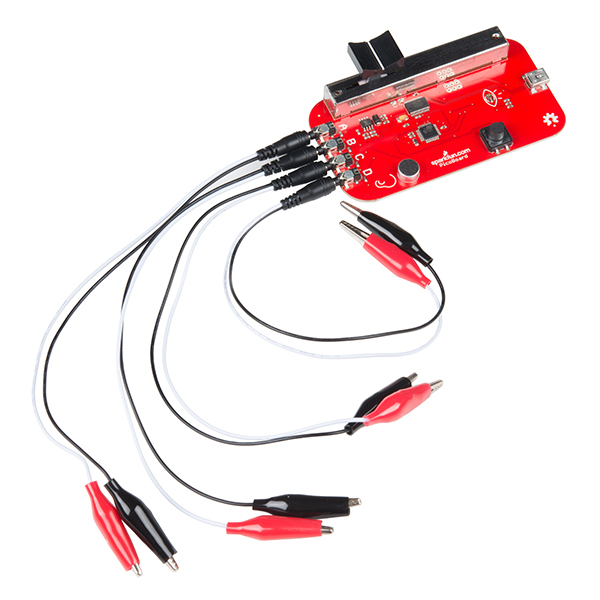
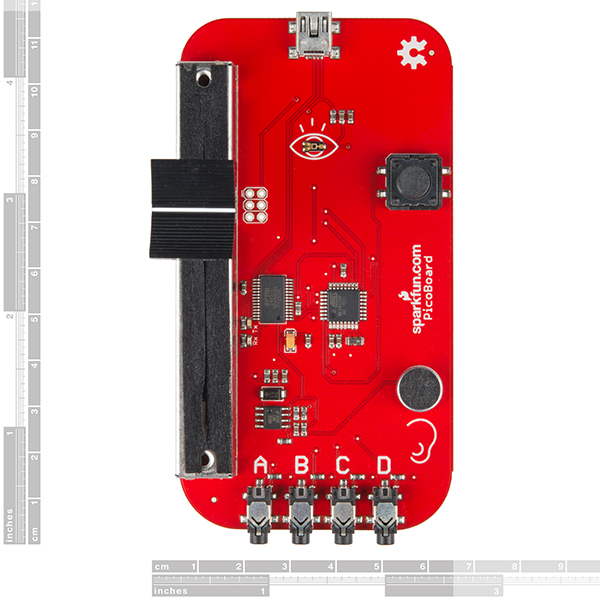
The PicoBoard allows you to create interactions with various sensors. Using the Scratch programming language, you can easily create simple interactive programs based on the input from sensors. The PicoBoard incorporates a light sensor, sound sensor, a button and a slider, as well as 4 additional inputs that can sense electrical resistance via included cables.
Designed for educators and beginners, the PicoBoard is a good way to get into the very basics of programming and reading sensors.
Be aware that four sets of alligator clips are included, however a miniUSB cable is not included. If you don't already have a miniUSB cable lying around make sure to pick one up. You can find the SparkFun miniUSB cable in the Recommended Products section below. The PicoBoard is a derivative work of the Scratch Sensor Board.
Note: Scratch 3.0 is now out, and although the PicoBoard is physically compatible, it is not currently supported. We are working to correct this.
- 1x PicoBoard
- 4x Tall Silicone Bumpers
- 4x 2.5mm Audio Cable to Dual Alligator Clip
SparkFun PicoBoard Product Help and Resources
Using the SparkFun PicoBoard and Scratch
November 11, 2014
Here are a few tips in using the PicoBoard with Scratch v1.4. The PicoBoard allows us to write Scratch programs that interact with a variety of sensors on the PicoBoard. These sensors include: sound, light, a slider, a push button, and 4 external sensors (A, B, C, and D).
Core Skill: Programming
If a board needs code or communicates somehow, you're going to need to know how to program or interface with it. The programming skill is all about communication and code.
Skill Level: Noob - Programming will be limited to basic drag and drop interfaces like ModKit or Scratch. You won't be writing code, but you will still need to understand some basics of interfacing with hardware. If you?re just using a sensor, it's output is analog.
See all skill levels
Core Skill: Electrical Prototyping
If it requires power, you need to know how much, what all the pins do, and how to hook it up. You may need to reference datasheets, schematics, and know the ins and outs of electronics.
Skill Level: Noob - You don't need to reference a datasheet, but you will need to know basic power requirements.
See all skill levels
Comments
Looking for answers to technical questions?
We welcome your comments and suggestions below. However, if you are looking for solutions to technical questions please see our Technical Assistance page.
Customer Reviews
4.3 out of 5
Based on 3 ratings:
0 of 1 found this helpful:
Very good device
it's works well but it's a bit expensive with tariffs (France).
Geweldig voor de kinderen om tel eten programmeren
In combinatie met scratch is picoboard echt geweldig. Zeer eenvoudig te installeren. Oneindig veel mogelijkheden.
It's fun but don't expect much
Package arrived and we took out a fragile board with some things soldered into it. Loaded up Scratch 1.4 and my old computer recognized it just fine and my 8 year old was off to coding and experimenting around with it.
There are no included instructions or USB cable, but you probably have one lying around somewhere if a Pico Board interests you. We used my cable that I use to charge my PS3 controller. I suppose there are lots of help files online or through Sparkfun support, but we haven't needed that yet. Probably not something you would buy unless you wanted a challenge anyway.
Seems a bit flimsy and fragile with no protective structures at all, unlike the Raspberry Pi with its plastic box. Kinda cool to keep it simple though. Just worried about extensive use by an 8 year old who may damage it somehow.
Overall fun and unique product
I recently got a problem to recognize it. When I'm on Windows 7 OS, I plug the USB cable into the computer but the system tells me that it's not able to communicate with it. I was working with the board and suddenly the computer is not recognizing anymore. When I'm on Linux/GNU I saw that the device is connected: Bus 001 Device 027: ID 0403:6001 Future Technology Devices International, Ltd FT232 USB-Serial (UART) IC.
Is there a way to hack on this board? How can I update the firmware ?
Thanks in advance
Scratch v2.0+ Online Plug-In for PicoBoards
There was an update with Scratch v2.0+ online using browser plug in. They talked about it in the forums http://scratch.mit.edu/discuss/m/topic/4488/?page=2. They can download it from the extensions link in Scratch 2.0+ => http://cdn.scratch.mit.edu/scratchr2/static/34f16bc63e8ada7dfd7ec12c715d0c94/help/en/ui/extensions.html.
Testing the PicoBoard with Scratch v2.0+, I was able to get it working. After installing the plug-in, you must enable the plug-in on your browser, There should be a pop up window in your browser asking if you want to allow the plug-in. If you click on the puzzle block that is around the address bar, you can enable the plug-in labeled "Scratch Device" from scratch.mit.edu by selecting "Allow and Remember" from the drop down menu. Then select "OK" to save the settings. Refresh the webpage after enabling this plug in. Last resort is to restart the browser.
With your PicoBoard plugged into your computer and the driver installed, you can access the device in the new Scratch v2.0+. To test, you can select "More Blocks." Click on the "Add an Extension" and select the PicoBoard. The PicoBoard will have a circle that is to the right of the device. It will appear green when the device is connected.
Testing the PicoBoard in Scratch v2.0+ Online
Try to test one of the sensors on the PicoBoard by dragging and dropping the last block labeled "slider sensor value." From here you can view the slider's sensor value. Using the slider, I was able to see the the value of the slider when left clicking the sensor value block. A comment bubble popped up showing the sensor value. I then moved the slider to a different position and left clicked the sensor value block to see a different value for the slider.
I use Picoboards a lot for Scratch 2.0 projects with kids. While the Makey Makey board is great for simply closing a circuit, the Picoboard offers kids a greater range of creative possibilities in Scratch because it can measure a range of resistance values. I second the commenter below who suggests a cheaper version without onboard sensors; it is much more instructive for kids to use pots, photocells and other sensors, and to then map an acceptable resistance range in Scratch. Here is an example of a project I did with kids (with adult help): https://www.youtube.com/watch?v=g1zfwKBuJRQ One problem that we encounter frequently is that the Picoboard will lose its connection through the plugin if the computer sleeps. Make sure Scratch programs are saved and relaunch the browser to fix.
Check out some of our resources with the Picoboard and Scratch from our Educator Resources => https://learn.sparkfun.com/resources/tags/scratch.
Have you considered making a cheaper version without the built in sensors that just has the four inputs that can sense electrical resistance? we really only use those in workshops and schools and it would be terrific to try to get the cost to $20-25
i can get the low cost version for you. If you are interested in, you can mail stevencch9@gmail.com
I just bought a picoboard. It seems to have configured sensors fine except slider which is showing a value between 66 and 66.9 fluctuating crazily. Should I return it to retailer or is there a fix?
I want to ask is this Picoboard compatible with scratch 2.0 because none of the other Picobords worked with 2.0 just 1.4?
I remember there were issues using the PicoBoard with Scratch v2.0+ because there wasn’t a way to connect to the FTDI COM port through the cloud in the new software.The easiest is to have them use the older version. To use Scratch 1.4 with the picoboard, just go here => https://scratch.mit.edu/scratch_1.4/. However, with a new plug-in that was released, you can now use the PicoBoards with the new version of Scratch. To answer your question; yes, the PicoBoard works with Scratch both v1.4 and v2.0+. I just did a small test and was able to get it working with the newest version of Scratch.
Check out my comment => https://www.sparkfun.com/products/11888#comment-550b0456757b7f67018b4567.
Are there windows 8.1 drivers for this board? An ftdi driver? I purchased this for my friends grandson but they can't locate a driver.
Can you please confirm you will still be making this product? Someone said it had been discontinued!
Yes, we currently have no plans to discontinue this product. We did update it so technically the old version is discontinued, but the changes were basically internal (better button, cleaned up some things on the board, etc.)
EDIT: ==>Make sure the latest drivers are installed: http://www.ftdichip.com/FTDrivers.htm ==>Hard Reboot your system (Shut it down and turn it back on) after installing everything.
Now this works great! All except for one machine, which is still a mystery...
This still works in Scratch 1.4 as well. You'll need to install the drivers as well, and also make sure to select which serial port you want to use by right-clicking on the reporter block.
==================================
We are having issues trying to get this to work on our MacBook Airs. Doing a wide sweep of potential solutions. We are using Scratch 2.0 online version and have followed the instructions for installing the plugin. We get notice that the plugin has been installed, but whenever we plug the board in we don't get any sort of feedback. It reads as all sensors HIGH or LOW, even without the board plugged in.
We are using Macbook Air, OSx 10.8.5/4 (mix), Safari 6.0.5, Flash 14.0.0.145
Any help or pointers would be appreciated, thank you. We are attempting to run a class of 19 students for a week starting in 5 days.
This is likely due to the fact that Scratch 1.x is based on Squeak Smalltalk, and 2.x is based on Adobe Flash. The Scratch 1.x branch is still actively being developed by the Squeak community and is even expanding to Raspberry Pi. http://www.raspberrypi.org/tag/scratch/