- Home
- Product Categories
- Temperature
- SparkFun Digital Temperature Sensor Breakout - TMP102


SparkFun Digital Temperature Sensor Breakout - TMP102
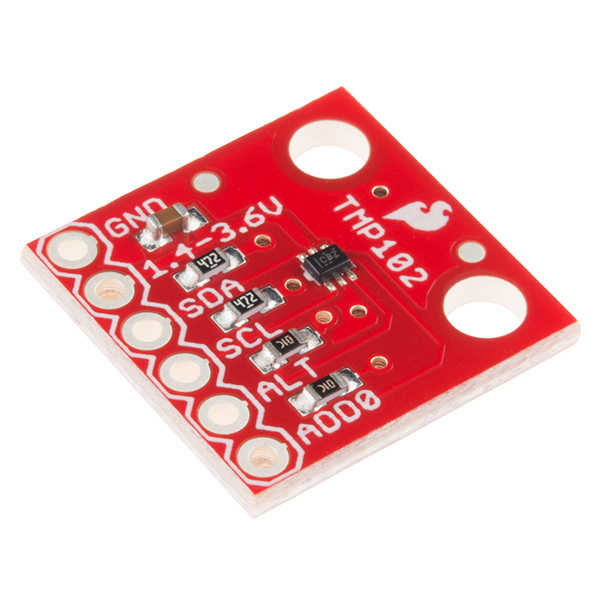
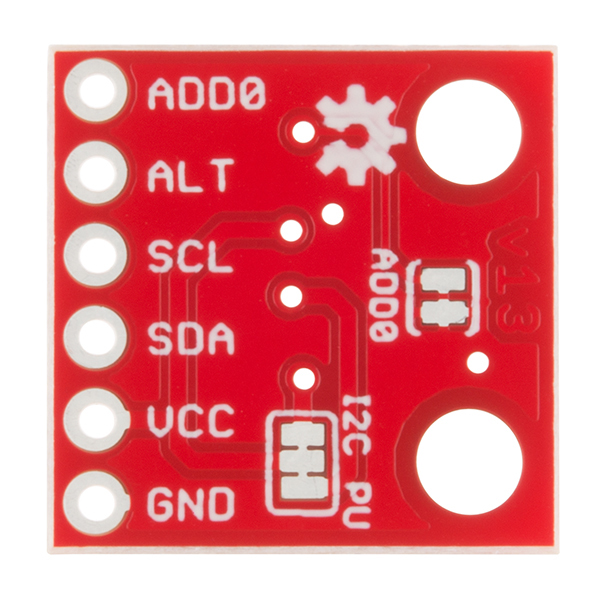
The TMP102 is an easy-to-use digital temperature sensor from Texas Instruments. The TMP102 breakout allows you to easily incorporate the digital temperature sensor into your project. While some temperature sensors use an analog voltage to represent the temperature, the TMP102 uses the I2C bus of the Arduino to communicate the temperature. Needless to say, this is a very handy sensor that doesn't require much setup.
The TMP102 is capable of reading temperatures to a resolution of 0.0625°C, and is accurate up to 0.5°C. The breakout has built-in 4.7kΩ pull-up resistors for I2C communications and runs from 1.4V to 3.6V. I2C communication uses an open drain signaling, so there is no need to use level shifting.
- Uses the I2C interface
- 12-bit, 0.0625°C resolution
- Typical temperature accuracy of ±0.5°C
- 3.3V sensor
- Supports up to four TMP102 sensors on the I2C bus at a time
SparkFun Digital Temperature Sensor Breakout - TMP102 Product Help and Resources
TMP102 Digital Temperature Sensor Hookup Guide
February 2, 2017
How to connect and use the SparkFun Digital Temperature Sensor Breakout - TMP102 with an Arduino.
HIH-4030 Humidity Sensor Hookup Guide
December 6, 2016
Measure relative humidity with SparkFun's HIH-4030 Humidity Sensor Breakout.
Graph Sensor Data with Python and Matplotlib
July 23, 2018
Use matplotlib to create a real-time plot of temperature data collected from a TMP102 sensor connected to a Raspberry Pi.
Photon Remote Temperature Sensor
March 1, 2016
Learn how to build your own Internet-connect, solar-powered temperature collection station using the Photon from Particle.
Temperature Sensor Comparison
March 18, 2020
A comparison of analog and digital temperature sensors. Which is better?
Python GUI Guide: Introduction to Tkinter
August 13, 2018
Tkinter is the standard graphical user interface package that comes with Python. This tutorial will show you how to create basic windowed applications as well as complete full-screen dashboard examples complete with live graph updates from matplotlib.
Python Programming Tutorial: Getting Started with the Raspberry Pi
June 27, 2018
This guide will show you how to write programs on your Raspberry Pi using Python to control hardware.
Core Skill: Soldering
This skill defines how difficult the soldering is on a particular product. It might be a couple simple solder joints, or require special reflow tools.
Skill Level: Noob - Some basic soldering is required, but it is limited to a just a few pins, basic through-hole soldering, and couple (if any) polarized components. A basic soldering iron is all you should need.
See all skill levels
Core Skill: Programming
If a board needs code or communicates somehow, you're going to need to know how to program or interface with it. The programming skill is all about communication and code.
Skill Level: Competent - The toolchain for programming is a bit more complex and will examples may not be explicitly provided for you. You will be required to have a fundamental knowledge of programming and be required to provide your own code. You may need to modify existing libraries or code to work with your specific hardware. Sensor and hardware interfaces will be SPI or I2C.
See all skill levels
Core Skill: Electrical Prototyping
If it requires power, you need to know how much, what all the pins do, and how to hook it up. You may need to reference datasheets, schematics, and know the ins and outs of electronics.
Skill Level: Rookie - You may be required to know a bit more about the component, such as orientation, or how to hook it up, in addition to power requirements. You will need to understand polarized components.
See all skill levels
Comments
Looking for answers to technical questions?
We welcome your comments and suggestions below. However, if you are looking for solutions to technical questions please see our Technical Assistance page.
Customer Reviews
4.8 out of 5
Based on 6 ratings:
1 of 1 found this helpful:
Very easy to use temperature sensor
Since every integrated circuit is the size of pepper flakes, this is a very handy breakout board. The I2C interface is pretty ubiquitous these days, and when you throw in available Arduino libraries, there is really no coding effort to talk to it.
Cheap and Good!
(This sensor is why i am no longer allowed to submit facilities "Helpdesk" requests.) Easy to fire up and seems adequately accurate. Yay!
Simple and easy to integrate
Had one up and running on a RPI 3 with Windows IoT / C#, and others attached to ESP8266, all communicating via mqtt.
Will definitely buy again!
Works very well
I'm using these to monitor the temperature of some walk in freezers/coolers. Seem to work very well and are very accurate. The only thing that would make them better is to put a qwiic connector on them, but then they'd have to be a little larger.
Great sensor
I have two sensors and a raspberry pi to help track temperatures inside a "mini greenhouse" as well the outside ambient temperature. They were up and running in no time with the sample python code. Seem pretty accurate as well.
Has anyone seen the TMP102 in a waterproof package similar to the DS18B20? All I can find is either a breakout or the smc/ic. I prefer the 102 over B20, but can't find something that's a little more polished than a breakout board but can still be used in a builder project. Any comments/help would be greatly appreciated. Thanks. -jcs
I haven't seen anything that is "consumer-grade" waterproof. Maybe sealing it with epoxy is an option??? Otherwise, feel free to also reach out to the community on our forums.
Can I get some doggone mechanical data please? I don't use kikad and I don't want to install it just to get the mounting hole locations. Thanks!
Am I reading the documentation correctly that there are only 4 possible address? I would ideally like to put 6 of these on the same bus.
Hello there! You're going to need to split your I2C bus to do that. We carry a board called the Qwiic Mux - PCA9548A that will allow you do create more than one I2C bus.
Hi, Could I please have the mechanical dimensions of the board as well as the mounting hole cutout size/location? Thanks
You can find that information by downloading the boards Eagle CAD files from the 'Documents' tab above and opening the files in Eagle. Then, turn on layer 47 in Eagle and the dimensions will appear.
Could you guys instead provide that as a screenshot so I don't have to go install Eagle just to view something that should be included in a datasheet provided by SparkFun?
If I were to attach this to a heating pad, how many degrees C could I go up to without damaging the board?
Is there some recommended attachment style?
The temperature range is -40 to 125 degrees C. How you attach is up to you really. For the most accuracy, I'd recommend having the black IC in the middle make contact with the heated bed. If your contact area is exposed metal, you'll want to make sure to use kapton tape to electrically insulate the board, or use non electrically conductive thermal pads.
For more accuracy, you'd want to measure the heat of the pad across the temperature range you'd expect and write a transfer function for the temperature the TMP102 is returning.
-------------------- Tech Support Tips/Troubleshooting/Common Issues --------------------
Fritzing
You can find the Fritzing part in our GitHub repository after the pull request is merged [ https://github.com/sparkfun/Fritzing_Parts/tree/master/products ].
For the older TMP102 Fritzing part, you can find it here => [ http://fritzing.org/projects/temperature-sensor-using-tmp102 ]. It is included in the Fritzing Library. It is the old Fritzing part for the first version of the TMP102 [ https://www.sparkfun.com/products/retired/9418 ].
Would have saved me a lot of time if I had known that the ADD0 pad on the back of the module had to be opened in order to use I2C addresses 0x4A and 0x4B. That really needs to be added to the documentation...
I figured it out from the schematic, once I realized that there are two different versions of the schematic: v13 on the product description page, and v12 on the hookup guide page.
The interface library: "SparkFun_TMP102_Arduino_Library-master" doesn't work properly on the ESP8266. When it tries to create the 2's complement for negative temperatures, it assumes 16-bit int instead of the 32-bit int on the ESP8266. As a result, negative temps become 7400 degrees...
Library has been updated and negative temperatures should now return the correct value.
Thanks for catching that! We've updated the guide to better explain how to use ADD0. We've also fixed the link to the v13 schematic.
As far as library compatibility on a ESP8266, that's still a work in progress.
There is an issue with the "Getting Started with the TMP102 Breakout Guide" link just below the description block. Looks like "hhttps://..." instead of "https://..."
fixed