- Home
- Product Categories
- Robotics
- RedBot Kit


RedBot Kit
Replacement:ROB-12032. We fixed an issue with the RX and TX being switched on the Mainboard, go check out the fixed rev! This page is for reference only.
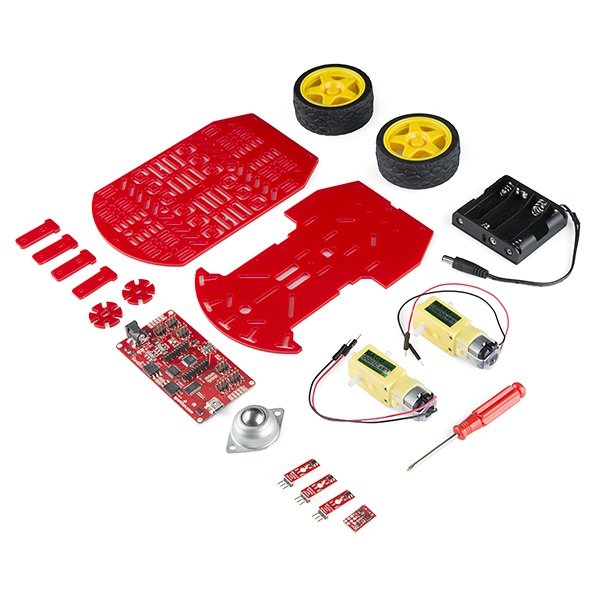
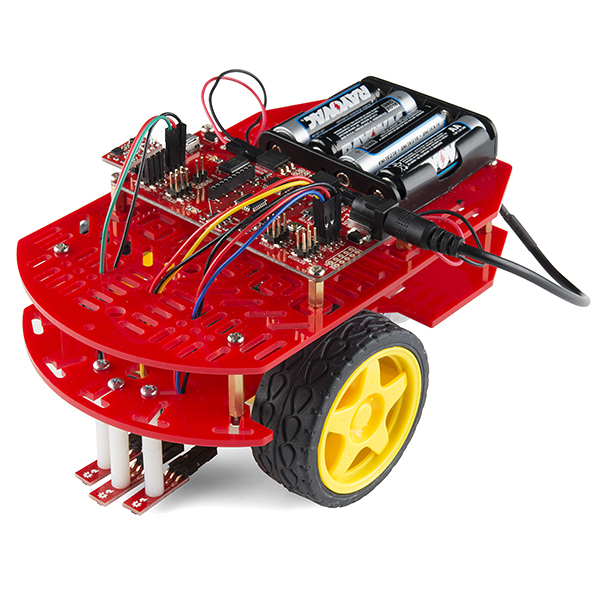
Welcome the RedBot Kit a robotic development platform capable of teaching two motor robotics and sensor integration! This kit comes with our new RedBot Mainboard, the Magician Chassis, a handful of sensors, and everything required for assembly.
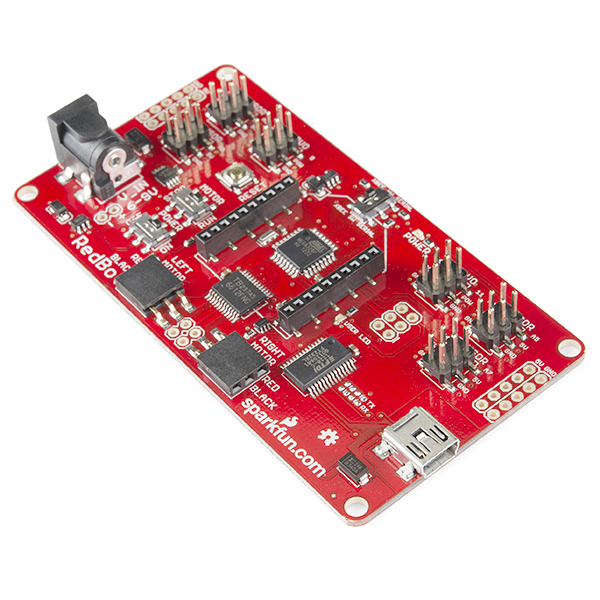
The RedBot Mainboard is a modular robotic development platform that works with the Arduino IDE. The RedBot is a motor driver and Ardiuno combination with various headers and connections, eliminating the need to stack multiple shields to get desired. By simply connecting a USB mini-B cable, you can program it in the Arduino IDE using our example code, or your own.
The Magician Chassis is an economical robot platform with a lot of versatility. It features two gearmotors with 65mm wheels and a caster. The chassis plates are cut from acrylic with a wide variety of mounting holes for sensors, controllers, power, etc. The chassis does require some basic assembly but detailed instructions are included in the RedBot Kit.
Rounding out the group are three Line Follower Sensors and one Accelerometer Sensor. The Line Follower sensor gives your robot the ability to detect lines or nearby objects using infrared light. The Accelerometer sensor provides bump and motion detection by measuring acceleration forces on the x, y, and z axes.
The RedBot Kit won't be able to operate on Mars but it will definitely fuel your curiosity about robotics!
Note: This kit ships without batteries. You will need 4 AA batteries to get rollin'.
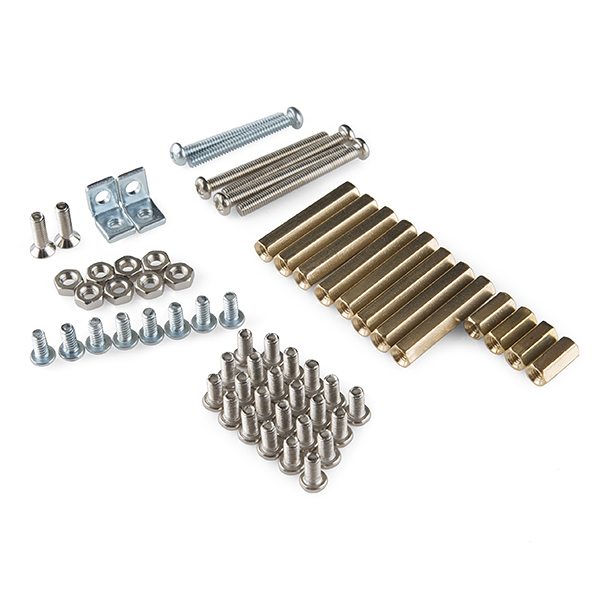
- 1x RedBot Mainboard
- 1x Magician Chassis
- 1x Accelerometer RedBot Sensor
- 3x Line Follower RedBot Sensor
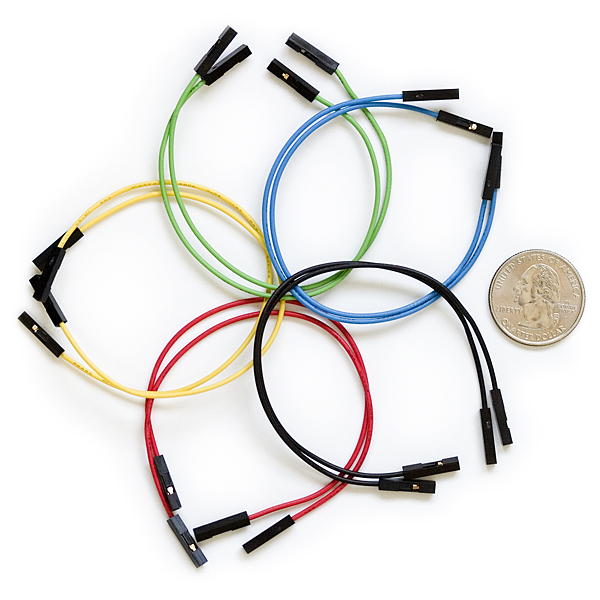
- 10x F/F 6" Jumper Wire
- 2x 4-40 Angle Bracket
- 2x 4-40 1" Phillips Screw
- 8x 4-40 1/4" Phillips Screw
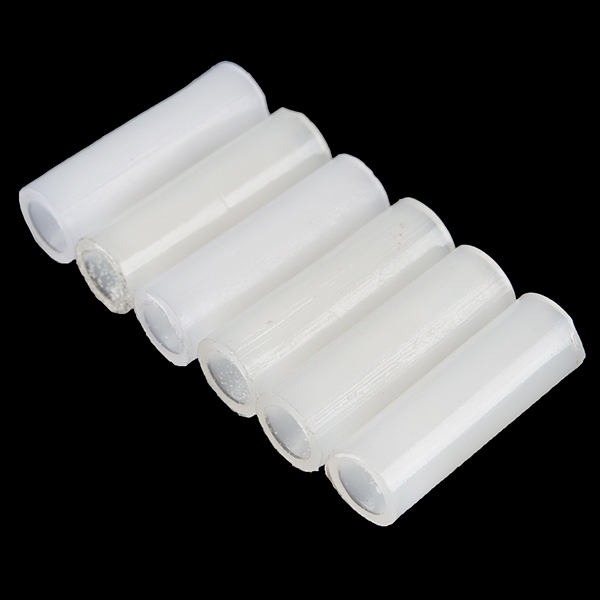
- 6x 4-40 3/4" Nylon Standoff
- Schematic (RedBot)
- [Schematic](http://cdn.sparkfun.com/datasheets/Robotics/RedBot Accelerometer.pdf) (Accelerometer)
- Schematic (Line Follower)
- Eagle Files
- RedBot Arduino Library
- Quickstart Guide
- Magician Chassis Instructions
- GitHub
- Wishlist
- Product Video
RedBot Kit Product Help and Resources
Comments
Looking for answers to technical questions?
We welcome your comments and suggestions below. However, if you are looking for solutions to technical questions please see our Technical Assistance page.
Customer Reviews
No reviews yet.
So it's $75 for the kit and it looks like close to $90 for the individual parts. I bought a kit and need another but don't need the chassis but will order it anyway to have another chassis. Pretty good deal. Love me so SparkFun.
"...eliminating the need to stack multiple shields to get desired."
Wait; all I had to do was stack multiple shields?
Hi ,
i test the pins at the RedBot Mainboard: SENSOR A0 , A1 = Digital 14 and 15 SENSOR A2 , A3 = Digital 16 and 17 SENSOR A4 , A5 = Digital 18 and 19 SENSOR A6 , A7 = UNKNOWN ??????
And use a simple line tracking sensor example : ///Arduino Sample Code void setup() { Serial.begin(9600); } void loop() { Serial.println(digitalRead(18)); // print the data from the sensor delay(500);
But what pins are used for A6 and A7 ????
Thanks in advance !!
Patrick , The Netherlands
Hello,
I bought the RedBot , but nothing will happen when i install the library and DEMO sketch, sometimes the kit is turn rounds only , but will not folllow the lines ? Also the library_demo is not working, it turns 1/2 round and stopped. The accelerometer is working i think ? , when i push the kit it will turn rounds only, at the serialmonitor it will show "Hello World " but that's it.
I use IDE Version 1.0 and tryed other IDE versions , I have download the library and install it at : C:\Program Files\arduino-1.0\libraries , just as the other libraries.
I hope someone can assist me to solve this issue,
excuse of my bad english ;-((
Thanks in advance ,
Patrick, the Netherlands
please contact techsupport@sparkfun.com so they can help you better.
Thanks RobertC,
I will do this.
Regards,
Patrick Spelbos , The Netherlands
Anyone having problems getting this to follow a line? I put a piece of cardboard down and took a marker and made a 10" circle with a black marker. It detects the line and starts to follow it, but it drive too fast to keep on the line. I've slowed it down as much as I could to keep above the stall voltage. Also one of the motor shafts is cracked. I didn't notice it until I put it together, and it doesn't seem to be affecting performance as far as I can tell.
Update: I lied the cracked shaft causes the wheel to wobble a bit. Email off to CS @ sparkfun!
I got my redbot. Could we get instructions for building the thing in the package that match the pictures on the website. Also a hook up diagram in the package? I was building it away from my computer and the chassis instructions are lacking.
the chassis should come with some assembly instructions. if not, they are available above.
also, if you check the quickstart link above, you can select "pdf" or "print" on the left-hand side and print out the directions if you're not around a computer. we try our best to not include extra packaging which not only adds a considerable amount of cost, but is also wasteful, as the majority of our customer use the online resources (which are more up to date)
if you're still having issues, please contact techsupport@sparkfun.com
I appreciate it. I got it together but the battery holder on the instructions is a different size and different location than the picture above. Tonight, we program.
Hi i was just wondering how you are supposed to attach the two nylon washers together? Thank you Perrry
There should be screws of sufficient length to go all the way through. If not, contact tech support about getting some replacements.
What's more important than specs is the status of this kit as a reference platform. I would love to see similar development as parallax has around their scribbler platform (ie, a tile based programming interface for younger kids).
Either way, having a reference platform will allow much more direct sharing of projects and ideas, even if it is a jumping off point for hacking into a unique robot - which is not really a primary feature of things like the scribbler or 3pi.
I am wishing Redbot was around a year ago when I was developing my own version
Since most of the parts for mine came from SparkFun, I guess it should be no surprise that they look remarkably similar.
this looks pretty awesome! but I just got the chassis by itself a few weeks ago :/
In that case you will be happy we carry just the board :) https://www.sparkfun.com/products/11622
So is there an h bridge built on to the mainboard? If not, how does it control the standard dc motors that come with the magician chassis?
it does. check the schematic, or check out the quickstart guide.
Still tinkering with using my tv as my computer monitor. Couldn't quite read the schematic, but the Quickstart guide made it easier to see all of the headers and such. The teacher in charge of the computer club is very fond of the parallax boe bots. These are half of the price, and seem easier to program (granted I know how to program an arduino). We will have to see if I can convince him to order a couple to compete against the boe bots we already have.