- Home
- Product Categories
- Robotics Kits
- Multi-Chassis - Tank Version


Multi-Chassis - Tank Version
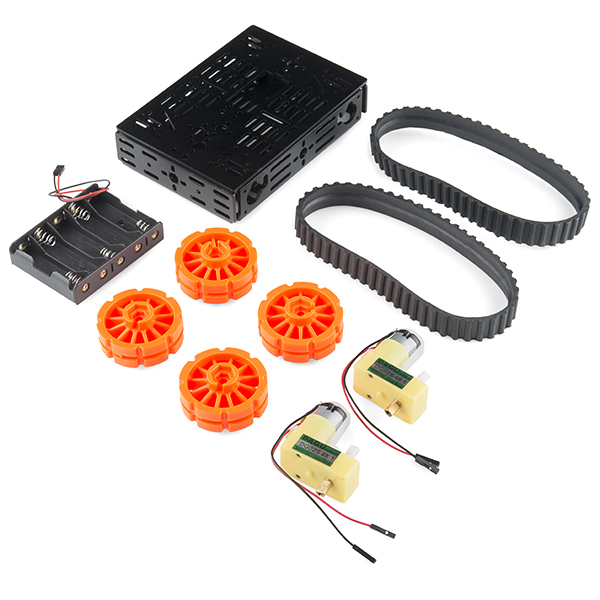
This is the Multi-Chassis Tank Kit, an easy to assemble and use robot chassis platform. The Multi-Chassis kit provides you with everything you need to give your robot a rugged tank tread platform with plenty of room for expansion to add various sensors and controllers. All you need to do is supply is a basic motor driver and power and you'll be ready to drive!
This Multi-Chassis Tank Kit includes two 48:1 DC gearboxes with a metal final output gear and shaft that independently drive each 52mm tank treads making this chassis able to drive around tough terrain like tall grass and sand. Each side of the 2.5mm thick aluminum frame comes cut with plenty of attachment points to add a multitude of different robot controllers, drivers, and sensors. A standard size servo can be mounted inside the chassis and be used for robotic arms or sensor arrays.
Note: A building instruction booklet with a complete list of items included is inside this kit and in the documents section below. This comes as a kit but includes all the hardware and tools necessary for assembly.
- 1x Aluminum Frame
- 2x 48:1 DC Gearbox
- 4x Track Wheel Hub
- 2x Tank Tread
- 4x M3 25mm Standoff
- 14x M3 8mm Screw
- 2x M3 30mm Screw
- 2x M3 16mm Screw
- 2x M2.5 20mm Screw
- 2x M2.5 25mm Screw
- 2x M3 10mm Screw Collar
- 2x M3 20mm Screw Collar
- 2x M3 Nut
- 4x M2.5 Nut
- 2x M3 Nut
- 1x 5 AA Battery Holder
- 1x Spanner
- 1x Screw Driver
- Completed Kit Size - 157L x 149W x 60H mm
- Wheel Diameter - 52 mm
- Datasheet (DG02S Gearbox)
- Instruction Booklet
- Product Video
Multi-Chassis - Tank Version Product Help and Resources
Wireless RC Robot with Arduino and XBees
March 12, 2019
In this tutorial, we will expand on the SIK for RedBot to control the robot wirelessly with XBee radios! We'll explore a different microcontroller and wirelessly control the RedBot at a distance.
Core Skill: Robotics
This skill concerns mechanical and robotics knowledge. You may need to know how mechanical parts interact, how motors work, or how to use motor drivers and controllers.
Skill Level: Rookie - You will be required to know some basics about motors, basic motor drivers and how simple robotic motion can be accomplished.
See all skill levels
Core Skill: DIY
Whether it's for assembling a kit, hacking an enclosure, or creating your own parts; the DIY skill is all about knowing how to use tools and the techniques associated with them.
Skill Level: Noob - Basic assembly is required. You may need to provide your own basic tools like a screwdriver, hammer or scissors. Power tools or custom parts are not required. Instructions will be included and easy to follow. Sewing may be required, but only with included patterns.
See all skill levels
Core Skill: Electrical Prototyping
If it requires power, you need to know how much, what all the pins do, and how to hook it up. You may need to reference datasheets, schematics, and know the ins and outs of electronics.
Skill Level: Rookie - You may be required to know a bit more about the component, such as orientation, or how to hook it up, in addition to power requirements. You will need to understand polarized components.
See all skill levels
Comments
Looking for answers to technical questions?
We welcome your comments and suggestions below. However, if you are looking for solutions to technical questions please see our Technical Assistance page.
Customer Reviews
2.5 out of 5
Based on 4 ratings:
1 of 1 found this helpful:
Terribly Underpowered.
Five double A batteries do not provide nearly enough power for this tank. Also, there is no data on the motors so it is difficult to find out how much power I can actually supply to them.
1 of 1 found this helpful:
No power
Its a solid build, and kinda a cute little tank, but I wont crawl up or over some rugs in my house. I'm not sure what do to for more power. I considered making it "4 wheel drive" but now it just sits. I had a lot of plans for this, but now i'm looking bigger.
2 of 2 found this helpful:
Bad choice - go with the wheels
While the metal chassis is solid and versatile and the wheels are intelligently mounted with proper bearings, the included battery supply is next to useless. It will barely even spin the wheels with five fresh alkalines fitted - unless the tracks are removed. It certainly won't drive the vehicle and that's with no extra weight other than an Arduino! The tracks seems to be far thicker than is needed in this application and introduce substantial friction. I would have been much better off buying two Ardumotos and instead choosing the 4WD wheeled version of this chassis, I now need to go to the hobby store and see what is available in larger battery packs. Maybe linked tracks with less friction would be an improvement?
Update - I bought a 2S LiPo battery pack. With this battery (nominal 7.4V full charge) this chassis has all the performance I want. It seems the 5 x AA (nominal 7.5V full charge) battery holder included with this chassis is simply garbage - throw it away. Easiest explanation for its poor performance is that the cell connections are high resistance because the tight plastic molding does not allow the weak springs to push the battery against those poorly shaped terminals with any force. In fact I got zero voltage initially, had to assist the springs to get the cells to make contact! How dumb is it to skimp on a battery holder when it makes your whole product look useless?
Really poor product
OK. I read all the reviews and comments so I kinda knew. But it was on sale! So here is my experience. The description says "comes with all tools necessary for assembly." Not so! First the holes punched in the chassis to mount the wheel bearings were too small and required a lot of reaming and grinding correct. Then I found that the motor mount holes were not in the right place relative to the shaft center which required even more grinding. The tight fit of the wheels on the motor shaft has already been noted and also required considerable filing to be able to mount the wheels. Perhaps some of the comments on poor power are due to these mis-alignments causing friction. Also, the battery mount screws are right above the motors without enough clearance, requiring grinding down the screws. So, if you have a well equipped workshop, and a free afternoon, you can make this work. It is definitely not "easy to assemble."
Having corrected the mis-alignments and applying lots of grease, I found the power to be ok but not great. On a smooth floor it goes pretty well forward and back, but has some difficulty rotating in place and will not do this at all on a carpet even at full power. No, it will not "go through tall grass." With 5 NiMh batteries, the motors get noticeably warm even at relatively low duty cycles, so I don't think they can take too much more voltage.
All that said, I am not returning it because all I really wanted was something to be able to prototype things for a larger vehicle in my tiny home office - it is doing that ok. But after the assembly problems and a poor experience with the "Rover 5" and its wheel alignment problems, I don't think Sparkfun should be offering these products due to poor quality.
Hello, Could anyone please tell me the weight of this kit?
I am very impressed with most of the chassis. Dagu has done a nice job. The aluminum is nicely punched and folded. There are abundant slots and holes for mounting just about anything. I was surprised and impressed with the bearings that the wheels run in. They make a big difference in how smoothly everything goes together. Assembly is mostly easy and straightforward. Tread quality is good. Everything seems like it would stand up really well to falls, even from 4' high workbenches.
I just have a few gripes: No mounting holes in a pattern for Arduino? I can mount 42 servo motors, but no controller? C'mon! No mounting holes for the included battery pack? This is inexcusable! The bent up prongs in the chassis interior make it really hard to fit the pack next to the motors even if you drill new holes to mount it. Getting the wheels mounted on the output shaft was a trick. I had to stack the included washers and use screws to pull the wheel onto the shaft. Trimming a little of the plastic where the motor output shaft enters helped. Lack of power is disheartening. I'm going to look into higher power motors, but these stall trying to drive over a pencil. I don't know what trickery was involved with the stair climbing in the Product Video. Has paint that chips, anodizing would be nice.
I agree with this except for stalling while driving over a pencil. I have no idea how this happened, mine works really well. After I perform further testing I will post some measurements.
"stall trying to drive over a pencil" - you must be doing something wrong, this thing should have no problems going over a pencil. You axles sound way too tight, or you are not controlling the motors the right way and supplying them with proper power. What kind of motor controller are you using?
Ok guys I'm going to cry, the battery pack is mounted in the bolt slots that slide diagonally. Also, you can mount the "red board" (highly recommended) with two bolts on it, we used this kit in robotics camp two days ago. And they uped the motor speed via programmer. The red board is basically arduino uno, it still uses that programming language of arduino, please say if this was helpful.
I love this chassis. It's an awesome mix of quality and price. The motors are much quieter than the other toy chassis I bought years ago.
The one problem I had was mounting the wheels on the motors. The fit was soooo tight (yes, I lubed it as instructed) that I think I ended up bending the shaft the wheels are mounted on. As a result, my robot has a bit of a hitch in his giddyup.. They were such a pain to put them on I don't know if I'll be able to ever get them off to replace them without destroying the whole thing.
Other than that it's a good kit for the money.
I'm a little disappointed with this kit. It looks so good, but its looks are deceiving. As others said, its not perfect. My biggest problem is just the lack of power. Using a motor shield and the same battery pack I use with the Tamiya tank kit this stalls out with the slightest obstacle and just doesn't move very quickly.
This chassis is really good. I'm using it with the serial controlled motor driver and it works great. Also, I have no idea how this managed to stall driving over a pencil. Mine seems very powerful running at 9 volts.
when is going to be really available? i've been waiting for more than a month..
I am completely new to Arduino. I want to use this for an r/c project. Can someone direct me to a tutorial for using this with an r/c radio system?
I know sparkfun has one, I've been to It before. If I find it, I'll let you know.
The tutorial is archived. It is here. You can also find cheap radio controllers here.
Would someone check this math?: Motor Speed = 65rpm No Load. So lets estimate 60rpm with some light load. Wheel diameter = 52mm. Lets say 54 with the tread added. (so radius = 27mm)
So using the formula for tangential velocity given the period (1s), and radius, I find the speed of the chassis would be about 0.170m/s or 0.380mi/h.
I'd estimate that 60rpm is fairly accurate for the load of just the tread. Using the Ardumoto and 5 fresh alkaline batteries I got about that speed at 100% PWM. The problem is the stall. This poor thing stalls at about 10-15 degrees of incline at 100% PWM. I'm a little disappointed that this great chassis is limited to flat floor crawling.
Will the the Motor Driver 1A Dual TB6612FNG work for this platform?
Thats a good question, we dont know its stall current rating. Datasheet says max no load current is 170mA.
Can you guys stall a motor out at 7.5v (same as five AA batteries) for us and see what its max current is? B-)
Stall current is supposed to be 2A. Nominal current is supposed to be 800mA.
Thanks for the reply! Where did you find that information?
It's on the box when you get the chassis.
Is there documentation or example code on how to control this with a Raspberry Pi (preferably) or Arduino?
It's pretty basic "turn motor on" to drive. you just need a motor driver that can power 2 motors. the redbot mainboard would work.
Thanks, Robert. I ended up using a Raspberry Pi, a Ryanteck motor controller board, and Java for the software.
http://electronics.onebeartoe.org/roller/assembly/
http://electronics.onebeartoe.org/roller/usage/
Could it be used with the RaspiRobot Board "https://www.sparkfun.com/products/11561" ?
Sure.
In the documents section you provide a datasheet for the RS030 encoder. There is no mention of them being included in the kit nor do they appear to be available from Sparkfun. Are they included?
Sorry, but the encoder is NOT included. We made a mistake!
Any plans to include encoders? If not, do you have any suggestions what encoders will work with these motors? Thanks!
check below in the related products. it's the 'wheel encoder kit'.
The main picture still shows the encoder wires/connectors.
Did you delete the other posts?
I hid them to save future confusion. Thanks for catching the pictures, we'll get them updated.