- Home
- Product Categories
- Arduino Boards
- SparkFun MicroView - OLED Arduino Module


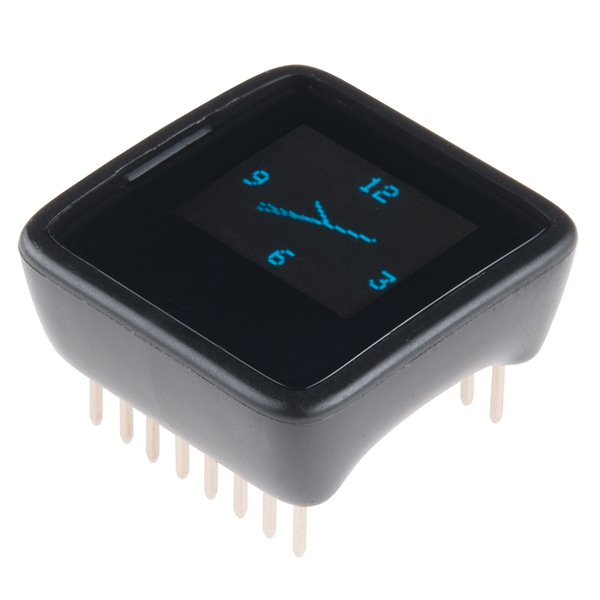
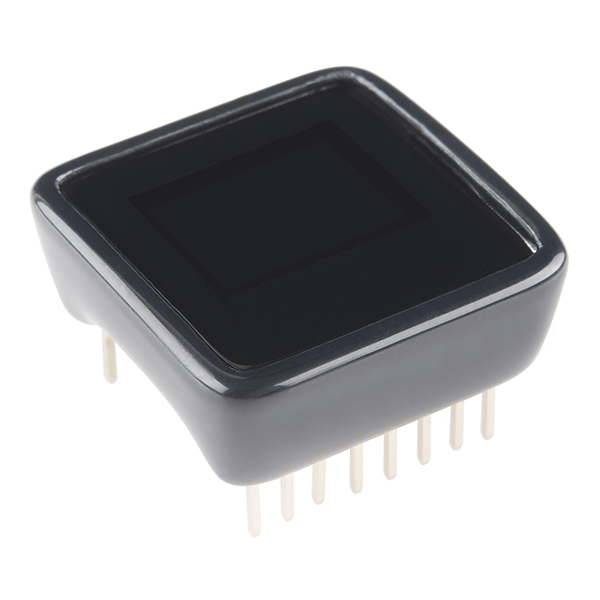
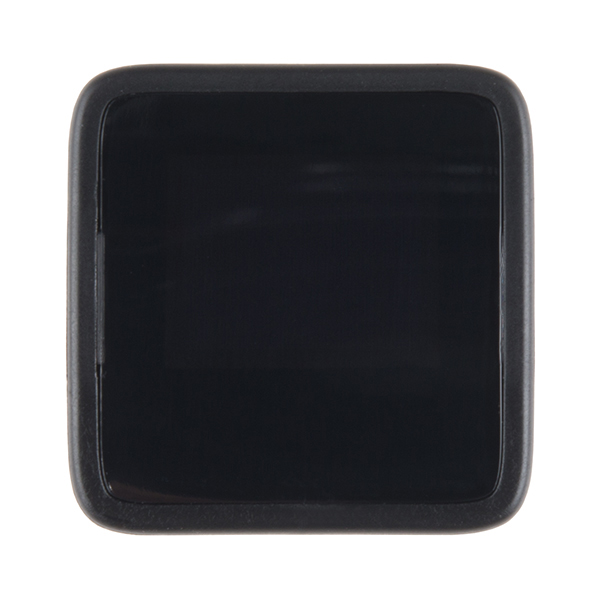
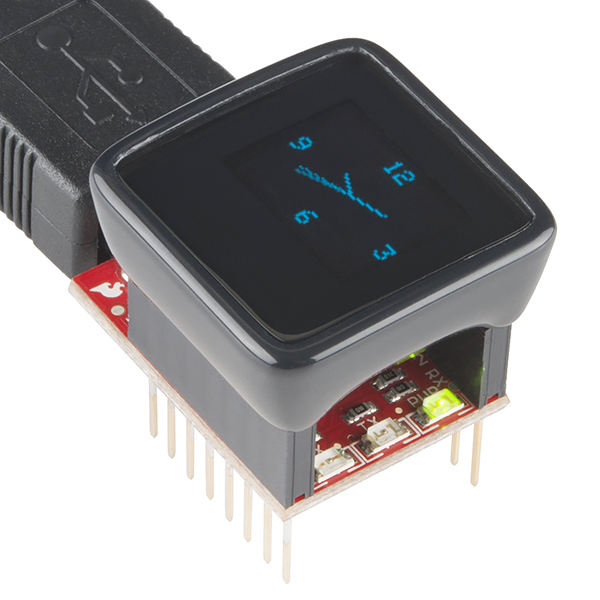
SparkFun MicroView - OLED Arduino Module
The MicroView is the first chip-sized Arduino compatible module that lets you see what your Arduino is thinking using a built-in OLED display. With the on-board 64x48 pixel OLED, you can use the MicroView to display sensor data, emails, pin status, and more. It also fits nicely into a breadboard to make prototyping easy. The MicroView also has a full-featured Arduino library to make programming the module easy.
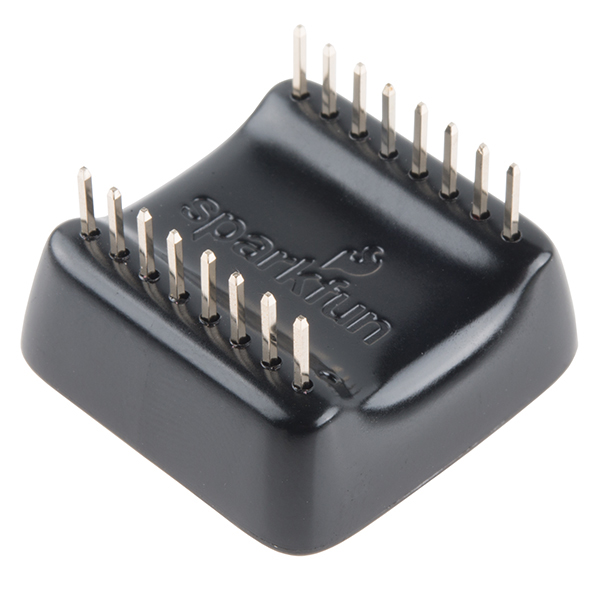
In the heart of MicroView there is ATMEL’s ATmega328P, 5V & 3.3V LDO and a 64x48 pixel OLED display, together with other passive components that allow the MicroView to operate without any external components other than a power supply. Additionally, the MicroView is 100% code compatible with Arduino Uno (ATmega328P version), meaning the code that runs on an Arduino Uno will also be able to run on the MicroView if the IO pins used in the code are externally exposed on the MicroView.
Note: The MicroView programmer is sold separately. Check the recommended products below. Also, unlike the Kickstarter campaign, this does not come with the breadboard and USB cable. You only get the bare module.
- 64x48 Pixel OLED Display
- ATmega328P
- 5V Operational Voltage
- VIN Range: 3.3V - 16V
- 12 Digital I/O Pins (3 PWM)
- 6 Analog Inputs
- Breadboard Friendly DIP Package
- 32KB Flash Memory
- Arduino IDE 1.0+ Compatible
- Schematic
- Eagle Files
- MicroView Hookup Guide
- MicroView Bootloader Installation
- GitHub (Design Files & Example Code)
- GitHub (Library)
- Product Video
SparkFun MicroView - OLED Arduino Module Product Help and Resources
MicroView Digital Compass
October 24, 2016
Build a portable digital compass using the SparkFun MicroView and the MAG3110 Magnetometer Breakout.
SparkFun Inventor's Kit for MicroView
February 27, 2015
The SparkFun Inventor's Kit for MicroView follows our tried and true inventor's kit model, bringing you 11 simple yet fun experiments to introduce you to the SparkFun MicroView.
MicroView Hookup Guide
December 15, 2016
A quick tutorial to get you up and running with your MicroView Development Board.
Choosing an Arduino for Your Project
December 11, 2017
Examining the diverse world of Arduino boards and understanding the differences between them before choosing one for a project.
Splash Screen Data
The splash screen data lives in the bootloader. You can change it, but you have to recompile and reflash the uC. Use LCD Assistant to generate the bitmap data for the splash screen. We Don't have a tutorial for MicroView, but we do have one similar enough it might help here.
Comments
Looking for answers to technical questions?
We welcome your comments and suggestions below. However, if you are looking for solutions to technical questions please see our Technical Assistance page.
Customer Reviews
4.3 out of 5
Based on 47 ratings:
3 of 3 found this helpful:
MicroView ReView
I'm pleased as punch with both of them..I loved the first one so much, I bought another....Would like to start a collection. I'm relatively new to electronics and mcu, and I must say that definitely as Arduino is an excellent platform for learning and development, the MicroView really enhances the experience. The MicroView is indeed a great tool for learning and is the spirit of Arduino. Great job in bringing this to us. Thank you SparkFun! Peace to all and happy 'making' cool stuff.
4 of 4 found this helpful:
Very Nicely Made
In the car industry they call it fit & finish it is put together well .The uView Easy to use I have a Microview controlling a custom made Hexapod i built .Also a robot that looks like MO from Wallee it is his eye display and controls him also ,Bluetooth programmable he is 30cm x 30cm x50cm Programmer works well no hiccups. I am very happy with the Microview
3 of 3 found this helpful:
I forgot to order the USB programmer....
....so I havn't had much use for this amazing Oled arduino thing yet. It should definitively be a bundle in the Sparkfun netshop.
Update April 14: Got my USB programmer today, and had the MicroView up and running in 10 minutes. Great little thing, and I see many uses for it in my projects. I have much prior experience with Arduino and other platforms, and I just love the fact that this has the same power as an Arduino Uno AND has a built in display. Not as many GPIOs, but great for many projects. Really nice packaging, great display for its size. Love it!!. If things are going as planned, I'm soon going to need at least 10 of these.
Sorry to hear you didn't get a programmer at the time of purchase. We sell them separately because a lot of people want to use one programmer to work with many displays. If you are interested in a kit, have a look at this. https://www.sparkfun.com/products/13205 Cheers
3 of 3 found this helpful:
Works like a charm
Was up and running in no time. Ran a number of the tutorials and some experiments. I am surprised how fast you can update the screen given the fact you are updating a memory copy in the ATMELmemory space and copy the memory to the display memory each time you want to update the screen. I am still considering for which project to use this.
1 of 6 found this helpful:
Received two, both non-functional.
First one, the display didn't work properly. The program that the Microview comes with was corrupted on the display and I couldn't program it. The second one the display looked great, but I couldn't program it either. The Microview is not ready for primetime yet...
Not Sparkfun's fault, they were very supportive and responsive throughout the support and return process. However, I cannot recommend this product at this time.
So sorry for all the troubles. I'm glad we could get you all taken care of with your RMA. Cheers
A lot of fun
I've been enjoying using the MicroView because it lets me quickly get visual feedback from my project without having it plugged into a computer.
0 of 3 found this helpful:
Microview OLED module
I got two unit, both could not be programmed with the USB programming adapter. Following the instructions for opening the units and attaching the SPI wires I programmed the bootloader and got a successful programmed message. However, the devices still cannot be programmed via the USB programming adapter, but I could program the examples using my USBtinyISP programmer (the same one I used for burning the bootloader). So these modules are pretty much usless until I figure uout how to fix this. Sparkfun should never have shipped these units, and it shows very sloppy quality control.
If you are having issues with your items, please contact us at https://www.sparkfun.com/returns
Solid Unit
Anyone know for how much the 5-V regulator is rated? I know it's not "amps," but how many milliamps? :)
Hi, It's rated for 5.0V and up to 500mA. Happy hacking
It is a wonderful tiny device
I am very impressed by the amount of projects you can do with this tiny device, only limited by the imagination. I consider the Microview OLED a modern wonder of the microelectronics at a very affordable price.
All around good Arduino
All around good Arduino, with easy breadboard insert and a OLED screen for live feedback.
Nice product
Everything I needed for my project
A perfect fit for my project.
I prototype a lot of ideas for work and have found the MicroView an easy way to produce a functional prototype quickly.
Very Handy
This was easy to work with and it really helped cut down on development time.
I wish it had more i/o pins though.
mixed review
I bought two. One failed very soon. The other I have had a lot of fun with- Game of Life.
Give us a call. We'll be happy to help you.
up and running fast, excellent library
i was able to get up and running fast, developed a fast graphical output system with a 9DOF imu breakout feeding into the display. This is a really well thought out system, the only wishes I have would be more versions (3.3V, lipo w/USB charger, xbee adapter) - this is a fun little board.
Second one
I liked first one and got this one on sale without the Sik because I like the combination of the oled and Arduino. I also liked the examples in the Sik for it on codebender.
Great product
Well done! Thanks
Great product and very good documentation.
Makes debugging soooo much easier!
Having a display is cool, but what makes the MicroView awesome is the easy to use widget and display library. Is that sensor really giving you the right signal? Throw a widget on the screen and see the raw input value. BOOM. The ability to quickly view internal state when developing sketches and circuits was an absolute game changer for me.
I was really able to shrink my Arduino based air quality sensor with this
I have some more coding to do with this project, but after getting it out of the box, I was able to get this up and running in hours.
It shrank the foot print of my project by about 3/4 the size. After looking around, I was able to find the commands I needed to display the value the sensor read on screen.
Since making the video on The Suburban Hippie Experimentalist, I have made some strides in making a better display.
I plan to add a better visual representation that allows me to see the indoor air quality at a glance from across the room, and a piece that will allow the sensor to be one small air quality sensor that plugs into any A/C outlet and is completely self contained, and is very small.
https://www.youtube.com/watch?v=fnvGfAFi6e0
Perfect Fit
This little Arduino with a display worked out great for two of my projects. It's fast when drawing on the screen. The support libraries had everything I needed. Simple Copy/Paste/Meld/Morph processes for the code allowed me to easily represent my data. The big fonts are the ones I use. I've found people don't like the small text like those on the fit bits. I'm using this in a physically demanding way and it's proven to be a tough little device. The workflow of "Plug-into-FTDI" then "Plug-into-Project" then FTDI then Project then FTDI then Project is fine with me. The pins on the MicroView are strong and stiff. I also use it as a prototype item to eventually be replaced by the Micro OLED breakout and an Arduino compatible micro that is more appropriate for the final product. Like a Particle Photon for example. I have had nothing but good experiences with this device and would highly recommend it to anybody for consideration in their project.
Okay, but
The packaging is very good. Size is great but the price is too high to use on a commercial project. It's good for personal project but would be too expensive to integrate into a manufactured design.
Love this little device!
These things are so much fun. The display looks sharp and is really useful.
I've bought over 50 of them for various projects in the last couple of years, never had a problem with any of them.
It would be great if they had more memory (limited to begin with, and the Microview library takes up a lot) but still very very usable.
0 of 1 found this helpful:
Cool for small project
This just works, and the library is very cool. .5 star off for the cost, and .5 star off for not having 3.3 available as a pin for peripherals that need that. (or it would be really cool if you could switch whether you got 3.3 or 5 out of the regulated power)
Works as advertised so far.
I wired it up and installed a demo it works as advertised so far. Haven't really had the time to really play with this as I've had 22 teeth pulled in the last 5 weeks and am dealing with the wreckage of 3 years of Cancer treatments.. I would think that a review should be spontaneous and not prompted by sales and marketing dweebs. As an engineer I really have a STRONG dislike for marketing monkeys.
Excellent concept, but very limited use.
The font libraries are very limited and allow for very small text only. Itried many times to generate new full size font libraries using your sugjested tool, but was not able to do so. The product would be ideal for my application if there were larger text fonts available.
Hi, I believe you may be interested in this tutorial on how to create your own custom fonts - http://learn.microview.io/Font/creating-fonts-for-microview.html
Very nice module
I bought three of these. Since I'm a mechanical engineer and don't have a lot of experience with Arduinos it took me about 2 hours to download and install all the necessary stuff and communicate with the microview. Once I got that sorted I built all 11 learning kit circuits. Now it's on my desk as a temperature display. The included libraries for widgets (Gauge and slider) is somewhat limited, but I can live with it. Next I am going to use it to drive a brushless motor and use the PWM to drive a haptic device. There are enough IOs left for most projects. Now we need a photon with integral display.
Awesome device
within 15 minutes of opening the package with the OLED display and Microview programming module I had the demonstrations operating. Excellent packaging and the demos provide lots of good ideas for real world usage. Plan to use this as a standalone debug to display status, commands, etc for an arduino powered robot when disconnected from the USB.
really great looking
i use it for a pressure gauge on a water line and works perfectly and brings a great looking
Fascinating product
You can do almost anything with this gadget from text to graphics to design your own meters. Most fun i've had at the bench in a long time.
Great Arduino, and tiny, with sharp display
It took just an hour to swap the Arduino Nano in my PWM controller for this MicroView and add the messages for voltage and charge status. I really like the tiny size and "finished product" look of the MicroView. I also really like the small size but that rebounds as a small display. I tried a couple different fonts and ended up using the smallest since that lets me put more info on the screen.
I bought 2 just because. I'm looking forward to doing a project with digits for instantaneous reading and a graph for trends. The screen is very easy to manage, so I expect more fun.
Super miniaturization feat!
Discovered that it was pretty involved for my 10 y/o grandson. However, don't hesitate to purchase the inventor's kit because it has a lot of things to experiment with. Once you get the hang of the programming language and the mountain of libraries available it's a cinch to make it do what you want. No matter what I program I'm sure someone will come out with something far beyond my abilities. Look around!
A Manual Is Needed
The MicroView performs an important function. I use it in an alarm system to indicate the elapsed time since power was applied to it, which is when the larger system was triggered. This is the simple program I put into the MicroView:
include <MicroView.h>
void setup() { uView.begin() ; uView.clear(PAGE); uView.display();
} int mn=0; // minutes int sc=0; // seconds
void loop() { delay(1000); sc=sc+1; if (sc>=60) { sc=0; mn=mn+1; }
uView.setCursor(0,0);
uView.print("Minutes  ");
uView.setCursor(0,20);
uView.print(mn);
uView.display();
} What I need is an easy way to increase the font size. Sam
Random blank display problem
I recently purchased the MicroView thinking it would suit my needs. I was especially pleased to see that display power is under program control, so that sleep modes can be used for battery powered projects.
However, about half of the Arduino examples, although successfully compiled, linked and uploaded, produced only a blank display. I suspect a timing problem with display initialization (as the OLED display data sheet explains). I ended up sending the unit back, as Technical Support was not helpful in solving the problem (suggested I buy the custom programmer).
For the record, I'm using Win7 Pro-64, Sparkfun FTDI Basic USB serial adapter and Arduino IDE 1.8.2, with zero problems on several other types of Arduino boards.
All good except the price
I've bought 5 so far and they've all done exactly what I wanted them to do. With a little work and thought it's amazing how useful a 3/4" display is. One of my apps shows speed, remaining distance, remaining time, compass heading, number of GPS satellites and fix quality using the display widget objects. All easily readable and easy to code.
The only downside is the price. It's about double what it feels like it should be, probably based on an unconscious appraisal of what kind of use I'm getting from it and what it would take to replace it with cheaper parts - basically, what I'm paying for pretty. I get around this by waiting for sales where this part is heavily discounted and buying then.
Thank you for your review! You might check out our Micro OLED Breakout. It's the same display, but doesn't include the Arduino and case. You could drive several displays from a single Arduino if you hook them up right.
Super handy
I love having a screen that's easily available for displaying tiny, but legible, messages. Uno compatible its not cheap but an elegant form factor.
Great for embedded projects that require a display
As long as you keep it simple, this bugger is great for embedded projects that need as mall display. For instance, I have done a PWM controller (slide-pot input to PWM) and used the display to show % and the output state. I've also used this as a basic dial gauge, and even as a metronome.
However -- the MicroView does make some compromises. First, their graphics library is not the fastest...and the ATMega328 is also not the speediest chip. You'll need to be wary of how frequently you post screen updates. The other compromise -- a lot of pins are obviously not brought out, so you'll need to study the data sheet to make sure this is up to your task.
Again -- a great device (I've bought at least a half-dozen) for simple embedded projects. It's really small!
Compact and Versatile
I have used the MicroView to build: a portable, battery powered, LP gas sensor using an MPQ sensor and BOB; a portable, battery powered, basic component tester; a portable, battery powered, QRP, SWR/Power meter; the readout for a wireless weather station using the SparkFun weather meters and 915 MHz data transceivers.
What we need now is a MicroView on steroids - larger display and more pins available. Hint?
Debugging terminal
It is wary useful for me as debugging terminal.
This is the coolest thing!
If you're doing something with Arduino, and it doesn't need every single I/O pin, the MicroView is perfect. For little extra effort (the library is very good), you can have a visual representation of whatever you want to show (images, values, parameters, user feedback, etc.), with no additional hardware. At first glance, it isn't apparent that this thing is basically an Arduino Uno plus a built-in monochrome OLED display. Get the USB programming adapter if you have a few extra bucks--it makes it all very easy.
This is my favorite Arduino
I've incorporated the MicroView into various robotics projects and most recently as a way to get Pixy camera data into the LEGO Spike Prime hub. I connect the camera to the MicroView using I2C and then output the data thru an external DAC which powers an LED. A Spike Prime light sensor sits on top of the LED creating an optocoupler, which feeds the camera data into the hub. Using this system, I can feed data from virtually any kind of sensor into the Spike Prime. It's also very handy to be able to monitor the sensor data in real time on the MicroView screen.
works as advertised
This was easy to get up and running. The hardware is great. My main gripe is with the API provided. The documentation could use some improvement.
Solid Plastic, MicroView, it's Fantastic
One of the goals for this device was to provide a simple way to watch variables in a sketch. If it only did that, it would have been great, but the graph libraries make it easy to generate graphs to visualize the results as well. I bought this along with a three axis magnetometer for a "simple" project with a very poor understanding of either how an I2C interface or how a magnetometer actually worked. Being able to see output graphs right on the device has been really helpful for troubleshooting and scaling the responses in real time. (Instead of taking the serial log and then working with the data separately.) The graphs were easy to set up and use following the examples at Codebender. (Huge kudos to CodeBender, that's a separate rave.) I also have to echo the other reviewer's comments on the fit and finish of the device. It's definitely a slick little package, feels durable, and the heavy pins aren't getting bent all over the place either. It would be nice if price dropped over time, but even so this is a very fun device to use, and I can see buying them for other "simple" projects.
Great product
Love it. Hooking it up to xCode (mac) was a piece of cake: Plug and play. So played around a bit before using a real project, and I found the display incredible crispy, sharp and pretty fast. Due to the microview library and examples, you're able to start using it without any knowledge (besides arduino knowledge :-) )
Great LItte Arduino
The MicroView is a great little Arduino. The ability to display values directly on the device is simple to program and better than needing the controler hooked up to the computer.
I hope in future version might iinclude up/down/left/right/down to select imput. The addition of a joystick style input wiht either pushing the full display on the edges with physical buttons.. Or a small touch screen overlay with thes same bsic inputs.
On the technical side I use a Mac for most things and the programer fits upsid down in my usb port. I'm not sure why I would ever directly plug the device into the side of a laptop to use. Overall it would be better to just put a micro USB connector on the programer so that the MV connects like other microcontrollers. That is unless BTLE or wireless is added and the program just gets chucked away.
This is an amazing idea. I would love to make a necklace with this. If only it were available with female headers (low profile would be best) so it would sit closer to the skin and not pose an impaling risk. Have you ever considered a version with female headers, or no headers for easy customization?
If you are nifty with soldering and coding, you can use the base parts to create a smaller device:
Otherwise, you may also want to check out the TeensyView, which will be easier to wire up.
While the OLED Breakout is the same size as the MicroView, the Pro Mini is a lot wider and on a separate board from the screen driver, so I don't see how it could possibly be smaller. And there is no case. The Teensy is even longer than the Pro Mini. Maybe I can open up the MicroView and de-solder the headers. Maybe I can just get somebody to 3D print a case for the TinyScreen+ and have a device that's the same size as the MicroView, but with a SAMD21, 96x64 RGB OLED, four push-buttons on-board and a micro USB port for programming and charging the LiPo.
Sorry, to clarify... that is for a lower profile version (no additional thickeness from case and protruding headers). The reason for the male headers is for users to still be able to prototype on breadboard. However, I think this thread is leading towards customization questions, which we currently don't offer services for.
Excellent. Thanks. I can de-solder the pins and drill a couple holes in the side of the case to attach the cord. (with VIN and GND inside)
Hi All, I order MicroView I though it is such as Micro OLED. Is possible to used such as Micro OLED.
please awaiting you kind reply and help.
Just putting it out there, if you are planning on getting the MicroVeiw you're probably getting the programmer which costs 55$ in total. However, the sparkfun inventors kit for MicroVeiw gives you the MicroVeiw and the programmer and the cable and: a breadboard,a motor,a servo,sensors,wires,LEDs,Transistors.......and for 5$ less!!
Hi Jim, the MicroView video looks great and would like to build the 3d cube application in order to learn how to use the accelerometer and gyro too, is the code and components list available online? thanks!
learn.microview.io down?
No idea how to use fonts and scrolling, and class reference isn't helping much.
All the data from learn.microview.io has been migrated to here.
Is the IIC line 3.3V or 5V logic?
So I am looking to use this as a compass and outdoor air temp on my motorcycle in place of my voltage gauge. I am worried about waterproofing this. Has anyone ever had to deal with this?
Has anyone been able to program the microview using an uno as the FTDI programmer?
Immediately after posting this I switched Tx and Rx and found my error. The answer is yes for anyone else interested.
Might want to say the clock speed is 16MHz somewhere on this page
What would be the theory behind using an ESP8266 module with this? I have a program already written and running on an ESP8266 Huzzah board and I want to use the screen on the Microview to display data from it.
Hi there—has anyone run a GPS shield off this? Can anyone recommend which one would be best? I'm trying to keep the size as small as possible. Thanks!
Hi all, My KS MicroView arrived and it's great. A few of us primarily interested in MicroView games programming have started a free forum (uview.forumchitchat dot com) to discuss and share code, if anyone would like to join/contribute please do. www.uview.forumchitchat.com
Very cool! I've also been working on a small joypad for the MicroView that pairs nicely with game programming. It's called MicroJoy, and you can build your own here. Hope it's useful to anyone wanting to build games with MicroView!
Cool stuff. You might also want to mention this over in the support forum.
to 408183: yeah they are making money off the the project. But even though they are not getting rich off this. They are running a business that employs people and comes up with ideas that we use for pleasure and work. Don't allow yourself you confuse what these people are doing for the benefit of all of us and the greed that is Wall Street. I take offense to that.
I feel like this device is in desperate need of a pushbutton or two.
And Bluetooth... Yes, that would make it perfect!
Well, I think you'd be hard-pressed to fit a Bluetooth module in there. I just added a header to break out the ISP lines - so I can tell you, there really isn't a lot of unused space inside the casing of this thing. Putting a couple pushbuttons on some of the non-exposed I/O pins would require changes to the plastics (to incorporate holes and caps for the buttons - possibly necessitating a slide-mold to put the buttons on the side of the unit) and probably a more compact layout for the PCB (replacing the TQFP '328 with a QFN, for starters) to make space for the switches themselves. It's an expensive proposition unfortunately but otherwise well within the realm of possiblity.
Perhaps just a stainless steel "staple" along each edge wired to inputs to be used for touch sensing. It would require a bit more assembly to wire the staples to the PCB, but should be cheaper and more compact that physical switches. I might try this mod if I ever open one up...
Agreed. A simple touch contact on the bezel would make this product 10x more useful!
I don't think it's cheaper than Kickstarters, in fact I think it's about $10 more if I remember correctly. The difference is that the Kickstarter version comes with the MicroView and the Programer so that is about $55 on here and I think it was $45 on Kickstarter.
Anyhow...Happy they have this product for pre-order. Now if I could just get them to sell the little OLED screen as a stand alone breakout that would be super cool!
====SWAIN::;---
Sniped this site from the original posting of the MicroView. OLED Display
I, too, backed at the MicroView+programmer level, and it's definitely cheaper for me due to the international shipping - though only just. At other levels, it's not necessarily as favorable. That said, it's a KickStarter project - backing it is what helped made it possible in the first place and I also get to have mine pretty soon (as opposed to ~October). It's a bit like the veronica mars movie (people ended up being able to watch it online for cheaper than most backer levels), or even the oculus rift (facebook acquisition outrage where "where's my slice of that pie??" applies, not the more fundamental outrage). It might sting a little, but those are always possible outcomes. At least it's got SparkFun behind it, and there's little fear that it ends up vaporware ( unlike a few other projects I backed :) )
WTF? Kickstarter backers get hosed on the price? "Help us out now, so we can sell these on Sparkfun in 3 months for cheaper." Dirty trick.
I believe the purpose of the Kickstarter was to turn it into a product (engineering costs). Now that they have the product designed (and sold X thousands of them) the cost ought to be lower. It’s not a trick; it’s how product development typically works. Crowdsourcing just allows people to part of the development process and cover those costs, in return you get in on the first production run. Also, the Kickstarter price covered shipping (the price above does not).
Yeah, it might look like that at first glance, but as others have noted, this is JUST the module. If you buy the $6 breadboard and the $3 cable, you're a tad more, and you don't get shipping included.
Did you miss "FREE WORLDWIDE SHIPPING" on the KS rewards?
I'm actually glad to see the prices are in-line - it means both GeekAmmo and SFE did their homework and got the pricing right in the first place. If they offered it too cheap to backers of the KS campaign they may have run out of money, and now SFE aren't trying to rip us off if we missed the KS (not that they ever would!).
The "MicroView" backing level on the Kickstarter also comes with a breadboard, while this product page and listing are for the MicroView unit alone.
The "Starter Kit" backing level is the one with the MicroView and Programmer (and breadboard and cable).
"Free worldwide shipping" is not the same as "heavily subsidized because everybody is paying into it worldwide shipping".
We end up getting many months before anyone else can buy them The first wave of builds will be for the backers, so Oct - Jan would be when non-backers can buy theirs. On top of that, you get free shipping as opposed to Sparkfun's shipping. All and all, it's a good deal. I backed it for $55, getting me the USB programmer, which ends up being the exact same price as buying both here, except I get mine in July/August instead of later on in the year.
can someone tell me what the line should read to change the C to an F in the Temperature example Currently it is[ uView.drawChar(47,33,67); // Character C is ASCII code 67
The
67in that function sets the value to 'C' (C's ASCII value is 67). Replace that with eitherF, or F's ASCII value,70. The47and33set the x and y position of the character.Would be great to have a dimensioned drawing of the exterior case.
Problem is, which parts are you dimensioning? If you just want to know the dimensions of an enclosing box: 26.7 x 26.1 x 10.5mm. Anything beyond that - e.g. if you need it to form-fit into another device - and you'd probably be best off loading the MicroView STL files into a cad program and measure the parts of importance to you, as it's not a regular shape.
Is there a dimensional diagram somewhere? I'd like to print an enclosure for this and would prefer not to have to take measurements myself if the diagram's already out there.
e: nvm, the STLs are linked on this page.
Customer project with the Geiger Counter, microView and a 3D printed enclosure => http://www.thingiverse.com/thing:854368.
SparkFun, could you tell us the pin diameter (diagonal, since they're rectangular)? Is there any sort of data sheet that would contain this information?
The pins are square - 0.64mm on each side. I found this datasheet, which isn't exactly those headers, but should use the same pins.
Thanks a ton. So that makes for a diameter of 0.64mm * sqrt(2) = 0.9051mm. I'm trying to fit the MicroView onto my board with this pass through socket.
Could someone tell me the average power consumption of this? (Say for code of average intensity). I know the OLED by itself pulls about 10-20mA. I'm trying to figure out the smallest LiPo that SparkFun offers that can run it for at least 4 hrs.
It usually pulls somewhere between 17-25mA - mostly depending on what percentage of the display is lit up.
Anyone know how to go about adding SD card or other type of storage to this?
Easier said than done in this case. SD storage is done over SPI, but on the Microview the screen also uses SPI. Because we figure that the SPI bus is going to be busy with the screen and we had limited number of pins available on the package we didn't breakout these pins. If you want to do SD storage look into adding the OpenLog, it is designed to just log whatever data is sent over the serial lines, but it does have an ATMega328 that you can reprogram to do whatever you need it to.
anybody used one of these outdoors in sunlight? how readable is it? also is it usable in cold temperatures? esp. compared to LCD or other LED displays.
Hello, Would you be able to post a link to the code used to demonstrate the hookup of the 9DOF IMU to the Microview? Thanks in advance.
I have 3 or 4 of these and they are great for breadboarding. The housing is nicely made, but useless for panel mounting. It would have more useful to have a bezel. They claim to have STL files to make your own case, but STL cannot be modified much. STEP or IGES files would have been better. There is need for an input device - some buttons would have been nice. The biggest problem however the lack of API documentation. The github material is all old and appears that someone just gave up writing the documentation sometime last year. This could be a great seller but needs more support. The elementary tutorial is not enough.
I'd expect for the $40 price, one would purchase the MicroView AND the programmer, not just the MicroView. The current price scared me away.
Hi ! Do you think that it's powerfull enough to be used with the mp3 player shield ? Thanks
Yes and no. This runs on the ATMega328 which is the same microcontroller the Arduino Uno runs on so it will have the same power. That being said the microview talks to the screen over SPI which is one of the reasons the SPI pins are not broken out. Since the MP3 player shield uses the SPI bus for both the SD card and the VLSI chip actually hooking everything up might be a bit tricky.
OK Thanks.
How can I change the SparkFun splash screen to my own custom splash screen?
Still waiting on my KS order.......what gives?
Most likely we have the wrong address (or no address) for you. Email customerservice@sparkfun.com and they should be able to help you out.
What happens when you report a comment? The reason I am commenting this on this product is it is the top seller so plenty of people must view it.
Most comments do get viewed - some of us actually use the comments feed and are aware of every comment posted ;)
When you report a comment, somebody from SFE staff will take a quick look to determine if it is, say, spam or otherwise inappropriate, and may then take action to remove the comment. I have only used it for spam, myself. If there's a comment that otherwise requires attention (perhaps somebody left personal information mistakenly thinking it was private - it's happened before), I tend to nudge one of the SFE staff on IRC, fill in the contact form, or send an e-mail.
For what it's worth, this information is also available in: https://www.sparkfun.com/static/comment_help
( though I can't quite remember how you get to that page :) )
I really like the microview - very cool product!
If you are considering a rev2, please add + and - markings on the plastic case near their respective pins. When this is plugged into a breadboard (without the programmer) the curved shape of the backshell makes it a bit hard to find the last pin in each row. This makes "off by one" errors possible with the 9V supply which is not a good thing.
Nice little thing. A bit expensive for more than prototyping in my opinion. But hey, why not make a pong? https://www.youtube.com/watch?v=h_DoMO6bPGM
To be clear, does this have internal voltage regulation (Input is listed at 3.3-16V). If I plug 12V into VIN, will everything function fine?
Also, the specs are listed as 12 Digital I/O pins although only 4 are listed (2, 3, 5, and 6). Do the other 8 come from using and TX/RX and A0-A5 as Digital I/O?
Hi, Is there a way to switch off the screen without turn off the microview. I need to save my lipo battery. I don't need the screen except when a user push a button or something like that to see some information on the screen.
Except the API end(), I don't see any other API to do that. any Ideas ?
When I do: uView.clear(ALL); I get about 2 mA of power savings and a blank screen. Because this is an OLED display, I think turning off all the pixels using that command is a significant power savings.
I think alternatively if you really want larger power savings, you can use the end, and then use hardware interrupts to wake the arduino back up... but this really isn't my area of expertise.
What is the physical size of the Micro View? Size of a cutout for a front panel display.
The MicroView front face is 26mm x 26mm. Keep in mind that it has rounded corners (I'm not sure about radius) and a slightly curved face (no flush mounting - you'll have to compromise). There's a 3D STL model available if you need to do some measurements without having one in hand: https://github.com/geekammo/MicroView-Enclosure
Edit: Oh, and if you only need to be able to see the display, not necessarily mount the entire housing, there's a 3D model of the top cover with cut-out as well.
I think I want to replace the 16MHz resonator with a 14.7456MHz one to work with my programmer. Dose anyone know the resonator package style used on this? I'm poking around and I cant seem to find a resonator / crystal that is the correct size or close enough. The eagle files don't say much about the package. THANKS
I don't know if it's a style per se, but the silkscreen lines suggest a dimension of 3.18mm x 1.27mm. Digikey (as an example) shows six components from two vendors for a resonator, 3-pad, SMD, 3.2mm x 1.25mm/1.3mm 14.746/14.74MHz, but they're all non-stock and one isn't even actually 3-pad ;) I'd imagine if you expand the size allowances you should be able to find one.
It would be a lot less hassle to grab a programmer that works with the MicroView 'as is', though?
That said, I could have sworn a BOM was going to be made available so you could get the exact parts - maybe I missed it, but I'm definitely not finding one :)
A bit late, but we generally don't publish the BOM. We don't mind giving out that information but rarely do people need it. Also, we try not to divulge all of our supplier information to our competitors, but if you email techsupport@sparkfun.com they should be able to send you a BOM for pretty much anything you need.
I fully understand. In this case, though, the intended availability of a BOM was mentioned in the KickStarter project:
KS:MicroView - Update 1
Hey... Got one... VERY cool... Love it.
BUT... powering it is weird. Looking for a battery method to power it.. Looks like a single LiPo is s no-go. Two LiPo's in series would work, but but charging two LiPo's. is a pain. All chargers available from Sparkfun, Adafruit and Chinese guys on Ebay are single-cell. So..
Does anyone have any suggestions for a SMALL battery arrangement for this?
I could go with 4 AAAA cells (yes AAAA), but cannot find a four-cell AAAA battery holder anywhere. A 9 Volt is just to fat for the project in mind.
Open to any ideas!
How about lithium button cells, such as CR2032? There are smaller versions than the ubiquitous CR2032, of course, but with less capacity.
You could use this tiny boost converter to make it run on a single CR2032, if 200 mA is enough, otherwise you can find more powerful ones.
Sparkfun even has a nice box for two CR2032 in series, with on/off switch and wires.
If you want rechargeable you could go for a single LiPo and a boost converter.
Have you considered a boost circuit? I have to say though, that if a 9V battery is physically too big, you're probably not going to be left with much space for single lipo+support circuitry to have a whole lot of capacity in that single lipo. Perhaps re-consider your recharging plan?
Your status currently says "This product is produced in-house by SparkFun. We are currently planning to build 199 units." I don't know what that means in terms of "if I order one right now, when will I get it." That would be more interesting to me. I'm glad you're going to be getting 199 of them though.
That information is much harder to estimate. Sometimes they are waiting on a part, sometimes they are physically being built and will be available in a few hours. Currently our system doesn't really have a way to distinguish and get an accurate date for products, but we do want to assure you we are planning on building more as soon as possible. In this case they are pretty high priority, so I'm guessing they should show up in the next week. Also, you can always email customerservice@sparkfun.com and ask for more details if you need them in a certain time frame.
A couple of issues: 1) The learn website (http://kit.microview.io/) won't let you view it unless you give it the email address you used as a Kickstarter backer. I'm not one. 2) Really needs more documentation. I've looked at a half dozen tutorials and web pages and I haven't been able to find the physical and display dimensions. Just a regular spec sheet and list of features, please! If there is one somewhere, great! I wasn't able to find it in 20 minutes of poking around. Maybe one exists and I just didn't dig hard enough. Preferably, it would be listed in the documents section of the product page on the SparkFun website.
Thanks, Brad
We got that removed a while ago if you still need that information.
Does anyone know how fast the screen can re-draw itself (i.e. supportable frame-rate?)
This device has great promise (I received one with the first Kickstarter shipment) but is in desperate need of documentation. The Learn MicroView tutorial is a good start, but needs to explain how to use fonts/gauges/etc in addition to just providing step-by-step examples of their use.
like the idea and most likly will buy some. I can see a add on's to this. A matching bezel 1/4 height full width allowing snap in buttons, camera and/or speaker
These are great! But we need more MicroViews! Looking forward to being able to buy more.
I received my MicroView/programmer this week and I must say that the unit itself is very slick and looks fantastic, also the fast response from the dev team on these boot loader problems has been admirable; they set an example for great customer service when things go wrong. That said, I am having problems beyond verifying if I can upload a sketch. Right now using the recommended codebender start up the device cannot be found after installing the FTDI drivers, but my MicroView also does not enter into the demo mode after attaching it to my USB port. I get the Sparkfun logo displayed but that is all, the unit does not proceed to step through the various demo sequences as I would expect. I haven't seen any information regarding this particular issue yet, does anyone else have any insight into why I am not seeing the demo? Thanks, and keep up the great work.
I'm happy to report that after getting my Uno dusted off and following the great tutorial from Alasdair Allan here: http://makezine.com/2014/08/21/how-to-fix-your-broken-microview/ I was able to flash a bootloader to my microview and can now upload sketches. This is a fun device, thanks to the team and community for this great kickstarter. =D
Just received my two Kickstarter kits. Plugged everything into the first kit and connected to the Arduino IDE software. After loading the library, I connected to the port - /dev/cu.usbserial-DA00SWER - and "HelloWorld" worked first time out.
Found a notification on - http://learn.microview.io/intro/getting-started.html - that you are having some difficulties with some kits so I fired up my second MicroView. It did not run straight out, BUT i found that the port connection was at a different address - /dev/cu.usbserial-DA00SUDC. After changing the port, everything worked fine.
Do all FTDI programming boards have a different address? This may be a bit confusing to some, but the good news is that you can run more than one programmer on the same IDE.
Inquiring minds would like some clarification.
When you plug in a USB-to-serial adapter, it gets enumerated by the system and gets some kind of designation. On Windows it gets a numbered COM port (COM1, COM2, etc.) as if it were an old RS-232 port. On Linux and Mac, the designation is more flexible. The main requirement is that the designation for a newly-plugged-in device can't be the same as the designation for another device that's already plugged in. On the Mac with the FTDI driver I think those last four hex digits at the end of the designation are the device's serial number. It's ugly to look at but the upshot is that any time you use the same device, it should have the same designation... Unlike Windows or Linux (my system anyway) where it'll be given some arbitrary number...
Yes. I'm not too familiar with OSes other than Windows, but each does show up as a different port. Yes, this is a blessing and a curse.
Just un boxed my Kickstarter reward and as always the build is the typical high quality I have come to expect from Sparkfun. However, the protective vinyl covering on the display once removed has left a nasty sticky residue on the screen. My bet is the product got too warm in the back of a truck during the shipping process. Anyway, does anyone have a suggestion for safely removing the residue without damaging the display?
I was proud to contribute to this product's Kickstarter, and once I work out projects for it, I am likely to buy more. I might be one of the folks to design a MicroShield for it.
I got my MicroView learning kit today. The preloaded interactive wiring & LED demo was a nice touch to show off what it does out of the box. It is going to find its way into a few projects so I hope I can order more soon.
My learning package arrived today! The website is not up yet though :(
Which website? This one? kit.microview.io
The Kickstarter page indicates that "Voltages below 6VDC are for hackers that wish to drive the ATmega328P and LDO beyond the datasheet's limit." Does this mean that if I power it from a LiPO through a 5V boost converter I should expect flaky performance unless I e.g. down-clock it, or should 5V be a suitable power supply? The programmer board would be providing 5V from the USB after all...
You should be totally safe with the LiPo boosting to 5V. The power circuitry on the MV is a lot like an Arduino: VIN goes through a 5V LDO to supply the ATmega328, and that 5V line runs through a 3.3V regulator to supply the display. With an already regulated 5V supply, you can bypass the VIN pin and plug that directly into the MV's 5V pin to supply the module. (That's actually what the programmer board does.)
Does this (SP branded/version) come with the 'tutorials' pre-loaded on it?
I dont need all the extra components from the kickstarter.. (I have enough of my own leds, resistors..etc to not have to re-pay for them).. but getting the complete 'kit' with tutorials and what not IS important to me..
Also same question as posted previously... if I have my own FTDI programmers... can I use that instead?
thanks!
If I have an FTDI cable, can I program this over a breadboard without buying the programmer module?
It'll just about work, but you'll need to do something about the auto-reset capacitor. To save space, the MicroView's auto-reset cap lives on the programmer, so to get the MicroView to program with your FTDI cable you'll need to connect an external 0.1uF cap between DTR (the FTDI's green wire) and the MicroView's reset pin. I'll put a more detailed blurb about this in our MicroView tutorial when it goes live.
Thanks for clarifying about the FTDI programmer/useage.
Can you comment on the 'tutorials'? They mention they come 'pre-loaded' on the kickstarter page.. do these too come with the tutorials 'built-in' as well? or a place to download them/view them externally at least?
Thanks.
Sounds easy enough. Thanks!
So where is the programmer?
https://www.sparkfun.com/products/12924