- Home
- Product Categories
- Distance
- LIDAR-Lite v3

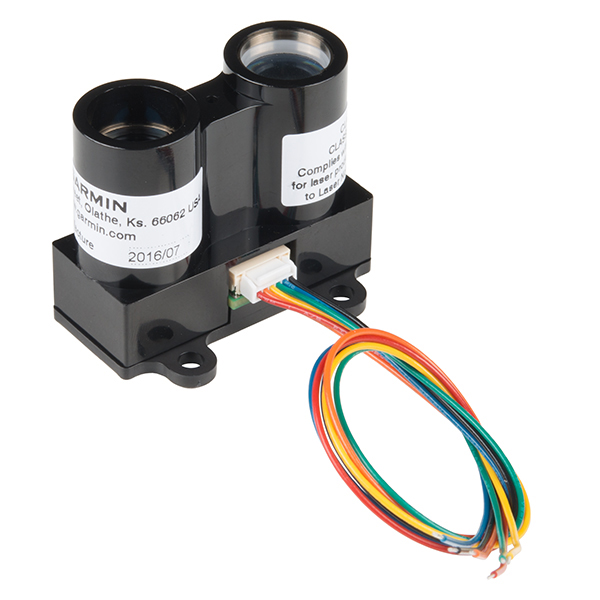
This is the LIDAR-Lite v3, a compact optical distance measurement sensor from Garmin™. When space and weight requirements are tight, the LIDAR-Lite v3 soars. The LIDAR-Lite v3 is the ideal solution for drone, robot or unmanned vehicle applications.
This easy-to-use 40-meter laser-based optical ranging sensor has all the core features that made the LIDAR-Lite v2 so popular. Small in form and light in weight with low power consumption of less than 130mA during an acquisition. And it’s user-configurable so you can adjust between accuracy, operating range and measurement time.
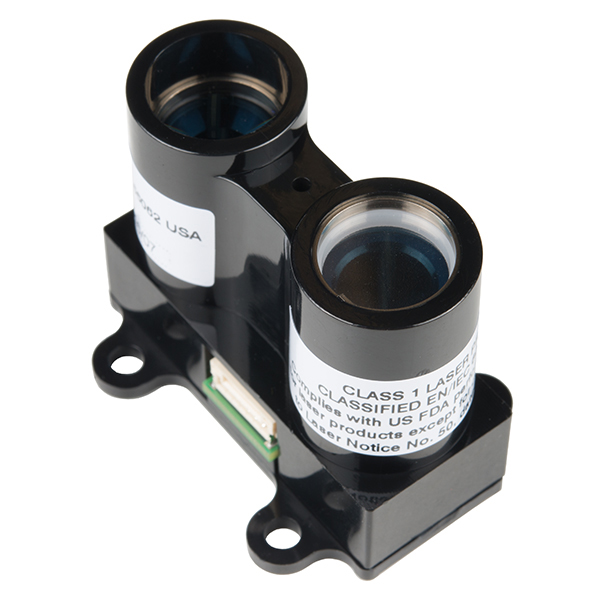
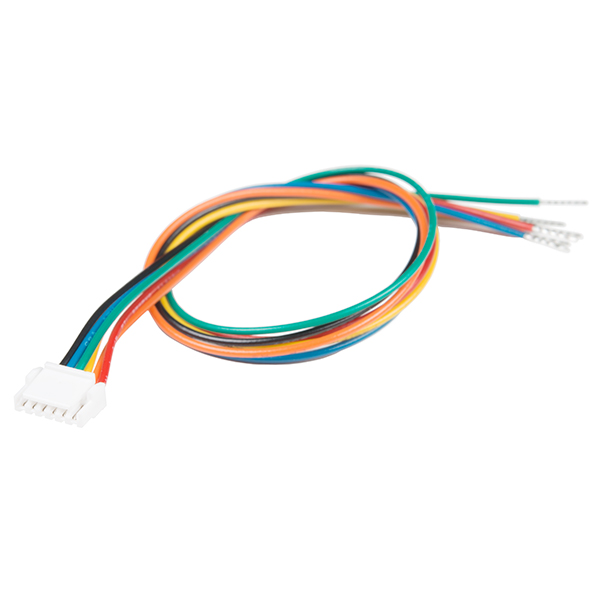
Each LIDAR-Lite v3 features an edge-emitting, 905nm (1.3 watts), single-stripe laser transmitter, 4 m Radian x 2 m Radian beam divergence, and an optical aperture of 12.5mm. The third version of the LIDAR-Lite still operates at 5V DC with a current consumption rate of <100mA at continuous operation. On top of everything else, the LIDAR-Lite is user-configurable, allowing adjustment between accuracy, operating range and measurement time. It can be interfaced via I2C or PWM with the included 200mm accessory cable.
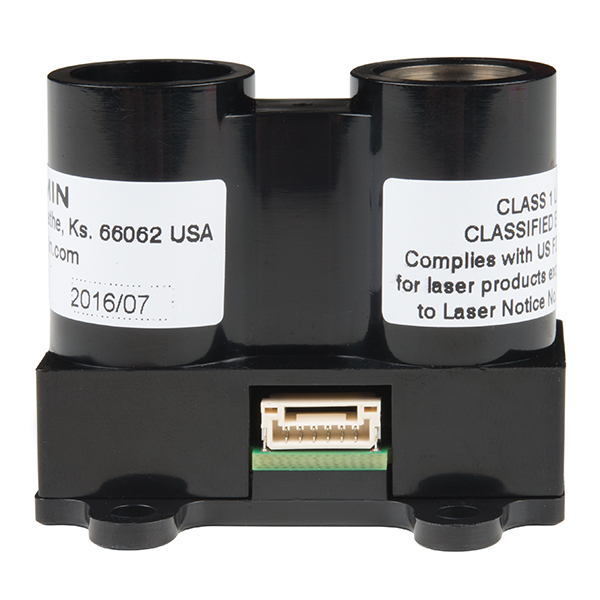
Note: CLASS 1 LASER PRODUCT CLASSIFIED EN/IEC 60825-1 2014. This product is in conformity with performance standards for laser products under 21 CFR 1040, except with respect to those characteristics authorized by Variance Number FDA-2016-V-2943 effective September 27, 2016.
- Range: 0-40m Laser Emitter
- Accuracy: +/- 2.5cm at distances greater than 1m
- Power: 4.75--5V DC; 6V Max
- Current Consumption: 105mA idle; 130mA continuous
- Rep Rate: 1--500Hz
- Laser Wave Length/Peak Power: 905nm/1.3 watts
- Beam Divergence: 8m Radian
- Optical Aperture: 12.5mm
- Interface: I2C or PWM
- 20 x 48 x 40 mm (0.8 x 1.9 x 1.6 inches)
LIDAR-Lite v3 Product Help and Resources
LIDAR-Lite v3 Hookup Guide
May 16, 2018
A tutorial for connecting the Garmin LIDAR-Lite v3 or the LIDAR-Lite v3HP to an Arduino to measure distance.
Large Digit Driver Hookup Guide
June 25, 2015
Getting started guide for the Large Digit display driver board. This tutorial explains how to solder the module (backpack) onto the back of the large 7-segment LED display and run example code from an Arduino.
Mechanical drawing
A simple mechanical drawing can be found at this link.
Core Skill: Soldering
This skill defines how difficult the soldering is on a particular product. It might be a couple simple solder joints, or require special reflow tools.
Skill Level: Noob - Some basic soldering is required, but it is limited to a just a few pins, basic through-hole soldering, and couple (if any) polarized components. A basic soldering iron is all you should need.
See all skill levels
Core Skill: Programming
If a board needs code or communicates somehow, you're going to need to know how to program or interface with it. The programming skill is all about communication and code.
Skill Level: Competent - The toolchain for programming is a bit more complex and will examples may not be explicitly provided for you. You will be required to have a fundamental knowledge of programming and be required to provide your own code. You may need to modify existing libraries or code to work with your specific hardware. Sensor and hardware interfaces will be SPI or I2C.
See all skill levels
Core Skill: Electrical Prototyping
If it requires power, you need to know how much, what all the pins do, and how to hook it up. You may need to reference datasheets, schematics, and know the ins and outs of electronics.
Skill Level: Competent - You will be required to reference a datasheet or schematic to know how to use a component. Your knowledge of a datasheet will only require basic features like power requirements, pinouts, or communications type. Also, you may need a power supply that?s greater than 12V or more than 1A worth of current.
See all skill levels
Comments
Looking for answers to technical questions?
We welcome your comments and suggestions below. However, if you are looking for solutions to technical questions please see our Technical Assistance page.
Customer Reviews
4.4 out of 5
Based on 28 ratings:
2 of 2 found this helpful:
Lidar Lite V3---Satisfied so far
I bought this for obstacle detection on an aerial drone. It worked exactly according to the included instructions in the PWM mode. I did need to add a large capacitor 1000 uF (less may be fine) to insure it initialized properly on every power up. The manual showed the capacitor in the I2C but was not clear that it is needed in the PWM mode.
When I interfaced this with a PixHawk autopilot I found that the recommended series resistor on the trigger line did work. Connected the trigger line directly to the PixHawk Aux pin and it seems to be functioning well. I will be flight testing this week with it.
1 of 1 found this helpful:
Simple, fast, accurate
I'm very happy with this little unit. Setup was a breeze and the accuracy in my use case (detecting block walls) is excellent. I honestly expected much less than the unit delivered, and feel it was worth the price. I've used many sonar and IR based units before and found this unit to be much more reliable. If you are picking this up for an Arduino, make sure you have a hefty capacitor on the power line, it pulls a fair bit of current on turn-on, they recommend a 680uf cap.
1 of 1 found this helpful:
Waste of money - only works in lab - not outside in moisture
I bought three of them for a prototype to be used for a product we want to bring to production. Worked great for a while (all 3 of them) As soon as I got it outside (shooting through rain - but protected from getting wet) it failed miserably. Sunlight killed it. This is for a lab environment. Be careful about hooking it up. Very delicate. I bought a China laser rangefinder for $33. Very happy with it.
Sorry to hear about the issues with the Lidar. Have you contacted our technical support department @ techsupport@sparkfun.com with information about the environment you were using the sensor in? They may be able to help offer some suggestions and solutions to help with issues like what you describe.
3 of 3 found this helpful:
Meets specs, used in a different application.
I purchased this to detect reflective poles at distances up to 90 feet. The distance to each pole being predetermined to avoid surrounding items. The results are used for triangulating location and heading for outside AGV navigation. It was able to clearly detect a quarter inch wide reflective strip at 50 feet using the default settings as delivered. Modifying the settings should provide a very robust and reliable method of detection once mounted on a rotating base.
2 of 2 found this helpful:
This my third one
Mainly because it's small enough to mount on a mid-sized multi-rotor, I know the wiring and I sold #2, so needed another one.
I use them solely for distance measuring, as a radar altimeter and object ranging, having them mounted on servos that follow the camera's gimbal tilt. I use them PWM, connected to a Pitlabs OSD board, which then displays the distance in the video stream.
For me, the device works as advertised, reliably showing distance from 1-150ft. The PWM signal needs a 470ohm resistor to trigger it continuously.
In the crappy news Dept., it's pretty disheartening to pay 50% more than the first two with that fancy Garmin sticker on it.
2 of 2 found this helpful:
Great little LIDAR Transceiver
I design and work with scientific LIDAR for the University of Colorado and I am impressed with this device. Generally, a time-of-flight LIDAR with this sort of range resolution is difficult due to the amazing speed of light and high speed needed for acquisition. This device uses a nifty trick to solve this, doing a really nice job of centimeter-ish range resolution in a small low-power and easy-to-use package. I was able to have an operational device in just a few minutes using an Arduino.
1 of 2 found this helpful:
Doesn't work through glass
I was considering using this for a full size automobile dash mounted device. I created a test rig with a beagle bone black with a Wifi adapter to send the measures to a mobile device(cell phone or tablet). Everything works great with this setup if I walk around outside and point the device at various objects. But when I try to mount it on the dashboard, the window changes the signal so much that the device reads 0 all the time.
I'm not surprised by a limitation like this, but it is annoying.
Bottom line, when using this device be sure the front of the device is out in the open. No glass or plastic in front of it.
2 of 14 found this helpful:
can't review yet, parts not included
I have to wait to review this unit as the required electrolytic capacitor and resistors were NOT included for the $150 price. As soon as they arrive and I futz around with installing external discrete componentry, I can give a review. So far, not pleased. Updates to come later.
0 of 3 found this helpful:
has not arrived yet
i have not received your shipment for this. Where is it?
According to the tracking number, it was delivered on 1/04/17 at 12:45. Hopefully you've gotten it by now, and will have a chance to work with it soon. Once you do, please let us know what you think!
Impressive capabilities for diffuse targets
Works well and Arduino library is basic but working. I had hoped to use this with retroreflective targets, but they tend to overload the receiver, and you get ambiguous results. I will continue to experiment.
Very exciting sensor.
I have high hopes for the Lidar sensor to sense distance and direction on a outdoor robot. In this installation, the Lidar sits on a 180 rotation servo to provide the angle to the object detected. The outdoor tests have been more successful than with other sensors tried for this purpose. It is being used in the PWM mode now because the Arduino mega serial ports are busy. Yeah, I know. So far, so good.
Cool and Capable Sensor
Range and refresh rate set this sensor apart from other range detectors such as the Maxbotix outdoor sensors which are comparably priced. Not only can the LIDAR resolve objects farther, it is able to "see" soft and non-reflective objects such as people. Also, it can refresh hundreds of times a second as opposed to a 6Hz refresh on the outdoor Maxbotix's gear.
One complaint, there is a fair bit of noise in the data stream - especially when it does not get any / a strong return. You will need to filter and that will reduce the effective refresh rate.
Chip
good laser ranger for the price!
We tried at night and shoot on building outside and tree, it does work for building wall at 40meters away!
0 of 6 found this helpful:
Haven't gotten around to implementing my LIDAR Speed Detector / Recorder yet
Because i've been busy with other stuff.
Great little sensor...
...but the mounting hole dimensions aren't even given on the spec sheet. They ALMOST line up with the Actobotics "1.5 inch" hole pattern - see https://www.sparkfun.com/products/12103 - that would be a plus!
Going to be using it to detect objects in front of my boat - so it'll be on a pan and tilt assembly which keeps it level using the Razor 9dof IMU M0 - https://www.sparkfun.com/products/14001 as the sensor and controller.
A lot of fun!
Built my own air-cordian. I might have to add a second to control the notes better. But it has been a kick...now if I can just learn own to play it ;-)
Muy buen componente
Es interesante para generar prototipos de aplicaciones que usen la visión artificial. recomendado.
Amazing Piece of Technology!
Amazing device! Very accurate tho i would recommend avging datapoints. Also, is not accurate at less than 30 cm.
really nice little unit
A thorough read of the Garmin data sheet and a look at the library examples got me going. The unit operates exactly as specified and now it's being integrated into the rest of the robot systems. It works great so far in measuring interior spaces, walls, etc., Tests this summer will examine how well it does outside and on people avoidance. But solid product.
Fantastic!
I am more menunal than your service. Products in Turkey came very quickly. Unfortunately, Turkish workers were not as fast as you. The quality difference is obvious. Thank you :)
The greatest sensor I have worked with!
This sensor is helping the blind see. This sensor along with sparkfuns Pro Micro and Sparkfun code is the primary sensor on a new product Im working on. Shouldn’t disclose the device until I have filed for a patent.
Blindvet007
Disappointed, really!
After trying to use 3 other distance sensors, I discovered at a high cost the lack of detailed descriptions in the datasheets and the websites themselves. For my project that needs a laser beam in visible and RED light, it is disappointing to buy a product that does not report in such a way as to highlight that the light beam is IR, ie infra red. This feature makes it impossible to use this sensor in my project. Another thing I found in this sensor was that it did NOT report the distances up to 300 cm, which contradicts the information in the datasheet that indicates 40 m. Could it be that in my expectation of having the problem resolved, I did not see such information or did the information on the site and datasheet really need reformulation?
( sorry my poor english)
In portuguese:
Depois de tentar usar 3 outros sensores de distância, descobri a o custo alto da falta de detalhamento das descrições nos datasheets e nos próprios sites. Para o meu projeto que necessita de um feixe de laser em luz visível e VERMELHA, é decepcionante comprar um produto que não informa de maneira a destacar que o feixe de luz é IR , ou seja, infra vermelha. Esta característica inviabiliza o uso deste sensor no meu projeto. Outra coisa que descobri neste sensor foi que ele NÃO informou as distâncias acina de 300 cm , o que contraria a informação no datasheet que indica 40 m. Será que na minha expectativa de ter o problena resolvido não vi tais informações ou realmente as informações no site e datasheet necessitam reformulação?
Easy to use
I wired it up, copied the example code and was receiving distance data on the first try. It's very easy to use.
This product helped me out in a tight deadline and helped an experimental project take flight. However I'm getting a strange latency on the signal readings of about 20 minutes, odd.
Other than that, the performance has been out of this world.
I'm wondering if there is a return policy as we'll only be using this for 30 days? (Logistics of shipping back to you may be complicated though)
Now all you need is rotating mirror at an angle that rotates above the sensor, and a position sensor on the mirror and you can have 360 degree range finding with one sensor. At 500hz sample you can almost get 2 samples a second per degree. (though I'd be ok with 1 sample per 1.4 degrees, giving 2 samples a second) Get on it Sparkfun!
Hi, I made this 3d printable part for continuous 360 degree rotation. This was for the previous version of the LIDAR but looking at the bodies it will most likely work with this one as well. I like your idea of the rotation mirror, this saves the need for a slipring. Anyway, here is it: http://www.thingiverse.com/thing:1778878
Hey, nice thing. I have a few questions though.
First, what size servo does it use? The link to the product page is dead.
Second, what optical pickup did you use? And do you think it could work with https://www.sparkfun.com/products/9299
What if you shot this down at something like ice. Would you get a measurement back of how far the water would be on the other side?
Hi there, it sounds like you are looking for technical assistance. Please use the link in the banner above, to get started with posting a topic in our forums. Our technical support team will do their best to assist you.
That being said... probably not.
Problem when using 2 lidar lites over i2c :Changing the i2c address doesnt seem to work, has anyone managed to sucessfully accomplish changing the address by reading the serial number, then writing the serial number and new address to the correct registers?
Soooo, the price doubled cuz they were bought by Garmin????
Hello, Bought one of this a couple of months ago ( this site, other lost account ). Got it working on I2C/Arduino, using the recommended capacitor with the example sketch (GetDistanceI2c), ran some tests, the results were fine, everything ok. Started using it again yesterday, same setup, first try: 10-20 results and silence, tried again, same result, third run - nothing on serial. Since then i get nothing on serial, no results, either on I2C or PWM. On I2C i think it fails at myLidarLite.begin(0, true). Anyone else got this problem or a solution for this ? ( the device is practically new and the wires, voltages, arduino IDE, etc are all verified and in working order ).
Hello!
I have a question in regards to a possible use case for this sensor:
I'm trying to measure the distance from this sensor (fixed point) to a moving point with a max movement of 0.5m located 10 meters away.
Is there a was I can add a marker to my moving point so the LIDAR can measure deflection as best as possible? If not how can I measure the distance to only that point?
Thanks, Charles
Hi, I would like to know if this sensor works on water (Signal will bounce on water?) I need it for a water level tank.
Cheers,
Adolfo
Having some trouble getting this product to work using I2C interface. Works as advertised in PWM mode so it's at least mostly functional. In I2C mode I can set and read-back the R/W registers so comms seem OK, though the serial number registers return all 0's (suspicious). When I command a distance measurement, the distance value is always 0x2424. The status register bits all seem OK (no error conditions) after the measurement. I'm using a NI RoboRio as the controller. I may test it with an Arduino as a cross-check to see if it's something peculiar to the Rio's I2C. Anybody have any thoughts?
Maybe this will bring the price down to something more in the hobbyist/experimentation zone: http://spectrum.ieee.org/cars-that-think/transportation/sensors/osrams-laser-chip-for-lidar-promises-supershort-pulses-in-a-smaller-package
Anyone tried this on RPi + python I2C smbus @ 400kbps yet? Seems to be completely locked for me. I can get I2C connectivity but only the power-up reading is supplied when I trigger a read (ACQ_COMMAND 0x04) and read the FULL_DELAY_HIGH / LOW registers. Tried various other methods too including free running mode with no success. STATUS read consistently reports 0x26 showing signal and reference overflow.
Regarding GPS interference, this is from the included product information paper:
"This Limited Warranty also does not apply to, and Garmin is not responsible for, any degradation in the performance of any Garmin navigation product resulting from its use in proximity to any handset or other device that utilizes a terrestrial broadband network operating on frequencies that are close to the frequencies used by any Global Navigation Satellite System (GNSS) such as the Global Positioning Service (GPS). Use of such devices may impair reception of GNSS signals."
Does anyone have a set of physical drawings of the housing, or at least some specs on the spacing/size of the mounting holes?
We have used earlier versions of the Lidar Lite but stopped using them because of the noisy RFI that they generated. The RFI was so bad that it caused problems with the GPS. Has this problem been corrected? Tnx
Can we use this for underwater vehicles?
Can this be used for underwater vehicles?
Has anyone used v3 to measure velocity? The v3 libraries are missing some of the v2 components, most noticeably the velocity measurement capability.
Hi, I would like to know if the LL3 is still stable and reliable outside. For instance, is it still operating under sunlight, or in an environment disturbed by the rain, the wind or the heat... ? Thank you for your time,
Does this work with 3.3V IO or is 5V required? The garmin spec isn't clear, other than to say the i2c can run "up to a maximum of 5V"
In the FAQ section of the manual, they say 5V is required (this document, page 12)
Have you guys been able to use I2C without the capacitor? And if not, do you carry a capacitor that would be suitable? I was really hoping they'd get rid of that on V3.
Currently testing one without the capacitor and it seems to be working fine. I believe the capacitor is suggested to protect the Arduino. Probably a good idea to use one if you can....capacitors are cheaper than Arduino's!
Any word on whether the offset and other issues of the v2 have been fixed? They are well documented on the Arducopter wiki :http://ardupilot.org/copter/docs/common-rangefinder-lidarlite.html
What is the repeatability, please?
I would also like to know what changes were made between the v2 and v3 models. Is it just a Garmin re-branding of the V2? It is great to see this product returning to the market.
Its cool that its comes back. Do you know what are the changes made between V2 and V3? there were some reliability issues on V2, are they fixed?
Product Page link seems to be wrong, server not found
Sorry about that, fixed.