- Home
- Product Categories
- Particle
- SparkFun Photon Battery Shield


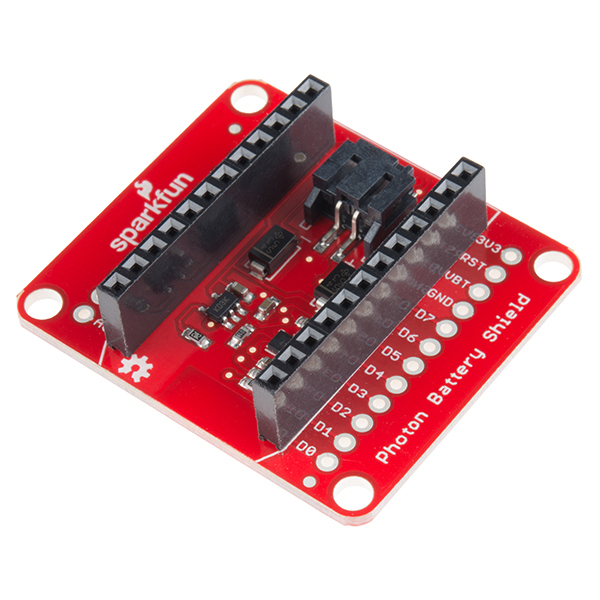
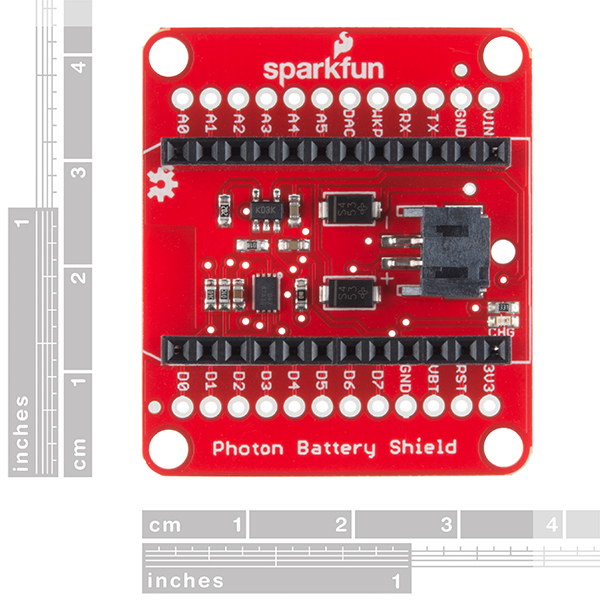
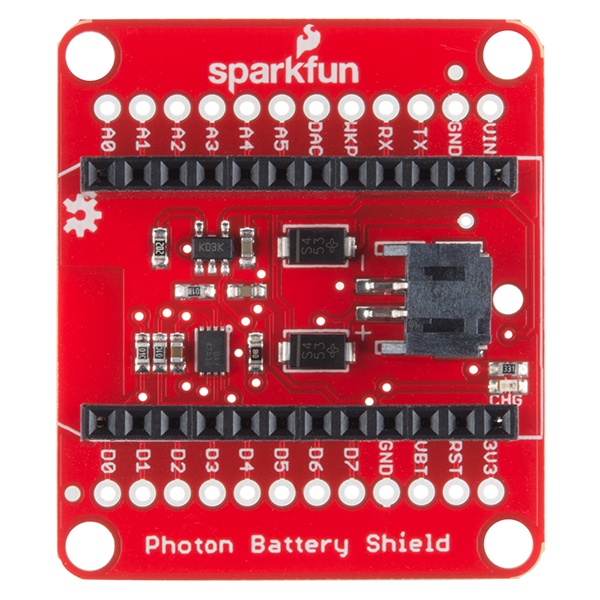
SparkFun Photon Battery Shield
The SparkFun Photon Battery Shield provides you with an easy way to power your Photon module with a Lithium Polymer (LiPo) battery. Not only can the Battery Shield power your Photon, but you will also be able to charge a LiPo battery through it. The board comes with a JST connector for your single-cell LiPo battery and utilizes the Photon's on-board micro-USB connector for the charge input.
This battery shield uses a MCP73831 for LiPo charging and a MAX1704X for fuel gauging. This is a very simple shield for your Photon to provide it basic and on-the-go power wherever and whenever you might need it! The SparkFun Photon Battery Shield comes with the headers already soldered on, so you can plug and play!
The Particle Photon is a tiny WiFi development kit for creating connected projects and products. Sporting a 120MHz ARM Cortex M3 and built-in WiFi, the Photon is not only powerful, but easy to use. The small form factor is ideal for IoT projects with cloud connectivity.
Note: Not only can this shield operate with the Photon, but it can also be used with the Particle Core!
- Headers and Connectors Pre-Soldered
- Compatible with the Photon and the Core
SparkFun Photon Battery Shield Product Help and Resources
Photon Development Guide
August 20, 2015
A guide to the online and offline Particle IDE's to help aid you in your Photon development.
IoT Industrial Scale
October 10, 2016
What does a baby elephant weigh? How much impact force does a jump have? Answer these questions and more by building your very own IoT industrial scale using the SparkFun OpenScale.
Photon Remote Water Level Sensor
June 2, 2016
Learn how to build a remote water level sensor for a water storage tank and how to automate a pump based off the readings!
Photon Remote Temperature Sensor
March 1, 2016
Learn how to build your own Internet-connect, solar-powered temperature collection station using the Photon from Particle.
Photon Battery Shield Hookup Guide
July 2, 2015
The Photon Battery Shield has everything your Photon needs to run off, charge, and monitor a LiPo battery. Read through this hookup guide to get started using it.
**Charge rate**
This board defaults to a 500mA charge rate - it does not have the jumper to swap between the 500mA and 100mA values like the other boards we use based on the mcp73831 charging IC.
Core Skill: Electrical Prototyping
If it requires power, you need to know how much, what all the pins do, and how to hook it up. You may need to reference datasheets, schematics, and know the ins and outs of electronics.
Skill Level: Rookie - You may be required to know a bit more about the component, such as orientation, or how to hook it up, in addition to power requirements. You will need to understand polarized components.
See all skill levels
Comments
Looking for answers to technical questions?
We welcome your comments and suggestions below. However, if you are looking for solutions to technical questions please see our Technical Assistance page.
Customer Reviews
4.6 out of 5
Based on 7 ratings:
3 of 3 found this helpful:
So far so good
Forgetting the fact that my Photons have not arrived yet, I studied this shield for use with the Weather Shield, a 6Ah LiPo, and the 4.5 watt solar panel. Everything seems to be fine as long as I remember to cut the I2C pull-ups on the shield. I have the Weather Meter device and a weather resistant enclosure so when I mount my project outside, it will stay powered for a very long time. I have all of the Photon Shields and like the size, features and construction. Very good quality. But, like most of us, I am waiting for my Photons to arrive. The moment they do, I will simply plug them into this shield, which is plugged into the weather shield with all its sensors connected, and will then see first hand how all these Photon products operate.
Update: After receiving my Photon, I assembled my weather station using the weather shield and the battery shield. I also added a photocell for reading light levels and connected the soil moisture sensor and soil/water temperature sensor. Everything works perfect. I have found that running this system constantly will expire the 6Ah Lipo after 25 hours. I then changed the software to have the photon sleep for 1 minute, wake up and take readings for 1 minute then back to sleep. 1 minute on, 1 minute off. This extended the life of the Lipo for 4 days. However, the solar panel didn't charge the battery at all during this time since the sun never shined. It was always cloudy. Will probably go to a larger solar panel and manage the sleep time more so it will stay alive for at least a week without any sunny days. But, as far as I am concerned, these shields worked fine and the software libraries are extremely helpful.
3 of 3 found this helpful:
Works like a champ
I have this connected to a 2.5W (Solar Cell Large) solar call and it's working perfectly to charge a 1000mAh battery, running a Photon that's sleeping for 20 min, then awakening, taking a temp/humidity reading, and going to sleep for another 20 min. After sundown it wakes every 60 min so as to conserve power. I have plenty of power at this point, even on cloudy days.
2 of 2 found this helpful:
Good stuff
The battery shield is an extremely valuable addition to the Photon ecosystem! I have not yet tested it thoroughly (especially in combination with photon sleep states) , but it works like a charm so far.
small tip for improvement: The JST connector is too much recessed, so it is not easy to pull out the battery cable.
Well it works as it should thus far
I will start by saying I love getting little red boxes from SparkFun!
So this battery shield works well with a LiPo battery that I bought from Adafruit about a year ago with one of their Arduino Uno Power Boost Shield (which died after a week). The battery I have is the 2500mAh 3.7v LiPo.
Sort of wondering why there are two set of 12 pin header spots on the PCB? The stacking headers are super long and would fit on the spots on the next shield down.
The guide that shows you how to access the battery gauge works very well and I have have logging my battery for about 2 hours and thus far have only used about 4%. Anyways, SparkFun always delivers!!!
Great Utility. Not so great design.
I am beginner at tinkering and so boards like these make my life easy. While I will spend time and learn the fuel gauge and battery charging circuits, this battery shield did help me in quickly prototyping a device. That is the great utility part.
Coming to the not so great part... the design. If this is meant for beginners who do not know how to build a fuel gauge circuit, It can be assumed that these beginners will be using standard breadboards. With that huge space for extra through hole pins, it covers the entire bread board. Needed to use more jumper wires / extra breadboard. Connected some wires from under the shield to the bread board. Now every time a change is needed, have to unplug all wires, remove the shield and make changes. Cumbersome!
Maybe its just me. But just the photon form factor would have been easier to manage.
Very handy
This board makes it simple to setup a Photon with lipo. The fuel gauge is a great addition and I add screw terms to the outer pinout row for solid connections.
Minor detail, but it looks like the isolation diodes are shown backwards in the 3D image on the website.
It has been working as advertised with a Photon for some time. But I'm wanting to add a voltage divider to detect when the power from the DC plug is lost. A simple resistor voltage divider to, say D4, would allow detection of power failure from the external 5V supply; the isolation diodes are already present. An idea to add for the future? Maybe for now I'll just solder resistors onto the board. Thanks.
I'm using this shield with a particle Photon. I was previously using a battery shield from the particle store but it gave odd values for SOC and voltage. This shield gives better data. The trouble I'm having is getting the battery to charge though. I'm using a 10 watt (12volt) solar cell, running it through a 5 volt regulator to which I've attached the end of a USB cable. That's plugged into to the Photon board. The panel will power the board but won't charge the battery. Anybody have any idea what I'm doing wrong?
I see this shield used with solar panels that produce a voltage much higher than this is supposed to take, is this ok? Are they taking advantage of the fact that solar panels tend to drop the voltage to whatever is the minimum? For example, the 2.5W panel will produce up to 9.15V... https://learn.sparkfun.com/tutorials/photon-remote-temperature-sensor?_ga=1.177717536.462831652.1449778383
Could this board be use with the new Particle Electron board? I can see that the Electron board has more pins, so I guess it can't be stacked on it, but can it be otherwise connected / are they compatible?
What battery would I need for this shield to power a photon and this servo (https://www.sparkfun.com/products/9347)??? Thanks!
Has anyone attached the optional surface mount barrel jack on this photon battery shield? I bought this shield and it seems to work well. But I want to use the barrel jack option. I'm looking at the hookup guide for the this shield and the optional surface mount barrel jack (PRT-12748) that I also bought. It appears by looking at the pad traces on my battery shield that this would short out the shield, or at least make the polarity backwards from the center positive barrel jack if installed as shown in the photo. Turning the jack around on the shield would seem to give the correct polarity, but that puts the barrel input in a very inconvenient position under the shield. Did the installation as shown in the photo actually work for anyone? Am I missing something here?
Edit: OK. My bad. I was interpreting the barrel jack connections backwards. The double-pad connection on the side is from the center positive connector. It is correct in the hookup directions and photo.
Can someone tell me please if this will support the 6Ah LiPo battery? ( https://www.sparkfun.com/products/8484 )
The fuel gauge doesn't work well on my Photon. The getSOC() function sometimes returned 256.0, and then the Photon became extremely slow. It usually happens within 10 minutes, and then the loop rate decreases to about 1 Hz. Maybe I'm reading the value to often. What is the maximum sampling rate of this gauge?
UPDATE: One thing I've changed is that I set the sampling rate to 0.2Hz but keep other stuff runs at 50Hz, and then the problem disappeared. I test my 2000 mAh lipo and it last 11.5 hours without any problem, and it still has 20% left. At this point I got 3.42V from Vin and 3.32V from 3V3.
what's the minimum voltage on VIN when powered by battery? the Photon needs 3.6v min on VIN and with the reverse polarity protection diode voltage drop there's not much left for a battery to power the Photon unless fully charged. Am I missing something?
I'm using a 2000 mAh lipo and it works fine from fully charged all the way down to 20 %. After that the Photo tends to lost connection and sometimes reboot itself.
Can you please measure the voltage on your battery once the Photon starts rebooting and losing connection? Update: nevermind, I just read your comment above, you already answered my question. Thanks!
I realized that the failure is probably caused by poor WiFi connection in my room. I put the Photon in the same room of my router, and it last 13+ hours without any problem. The battery level went to about 8% at this point. By the way, the longest duration I've tested, with a charger and good signal strength, that without rebooting or loosing connection, is 30 hours. The Photon seems to be not so robust as a stand along microcontroller.
I like the idea, an extension of this could be a Solar charger for embedded/outdoor applications, especially with the electron. Kind of a particle sunny buddy, or even a non MPPT version to keep costs down.
Does it exist any bottom shield?, that is, a shield like this, but without pins sticking out under?
Would also be nice if this shield was smt, and no pins under, so one could mount the battery under this shield to take less space..
This shield doesn't come in a version without the stackable headers. But a pair of flush cutters can easily turn the headers into female-only :).
I can see that, but they will easily puncture your lipo package.. looks like a wearable shield+batteryshield could solve it, but then one are stacking high for an device that is small in the first place.
This is a great product, except (in my opinion/experience) for one "fatal" oversight: the lack of a power on/off switch. In the past couple of years, I've worked with several products that use the same batteries and connector, but also omit a switch. Therefore, the only option to reserve power when not in use (other than running in low-power mode on the processor---a requirement in some applications and impossible in others) is to unplug the battery. And that is not an easy task, given the almost glue-like grip of the JST connector. You either must use a tool (though you will need to adapt, as there is no tool specifically designed for this purpose), or expect to have a few broken fingernails.