- Home
- Product Categories
- Raspberry Pi Kits
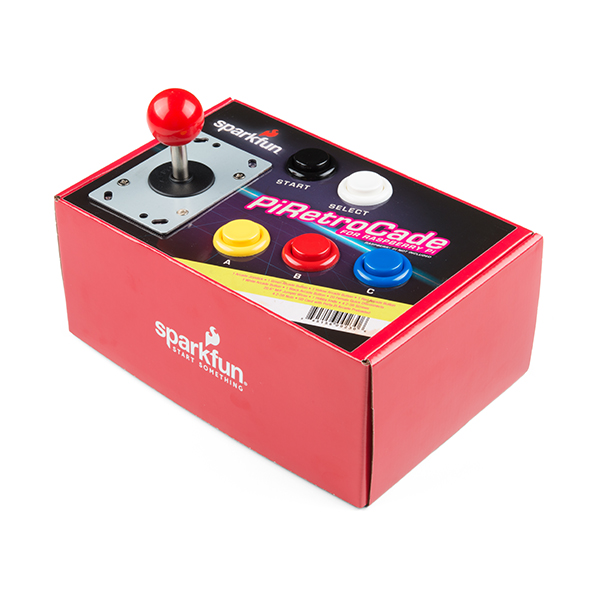
- SparkFun PiRetrocade

SparkFun PiRetrocade
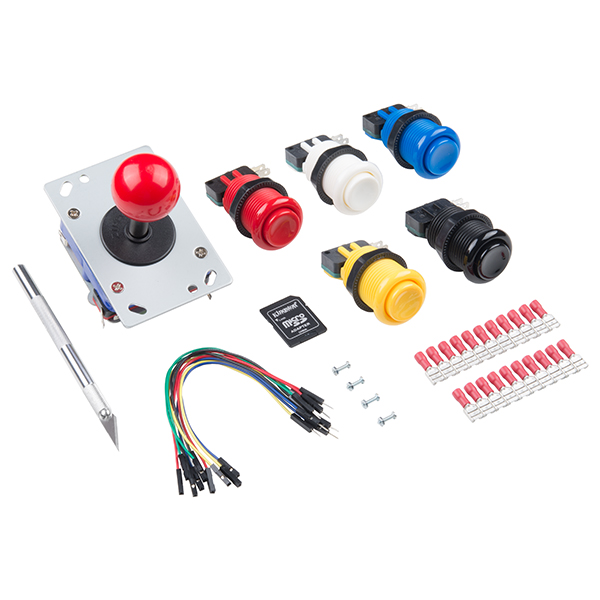
Do you own a Raspberry Pi2 or Pi3? Have you always wanted to use it to set up your very own gaming station? The SparkFun PiRetrocade provides you with all the control hardware and arcade software you need to play almost any retro arcade and console video game! Included in this kit are five concave arcade buttons, a joystick, an SD card preloaded with Porta Pi, and all of the connective tissue. The only thing you need to provide is your own Raspberry Pi (we recommend the RPi3) and a screen to play your games on! We even designed the box the SparkFun PiRetrocade comes in to be converted into a custom game pad. Just cut out the designated points with the included utility knife and you're ready to play!
The image on the SD card is called Porta Pi Arcade and is a collage of several programs compiled by Ryan Bates at Retro Built Games. The image contains RetroPie, Emulation Station, RetroArch and Retrogame. The only thing you need to worry about is powering your Pi, attaching a monitor through an HDMI cable, and loading up your desired games.
Other than the Raspberry Pi 3 (and a means to power it), you'll need wire strippers and crimp tools to assemble your PiRetrocade, as well as a monitor, HDMI cable, and speakers or headphones. Make sure to check out our Getting Started Guide below for complete assembly and installation instructions!
Please note that this kit & image will NOT work for RPi 3B+ or later and only works with RPi 2 & RPi 3 hardware
- 5x Arcade Buttons
- 1x Joystick
- 1x MicroSD Card with RetroPi
- 20x Female quick disconnects
- 20x 6-inch M-F Jumper Wires
- 1x Utility Knife
- 4x Screws and four nuts
SparkFun PiRetrocade Product Help and Resources
PiRetrocade Assembly Guide
October 28, 2016
Build your very own retro gaming controller with a Raspberry Pi using the SparkFun PiRetrocade Kit!
SD card not working with earlier pi?
The SD card we include with this kit only works with a Pi2B or Pi3. There are two different versions of the Pi2B. (Pi2B and Pi2B v1.2) The 2B v1.2 has a ARM8 like the Pi3 and the older version has a ARM7.
Core Skill: DIY
Whether it's for assembling a kit, hacking an enclosure, or creating your own parts; the DIY skill is all about knowing how to use tools and the techniques associated with them.
Skill Level: Rookie - Basic hand tools are required and instructions will allow more freedom. You may need to make your own decisions on design. If sewing is required, it will be free-form.
See all skill levels
Core Skill: Programming
If a board needs code or communicates somehow, you're going to need to know how to program or interface with it. The programming skill is all about communication and code.
Skill Level: Competent - The toolchain for programming is a bit more complex and will examples may not be explicitly provided for you. You will be required to have a fundamental knowledge of programming and be required to provide your own code. You may need to modify existing libraries or code to work with your specific hardware. Sensor and hardware interfaces will be SPI or I2C.
See all skill levels
Core Skill: Electrical Prototyping
If it requires power, you need to know how much, what all the pins do, and how to hook it up. You may need to reference datasheets, schematics, and know the ins and outs of electronics.
Skill Level: Competent - You will be required to reference a datasheet or schematic to know how to use a component. Your knowledge of a datasheet will only require basic features like power requirements, pinouts, or communications type. Also, you may need a power supply that?s greater than 12V or more than 1A worth of current.
See all skill levels
Comments
Looking for answers to technical questions?
We welcome your comments and suggestions below. However, if you are looking for solutions to technical questions please see our Technical Assistance page.
Customer Reviews
4.3 out of 5
Based on 7 ratings:
1 of 1 found this helpful:
Very Cool Project!
I thought this was a very cool project and fun to put together. Now that I've built mine, I went to Hobby Lobby and found a plain wood box that was very close tot he size of the cardboard box and built my new permanent place for these controls. I already have plans on making that installation better, longer wires, that way when I open the top it doesn't pull the wires out of the GPIO pins on the Pi. Also, plan on using a GPIO extender so I can remove the pi by disconnecting a ribbon cable vs having to plug each wire back into the pi each time. This kit helps teach you be basics, then you can expand from there. Well worth the money.
Perfect
Easy build. You best have a raspberry pi 3 as recommended in order to use the whole thing immediately. Everything else is included! Great!
Sooo much fun!!
I've totally got the retro gaming bug now and am planning on building a full-sized gaming cabinet. This is a great kit for learning some basics about electronics and Raspberry Pi.
Neat kit, needs a couple of improvements
This is a great kit, and the software that comes with really helps out. A couple of notes. It would be nice to have longer than 6" wires, so that if you use a Pi in a case and want it to rest on the bottom, the wires don't accidentally disconnect if the box is opened.
Also, I don't like the ESC being mapped to SELECT (on the box); it's confusing. A couple more buttons (one for SELECT, one for a Y button) would be great. And the C button should be labeled X.
But that's all nitpicky. The components are solid, the instructions are great, and this thing is a blast. I'm planning on building mine into a lapdesk with an add-on USB attached second lapdesk controller.
Once I got it running--it is good
The box is cool. The joystick and buttons are huge and nice and would work on an original arcade.
The wires are jumpers for small projects. So you have to cut off one end (or both) of the tiny jumper wires that are too small for the crimping and crimp them. Then the wires do not reach, and so I had to add more jumpers to make it reach and not pop-out half the wires when you open the box.
Then you have to count little points on the Raspberry Pi to get it working (not the kits fault--but it still is a bit funky). Finally, all is good. The software is a bit odd, but I did play DOOM, and that is just wonderful.
I bought more crimp ends (I have about a 75% hit rate with crimp), and I used solid core wire for one wiring harness as it was still too short when completed.
So be prepared from crimping, I bought Sparkfun's tool for next time, and expect to add some jumpers to make everything reach when the top is fully open. Still fun.
Be prepared for the learning curve
This is a game emulator, and the product page should state that clearly. The guide goes into more detail, but I really feel the ROM file information is lacking. There are very few open source ported games loaded. The buttons and joystick are good quality, but the jumpers are too short. This really makes the RPi hookup a pain, as the GPIO connections will pull out unless you secure the RPi on the lid near the buttons. I could deal with the hardware issues, but the work to get ROM files (legally) is glossed over here.
Great fun
Had a great time building with my son. Inspiring us to go further to build a cabinet. Sparkfun was great when we cut the holes wrong, they shipped out another box free of charge. Note when you cut the whole to cut the white area only so they are not too big. Tons of fun, you will lose some sleep.
I want to build this into an old Arcade Game Cabinet I have complete with coin slot for quarters. Is there an input for the micro-switch on the coin mech that would allow one play per time it is tripped? It will be fun to have it in my basement and require my friends to cough up quarters to play it.
Ryan Bates over at RetroBuiltGames.com has a great tutorial on adding a coin slot + acceptor to a cabinet build. http://www.retrobuiltgames.com/porta-pi-arcade-help/add-coin-acceptor/. Since it is just an optical sesnor you could make your own coins which would be pretty rad. We also sell https://www.sparkfun.com/products/11636 which accepts 6 types of coins. The Hatermatic github repo by Mike Hord is a good place to look at how to wire this one. https://github.com/sparkfun/HaterMatic
Thinking of getting this for a friend for Christmas (he loves games). I have limited funding (it's a long, sad story) but I do have a 1st-generation Pi Model B... will this kit work with it, or is that a bad idea (or both)...?
Sorry about the delay. The emulator should work on any version of the Pi, but the older versions of the Pi used a different chip and therefor need a different version of the OS. Check out the retropie guys (see David in Denver's post) and you should be able to get the image you need for any version of the Pi.
I got it to work with my 1st generation Model B, but it was a big, big pain. The supplied SD card with PortaPi won't work with the PI 1 --- it crashes when the emulator is run.
I had to make a new SD card image from retropie.org.uk for the PI 1. Then I added retrogame, https://github.com/adafruit/Adafruit-Retrogame, and change the configuration file to match the buttons. There might be a step or two I've forgotten, but it works now. Performance seems to be adequate for the few simple games I've tried.
Is there any chance a hi-res version of the box artwork is available? I’m going to laser cut a plate that matches the box and I would like to use the box artwork. My box is pretty beat up. Gotta have that Sparkfun logo on my console,
Email our techsupport team and they should be able to get you the file.
What am I doing wrong? There are only about five games I can load and play. Games like doom load up in the middle of a already played game session even if I pick "New Game". RetroPie says there are 13 games available but I cannot get into any of them. I need some help.
To make a 2-player setup would one just need an extra set of joystick and buttons, or would different software and hardware be needed?
It depends on what hardware you have. If you have a Raspberry Pi model B then there is not enough GPIO to add player 2 controls. If you have a model B+ with the 40-pin header then you will need to update the software as well.
To update the software (Edit Keyboard Mapping): 1.Boot up your raspberry Pi with a keyboard. Once you are in Emulation Station press F4 to get to a terminal. 2.Type: "cd Retrogame" 3. Type: "sudo nano retrogame.c"
4.Scroll down to about line 74, You should see an input column and a column for the corresponding keyboard mapping.You can add player 2 controls here as well re-assign the GPIO/keyboard mapping for Player 1.
Once you are done updating make sure the last line of this block of code does not have a comma at the end the way the previous lines do.
Now you need to update RetroArch so that the emulator recognizes the new keyboard mappings. In the terminal type: "startx". Navigate to the retroarch.cfg file which is located: /opt/retropie/configs/all and scroll down to the keyboard inputs. Make the changes that reflect the changes you made to retrogame.c save the file and it should be good to go.
If you have any questions just let us know.
I think my card has become corrupted. Is there a disk image I can download to create a replacement?
I did the same thing, trying to remap keys for the Mame emulator to match the buttons. I followed the link in the Tutorial to RetroBuilt Games. Here's a copy of the link: http://www.retrobuiltgames.com/porta-pi-arcade-help/porta-pi-software-os-download/
Then I downloaded the "RetroPie_V3.8.1 for Pi2 / Pi3" image and used Win32DiskImager to re-image the card. That seemed to get me back to square one.
I just noticed, the description says this comes with a 1x SD Card with Porta Pi. The only Raspverry Pi that uses SD is the B. The A+, the B+, the 2 and 3 all use micro SD cards. Which does this come with? an SC or Micro SD?
There is a microSD card with and full size SD adapter. We basically program this guy.
Looking at the parts list, I see Female quick disconnects listed, but only male quick disconnects when I search your site. Are the female ones not available on your site or is it the male ones? If so, which size, since you have two different ones listed when I search. Thanks.
We did sell the female quick disconnects at one point in time but they have been discontinued.
I would get this if it it came with a better enclosure, as in a plastic case that would be sold separately.
Yeah this is meant to be a temporary solution until you build/buy a cabinet. Pretty much any project enclosure big enough to hold the joystick and buttons will work. But I may just pitch this enclosure idea to engineering on Monday. Have a good weekend.
Thanks for the response. I do have the tools to build this into an off the shelf project enclosure. I plan to pick one of these kits up as soon as the new ESP32 is in stock! Please do pitch the idea...it would be better than a sloppy DIY solution.