- Home
- Product Categories
- Radiation
- Pocket Geiger Radiation Sensor - Type 5


Pocket Geiger Radiation Sensor - Type 5
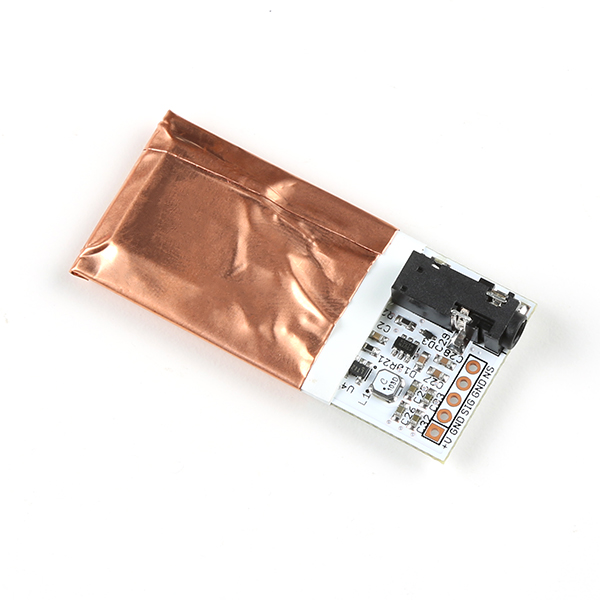
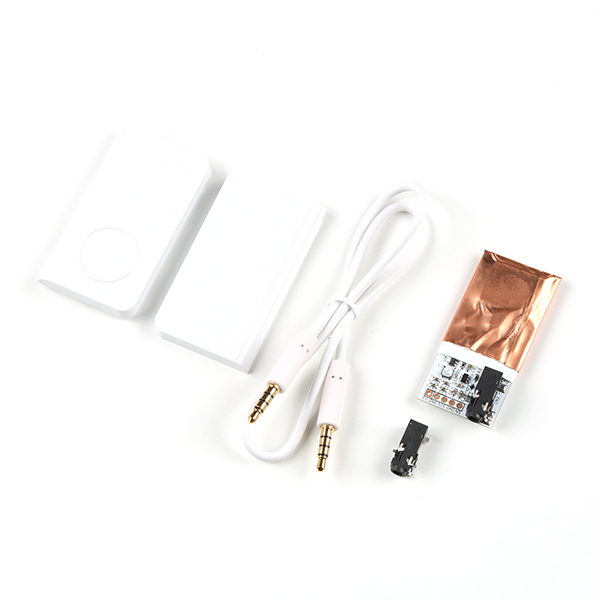
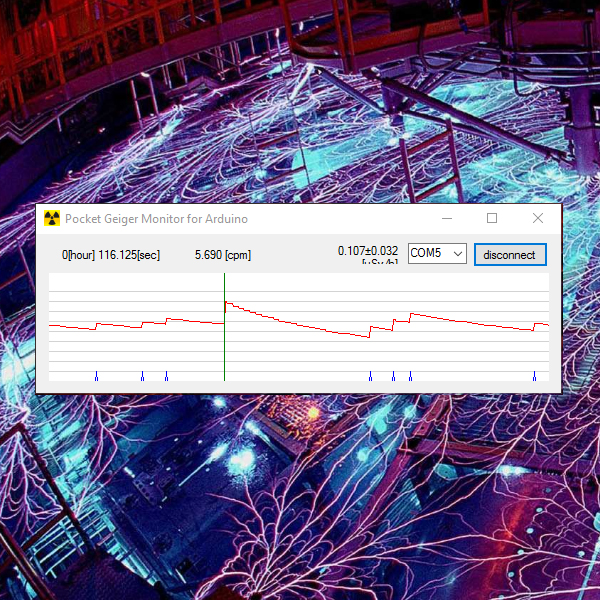
The Type 5 Pocket Geiger Radiation Sensor from Radiation Watch is a highly sensitive radiation sensor designed for the embedded systems market. Capable of detecting Gamma and Beta radiation, this sensor has a simple pulsed output that can be used with any microcontroller. Radiation Watch has a handful of documents and example Arduino code to get you up and running. They have also written a Windows example program in C# (source included!) to output graphs to a computer using an Arduino as the reader.
These small Geiger sensors feature a measurement range of 0.05uSv/h to 10mSv/h at 0.01cpm to 300Kcpm with a required measurement time of two minutes. The Pocket Geiger has an onboard DC boost circuit, so the board can be supplied with a friendly 3V to 9V. Using only 30mW (10mA @ 3V), it is very low power. Additionally, the counter comes with an optional enclosure and 3.5mm cable.
Note: This product is for educational purposes and should not be directly relied upon for determinations regarding one’s health or safety.
- Type5 Geiger Sensor board with copper EM shielding
- 16” TRRS cable
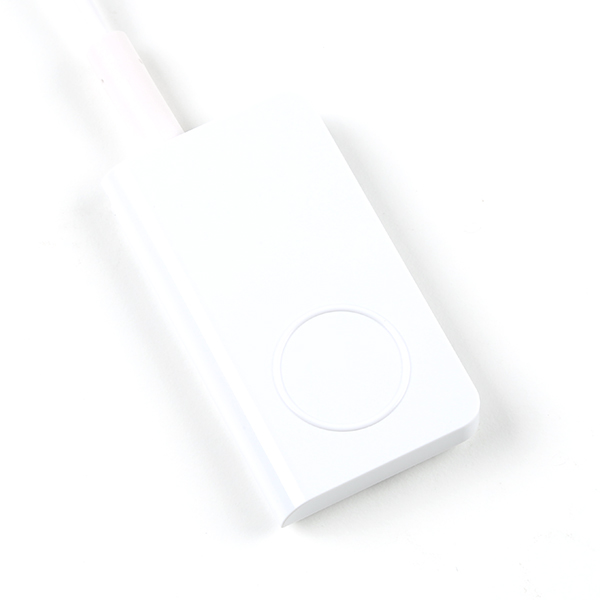
- Plastic enclosure
- Extra 3.5mm TRRS jack
- 58 x 26 x 11mm
Pocket Geiger Radiation Sensor - Type 5 Product Help and Resources
Core Skill: DIY
Whether it's for assembling a kit, hacking an enclosure, or creating your own parts; the DIY skill is all about knowing how to use tools and the techniques associated with them.
Skill Level: Noob - Basic assembly is required. You may need to provide your own basic tools like a screwdriver, hammer or scissors. Power tools or custom parts are not required. Instructions will be included and easy to follow. Sewing may be required, but only with included patterns.
See all skill levels
Core Skill: Programming
If a board needs code or communicates somehow, you're going to need to know how to program or interface with it. The programming skill is all about communication and code.
Skill Level: Rookie - You will need a better fundamental understand of what code is, and how it works. You will be using beginner-level software and development tools like Arduino. You will be dealing directly with code, but numerous examples and libraries are available. Sensors or shields will communicate with serial or TTL.
See all skill levels
Core Skill: Electrical Prototyping
If it requires power, you need to know how much, what all the pins do, and how to hook it up. You may need to reference datasheets, schematics, and know the ins and outs of electronics.
Skill Level: Rookie - You may be required to know a bit more about the component, such as orientation, or how to hook it up, in addition to power requirements. You will need to understand polarized components.
See all skill levels
Comments
Looking for answers to technical questions?
We welcome your comments and suggestions below. However, if you are looking for solutions to technical questions please see our Technical Assistance page.
Customer Reviews
3.5 out of 5
Based on 6 ratings:
1 of 1 found this helpful:
I can't get it to work.
I hooked the device up to 4.5V power and connected the signal pin to my oscilloscope. I brought a highly active (checked with another Geiger counter) sample of radioactive ore near sensor and there was nothing, just a D.C. level.
Hello!
Sorry to hear about the trouble with getting it working. Have you contacted our technical support department at Techsupport@sparkfun.com - they're usually the best people around here for getting things working.
3 of 3 found this helpful:
This detector is boss
Hooked it up to a 3.3V Pro Mini and it reads fine. You must pull up the input and noise pins, the internal pullup resistors in the Mini give about a 100 microsecond pulse which is perfect, but can be adjusted by wiring external pullups. Sensitive to vibration, and I have seen signals associated with the noise signal when it gets jostled around, so don't do that. Gives very consistent background readings over long intervals.
2 of 2 found this helpful:
Great for Science Fair Project
I'm working with my granddaughter on sensor servers implemented using the SparkFun Arduino Blackboard. One of the sensors we selected is the Pocket Geiger. Got it to work on the first attempt. I used the supplied TRRS cable to connect to a breadboard that was jumpered to the Blackboard. I powered up, uploaded the example sketch, and the Pocket Geiger began generating data. I measured background radiation and radiation from a piece of uranium ore from eBay. The uranium ore measured at about 100x the background. Very happy with our choice.
1 of 1 found this helpful:
Not even close to GM tubes....
The performance isn’t even close to the output from GM tubes. At first, I thought it wasn’t even working, but then after several seconds of exposure to (a weak) radiation source, it gave me a single count. So following my principle of last resort (read the manual when everything fails), I found out that you have to wait for two minutes to get enough counts to make a sensible reading!!! In any case, it served the purpose for which I bought it: to compare performance against GM tubes. Conclusion: don’t use this as a radiation monitor if/when WWIII starts, and nuclear warheads are flying around. Stick to GM tube based counters.....
0 of 4 found this helpful:
Unable to get it to work.
The Sparkfun write up says the pocket geiger can be connected to mobile phones and used with a downloaded app. It didn't work with my Samsung Galaxy S7 Edge.
Spark fun Tech Support confirmed it didn't work with their Galaxy S5 or iPhone 6, and suggested that I could build a small interface and power supply circuit, which they said worked great on the iPhone 6, and sort of worked for their Galaxy S5. I explained that I wasn't looking for a new project, just a sensor that worked. I returned it.
Yeah unfortunately it only works with some phones. We're unable to confirm its compatibility with all types of phones.
Accurate results over extended periods
This sensor is impressive, and cheap for what it is.
Purchasers need to be aware of how it works. It's NOT a Geiger–Müller tube, so it won't instantly output pulses/clicks as soon as a radioactive source is brought close to it.
It takes a relatively long time between a radiation event happening and a pulse appearing on the output, hence the "required measurement time of two minutes" in the description.
I was given one of these as a Christmas gift. Since I did not buy it, I can't leave a review. This comment is my review.
In short, this is a capable and easy to integrate sensor for long-term background radiation monitoring.
My use case is this sensor connected to an ESP8266 monitoring background radiation in my home and publishing the data to InfluxDB. The sensor has 4 pins, 2 for power one for signal and one for noise/movement alerts. It does not need a library or fancy code; the signal pin goes LOW every time it senses a gamma ray. A simple interrupt based routine that counts these events is all that is needed. I count events for 6 minutes at a time then convert CPM to micro sieverts. I have found that the conversion factor included in the sample code is not accurate, at least for my unit. I have run multiple concurrent tests of 5, 10 & 60 minute counts against my very accurate Mazur Instruments radiation monitor that uses a high quality GM tube. The typical background radiation at my house is very steady at 0.12-0.16 uSv/Hr. This unit (using the supplied conversion factor) is always very low at 0.02-0.05 uSv/Hr. I simply ran this sensor for a day and collected data, then compared to the same time period on my GM based device and calculated a more reasonable conversion factor. It's been running for several days now and is working very well. This is a great sensor for this kind of use case. Very happy with it. As others point out below and in the reviews, this is NOT a fast response device, it needs several minutes to get an accurate count.
Are you able to compare against multiple sensors to see if your new conversion factor is more widely applicable? I unfortunately have no other instrument with which to compare my results, but I am curious if I should adjust the factor in my code as you have done. I do have two X100-7 based devices running, and they track each other quite well, so there may be a great deal of consistency among units.
I feel compelled to add to this blog since there seems to be a lot of confusion about this sensor and several of the negative reviews are not justified in my opinion.
This product (Pocket Geiger Radiation Sensor - Type 5) is built around the X100-7 ionizing radiation detector from First Sensor AG. The X100-7 is a high-quality and very stable solid state PIN diode detector with a large surface area. Similar versions of this detector have been used in several of NASA's x-ray telescopes.
The great thing about this detector is that its response does not depend on a carefully-regulated high voltage potential the way that a Gieger-Muller tube does. On the other hand, the X100-7 has an approximately 2 minute response time, so radiation detection IS NOT INSTANTANEOUS as it is with Gieger-Muller tubes. This later fact leads to many misunderstandings. This is not the sensor you want to use if you are prospecting for uranium because the response time is too slow. But if you want to accurately measure how much cesium-137 has contaminated the environment after a reactor accident, for example, then this is exactly the sensor you want. That's why thousands of these same sensors are in use in Japan today.
This sensor can detect gamma radiation and, if the included copper shield plates are removed, beta radiation. It cannot detect alpha radiation, since alpha is easily blocked by something as thin as a sheet of paper and it cannot penetrate the thin copper foil that is integral to the sensor. The X100-7 is quite sensitive; I have used mine to detect the decay of naturally occurring potassium-40 in bananas.
An Arduino library is available if you go to the Library Manager in the Arduino IDE and search for "RadiationWatch". This library is also available here: https://github.com/MonsieurV/ArduinoPocketGeiger (disclosure: I worked on the original version of this library which was derived from the sample code).
This is one of my favorite sensors.
Here's an open driver: https://github.com/tricorderproject/arducordermini/tree/master/firmware/examples/radiation_type5_example
The Arducorder mini, a handheld multisensor device, that includes a backpack board to make the Radiation Watch Type 5 more sensitive. Some of the posts also show histograms of pulse widths from this sensor, that appear to contain some energy-level information: https://hackaday.io/project/1395-open-source-science-tricorder
OpenCT, an extremely low resolution scanner using this sensor and a radioisotope source: http://www.tricorderproject.org/blog/dr-jansen-or-how-i-stopped-worrying-and-learned-to-love-the-barium/
I put this together with an ESP8266 to wirelessly monitor my kid after a radio-iodine treatment. This all went together super quick and easy, highly recommended. I posted a full write-up of this project for anyone else wanting to build one at https://github.com/finderoffail/radiation_sensor
Nice write up; I hope the treatment went well. You may want to check out the Nano Power Timer if you have issues with the ULP for the ESP.
I like this sensor. Appears to work well with Arduino - particularly with interrupt based counter. The pulse width seems to encode photon energy. Calibrating now but initially matches background radiation.
So glad I got the email for this. The First Sensor pin diode is extremely accurate. I've tested it against an industrial gamma detector with a Cesium-137 source and they are very close.
A little disappointing straight out of the box...the incredibly long response time, using the included Arduino sketch, makes the sensor basically useless.
I have a small chunk of uranium ore to use for testing radiation detectors. It takes this sensor ~2.5 minutes to respond to the ore, slowly coming up from (about) the 3 cpm background to 600 cpm ore count. Likewise, when the sample is removed, it takes another 2.5 minutes to settle back to the background 3 cpm. I'm thinking the included sketch needs some work...
Also, the companion Windows C# program, PokegaMonitor, is limited. It only allows communications on serial COM1 through COM9. You'll have to edit and recompile the code to get it to work at other ports above COM9, like mine at COM11. Even at that, it has a very limited range - the ore sample sends it off the chart.
I'm curious what people are seeing for background CPM, and what samples people have found interesting when using this device? (I'm seeing about 3 CPM currently and am considering getting the Geiger test card from United Nuclear...)
3 cpm is about what I am seeing as a background count.
I'm trying to understand the schematic. Can anyone point me to a data sheet for U4, which the schematic says is an LT1651? My search skills have come up short.
Hi,
LinearTechnorogy DC/DC LT1615ES5-1 http://cds.linear.com/docs/en/datasheet/16151fas.pdf
How durable is this sensor? Is this sensor durable enough for used on weather balloons or drones?
I plan to fly it on rockets and possibly balloons above 100k'.
I suspect will see noise on rocket flight during motor burn. But expect should work well during coast, at apogee and during descent.
why send it in the sky? want to read high levels of radiation (radon) put it in your basement, you'll be surprised - depending on where you live in the country, but should still pick it up. When radon decays it emits a beta particle and gamma ray so should be picked up by this sensor if my thinking is correct.
It's measurements tend not to be accurate when it's being vibrated (that's what the "NS", or noise pin is for, though it does not appear to pick up all vibrations that affect the sensor). I've had one on a handheld device for 2 years and it's still working well (though it isn't in environmentally challenging applications like weather balloons that probably require it to be in a complete sealed enclosure)
Hmm, to my knowledge the Type5 version cannot simply be connected to the phone via jack as stated in the video: http://radiation-watch.sakuraweb.com/share/type5_testpin_specification.pdf. But perhaps I am wrong?
Pls check my sketch, Type5 -> 3.5mm phone plug (MIC), thanks! http://radiation-watch.sakuraweb.com/share/masub.jpg
Agreed, only the type 4 can be connected to a phone via a TRRS jack and even then supposedly only to certain iPhones or iPads:
http://www.radiation-watch.org/p/pocketgeiger.html