- Home
- Product Categories
- Robotics Kits
- 3pi Robot


3pi Robot
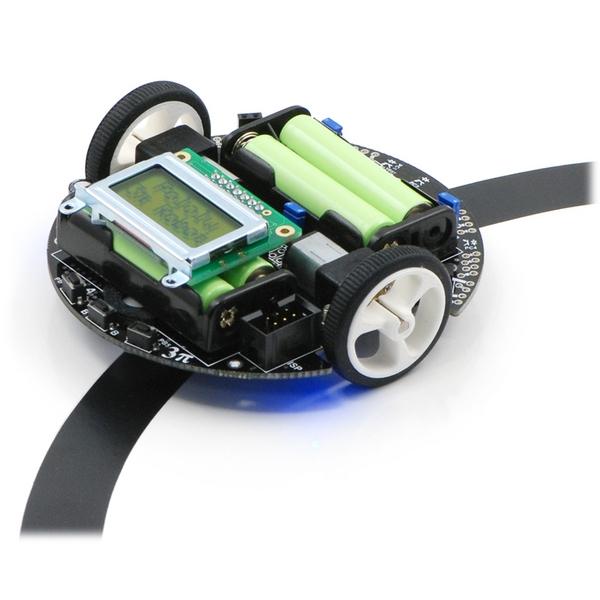
Description: The Pololu 3pi robot is a complete, high-performance mobile platform featuring two micro metal gearmotors, five reflectance sensors, an 8×2 character LCD, a buzzer, and three user pushbuttons, all connected to a C-programmable ATmega328 microcontroller. Capable of speeds exceeding 3 feet per second, 3pi is a great first robot for ambitious beginners and a perfect second robot for those looking to move up from non-programmable or slower beginner robots.
The 3pi robot is designed to excel in line-following and maze-solving competitions and makes a great platform for people with C programming experience to learn robotics. At its heart is an Atmel ATmega328 microcontroller running at 20 MHz with 32KB of flash program memory and 2KB data memory, enough space to run complicated programs. An extra 512 bytes of persistent flash memory is provided on the microcontroller for data logging or long-term learning applications. You can use AVR Studio or WinAVR for development. The 3pi is also compatible with the popular Arduino development environment.
Comes with 4 LEDs. Needs 4 AAA batteries, not included.
Check out this demo video!
- ATMega328 Processor
- TB6612FNG Motor Driver
- 2 motor channels
- 3 - 7V operating voltage
- 80kHz max PWM fequency* 9.5 cm/3.7" diameter ("3 pi" diameter)
- 83 g/2.9 oz without batteries
- User's Guide
- Quick Start
- Schematic
- Demo Hex File
- AVR C/C++ Library
- AVR C/C++ Library Commands
- Programming using Arduino
- Wall Follower Example
- Radio Control Example
- Line Follower Example
- Motor Driver Example
- Spanish User's Guide
- 3pi Forum
3pi Robot Product Help and Resources
Core Skill: Soldering
This skill defines how difficult the soldering is on a particular product. It might be a couple simple solder joints, or require special reflow tools.
Skill Level: Rookie - The number of pins increases, and you will have to determine polarity of components and some of the components might be a bit trickier or close together. You might need solder wick or flux.
See all skill levels
Core Skill: Robotics
This skill concerns mechanical and robotics knowledge. You may need to know how mechanical parts interact, how motors work, or how to use motor drivers and controllers.
Skill Level: Noob - You will be required to put together a robotics kit. Necessary parts are included and steps will be easy to follow. You also might encounter basic robotics components like bearings, mounts, or other hardware and need a general idea of how it goes together.
See all skill levels
Core Skill: Programming
If a board needs code or communicates somehow, you're going to need to know how to program or interface with it. The programming skill is all about communication and code.
Skill Level: Competent - The toolchain for programming is a bit more complex and will examples may not be explicitly provided for you. You will be required to have a fundamental knowledge of programming and be required to provide your own code. You may need to modify existing libraries or code to work with your specific hardware. Sensor and hardware interfaces will be SPI or I2C.
See all skill levels
Core Skill: Electrical Prototyping
If it requires power, you need to know how much, what all the pins do, and how to hook it up. You may need to reference datasheets, schematics, and know the ins and outs of electronics.
Skill Level: Competent - You will be required to reference a datasheet or schematic to know how to use a component. Your knowledge of a datasheet will only require basic features like power requirements, pinouts, or communications type. Also, you may need a power supply that?s greater than 12V or more than 1A worth of current.
See all skill levels
Comments
Looking for answers to technical questions?
We welcome your comments and suggestions below. However, if you are looking for solutions to technical questions please see our Technical Assistance page.
Customer Reviews
No reviews yet.
Here is a 3pi video that is impressive!
http://www.youtube.com/watch?v=mJV-KDqHgDQ
Hacking this and putting my Arduino on it with a wireless communication to control it from my tablet sounds like fun
What wireless communication unit do you intend to use to control it from your tablet? Would you have a peripheral connected to your tablet, or just use the built-in wifi or bluetooth? (I'm curious because I'm working on something similar and decided to give RedBearLab's BLE Shield 2.0 a try...)
Currently, I'm making a soccer bot for school with an Arduino for a brain and crontrolled via bluetooth by my tablet. I'm thinking a similar thing for this. I want to try wifi sometime though
How is that atmega328 running at 20MHz?????
Both, the ATMega328 and the ATMega168, are rated up to 20Mhz - so just connect a 20Mhz crystal and you are good to go.
Could one use the Arduino bootloader and language to program this?
Not sure on this one - the 20Mhz might be a problem. Arduino setup is usually either 8Mhz or 16Mhz - so the timing routines need to be changed (milliseconds and microseconds and such). Probably just selecting a different prescaler...
There's an mbed 3pi extension board available here, and complete package here. The mbed is great for high-level things like wireless communication, AI, etc, while the ATMega on the 3pi does low-level tasks - motor control, IR sensor/voltage readings.
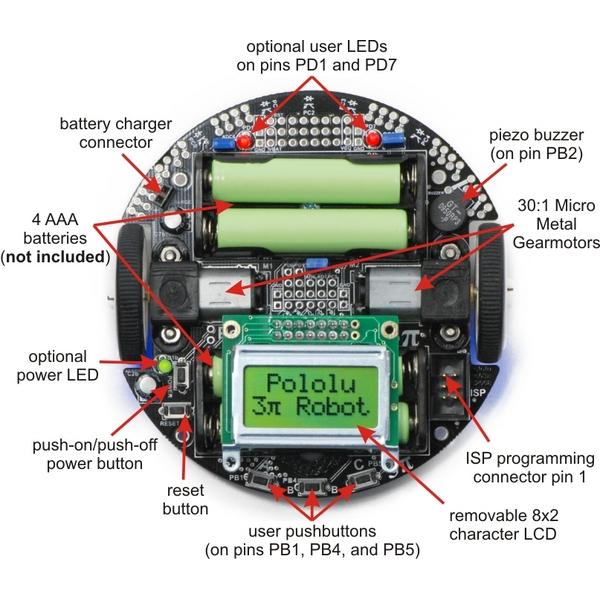
I'm confused, in the picture the microcontroller is labled as an ATmega168 but in the product description it is labled as an ATmega328 ?!?!
Pololu upgraded the microcontroller for the 3pi. Now all of them use 328.
A note to others who purchase this: Make sure your AAA batteries are 1.2 volts. I spent 45 minutes trying to figure out why the thing wouldn't turn on until I realized that the batteries I was using were special 1.5 volt lithium batteries. Replacing those with standard AAAs fixed the problem.
Thats odd - will it not run I standard alkaline baterries at 1.5volts apiece then?
May I change the program?
This product has 1KB "persistent flash memory"(aka. EEPROM) not:
Anybody know what Pololu Gearmotors this uses? I want to know so that if I ever buy one (which will probably happen) I can make it even FASTER.
They use 30:1 non-HP micro metal gearmotors. I don't think the next fastest non-HP motors (10:1) will have sufficient torque for good acceleration, and there are some complications involved in switching to HP versions of the micro metal gearmotors. Please see this thread on the Pololu forum for more information.
It comes with the USB interface for programming?, if not which one from this site it's compatible I'm a complete beginner, thanks a lot.
The AVR pocket programmer should work
http://www.sparkfun.com/products/9825
it comes already assembled?
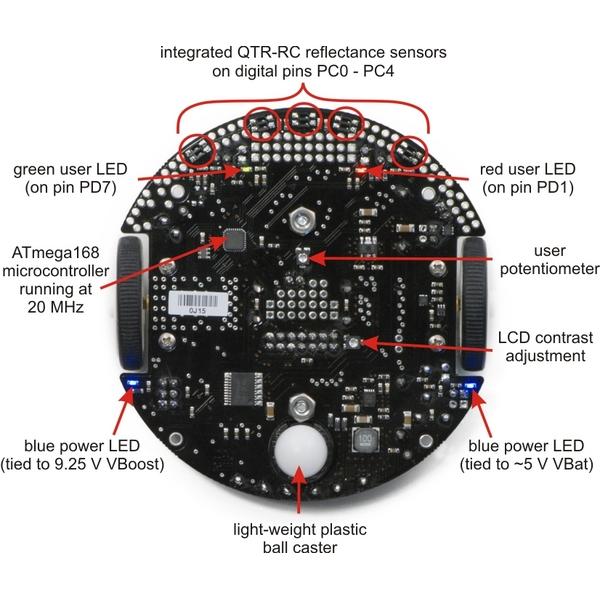
The 3pi ships fully assembled, as shown in the product picture. It includes some through-hole LEDs that you can solder in if you want (the board has corresponding, pre-installed surface-mount LEDs, but these are on the underside of the PCB and can be difficult to see). The labeled bottom-view picture shows the surface-mount LEDs, and the labeled top-view picture shows an example of the through-hole LEDs soldered in.