- Home
- Product Categories
- AVR
- Pocket AVR Programmer

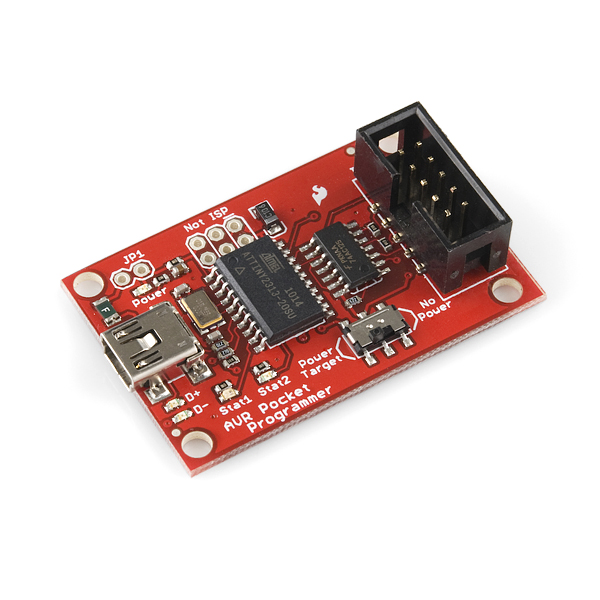
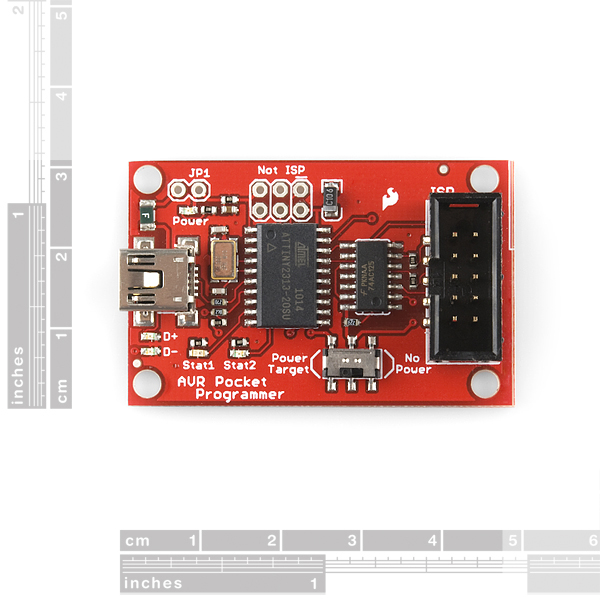
Pocket AVR Programmer
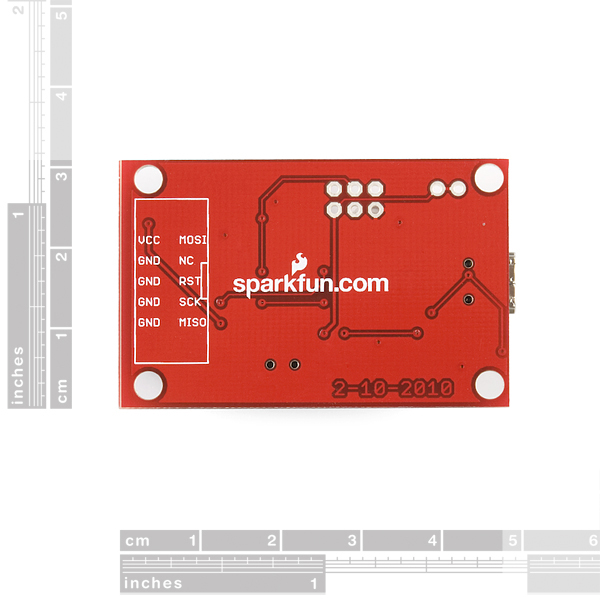
This new version uses an SMD 5x2 header. This is a simple to use USB AVR programmer. It is low cost, easy to use, works great with AVRDude, and is tested extensively on a Windows desktop. Based on Dick Streefland's USBtiny and Limor Fried's USBtinyISP. This is a low-cost programmer designed for those on a tight budget.
This programmer works really well for ATmega168 and ATmega328 and should work with all the AVR micros supported by AVRDUDE. The microcontroller-to-be-programmed can be any AVR with 64K or less of flash. The ATmega328 on an Arduino Uno or RedBoard works perfectly, but the ATmega2560 of an Arduino Mega does not.
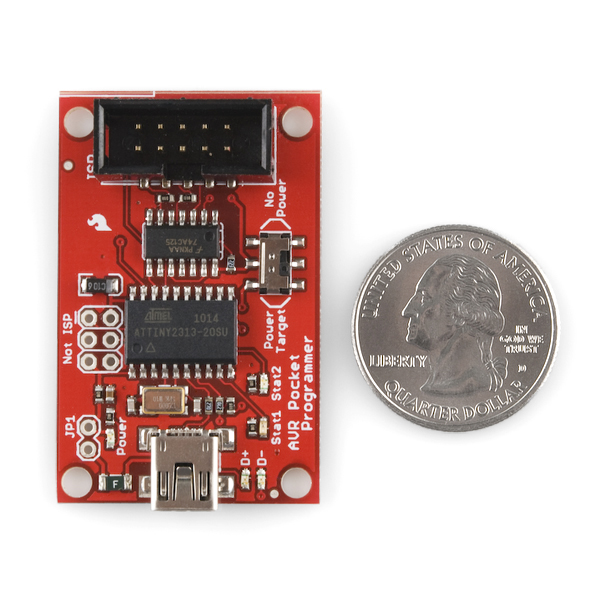
This board is buffered and power protected so that you can do some really evil things to the programmer without killing it. It is fast! One of the greatest features of this board is the ability to power the target (up to 500mA) from the programmer.
Note: This product is a collaboration with Limor Fried. A portion of each sales goes back to them for product support and continued development.
Note: The drivers link has been updated below to be Windows 7 compatible.
- 1x Pocket AVR Programmer
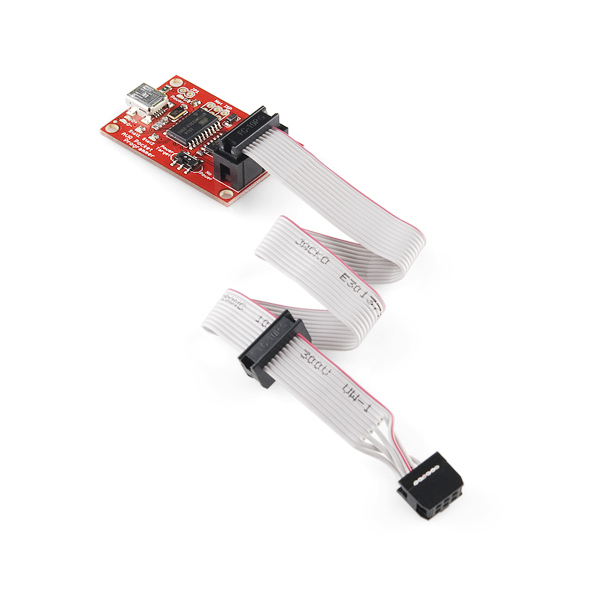
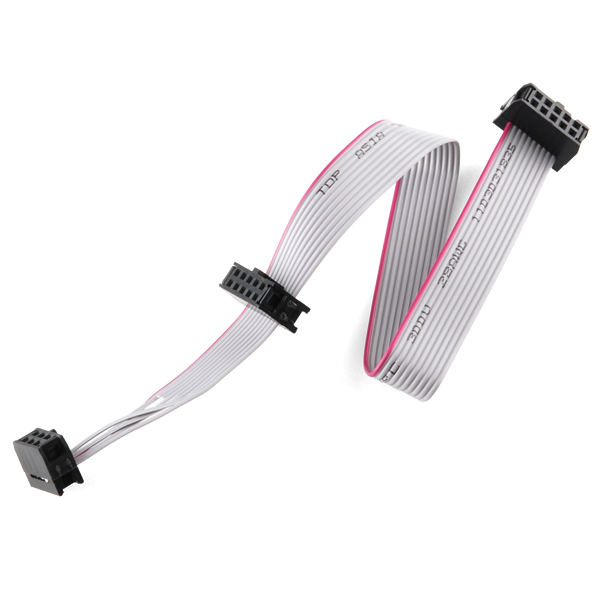
- 1x AVR Programming Cable
- Standard AVR ISP programmer
- ATtiny2313 with USBtiny firmware preloaded
- Buffered output
- PTC fuse protected power
- Programmer can power target
- Supports ATmega168/328 and many others
- Two status LEDs
- Both 10-pin and 6-pin targets supported (cable included)
- Schematic
- Hookup Guide
- Windows Driver
- Firmware based on USBtiny (type 'make all' in the spi directory).
- Eagle Files (Licensed under CC v3.0 Share-Alike)
- GitHub (Design Files & Example Code)
Pocket AVR Programmer Product Help and Resources
Pocket AVR Programmer Hookup Guide
July 7, 2014
Skip the bootloader and load your program directly onto an AVR with the AVR Pocket Programmer.
Installing a Bootloader on the MicroView
August 22, 2014
Fix your bootloader-less MicroView! This tutorial covers how to: disassemble the MicroView, wire it up to an assortment of programmers, program the bootloader, and test it out.
Installing an Arduino Bootloader
December 4, 2013
This tutorial will teach you what a bootloader is and why you would need to install or reinstall it. We will also go over the process of burning a bootloader by flashing a hex file to an Arduino microcontroller.
Core Skill: Programming
If a board needs code or communicates somehow, you're going to need to know how to program or interface with it. The programming skill is all about communication and code.
Skill Level: Competent - The toolchain for programming is a bit more complex and will examples may not be explicitly provided for you. You will be required to have a fundamental knowledge of programming and be required to provide your own code. You may need to modify existing libraries or code to work with your specific hardware. Sensor and hardware interfaces will be SPI or I2C.
See all skill levels
Core Skill: Electrical Prototyping
If it requires power, you need to know how much, what all the pins do, and how to hook it up. You may need to reference datasheets, schematics, and know the ins and outs of electronics.
Skill Level: Noob - You don't need to reference a datasheet, but you will need to know basic power requirements.
See all skill levels
Comments
Looking for answers to technical questions?
We welcome your comments and suggestions below. However, if you are looking for solutions to technical questions please see our Technical Assistance page.
Customer Reviews
4.4 out of 5
Based on 60 ratings:
2 of 2 found this helpful:
Great little board that does what is required
Years ago I bought one of these to program an ATTiny85 for a project. Did great when I had it hooked up to my MacBook Pro (at the time). Works great with AVRDude.
Downsides, and it was probably due to my setup issue, was Windows didn't work too well with it and any virtual machine with Linux didn't work too well (on same Windows machine).
Other than that, great little thing for those times you need to program a bare MCU without a bootloader.
7 of 8 found this helpful:
Some bugs, but not bad otherwise
Full disclosure: I make and sell a competitive product on Tindie. But that product was inspired directly by this one, although it was inspired by its shortcomings:
The mini USB connector is not nearly as ubiquitous as micro USB. In fact, this device was the only thing in the house that had that connector. So this device needed its own unique cable.
The target power switch isn't effective. This is because SparkFun added a pull-up resistor to the BUFFEN line. Their intentions were good - the BUFFEN line should be held high if the USB connector isn't plugged in. But when the target power switch is off and the programmer is powered by USB, target power can leak from the BUFFEN output of the controller through the pull-up resistor. This makes the programmer - as is - unsafe for targets that can be damaged by 5 volt power.
There are extra LEDs that it turns out add very little value. All the D+ and D- LEDs do is light up on bus activity, but the Stat1 LED already lights up when the programmer is working. Stat1 and Stat2, by the way, are not well labeled. They are the PROG and CONN LEDs in the original design. CONN lights up when the USB host enumerates the programmer (so, when the programmer is plugged in and recognized - no need, really, for a separate power LED), and PROG lights up whenever AVRDUDE is actually doing something.
I don't really see the 5x2 header being used much anymore. Every project I've seen uses the smaller 3x2 header or some proprietary 6 pin variant.
The IDC cable they supply is a 5x2 on one end and a 5x2 and 3x2 on the other end about an inch apart with the ribbon cable wires separated and string around to make the 3x2 connector wiring correct. It's a very clever way to solve the problem, but separating the ribbon cable wires dramatically weakens them. Mine wound up failing and I replaced it with 6 individual crimped 26 gauge wires going from a 5x2 to a 3x2 DIP header..
The TinyISP is only good for AVR programming, and only for targets with less than 128K of flash. Some other AVR programmers can also program both larger and smaller AVR chips (specifically, the Tiny4 series, which uses its own programming protocol), or do JTAG or HVP or other things, but the TinyISP - if for no other reason - simply doesn't have any leftover space in the ATTiny2313's flash for added functions.
All of the above aside, this was my first AVR programmer, and the only one I've ever used apart from one I built myself. I happen to think that of all of the programmers available the TinyISP is the best bang for the buck. Once you graduate from the bootloader, it's a good way to go.
2 of 3 found this helpful:
It works with Linux but...
The key to using this with Linux is that you must be logged in as root (or use sudo). Also, it does not show up in /dev/tty* like other usb-serial devices. avrdude just knows how to talk to it. try this...
sudo avrdude -c usbtiny -p atmega328p -b19200 -v
Nice little programmer
Bought this board to reprogram the bootloader on an Arduino Nano that I had managed to kill somehow. Reprogrammed the bootloader with this board right away and the Nano is back to normal.
Excellent little product!
Have had very good luck with this tool and the Arduino IDE. Have tried to use with AVR Dude, followed several tutorials, spark fun was definitely best, but I was unsuccessful on fronts. I'm quite sure it is me or my laptop. Anyway works awesome in an IDE that is already easy as pie!
Problems with 64-bit Windows 8.1
Windows 8.1 requires signed drivers for devices; I've not found a way to actually get this working yet.
Worked well
I got this for one purpose to update my nmelbeep anode. It was so easy to use that I can see me using if for many other programming task. Compact, easy to use, assembled and well built and a decent price means a I give it 5 stars.
Works well after a bodge
My switch to turn on or off power to the target wasn't working correctly. I had to jump the leads to allow me to program my project. I'm a little disappointed with the quality control but other than that it's worked great.
So sorry for the issues. Please contact us and we may be able to help. www.sparkfun.com/returns
Great piece of hardware!
Easy to use And lots of support. Using it with Atmel Studio/visual micro and works like a charm.
great!
Fast and reliable! It's all you that need!
Makes AVR or hard to program Arduino boards programming easy
I use this to program all my Atmel 328P and Arduino Micro boards and it works flawlessly. Also, it is very easy to use and the power to target switch is a great idea. I recommend this tool for any of the Atmel 8-bit processors or the Arduino boards that are touchy to program using the Arduino ISP such as the Leonardo or Micro.
Very easy to set up
Excellent unit-worked first with your tutorial help.
I cannot get Windows Driver to recognize device - Help!
Windows Reports:
Windows has determined the driver software for your device is up to date.
Unknown USB Device (Device Descriptor Request Failed)
Be sure download and manually point the driver wizard to these drivers - https://github.com/sparkfun/Pocket_AVR_Programmer/tree/master/Drivers
Worked Perfectly
Great programmer for the price! Worked perfectly with my ATMega once I got my wiring correct =). Very pleased.
Great product
Hooking up the USBtiny cable is a bit cumbersome, but overall great product.
Works Great for burning Bootloader, not for
I bought this programmer so I could burn the boot loader into ATMegaa328Ps. It does that perfectly but I get avrdude errors when trying to "Upload Using Programmer". I suspect a setup problem but I am baffled why the boot loader burns fine but not a program. A search of the Internet offers dozens of solutions for avrdude errors. None of them work in this case. I used to work with Microchip PICs and the programmer always worked fine. I don't understand why Atmel chips having so many programming problems.
There can be a number of things that can lead to programming errors. Here's a tutorial that will help you avoid some of the pit falls when programming with this board. -- https://learn.sparkfun.com/tutorials/pocket-avr-programmer-hookup-guide?_ga=1.177331365.1851504437.1417041706
Old Noob
This little device was the best thing for this old Noob to learn AVR programming!
Good programmer
Haven't had any issues with the programmer. The target power switch is nice. 10 pin to 6 pin cable was a nice touch, except they wired the 6 pin on wrong. Went ahead and just rewired it myself.
Wonderful Atmel AVR programmer
This is one of my favourite programmers. I have used it on a Windows computer and also on a Raspberry Pi using avrdude. I used it to program the following processors: ATtiny2313, AT90S2313, ATMega324, ATMega328, ATMega16 and ATMega32.
I think the only thing missing from this programmer is its ability to integrate seamlessly with Atmel Studio.
Better than the original AVR programmer
Besides being smaller and cheaper, target power switch is so convenient. Works perfectly with Arduino IDE.
Works great to program my tiny
Works great to program my tiny but I wish it had the tiny debug serial that you can turn on and off with an exclamation
Love It!
The Pocket Programmer is an excellent way for people to get into AVR programming with a relatively inexpensive yet effective ISP. It was very easy to set up and works perfectly with AVRdude. It can't program an AVR with over 64K of flash (e.g. the ATmega2560), but for many people/beginners/projects, that isn't an issue. The ability to power the target chip has proven to be very handy in the time I've been using the programmer. Overall, for $15, this ISP was an excellent buy for the vast majority of my AVR programming needs.
Works great
Had time program an r2d2. Turned out this was a great tool to have.
works great
Programmed both ATTINY85 and ATMEGA328 with no problem using AVRDUDE. Made a couple of ISP to ZIF adaptors holding the chip to be programmed out of circuit. The only thing I would change is the USB port from a MINI to a MICRO but that's my preference :)
Much Better than MKII
I've been using Atmel's MKII for years which requires the IC is powered from another device. SparkFun's unit does it all off one USB - Love it!
0 of 1 found this helpful:
Works Great
Nice doing business with you all.
Doesn't work with Atmel Stuio
I tried for days. Ended up getting the AVR Dragon. AVRDude just doesn't offer the versatility of the Studio. It's a bummer, dude.
Sorry it wasn't what you wanted. Let us know if you want to send that back. We will be happy to help you out with an RMA. See or returns page if you'd like to do that.
Question about use with AVR Studio
Is it possible top use this programmer with AVR Studio?
Hi, I have not personally tested this, however, there are comments from other users mentioning that they have had success with this programmer in AVR Studio. Thanks!
Works very well.
Works very well for the ATmega328P and I'm sure it works well with others too. Note that just as the description says, it does include an AVR programming cable. I ordered one separately because apparently I just can't read well.
Also note that it worked fine for me on Linux. I installed avrdude and used the following line:
avrdude -c usbtiny -p m328p -U flash:w:FILETOWRITE.hex
Also, a note to anyone interested, avra is the assembler that I use and it has worked just fine.
As someone else noted, it does have an issue with power leaking through when the power switch is off. This hasn't caused too much trouble for me, but sometimes I turn off my board and realize it's still on due to power from the programmer and so I have to unplug it.
Lastly, if you have something wired up and you're trying to program your μC but having errors, in addition to check your wires, you might also try disconnecting things from the chip. If something is pulling your programming lines to ground for instance it might cause some trouble.
All in all, would definitely buy again.
Handy Little Programmer
My first steps into AVR programming outside of an Arudino, and I must say this board makes it pretty easy. Thus far I've gotten my head wrapped around some ATtiny85s and I salvaged an Uno board I thought I toasted! Would recommend for sure.
Great programmer
Great programmer. I would suggest to add an option to select VCC level, so the user might select between: No Power / 1.8V / 3.3V / 5V.
Works Great!
Works great with our MagSpoof! https://store.ryscc.com/products/magspoof
Great value
The programmer can be a lot more finnicky in noisy environments that the other programmers I have. But I depend on them in a production environment because they integrate reliably with the docs provided, more or less, and because they are easy to replace. Most of my name brand AVR programmers have died and will not be replaced because of their pricing with little to no value advantage.
Thanks, Sparkfun.
Works for me.
I've used it to program an Arduino, a Wemos XI, and a homebrew ATTiny4313. In all cases works without a hitch. I'm using Arduino IDE and AVRdude on Xubuntu.
WOW!
I have an old STK500 and an AVR Dragon. I can reassure anyone who wants to start messing with AVRs that this unit is all you need. You can program flash and eeprom, read and write fuse bits, etc. It will be a long, long time before you need anything more. The downside of this technology is finding it on the system. Every time you unplug it, it moves somewhere else. I wrote a simple Python script to make finding it easier (Linux):
"#!/usr/bin/python"
"# usbFinder.py"
import subprocess
line = subprocess.check_output(['lsusb','-d0x1781:0x0c9f'])
device = 'usb:' + line[4:7] + ':' + line[15:18]
print device
Remove the quotes from the first two lines.
If you are using a Makefile, you can change $(AVRDUDE_PORT) to $(shell ./usbFinder.py) with the python script in the same directory as the Makefile.
This has to be the best value available anywhere. The Target power switch is a nice touch. The adapter cable that comes with it is keyed and has both types of ISP connecter.
Not compatible with Linux
If you plan to use this with Linux, stay far away.
The kernel thinks it's an MTP device, which then results in mtp-probe failing. It shows up in lsusb but never gets mounted as a serial device anywhere in /dev. Needless to say, you're left with no actual device path to provide to avrdude.
Pretty blue LEDs, though.
Hello!
Sorry about the issues with the pocket programmer. If you're not satisfied with the product, you can contact techsupport@sparkfun.com and they can help you to setup a return.
Reliable and insexpensive programmer
I use the AVR programmer to program ATMEGA328P processors on UNO, breadboard, and custom boards using the 3x2 cable connections. My computer has Windows XP and Arduino IDE version 1.8.2. I select the USBTiny programmer in the IDE rather than using Avrdude from the command line. The directions on the Sparkfun website worked perfectly. For my simple purposes, the price can't be beat. Setup was straight forward. It works.
Works as expected
This little board does a great job of programming Atmel AVR processors like the one on the Arduino UNO R3 and does it at a reasonable price.
Works Very Well
The last chip I programmed was a PIC16 back in 1998 using Mike Predko's parallel programmer. Ten years and a well designed AVR Pocket Programmer makes it SOOO much easier. The Pocket Programmer - and a bit of breadboarding - make ISP programming almost as easy as using the bootloader. I am totally satisfied and have so far programmed ATmega328, ATtiny84, and ATtiny88 MUs using the Arduino IDE and ATtinyCore/ATmegaCores.
Good, but not 3.3V safe.
The board is really handy; I like the small size, and using the specialized ribbon cable instead of separate 10- and 6-pin connectors is great! The USBtinyISP design is very well-supported, and works smoothly for me.
Unfortunately, it's not 3.3V safe (that is, can't be used to safely program a device that operates at 3.3V), and that was something I was really hoping for. The output buffer on most USBtinyISP designs is a 74AHC125, while this one uses a 74AC125. That means that even when the switch is in "No Power" mode, it still puts a little over 4V on the power pin, and runs its I/O at that level. (I have a more detailed description of the issue at https://forum.sparkfun.com/viewtopic.php?f=14&t=48654 .)
But for 5V designs, like putting a new bootloader on an Arduino, it's great!
Works great and gets the job done!
So far I find this programmer to be quite helpful in the programming of my AVR chips. It does what it should and that makes me happy.
Seems to work fine 😁
Used it to burn FlashForth to my arduino uno clone. Now, if i could only figure out How to use a terminal 😆
It works fine for me
I have used this programmer to program Arduino Uno boards and attiny13a based boards with excellent results. I only had to provide a USB cable to connect it to a PC, and use the appropriate avrdude command line to program with it.
It works. Price is right for what you get.
I was able to program the controller chip as advertised. It helped to do some research to see what others did to make it work. Instructions for getting the correct driver loaded and then what commands to use was very helpful.
Surprisingly reliable
I made a mistake in the makefile at first, where it was compiling for atmega32. After that, everything has been very good.
Works well, needs an enclosure.
It has worked well for me so far. I would like a simple enclosure to avoid possible contact with prototyping wires.
Excellent programmer!
It took less 10 minutes to set up my MacBook Pro and the AVR Pocket Programmer, and update the ATmega328 firmware on a QRP Labs clock. I used AVRDude and it worked perfectly the first time. It is a fantastic little programmer.
Does the job
Power / no power switch is a good feature.
Didn't realize it was USB mini, thought it was USB micro. Make sure have a mini USB cable lying around still.
Works fine.
Would be good to have some markings on the connectors.
Works as advertised
I have used this to program several PCBs that I have designed using the atmega controllers. Isp works flawlessly and it can burn arduino bootloader with ease
Works as advertised
I have used this to program several PCBs that I have designed using the atmega controllers. Isp works flawlessly and it can burn arduino bootloader with ease
Works as advertised
I have used this to program several PCBs that I have designed using the atmega controllers. Isp works flawlessly and it can burn arduino bootloader with ease
gets the job done, wish it had translators
Works as described, although getting everything to run with USBtinyISP can be a bit difficult. Follow the guide carefully. My only gripe is that this thing uses 5V logic levels, which isn't a huge deal, but is annoying the the age of low voltage cmos. It would be nice to see a translator like the comparable programmer from adafruit.
would be great if I could just get it to work.
Used this thing 13 years ago and now I need to do some programming and I actually ended up getting a new computer because no one supported the older OSX. Still canto get it to talk with the computer or new Arduino IDE.
Does the Job
Works well. Used it to load sketches and bootloaders. Did not work with USB 3.0 (blue) port on my Windows 10 machine, but worked with the older port just fine.
Just what it says: the small programmer that does the job.
Personally, I think this product is awesome. For one, it's much cheaper than a full-blown AVRISP MKII or similar and does an adequate job for most purposes. I personally don't have much of a use for a debugger in my programmer (yet)-a serial connection usually suffices. In cases without one, oh well, blinking an LED or making noise will have to do. Then again, what project doesn't have some kind of output?
It's based off of the ever-awesome USBtinyISP from Adafruit, but I actually like this version better for a couple reasons:
- There's only ONE cable socket, so the unused connector (10 pin or 6 pin) won't get in the way on its own cable. Sure, the 6-pin cable isn't as strong, but that's easy enough to doctor up.
- SparkFun uses a switch for target power that doesn't stick out and works beautifully and not a jumper, which can easily be lost and is generally more cumbersome. They also label which position does what, which is nice.
- Although it's not a through-hole kit, the all surface mount construction gives that nice oh-so-smooth backside of a PCB we all love. The IDC connector might be prone to being knocked loose, but a bit of superglue or similar can help strengthen its grip on the board. Also, being preassembled helps decrease the chances of it not working due to botched assembly and damaged parts during transit, which helps make it a nice "known quantity" that is pretty sure to "just work". One less variable (well, major variable, at least!)
- There's no case, but the red board looks pretty cool (like all SparkFun products). Also, you can add whatever case you like.
Overall, I find it's a solid programmer that works well for most purposes. You can even upgrade the firmware if a future update brings better features! (Well, you'll need another programmer for that...but most of us have an Arduino lying around and the ArduinoISP code. Or you could just use a blank AVR with enough flash space to store programming code and the new hex file.)
Worked perfectly once drivers installed.
Everything worked perfectly with my Win7 PC once I found and installed the correct drivers.
------------------ Tech Support Tips/Troubleshooting/Common Issues ------------------
Hardware Setup
The Pocket AVR Programmer can be used with one of our old tutorials "Lecture 2 - How to Get Code Onto a Microcontroller" https://www.sparkfun.com/tutorials/93. The tutorial was originally referring to two other programmers and not the AVR Pocket programmer. The circuit had to be modified a little to get it working. First, you need to build the circuit on the breadboard. I didn't need to add the voltage regulator to my setup since the AVR Pocket Programmer can provide the 5V. Make sure that you flip the switch to "Power Target." I did use two 0.1uF decoupling capacitors in the circuit, LED for blink, LED for power, reset button, and associated resistors as explained in the tutorial. One thing I did was to add a 16MHz crystal on pins 9 and 10 of the Atmega328p.
Install Driver and WinAVR
Make sure that you install the driver for your Pocket AVR Programmer. They can be found in the documents section under the Windows Driver link. After installing, the Pocket AVR Programmer will come up as a new tree under libusb-win32devices -> USBtiny.
Also, make sure that you are installing the latest version of WinAVR http://sourceforge.net/projects/winavr/files/. For more information on Downloading, Installing, and Configuring WinAVR, check out this pdf => http://winavr.sourceforge.net/install_config_WinAVR.pdf.
Installing Pocket AVR Programmer Driver on Windows 8
If customers are using Windows 8, they would need to disable the driver enforcement => https://learn.sparkfun.com/tutorials/disabling-driver-signature-on-windows-8. The tutorial talks about it.
Alternative Pocket AVR Programmer Driver Installation with Signed Drivers
An easier method is to do, point your computer to a driver package that has all of the drivers that are digitally signed. Codebender has packaged a nice digitally signed installer that gets us through all of this headache. Brian (from SFE Education) tried this on his Windows without the need to disable drivers and download their specific driver file. Go through Codebender's getting started walkthrough [ https://codebender.cc/static/walkthrough/page/1 ] to install the drivers in step 3.
Modifying the Make File
I had to do some modifications in order to use the Pocket AVR Programmer in the old tutorial. I was using the ConText editor [http://www.contexteditor.org/index.php] instead of Programmer's Notepad or JFE that was explained in the tutorial to modify the Make File. The code in the ConText editor was highlighted using the C/C++ option to read the file easier. Under the section that says "Programming Options (avrdude)," I had to modify two lines to get the Pocket AVR programmer working:
1.) In line 200, change:
AVRDUDE-Programmer = stk200 to AVRDUDE-Programmer = usbtiny
2.) In line 207, change:
AVRDUDE_WRITE_FLASH = -U flash:w:$(TARGET).hex to AVRDUDE_WRITE_FLASH = -F -U flash:w:$(TARGET).hex.
The first modification was to set the programmer to use the Pocket AVR Programmer. The second line is to override a certain check by avrdude. I found this in the comments but didn't run into this issue before and after modifying line 207. Keep in mind that # comments out a line.
Compiling Hex File
Open up the Command Prompt. I placed the blink_1MHz on my desktop but you can place it anywhere in your computer. Just make sure that you are in the same directory in the Command Prompt. Make sure that you know how to navigate through folders => http://www.wikihow.com/Change-Directories-in-Command-Prompt. After entering the correct directory, type make all to compile the hex file. This will output a lot of files in the blink_1MHz folder. The most important is the .hex file.
If you want to change the c file, you must modify the c file, type make clean in the command prompt, and type make all again.
Setting Fuse Bits, Uploading Hex File, and Setting Lock Bit
You should try looking at the tutorial for installing an Arduino bootloader => https://learn.sparkfun.com/tutorials/installing-an-arduino-bootloader/selecting-a-programmer. This will help in getting the correct connections from the programming cable to your breadboard Arduino. I double checked with a multimeter to check the wiring under the continuity setting. Also, the section under "Uploading Code - Hard Way" will be useful when in the Command Prompt to set the fuse bits, upload the hex file, and set the lock bits. The syntax is sensitive and you can have problems if you don't write the correct commands.
Since you are in the same directory already from compiling the hex file in the Command Prompt, you just need to type the two lines as stated in the tutorial to set the fuse bits and then upload the hex file and set the lock bit. Make sure that you change the hex file in the line ...flash:w:hexfilename.hex... to ...flash:w:blink_1MHz.hex...
For more information, I recommend checking out the avrdude manual on the other options => http://www.nongnu.org/avrdude/user-manual/avrdude.html#Top.
After doing all this setup, I was able to get the Atmega 328P microcontroller to blink with the Pocket AVR Programmer. Hope this helps.
Powering Your Target Microcontroller
Make sure that you power your target AVR microcontroller. Normal AVR programmers don’t have this option. Luckily, the AVR programmer is able to power your target by flipping the switch to the silkscreen that says “Power Target.” The voltage is 5V.
The No Power option is so that the USB is not providing power directly from the VCC pin on the USB port. When flipping the switch over, there is still some power coming partly from the ATtiny2313 pin connected to CTL. CTL is pulled high by the programmer when in a non-programming state (in order to tri-state the buffer IC). The power should be low enough where it won't harm the target. The Atmel chips that I have been using when switched to the No Power is within its voltage range so I do not see any issues. I would usually need to power the target board using a separate power supply and with the switch flipped to No Power.
Using my multimeter set to a measure current, I did notice that there wasn't a lot of power being sent to the Atmega328P. After flipping the switch to the Power Target, I noticed that it was pulling a lot more current because the USB's port was powering the target.
If you are using this to flash 3.3V microcontrollers, you should use a logic level controller [ https://www.sparkfun.com/products/12009 ] or resistors for voltage division [ https://learn.sparkfun.com/tutorials/using-the-logic-level-converter#hardware-overview ]. Even by flipping the switch to No Power, there is some power that leaks through to the target device. Measuring with a multimeter it is around 4.46V.
This is normal and the programmer was designed that way. The target will not be directly connected to the 5V pin when the switch flipped to the No Power side. It’s also normal the that D-, Stat, and Power LEDs are on. Speaking from experience, you will not be able to flash code to your target when the switch is in that position since you are not powering the target device with an external power supply.
Additional TS Troubleshooting => https://learn.sparkfun.com/tutorials/pocket-avr-programmer-hookup-guide/discuss#comment-564ba50bce395f75158b4567 .
Errors
1.) Using a USB hub cable with the programmer, it might not work properly if the cable is damaged. You might get this error through your serial terminal:
Try using a dedicated mini-B USB cable or a different USB cable to prevent this error.
2.) If you are seeing this error:
it is due to a few reasons.
I recommend checking pin connections. There might be the reset pin that is not connected sufficiently (I had problems when reprogramming an ATtiny with the reset and pin not connecting correctly). You need to to disconnect components attached to microcontroller before you can upload a new program to the chip. This is explained with the ATtiny's in this tutorial => http://highlowtech.org/?p=1801 )
This error usually means that the programmer is OK but it could not find the chip. Check the wiring connections and see if your target AVR microcontroller is powered.
3.) If you are seeing this error with the byte location varying on each attempt when flashing code:
It has something to do with the bitclock rate used by the programmer. A customer had a similar issue and found it through some of the resources that I had provided him. Most likely the original bitclock setting was too fast for the chip which would cause a failure to write/read the chip's memory correctly. Just open a command line interface and specify the -B50 in the avrdude command line in order to slow down the bitclock rate in the programmer (sck) to 50 microseconds.
Programming via Arduino with a modified "avrdude.conf"
Certain Arduino IDE's like v1.0.1 has the avrdude's command line hardcoded so it cannot be "changed." You can view this by using the IDE into verbose mode. To modify the "hardcoded" avrdude used with the Arduino IDE, go to your avrdude.conf file and modify the bitclock rate variable. The customer that resolved his case by using http://www.nongnu.org/avrdude/user-manual/avrdude_11.html#AVRDUDE-Defaults to change the"default_bitclock" at line 319 of the avrdude.conf for his ATtiny85:
The customer was able to compile the Blink.ino sketch file through the Arduino IDE in order to upload code to the Attiny85. There were no verification errors. By changing the bitclock rate, this would naturally cause the code to upload noticeably more slowly.
For an Arduino Bootloader, check here => http://code.google.com/p/optiboot/. This uploads the Arduino Uno Bootloader so that after using the programmer for the first time, you can upload firmware with an FTDI and the Arduino IDE without the need of the programmer.
Works very nice with Atmel Studio 7 using avrdude!
Is there a path out there to gang these, perhaps 5-10 pushing code simultaneously?
Does this device work with PDI? (e.g. 6-pin interface described here in section 2.5.2: http://ww1.microchip.com/downloads/en/DeviceDoc/Atmel-42093-AVR-ISP-mkII_UserGuide.pdf)
Hello, In the last 2 years I have bought two of these devices. One didn't work anymore after a month. It would return a random device ID no matter what deivce I used it on (I attempted several custom devices and several arduino uno's and mega's). I bought a new one soon after, and that worked up till a few days ago where it started showing the exact same behaviour. Can one of you tell me if this is an error in the device or if it is fixable? I tried to get a replacement from the reseller where I bought them, but they need confirmation that this means that they broke.
Kind regards, Sybren Zwetsloot
After some more tests I now occassionaly get this message:
avrdude.exe: AVR device initialized and ready to accept instructions
Reading | ################################################## | 100% 0.02s
avrdude.exe: Device signature = 0x1e9516 (probably m328pb) avrdude.exe: safemode: Verify error - unable to read lfuse properly. Programmer may not be reliable. avrdude.exe: safemode: To protect your AVR the programming will be aborted
avrdude.exe done. Thank you.
Hello, I wonder if it does work with 64 bit windows 10 pro! waiting for your reply. Thank you
in UBUNTU/LINUX you will get this error(as user): avrdude: usbdev_open(): Found USBtinyISP, bus:device: 003:002 avrdude: Warning: cannot open USB device: Permission denied avrdude: Error: Could not find USBtiny device (0x1781/0xc9f)
But if you run as root, it runs fie. So you have to add a file to /etc/udev/rules.d any file name should do, in my case I used like this vi /etc/udev/rules.d/sparkfun_usb_tiny.rules and added only one line to that file with the following line SUBSYSTEM=="usb", ATTRS{idVendor}=="1781", GROUP="sparkfun_users", MODE="0666" walla I hope it helps anyone (me myself maybe lol) having the problem.
Will this work with ATmega32U4?
Can someone provide some candidate mating connectors for the 2X5 connector? I've found a couple that should work but am looking for additional options. Interested in both crimp-on for ribbon cable and housings to hold individually crimped connections. Thanks.
I'm having a problem when installing drivers. I go through the install process and Windows recognizes the device and it shows up as USBtiny, but the device status is "This device cannot start. (Code 10)." Does anyone know what this issue is or how to fix it?
This programmer can also be used to program chips such as ATtiny9 or ATtiny10 (which use the TPI protocol). The following patch is needed for avrdude:
– usbtiny TPI support: https://savannah.nongnu.org/patch/?8924
Just bought this to program my atmega32 using arduino sketches. Got it working and now wondering how to see the micro's serial replies. Tried opening up arduino serial monitor and not seeing anything. baud rates set right. Any guidance would be awesome!
I was going to write a review in the Reviews section on this product but it will not allow me to for some reason. So I'll post it here.
I purchased this product as a programmer for the Atmel ATMEGA328P. I had a little difficulty figuring out the USB driver installation, but finally got it to install.
So far I've used to to reload the Arduino boot loader as well as with AVRdude and Atmel Studio. This thing works flawlessly! Very nice solution and the price is perfect.
Would highly recommend this wonderful low cost programmer to anyone interested in getting into the Atmel AVR (I'm a PIC & MCS-51 guy just getting into AVR's).
A proper solution for running under Windows 7, including 64 bit, without turning off driver signing.
1. Download the windows driver from sparkfun, and unzip it somewhere.
2. Download a recent libusb release from sourceforge: http://sourceforge.net/projects/libusb-win32/files/libusb-win32-releases/
and unzip it somewhere.
3. Take the libusb0.dll and libusb0.sys files from the sourceforge bin\amd64 directory, rename them to libusb0_x64.dll and libusb0_x64.sys, and replace those files in the sparkfun driver directory.
4. Replace the sparkfun libusb0.sys and libusb0.dll with copies from the sourceforge bin\x86 directory (renaming the sourceforge libusb0_x86.dll to libusb0.dll).
Your driver is now ready to go. Windows will complain during the install that the drivers aren't signed, but they actually are. Once installation is done, Windows will happily load the new drivers.
Sparkfun: please update those four files in driver zip file. That will fix it for everyone.
Thank you for your help, works fine on Win7-pro 64bit.
I tried this using both the amd64 and ia64 drivers neither worked and kept giving me "Driver not intended for this platform".
For anyone that wants it (hint hint, sparkfun), here is a zip with the updated libusb drivers and the Signature override tool i used to get it working under vista x64: http://dl.dropbox.com/u/8578398/pocketprog-driver.zip
Please update the driver package that is downloaded from this site. Having to mess around renaming .dll files ain't SparkFun.. It's SparkFrustrating. :-O
Is there a driver for mac?
Is this programmer ok for 'AVR atmega644' microprocessor? Thank you
Thanks BeagleBoy for this help. I was so inspired by this that I made a very detailed video on the process: http://newbiehack.com/MicrocontrollerProgramTransferPart2Drivers.aspx
Hope this helps.
Thank you phoddaniel and BeagleBoy; very helpful instructions. However, when I completed all these steps, I got a dialog box saying that this version of Windows (7, x64) will not run drivers that are not digitally signed. Help?
Edit: Nevermind, I didn't read all the comments. Drivers successfully installed. Now I just have to figure out why avrdude can't find the device.
I can confirm that this combination works fine with Windows 7 Pro 64bit, without any problems or hacking with driver signing. Thanks!<br />
<br />
Also I had to drop the "-B 1" -option to get this to work with avrdude 5.10, but so far I'm very pleased with this cheap and cute thing!
Was just trying this myself. The '-B 1' didn't work when using the chips internal oscillator @1MHz, but did work when using it at 8MHz, and also when using an external oscillator @16Mhz.<br />
<br />
ATmega168 chip/AVRdude 5.10.
That should be
3. ... from the sourceforge bin\amd64 directory ...
Argh! The preview showed the punctuation, but the final post doesn't have it.
So make it: bin backslash amd64 . Sheesh.
"libusb0x64.dll and libusb0x64.sys" should be "libusb0_x64.dll and libusb0_x64.sys".
WARNING - TARGET BOARD DESTROYED:
It is my opinion that the PCB differs from the circuit diagram on a critical point.
The 'Power Target' switch (on my board) is NOT wired as per the diagram. It removes VCC from both the ISP connector AND the 74LC125 buffer IC.
This means that your target device still gets 5 Volts via an internal path through the 74LC125.
No big deal, except if you plug in a target which uses 3 Volts only.
My $50 Seeeduino Film was instantly destroyed!!! Not very happy at all.....
Paul
Mine operates the same way. When I flipped the switch to "No Power" I assumed that it wasn't pumping 5 volts into it. Which, scared the crap out of me, BTW. I unplugged my walwart and shorted the power bus to discharge my huge filter caps. The LED matrix went out as expected, only to come back to life as I removed the wire shorting the bus. I'm glad that the programmer is at least buffered and power protected...
This error has been resolved. I ordered last month and finally flashed a few (hundred) boards over the weekend, weary of this information. "Power" gives 5V, and "No Power" gives no power. All perfect!
Actually the problem has not been resolved. What happens when you select "No Power" is TARGET-PWR still connects to the programmer through a 22k resistor to CTL. CTL is pulled high by the programmer when in a non-programming state (in order to tri-state the buffer IC). Thus the target board is powered via the CTL pin (which is at 3.3V) through a 22k resistor . The programmer needs to be redesigned to resolve this issue.
It's been a long time since looking at hardware specs, but in case someone is searching for the same information I am, I'd agree with TravisF, based on looking at the schematic/board layout (may2013) it seems sensitive 3.3V targets are ill-advised....I do not own this board currently, so I can't verify the below, it comes from looking at the design docs. 1 - Cutting the trace between JP1 pins might work (disconnects from USB 5V power so entire board could be 3.3V powered, but you lose fuse protection on VCC, and a target may not be able to supply enough current) However only 74AC125 buffers are spec'd to operate at 3.3V (schematic has 74ACT, while picture shows 74AC) Additionally, this presumes USB data signals will not cause issues on ATTINY if they end up at 5V...I found a reference that they were supposed to be 3V?
2 - Moving the switch to "not-powered" does not seem to prevent issues. Specifically as noted by TravisF/AffordableTechnology, CTL when driven from a 5V powered ATTINY will may either damage the 3.3V powered 74xx125 or leak through the 74xx125 & 22k (R10) to the target. If your device is 5V tolerant while running at 3V or not leaking much current through R10 you may not see problems. Really what "not-powered" means in this context is USB power is not directly providing power to a target, and the 74xx125 buffer is powered by the target's VCC. I would presume this is to avoid USB current limits more than to allow 3V compatibility.
3 - FYI if you're considering cutting the CTL trace keep in mind that the 74xx125 is only spec'd to allow inputs VCC+0.5 so it could still be damaged by running it at 3V while the ATTINY is at 5V
So in short it seems to me that if you need to program a 3V sensitive device, you may wish to use a logic level shifter.
It appears to me that since the 22k is meant to be a pull-up, the fix is to simply add a small diode to block the CTL signal from flowing through the resistor when it's high.
In fact, if you want to fix your programmer yourself, you can, but it requires hacking the board a bit. It's not for the faint of heart.
Look at the bottom of the board. about 1/8" below the "COM" in "sparkfun.com" there's a straight horizontal trace between two vias. Cut that trace.
Now, back on the top of the board, tack a 1N4148 diode between pin 8 of the 2313 (the big chip), and pin 1 of the 74HC125 (the small chip). Note that the two chips are opposite-oriented. Pin 1 of the 74HC125 is bottom right (with the USB to the left), and pin 8 of the 2313 is 3rd from the bottom-left. The cathode of the diode is on the 2313 end, and the anode on the 74HC125 end.
That done, you should find that with the target power switch turned off that you can safely program 3.3 volt systems, provided they're self-powered during programming.
The one note is that you are still feeding 5 volt logic into the 74HC's pins from the 2313. The 74HC's datasheet shows diodes on the input pins to Vcc, which are intended to protect the 74HC from excess voltage on the inputs. It's conceivable, I suppose, that that might wind up raising Vcc on the target, but I haven't actually tried it.
I'm glad I got mine before you ran out. Thanks for making the device available in assembled form.
My note on Linux compatibility: Running as root, it worked out of the box, when connected to the ISP port of an Arduino Uno under Ubuntu 11.4.
It is possible to use avrdude with the programmer without being root. Instructions are available over at ladyada.net.
Don't know if this poster is still looking, but for anyone else: I don't have this programmer, but for my USB Pickit2, I had to make a udev rule. use lsusb with device plugged in to get idVendor and idProduct. Create rule in /etc/udev/rules.d such as 51-avr.rules with text: SUBSYSTEM=="usb", ATTRS{idVendor}=="xxxx", ATTRS{idProduct}=="yyyy, MODE="0666", OWNER="me" GROUP="myGroup" xxxx is the vendor id from lsusb, yyyy is product from same. 'me' is your user name ( if you want to restrict ) group is one of your groups ( like users ). Google for udev rules for more info. Hope this helps!
"sudo arduino ide" works on ubuntu 12.10
Reminds me of my Bus Pirate. It is my favorite AVR programmer for the moment :-)
Getting this working with Windows 8.1 was vexing. Solution: beta signed TinyISP driver found on Adafruit's Trinket forum. http://adafruit.com/downloads/usbtiny_signed_8.zip
The sparkfun driver works fine with windows xp. I spent hours trying to get it to work with Windows 7 but it kept identifying it as an "unknown device" and refused to do anything. I spun up a windows xp vm and everything worked.
Just received this item, but 1 issue. Why is the 6 pin ISP connector cable on the 'wrong' side ? Now i have everytime a cable over my project or a fold in the cable.
It works out of the box with Mac OS X Mavericks 10.9 and CrossPack - AVR - 2013 12 16.
This worked on my Mac before I installed OS X Mavericks, but doesn't now. I've spent hours trying to get it to work without luck.
Same problem here, I have tried connecting the avr pocket on my macBook pro, on my air and my Imac, all failed. The red stat 1 is lighting, but the tty. never appear on my list
Ok, my apologies. The flash programmer is actually working. What I didn't know is that the avr pocket doesn't appear under the tty / cu section files at all. You don't need to bother of it. From my makefile I just specified -P usb to avrdude in order to find the programmer, and it worked like a charm, and the flashing was actually fast. On Arduino, you don't need to specify any port. I tried both of them on Maverick.
Just connected successfuly with avrdude on Windows 8! Instead of using the suggested windows driver, I downloaded Zadig which is a very straightforward installer for the libusb driver. (Download: http://sourceforge.net/projects/libwdi/files/zadig/zadig_v2.0.1.160.7z/download) After running it, I connected the Pocket AVR Programmer and it appeared in Zadig window as an unknown device. Then I selected the libusb-win32 driver and clicked "Install Driver". And that's it! no singed-driver problems etc.
Wow- this is a fantastic fix. Thanks for sharing this with us. I'm going to add this to the product GitHub repo.
Do not buy this product. It really sucks and the support is awful. You will get initialization failure is most cases and you will have to search for ages until you find what is happening. Go buy an ATMEL programmer instead.
Please fix this issue SparkFun! Such an easy way to avoid frustrating your customers!
Thanks!
64bit Win7 Solution!!! I am running Win7 x64 ultimate and trying to program some ATTiny84/5s with Ardiuno 1.0.1. After much frustration, stumbled upon this updated driver today and it just plain worked for me, no workarounds, no hassle. http://mightyohm.com/blog/2010/09/fixed-usbtinyisp-drivers-for-64-bit-windows-7/. I unzipped the archive and updated the 'failed' earlier driver install attempt - once update was complete, shows as USBtiny in Device Manager. I was expecting a com port to show up but figured out all I had to do in Arduino was select USBtinyISP as the "Programmer". TaDa!! Man am I pumped! Thought I was going to have to dance around all the other nonsense I was reading about to make this (now) super cool programmer work in Win7x64. Hope this helps others out there!!
This thing is freaking AWESOME! I had some problems in the beginning, when I first started using this programmer. I used my Arduino Uno SMD as an ISP programmer for a while to program ATMEGA's and ATTINY's while trying to get this thing to work properly. I had used it many times with Arduino 0022, but it was time consuming trying to find the .cpp and .hex files after compiling. But with the release of Arduino 1.0, it's a breeze to program AVR chips. You don't even need to use the command window. Just select 'USBtiny' from the list of programmers under 'Tools'. I've personally programmed the following with this programmer: ATTINY85, ATTINY84, and ATMEGA328P (both factory fresh and preprogrammed w/ bootloader). It works every time.
I have windows 7(x64) pc and its not detecting the pocket AVR programmer. Can anyone help me?
Totally agree with the guy who said this was SparkFrustrating. I finally upgraded my laptop to Windows 7 and now have a bricked programmer.
Following Beagle Boy's instructions, the downloaded driver will not install, or I just do not know how to do so. Double clicking on the pocketprog_x64 or pocketprog files results in a dialog saying there's a security catalog error.
Come on SparkFun. A year and you can't get this fixed yet?
The instructions here worked:
http://forum.sparkfun.com/viewtopic.php?f=7&t=26156&hilit=+windows+7+pocket
How difficult would it be for SparkFun to update their drivers so that customers don't have to jump through hoops to find proper instructions and download software from multiple sources?
SparkFun really needs to release a Windows7 driver package for this device. Pretty shameful that they haven't done that yet.
Windows 7 driver issue.77777
loaded drivers from this web site and WINAVR,
Kept getting "could not find usbtiny device"
Found windows 7 driver @ http://www.ladyada.net/make/usbtinyisp/download.html
Now all works fine:
Sparkfun howabout updating the driver info for us Windows 7 people.
For anyone still struggling to get the drivers working with Windows 7 64 bit, just download the libusb drivers from BeagleBoy's post (first one). Unzip them, and run bin/inf-wizard.exe. It will generate an .inf driver file which it then installs for you. Windows complains that it doesn't know who made the driver, but it still installs and works fine.
Thank You, Thank You!! That was simple and solved everything.
With going to the 'trouble' of using SMD, why use a "5x2 header" instead of a 3x2 as Atmel themselves use now?.
The cable in the related products (DEV-09215) has both 10-pin and a 6-pin connectors to accommodate both connector styles.
@mcuaust and @MikeGrusin: "Both 10-pin and 6-pin targets supported (cable included)" Does it still include a cable?
Love this board.
Newbie questions: (1) Can I programme Adafruit's Pro Trinket 3V with this one, along with your tutorial (https://www.sparkfun.com/products/9825#tutorials) linked above? (2) What is the SparkFun equivalent of Pro Trinket 3V?
Thanks
While I'm not too familiar with Adafruit's line it looks like you should be able to without a problem. Keep in mind it would probably be easier to use the USB port or an FTDI basic board, but this should work as well. Also, remember you will overwrite the bootloader if you program the board using this programmer. As for the SparkFun equivalent, I would say check out the Pro Mini or the Pro Micro.
It looks like this probably won't work for programming a ATMega1284, but can anyone suggest another option that would work? I don't actually need to access the full flash, I mainly need something like this for installing bootloaders.
If this uses the same firmware as the Adafruit USBTiny, then it actually DOES work with atmega128x's and 256's. The issue is that the readback verify fails and you get an error message. HOWEVER the programming DOES probably succeed. I see this on my Adafruit USBTiny, I get the error, but my programs make it onto the device (program works, and I can verify it with another programmer just doing the read/verify). Adafruit claims the lack of memory on the attiny2313 chip is the issue, and a software fix won't fit into the flash on this cpu. HOWEVER there is now a larger version of this part (attiny4313), anybody feel like a little hacking?
I'm having this weird issue where VCC is at or around 5V regardless of whether or not the power selection switch is set to power target or no power. How is this possible? It is really messing with the way I program my self-powered projects.
I am trying to use this Pocket AVR programmer with atmel studio 6 to program a 3pi robot I bought from Sparkfun. I have installed the drivers successfully but the programmer will not show up in atmel studio. Anyone had success with this device and atmel studio?
Thanks Sparkfun for this nice programmer. I had one hard time getting the drivers working with it for Windows 8 but got by with the help from these postings. It's working great with Arduino and AVR Studio 6. My latest enhancement was to add a ZIF programming adapter board and can now program multiple ATTINY85 and ATMEGA328's for my other projects. I have a couple of spare adapter boards available if anyone needs one. http://kc9on.com/wp-content/uploads/2014/10/Tiny-Adapter.jpg Thanks again for a great product!
Got it working after 2 hours under Win7 64 using a combination of techniques...
Zadig didn't work for me alone. I was still getting
However, installing this version of libusb32 finally worked for me: http://sourceforge.net/projects/libusb-win32/#Installation
I think installing zadig first allowed this installer to work. All I had to do was authorize the unsigned driver. Also, there is an issue if you have Atmel Studio already installed- apparently the Jungo drivers can mask libusb: http://uzebox.org/wiki/index.php?title=Avrdude
Just a note. Doesn't work [reliably] with atmega 1280 and 2560. Bricked an arduino mega 2560 and bricked 2 2560 chips before i found out. Ladyada also says so somewhere, the chips are too large to write to. Thanks. "should work with all the avr micros supported by avrdude: NOT TRUE".
You probably didn't brick those chips, just scrambled the fuses so you have no clock. Might be able to recover the part by injecting a clock to external clock pin and restore the fuses. Very worst case might have to borrow an AVRdragon and use HV parallel mode to reset the fuses if you managed to disable both JTAG and ISP programming modes!
Is there any form of instructions available? I can't find any online and was hoping that there would be something with the programmer, but no. :/
can i use atmega16a instead of atmega16 without harming the microcontroller or the programmer ? N.B.: avrdude lists atmega16 "ONLY"
According to the atmega16 to atmega16a migration guide, the 16a is a drop-in replacement with only minor electrical operating changes (mostly, it draws less current, overall). Shouldn't affect programming at all.
only issue might be a different chip id reported, in that case you'd have to make a new entry in the avrdude config file.
Hello, I don't understand : when i plug my Atmege324p-20PU with the Pocket Avr Programmer (when it's pluged into the computer) the state LEDs turn off :/. And then, when I execute the line "avrdude -c usbtiny -p m324p" the cmd told me "Error : Could not find USBtiny device (0x1781/0xc9f)" ! PS : My OS is Windows 8.1 Can you help me, please ?
If you are getting an error saying it can't find the device its most likely a driver issue. Make sure the drivers are installed correctly. If you are still having problems email techsupport@sparkfun.com.
That's what I thought, I had to reinstall 6 times or more :/ With the BeagleBoy's method, with the shared link of Sparkfun's page (top of this page)... Nothing works :/
any helps ?
I just bought one of these, and so far it's been nothing but frustrating. I've tried in in Arduino IDE 1.5.3 (most current) on Mac (no drivers needed) and Windows 7 32-bit (with all of the driver gyrations from BeagleBoy's post.
I get the same error in both environments:
avrdude: programmer operation not supported
avrdude: Using SCK period of 10 usec CMD: [ac 53 00 00] [00 00 00 00] CMD: [ac 53 00 00] [00 00 00 00] avrdude: initialization failed, rc=-1 Double check connections and try again, or use -F to override this check.
I've checked the connections - first time I was using jumper wires, but I soldered directly into the 6 pin connector and it still fails. I don't think this programmer works
I made a 3d printable case for this programmer: thing:332802
I had a very difficult time getting this to work with mac osx mavericks. I ended up installing xcode after I did the CrossPack install to get it to work.
Now it works great!
What is that used for ?
Can the pocket programmer be used as a serial connection to a PC. If so I would like to use it with my bareduino to obtain data via the serial monitor. Any help or directio would be great thanks.
I bought this in order to help someone get started with AVR programming. Not that I'm any expert in that area, but I wanted to help. It works just fine on a CentOS 6.5 box that has the avr-gcc toolchain on it and the libusb packages. I've noted that logic levels are intended for 5v parts and I'd need a level shifter and probably a voltage regulator of some sort if I want to use this on low-voltage parts. I also have an Olimex programmer (the ISP-500) which can work with low voltages.
Hello everyone,
Is it possible to use the Pocket AVR Programmer to burn a boot loader to the Arduino Leonardo?
Tyler
I strongly discourage purchasing this product. I used one for the past 9 months on my mac to program a variety of custom arduino based boards. It was a constant source of frustration with myriad bugs/annoyances. Just one example -- you cannot plug the thing in and expect it to work correctly if you use a virtual machine (e.g. vmware fusion) and it's open. Another real annoyance is the 5V power. All my boards were 3.3V. Yes it's hackable -- I cut a trace and added a 3.3V LDO to the board. The biggest problem with this tool though is that it's simply unreliable. I'd program my target several times without issue and then out of no where it would stop working. I'd have to restart my machine/unplug replug a few times. I could never be sure if my board was at fault or if the programmer was at fault (always annoying and frankly often it was the programmer). The documentation is terrible -- I couldn't, for example, figure out what the two status LEDs on board actually mean. Finally one day the thing just stopped working all together. No idea why. Won't program an off the shelf arduino board or mine. I bought the Atmel AVRISP mkII and I highly recommend it over this product. Yes it's 2x the cost, but it's worth it. No screwing around with hacking the programmer, it's MUCH faster, and it's much more reliable. Haven't had to spend anytime debugging my programmer instead of my board. Long story short it's worth the $39 for the atmel hardware.
Hello, i install Zadig driver but then i go to cmd and write avrdude -c usbtiny -p m324p it write Error: Could not finde USBtiny device <0x1781/0xc9f> . I think i do something wrong then i install drivers or i need to do something more, Please someone help.
Adafruit's AVR (aka Limor Fried's other USBtinyISP AVR) can't write to an Atmega 1280/1281/2560/2561. Does anyone know if this one does?
Basically this is just a clone of their programmer so it would have the same issue with the larger memory devices. That being said, I've successfully loaded the bootloader on an Arduino Mega2560 which uses the 2560 so results are a bit spotty on those chips.
I found it worked once for me too. After that i bricked all the 2560's i had before i found out indeed the usbtinyisp isnt up to it.
Has anyone gotten this thing to work with avrdude on Linux? I've tried 6.0.1, 5.11.1, and 5.5 (with an ATmega162V), but I get the same error: "avrdude: programmer operation not supported"
I had the same error “avrdude: programmer operation not supported” because the reset wire was not well connected to the ISP cable. Now this programmer is working in the Linux Slackware 14.1. I have installed this packages avr-binutils, avr-gcc, avr-libc and avrdude version 6.0.1. PS: I am using atmega328p
I have a older version of this product which is PGM-09231. Please help me installing this in win8. I worked with it very fine in win xp. Now i need someones help...
Is this programmer able to program data into an external EEPROM (like 25LC320 or AT25320)?
For anyone who gets the "initialization failed, rc=-1" error, and has "Power" "D-" and "Stat1" lit up, try replacing the cable first!
After a month of trying to figure out why I kept getting the rc=-1 error, I jammed a few 2-row male headers into the cable and went to town with a continuity tester. Sure enough, the MOSI on the 6-pin plug was open. I stuck a few male-male jumpers between the 10-pin plug and my target AVR and bingo-presto, it worked perfectly.
Evidently, the ribbon cable was defective. I suggest buying a spare, or just making your own. I hope this helps someone out there. Now I'm off to find some ribbon cable-making doohickeys...
does this include the usb cable if not does it use mini usb??
It doesn't include the cable, but it is mini-usb.
Does this work with atmega 328 and atmega328p ?
Hello,
OMG this Pocket AVR programmer drives me crazy.I followed all instruction step by step but it still doesn't work...
When I type "avrdude -c usbtiny -p m32" the result is
C:\Users\Sharshenbaev>avrdude -c usbtiny -p m32
avrdude: initialization failed, rc=-1 Double check connections and try again, or use -F to override this check. avrdude done. Thank you. - OS Win7 64bit - target Atmega32A Could anyone help me,please?
I plugged the PP into my Arduino and was able to download the boot. I was at first discombobulated by not seeing any COM port, but that didn't seem to matter. However, when I plugged in a virgin ATtiny13 and tried to download the bootloader, I got an error message. Any suggestions?
Can it be used to program a 8051 based ucontroller!!
This doesn't work. 3 people at our hackerspace have spent hours on this programmer. do yourself a favor - find something else. drivers flash blind cmd windows then nothing.
I added a dot to my ribbon cable connector on my AVR programmer so I quit hooking it up backwards.
Also, the connector doesn't fit on an UNO for flashing the USB driver. I used female/male header'ed breadboard jumpers.
I like this idea, and will get out my cable to do this right now. If you look at the plastic very carefully, you'll notice a small arrow denoting pin 1, but it's difficult to see and obscured by the ribbon cable. Thanks for the tip.
can be this used to program an Arduino UNO 16u2 R3?
Works with Amtel studio 6 Do this http://www.youtube.com/watch?feature=player_detailpage&v=iTTZUpzAjKc Skip to the end of the video they guy makes a lot of mistakes. Short Guide in AS6 Tools External tools... add title: Pocket Prog (whatever) command: avrdude.exe (have avrdude installed) Arguments: -c usbtiny -pm328p -U flash:w:$(ProjectDir)Release\$(ItemFileName).Hex:i (this is for atmega328p chip) Works on Arduino nano. Check use output window apply OK.
New project in AS& GCC c executable project Select Chip atmega328p enter code F7 to compile under tools click pocket programmer. That will program the chip.
Done
Hi, Is it possible to burn a bootloader for arduino PRO 3,3V/ 8MHz With this unit?? I am planning to make a board with a xbee onboard (in a socket so I can remove it while burning the bootloader), the RX and TX for the xbee Will be connected to other pins than the regular RX TX pins. I want to program my sketches with a FTDI. There Will be no other components that can handle 5V.
I got this to work a few times over a month or so, but today when I connect it, the computer appears not to assign a port to it. USBtiny shows up in Device Manager, but I see no COM port assigned, and when I run avrdude, I get the following error (which seems to have plagued a few other users):
I've tried multiple ports. Anyone know what I can do? Should I buy an Atmel programmer and give up on this device?
Silly me. I was specifying my programmer as stv500v1 when running avrdude (forgot to update my makefile). If anyone else makes this error, use this as a guide:
(Actually, I find that I can specify
-P com8or whatever port I want and it shall be disregarded (but execute without problem) since AVR Pocket Programmer apparently does not make use of a COM port.)is this supported on linux ?
Hi, I followed all the steps given by BeagleBoy but still I am having an error. Could not find USBtiny device . Why am I getting the error. I double checked all the connections
Thanks for the assistance.
I have been using this with Ubuntu 12.10, AVRdude and Arduino IDE quite happily. Worked out of the box, awesome possum, rock 'n roll etc. Thanks for a great tool!
A couple of tips: 1. Make sure the "Power board" switch is in the correct position. 2. Make sure no other components are connected to the programming pins of the MCU.
Also, the connector diagrams show the way the male connectors on the board should be wired up. I initially thought that it was a diagram of the face of female connector. Wasted a good deal of time on that little misunderstanding :/
Nothing I have been told to do has worked for Windows 7. But I saw a forum that said to download the USBtiny driver from ladyada.net (http://www.ladyada.net/make/usbtinyisp/download.html). After downloading this driver the programmer began working perfectly on my Windows 7 OS. This might not fix it right away because I tried a few other things first that may or may not have helped. Hope this helps everyone.
HELP PLEASE! Does it support atmega644?
Hi, Is this 'Pocket AVR Programmer' OK to use for programming AVR ATMega644? Thank you
Hi guyz,
need help. can this program the olimex AVR 40 pin protoboard https://www.sparkfun.com/products/32 ? It has a ICSP port but the connection pins seems the same as ISP. Any help would be appreciated. Thanks
I have an issue with the programmer... I need to hold the reset button in order to make the programmer works. If I do not hold the reset button, I sometimes get the message 'initialization failed, rc=-1' and sometimes it starts to work but then I get 'Yikes! Invalid device signature.'
My notes on using this programmer - both on Mac and Windows, as of Jan 2013:
http://tat-tvam-asi.in/hacking/programming-atmel-attiny85-with-the-sparkfun-pocket-programmer/
This appears to link to a website which loads malicious code (according to AVG).
I bought this programmer a few months ago and had difficulty recently getting it working with my Mac. However, it turned out to be "user error". I needed to flash my Uno for use with Grbl. Initially, I was getting a "initialization failed, rc=-1". It turned out that I had connected the cable incorrectly to ISP port of the Uno. The cable should point toward the reset button of the Uno. Hint, if you are using the AVR Pocket Programmer to power the Uno and the power LED doesn't light, then you have hooked it up incorrectly. Also, I was getting verification errors with Avrdude. The Grbl wiki suggested using the '-D' option. Once I removed the '-D' everything worked perfectly. Here is my setup:
Mac OS: 10.8 Avrdude: Used the avrdude supplied with Arduino IDE 1.0.2
AVRPATH=/Applications/Arduino.app/Contents/Resources/Java/hardware/tools/avr sudo $AVRPATH/bin/avrdude -C$AVRPATH/etc/avrdude.conf -pm328p -cusbtiny -Pusb -Uflash:w:grbl.hex
I hope that helps anybody deciding whether they want to purchase this programmer to use with their Mac.
Just spent a while trying to get the drivers to install on windows 8 x6. Tried a few of the different hacks out there and they didn't work.
Finally got the driver to install by restarting windows 8 with the "disable digital signature enforcement" feature to by pass the signature.
I tried with sparkfun's driver download and it did not work even with the signature enforcement disabled, then I tried with LadyAda's usbTiny driver download and got it working.
This programmer works fine on Debian Linux 64 Bit with the Arduino ide IF you run it as root.
It works great for OSX 10.7 and Ubuntu 12.04
Will this work for the Beginning Embedded Electronics - 2 tutorial?
Hello me, I'm you from the future. It does work, and also you will have a lot of fun with this.
Hey AsaJ from the past,
I'm working from the same tutorial. What did you change the AVRDUDE_PORT in the makefile to in order to get the chip to talk via USB? I've tried USB, LPT, and COM. None of them work. I have the driver installed.
Hmm, can't help you there. I kinda skipped the makefile stuff. Originally I did work directly through AVRDude, compiling and uploading code. Even then I avoided makefiles. Lately I've been using the Arduino IDE's "Upload using programmer" feature. Checks, compiles, and uploads in one fell swoop. Are you getting an error from AVRDude?
On Mac OS X using AVRDude from within Eclipse (with AVR plugin and CrossPack-AVR) works like a charm, no driver needed! Just plug and go. On Windows XP Eclipse (with WinAVR), you need to install the driver. But I first got an error where it couldn't find the USBTiny. If I unplug and replug the programmer, it works for a while. Then it won't find it again. A simple unplug-replug will make everything work again. Haven't tested under Linux yet. Overall I love it, with the unintrusive small form factor, has both ISP plugs, and target power. Makes things so much easier!
I also recommend to upgrade the firmware in this thing to V1.6 which seems a bit faster and gives a lot less verification errors. The new package can be found here: http://dicks.home.xs4all.nl/avr/usbtiny/ (program the .hex file from the usbtiny-1.6\usbtinyisp folder).
You can easily turn most avr into a basic programmer to update your PocketAVR via the "Not ISP" ISP header.
Is there actually any use to JP1? When I look at the Eagle files it seems as if it's always "closed" anyways.
Sorry if this is a stupid question but i have the avr programmer driver installed n everthing but i have a question
How do i burn the arduino mega 2560 bootloader back to the arduino using winavr just incase i modify the bootloader?
I purchased this to program some ATTiny2313s. However, I don't see how to program it with this programmer, as the socket on this cable does not match up with the pins on the ATTiny2313. How do I use this cable to program it? edit- sorry, looks like I got SOIC package ATTinys, which is new to me. My mistake.
This programmer worked flawlessly for me, using Ubuntu 11.04 and the avrdude method to burn an Arduino Uno bootloader. One little note: you have to be in super user mode, so the comands are:
sudo avrdude -b 19200 -c usbtiny -p m328p -v -e -U efuse:w:0x05:m -U hfuse:w:0xD6:m -U lfuse:w:0xFF:m
and
sudo avrdude -b19200 -c usbtiny -p m328p -v -e -U flash:w:optiboot_atmega328.hex -U lock:w:0x0F:m
I don’t know how to tell the Arduino IDE to issue an external command in super user mode, so I can’t use the IDE to burn. However, now that I got the command line method working (3 minutes after unpacking the programmer), I prefer the flexibility of specifying the hex file anyways. Great device. Previously, I spent two weeks trying to burn the bootloader with the “Arduino as ISP” method, but with this device, it worked right away.
I am able to get this hardware to install on my Win7 64bit, but as far as actually using it with the Arduino software, no luck.
It doesn't show up as a COM port, and using Arduino 1.0's "upload using programmer" gives me errors such as:
Can anyone who has actually used this device with the Arduino software, please post a video of the full usage? Uploading directly to any atmega chip.
That would help me a lot, and I'm sure many others out there that are at my not-expert level :)
have you checked the tutorial?
http://www.sparkfun.com/tutorials/247
yeah, but the problem is that the AVR programmer doesn't show up as any COM port for me
Not sure if you still need help but... in Arduino 1.0 you need to choose USBtinyISP as the programmer. Also make sure that your libusb is loaded correctly. I created a custom inf with the latest libusb drivers and the programmer is working fine for me.
If you still need help I can make a Video of the full installation...
A video would be nice. I can't seem to get this thing to work. I've even tried swapping a chip out of an Arduino that works just to use that as a platform for burning a bootloader, with no success.
Did you ever get this going?
No, it seems to have issues. I've been using an Arduino to do all of my AVR programming.
What happens if you try to upload without plugging in the programmer? I'm thinking it's finding the programmer, but not the chip. My first mistake was thinking that the diagram of the connector on the programmer schematics was looking at the face of the connector. I finally made some progress when I realized it's actually a diagram of the male connector. (So it's mirrored). The other thing that gave me that message was the "power board" switch. Also got it trying to use the upload button instead of the "Upload using programmer" menu option, or shift+upload.
Way late, but: I got it working by not using the cable. I used Female to Male hookup wires and hooked it up via This guide. Using an Arduino to do the programming was alright, but I proke a chip's pins and ended up making it permanent to the Arduino. I'm curious if buying a new cable will fix the issues?
I needed this to program the smd simon. I spent three days trying to get it to work. If not for two comments in this section I never would have. 1- use b 32 not b1 and 2 type -patmega328p not -patmega328. It worked great after that but I still could not find any disciption on what the lights or jumpers mean. Use the no power switch and power the simon by battery.And finally if it still does not work switch the cable around on the simon board. Man I sure learned alot though. Now to program in a debounce for the buttons.
The only thing I'd change with this thing are the LEDs, which in my oppinion are way too bright. It actually hurts my eyes looking at them...
This is a great little tool for programming AVR MPU (or others) after they're wired into a circuit. It would be nice to have a 3.3v version of this or an in-between board that would convert the power and signals to 3.3v. Some circuits I've built do not have 5v tolerant parts.
Even better would be one that supports 1.2V, 1.8V, 2.4V, 3.3V, and 5V. A little header with jumpers to select the resistors used for an adjustable regulator could do the trick. That might be cost prohibitive prohibitive though.
noob question: can this avr programmer be used with an arm7 chip? why or why not? is it just a matter of the pin-outs being different, or are there other reasons why? I apologize if this a stupid question
After beating my head against the wall for a while trying to get this to work under Windows 7, I finally got it working. Brief write-up here:
http://falconmade.com/Wiki/index.php?title=Using_the_SparkFun_Pocket_AVR_Programmer_under_Windows_7
will this program 3.3v boards? i have a bmp085 and rn42 connected to my mc and don't want to fry them...
Just a stupid thing, I've tried the command above and it does not work, I think -p flag is supposed to be m328p for Atmega328, not "atmega328".
Does anyone know if this Pocket AVR Programmer is compatible with Atmega48PA? Would like to know before buying it...
yep, it should work for any AVR device. (SHOULD)
I get
shippo0708$ avrdude -c usbtiny -P usb -p m8 -B 1
avrdude: initialization failed, rc=-1
Double check connections and try again, or use -F to override
this check.
On Mac 10.7
I have CrossPack, Arduino 0022 and xCode installed, tried with and without a board connected to the programmers ISP pins
recently I bought my first mac, please switch to "no power" in your Avr Pocket Programmer, off course you should power your arduino board and voila you can now upload your program.
Just started using this w/ a Mac: no drivers required to burn Arduino bootloaders from the Arduino IDE (when selecing USBTiny from the "burn bootloader" menu).
tutorial for use with ATMega328P:
http://justpushbuttons.com/blog/?page_id=103
There's no installer with the driver. Is that right? I can't install it.
BIG news: I was having all sort of problems with this until I connected to a USB-HUB, now it works perfectly.
I've written a nice piece of software to make using AVRDude easier. It uses a gui to generate the dos code.
https://sourceforge.net/projects/avrdudeassist
100th
I am working in a Windos 7 -64 environment and am trying to program a AVR-net-io board with a (replaced) ATMEGA1284P.
* I could successfully install a driver from here:
http://ladyada.net/make/usbtinyisp/download.html
* I have successfully changed chip erase delay in avrdude.conf (version 5.10) to 55000 as described here
http://www.robotmarketplace.com/products/images/0-PL1325_user.pdf
Command is:
avrdude -c usbtiny -B 1 -p atmega1284P -U flash:w:NETIO+.hex
* Erasing and writing works, but I get a verification error, first mismatch at 0x10000
Any ideas? has the chip worked for anyone?
Thanks, tfv
Some results:
* It does also not work with option -B 32 and without B option
* It seems to work fine with a smaller file
My assumption is that the file size is limited to 0x10000, but I need to write 68168 byte.
Is it correct that the programmer will not work for flash sizes above 64k?
Can anyone confirm that this programmer can be used with AVR Studio?
Never mind, found all the info I needed right here. http://ladyada.net/make/usbtinyisp/stk500compat.html
On an unrelated note, I was using AVR Studio 5 to write some code to multiplex a 4x7 segment led using C. The funny thing is, in AVR Studio 5 the hex file is over 8 KBytes while the exact same code in AVR Studio 4 is 838 bytes. The developmental tools including in AVR S5 are great and really makes coding 'fun' but on a microcontroller, bytes vs Kbytes is a big deal.
Let me get this straight: this device, USB Mini-B cable (CAB-00598) and an AVR programming cable (DEV-09215) will do? And then I just plug the programming cable to the correct IC pins in-circuit?
Has anybody tried it with an ATTiny2313?
Yea, you are correct, it does come with the programming cable. It does Not come with a USB Mini-B cable though. You'll have to buy one. And yes, that is what you do - just plug in the cable to the correct pins in circuit (after installing the usb tiny isp drivers) and use avrdude to program.
I successfully programmed an ATTiny2313. You are good to go.
Thanks!
I'll answer myself one of the questions: according to the description and the photos, the AVR programming cable (DEV-09215) is included.
Quite a bit slower than the Atmel AVRISP mkII it is replacing (fried it, oops!). Works fine though. For half the price a good value.
The programmer worked as a USBTiny for me with avrdude. I sent a .hex "Blink" file to my POP-BOT and doing so erased the Bootloader!
No problem! I re-installed the bootloader .hex file using the same programmer (with avrdude) and my POP-BOT is an Arduino based device all over again!
(Normally, uploading a .hex file written in Basic or C using "POP_Loader" directly over USB doesn't disturb the bootloader.)
For os x 10.6 users these flags work avrdude
"-c usbtiny -P usb"
Also, the programmer will NOT show up in /dev as a serial device.
good luck
avrdude: initialization failed, rc=-1
Double check connections and try again, or use -F to override this check.
I get this error in Linux and Windows x64. Any known ways to fix this?
Finally!!! Set the -B switch to 32 and it started to work. The board works fine in Linux too!
avrdude: AVR device initialized and ready to accept instructions
Reading | ################################################## | 100% 0.02s
avrdude: Device signature = 0x1e950f
avrdude: safemode: Fuses OK
avrdude done. Thank you.
I am hoping this could be used in an emergency to reinstall the Arduino Bootloader on a ATmega 168 based POP-BOT (A robot kit on this SparkFun website).
(I don't need to do this yet, but it would give great peace of mind!)
is it possible to communicate with your computer using the usart with the 10 pin connector
Can this AVR programmer be used stand-alone to flash a program to an ATMEGA168 using power from the target, without being plugged into a PC (or laptop)? It's not clear to me. Thanks!
Also, unlike skatefriday, I find this programmer to work great every time. Highly recommended.
Linux users: You can use this programmer by installing the drivers in a Windows virtual machine (I use VirtualBox and it works great - follow these instructions to pass the USB device to the guest OS: http://www.howtogeek.com/howto/31726/mount-usb-devices-in-virtualbox-with-ubuntu/). You'll need to find a copy of a Windows installation though. For Windows 7 64-bit, use the solution provided by BeagleBoy above.
Sounds to me like Linux is the easier of the two...... but that's cool, whatever floats your boat.
I have this programmer but would not recommend it's purchase. It's extremely finicky. Sometimes it works and other times it fails to initialize. There seems to be no pattern to when it works and when it does not. I wish I had saved my money and just gone out and bought the Atmel programmer.
Updated. I have this programmer and it's finicky if you use it in the manner described by the tutorial with wires pushed into the IDC connector. If you actually fashion a proper header on your board so you are always get good contacts it works pretty well. ON WINDOWS XP. I would not recommend it's purchase if you use Windows 7 as SparkFun apparently refuses to put any effort into Windows 7 driver support.
Hello,
I just received this Pocket AVR Programmer and I am having difficulty burning the bootloader to either an ArbotiX (atmega644p) or an Arduino Uno under Windows XP SP3. In both cases I get the error:
avrdude: initialization failed, rc=-1
Double check connections and try again, or use -F to override
this check.
Both boards use the 6-bin ISP header and it doesn't make any difference which orientation I connect the 6-pin end of the included cable or whether I have the power switch set to "Power Target" or "No Power" (with external power to the board). I installed the Windows Driver linked to above and the board seems to be recognized OK. I also installed WinAVR and the Arduino IDE (version 0022) and I get the same error whether I use the WinAVR command line or the Arduino bootloader menu item. At this point I am dead in the water. Any thoughts?
Thanks!
patrick
Same issue here!
How can I cable this board to an STK600-Atmega128RFA1
I cannot find any documentation and no software, etc
Has anyone programmed the atmel ATMega128RFA1-EK1 boards to talk (to one another, etc)?
Thank you!
"libusb0x64.dll and libusb0x64.sys" should be "libusb0_x64.dll and libusb0_x64.sys".
So specifically can this be used to burn the bootloader to a ATMEGA1284P DIP on a sanguino PCB via the ICSP socket on the Sanguino PCB..
interested woud be 1284 burners want to know...
I'm confused. What connects to the other end of the cable if all I have is the chip to program and it's not in anything? Is there additional hardware I need to put the chip in that connects to the cable?
You would need to built it up on a breadboard or something. You may want to look here:
http://www.sparkfun.com/tutorials/93
Can this product be used for anything that uses ICSP? Meaning, if I were to buy this cable that has the 10-pin and 6-pin headers, could I program both the AVRs and anything else that uses ICSP? Thanks.
It come with that cable so you don't need to get one separately.
Does anyone have any experience with the slightly arcane com0com/STK500 port bridge [http://www.ladyada.net/make/usbtinyisp/stk500compat.html, "...this software is in alpha."] approach to using this little whiz-bang with WinStudio?? Lot's of references to "..it should work.." and detailed directions from LadyAda, but it would sure be nice to have some reports before this geek gets in deep water (can't find much on the forum).
Would it be possible to get a 1MHz clock output on one of those spare pins to make available for clocking AVR chips that need it? (Like when 'fuses' get accidentally set such that the in-circuit oscillator/Xtal doesn't run.)
That would be super handy.
For the record, I've been using this programmer on Mac OS X 10.6 (Snow Leopard), using CrossPack (http://www.obdev.at/products/crosspack/) and AVRDUDE (http://savannah.nongnu.org/projects/avrdude/).
It all "just worked" for me -- right out of the box. No Googling, no configuring. CrossPack includes the USBTINY drivers. It's just fine and dandy.
I do have one funny thing happening most times I program the EEPROM area on an ATmega64A -- some weirdo time-out/protocol error message comes up during the process. But it always recovers and completes the write without a problem.
I can't tell what type of USB connector is on the programmer. Is that a type A or type B? i.e. What cable is needed to connect this to a PC?
Looks like a mini B to me.
Just to be clear, does this think work on OS X 10.6? I'm seeing some "yes"s here and "no"s elsewhere...
Also, does this thing support the whole AVRISP command set? The reason I need a dedicated ISP is because ArduinoISP doesn't support the commands AVRdude uses to tell the programmer to "slow down" for micros running at low frequencies. Does this thing have low frequency support?
I've tested compatibility with all of the ATTinys listed on the AVRdude list, the ATMega644p, and the ATMega168p.
Thank you very much. I am going to buy this to program Atmega644-20PU.
I have had no luck with this programmer with BitCloud on the atmega128rfa1. So if you plan to do any programming with the atmega128rfa1, this is not the programmer to use. See my posts in
http://www.avrfreaks.net/index.php?name=PNphpBB2&file=viewtopic&t=100752
for more info.
Can this be used for the Beginning Embedded Electronics Tutorial instead of the parallel port programmer? I want to use my laptop's USB port -- it doesn't have a parallel port or serial port. Is there a better solution?
Does this connect to AVR Studio, or do you have to use avrdude?
i cant run the windows driver on windows 7,it thinks its a security catalog.<br />
help
Hi, i install the drive but 'AVR Pocket programmer' not appears in COM ports in device menager, it's in 'LibUSB-Win32 Devices' <br />
I can't select the com port to send the hex file...<br />
What i do (im noob =/ sorry)?
Hi. Can this device be used as a SPI slave to log communication?
Can i use this to send the work of Jordi Munoz (AHRS karlman... etc) to the "9 Degrees of Freedom - Razor IMU - AHRS compatible ATmega328" http://www.sparkfun.com/products/9623<br />
???
Yes, but you can just use an FTDI as the 9DOF already has the Arduino bootloader.
by d way hw dd u burn d code on smd ATiny, for quite long time i m looking for SMD IC programmer and programming socket.
Ok, <br />
1) i buy this and the 9DOF.<br />
2) i use arduino to burn bootloader in 9DOF. Need?What (w/ AVR isp, w/ AVRISP mkII, w/ USBtinyISP, ...)?<br />
<br />
3) i put the program in 9DOF (AHRS).<br />
<br />
Thank you very much.
I was doing the HelloWorld example from http://my.opera.com/CrazyTerabyte/blog/2007/10/25/first-contact-with-atmega8-microcontroller-part-1 and the Atmega8-16PU would not flash with the "-B 1" flag. Is it used only when using an external crystal?<br />
<br />
And could someone please explain the "Power Target" switch? Which setting is to supply the circuit and which setting is to use external power source?
Is this compatible with the PonyProg software?
We've not tried the two together. If you do, let us know and report back.
Is there OSX support?
Works great on OS X 10.6
Can you use the ATtiny cores @ http://code.google.com/p/arduino-tiny/ and use the Arduino software to program ATtinys?
I was having problems with Windows 7 and using a Virtual Machine (Fedora 12) on getting this to work. I then turned to my MacBook Pro (Snow Leopard). I already had Xcode installed so I just installed the CrossPack AVR (latest version) (http://www.obdev.at/products/crosspack/download-en.html).
I followed the Getting Started tutorial and modified what I needed to modify and it worked flawlessly! I was programming an ATtiny85.
If you have a Mac (Leopard or Snow Leopard) get Xcode and this to program your AVR. I can give more info on this if requested.
I'd like more info, please - newbie here w/Macbook Pro OS X.6.7, attempting to program an ATTiny13. So, I need CrossPack, Xcode, and this programmer?
Basically.
Make sure you're good with CLI (Command Line Interface). Also, make sure you have the pins going to the right places, or it won't work.
I'm usually on IRC with this handle, so if you have any problems, just message me there.
can i use this to program the ATMEGA128?
any AVR microcontroller with a In Circuit System Programmer (ICSP) or In System Programmer (ISP) port can be programmed with this.<br />
<br />
iirc, every AVR has this funtionality.
i don't think some of the miniscule ATtinys can (ATtiny4, 5, etc.). But nobody wants them...
I read one person's comment that with the download from usbtiny website it should work with AVR Studio. I am thinking about getting it and would like to know for sure if will.
Hey
I just bought the AVR programmer and I'm trying to figure out how to wire it to the Serial Controlled Motor Driver
http://www.sparkfun.com/commerce/product_info.php?products_id=9571
using the broken out pins of the Atmega 328P chip so that I can make changes to the firmware.
The broken out pins on the motor driver are GND, 5V, ADC 7, ADC 6 PC 5, PC 4. Which pins correspond to the Programmer?
Thanks.
you can use this program for to programming avr with avrdude ! agraphic user interface .
dowload here:
http://yuki-lab.jp/hw/avrdude-GUI/avrdude-GUI-1.0.5.zip
information :
http://yuki-lab.jp/hw/avrdude-GUI/index.html
I bought from you a AVR pocket programmer. I do not understand however what the Power Target and No Power switch settings mean.
Are these settings to receive (or use) power FROM the target or to give power TO the
target?
Also it is not clear which voltage I have to connect to PIN2 of the 10 pins ISP progamming header when I am powering the target with a 3.7 V Lipo battery. My at90usb120 MCU on the target, which need to be programmed, runs at 3.3 Volt. Or can this PIN 2 be left unconnected?
I am looking forward to your answer.
For technical support, please contact techsupport@sparkfun.com. Thanks.
Hi there,
Does anyone know if this Pocket AVR Programmer is compatible with the Arduino IDE?
I would like to use it to burn the bootloader onto an ATmega328 chip through the Arduino IDE. Is this possible?
Thank you,
GTMEstudent
Yes, it's compatible with the Arduino IDE.
I installed windows driver successfully on both windows 7 and XP. None of them shows the COM port. I don't know how to get Arduino IDE work without specify COM port under "Tools->Serial Port" menu. Thanks!
I figured out myself by choosing "w/USBtinyISP".
Would be ideal if it worked with 64-bit Windows, but because the driver is unsigned it can only be used with 32-bit versions of Windows. I've used it to program several ATTiny13s and it worked perfectly, but I have to copy the .hex files over to my 32-bit netbook every time I want to program. Highly recommended if you use 32-bit Windows. But if you have 64-bit Windows, you should avoid this product since the driver won't work on your computer. Don't be fooled by the 64-bit driver that you see in the ZIP file. It is unsigned and therefore won't install on Vista x64 or Windows 7 x64.
Agreed. I posted this on the recent new products announcement with no response, so I'll post it again here so people know:
Is there any improvement to the driver situation for the pocket programmer? It is really tricky to get working on my windows 7 x64 computer, and that's the most common configuration shipping these days!
You guys really ought to make it more clear that it doesn't work as well as you guys say. There is an enormous thread in the original product's comments about all the trouble people have had with it:
http://www.sparkfun.com/commerce/product_info.php?products_id=9231
Its cute and all and I can imagine it being great if it works, but since Win7 x64 is the most common new PC on sale today (and I got mine a year ago), you guys ought to mention something about it!
I actually had to abandon mine and use the AVR Dragon because i couldn't get this thing working reliably!
-Taylor
If you Google around there are instructions on how to install unsigned drivers on Windows 7 x64. That's what I did and it now works perfectly fine. If I find the exact instructions again I will post them.
We are working on it. Thanks for the link. We will post an update when we have one.
I like the "ISP" and "Not ISP" labels.
However, I do not like the fact that you've chosen not to break out 5 pins on the ATTiny. These could be useful, especially if 3 pins could be borrowed from one of the other connectors. Don't just leave them there. At least give us some vias or test points to solder onto!
I agree, a few broken out pins wouldn't hurt.
It works like a charm with Eclipse + AVR Dude.
But it should work with avrstudio too. There is a download link on the usbtiny website
so umm... "This new version uses an SMD 5x2 header" looks like it is still a through hole connector to me?
any other changes other then the silkscreen being fixed for the pin out of the connector?
was the target power fixed on the buffer?
The picture hasn't been updated yet. The only change is the header. It's simply a production change.
So no fix to the USB problem? From the comments on the item page for the old item of the board it seemed like the problems people were having with the device's USB connection were electrical in nature (a voltage issue as I recall), and occurred in some cases on all OSes...
I have found one problem with the programmer. If you plug the programmer into a USB port while it is connected to a circuit with the 'power target' switch set to on, no USB connection is made.
Found a Windows 7 fix that works:
http://andrewbrobinson.com/2010/05/31/avr-pocket-programmer-under-windows-7/
This did not work for me.
Just found this today... hope it helps: http://mightyohm.com/blog/2010/09/fixed-usbtinyisp-drivers-for-64-bit-windows-7