- Home
- Product Categories
- Robotics Kits
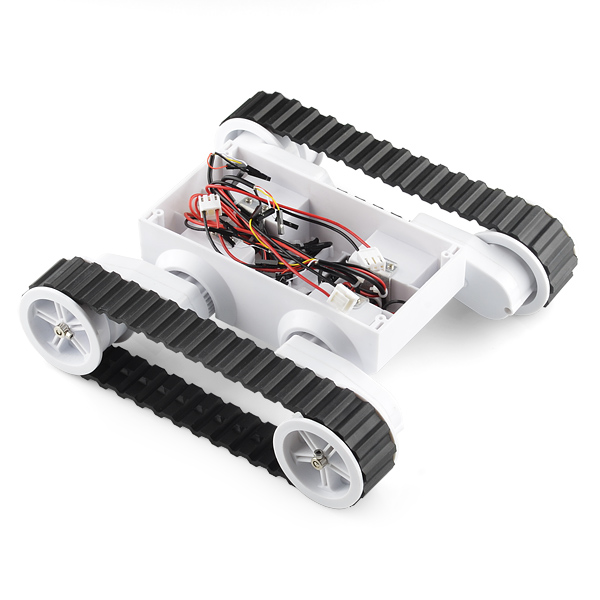
- Rover 5 Robot Platform

Rover 5 Robot Platform
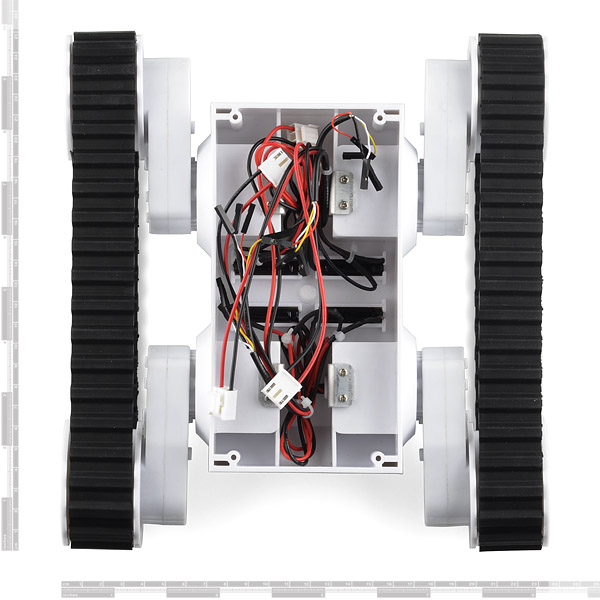
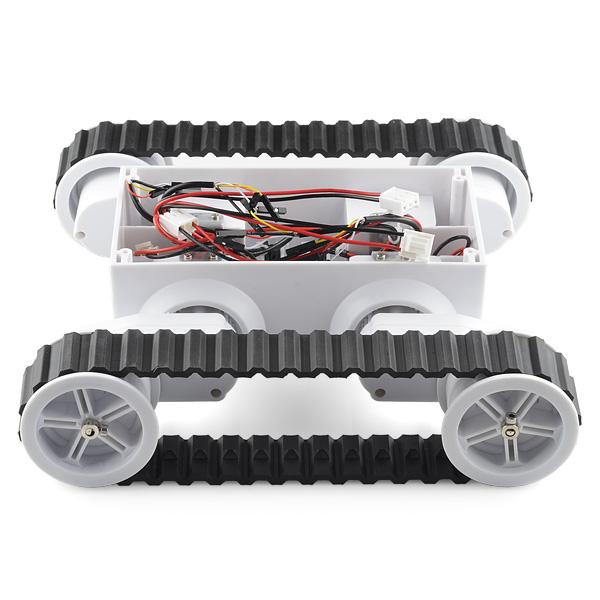
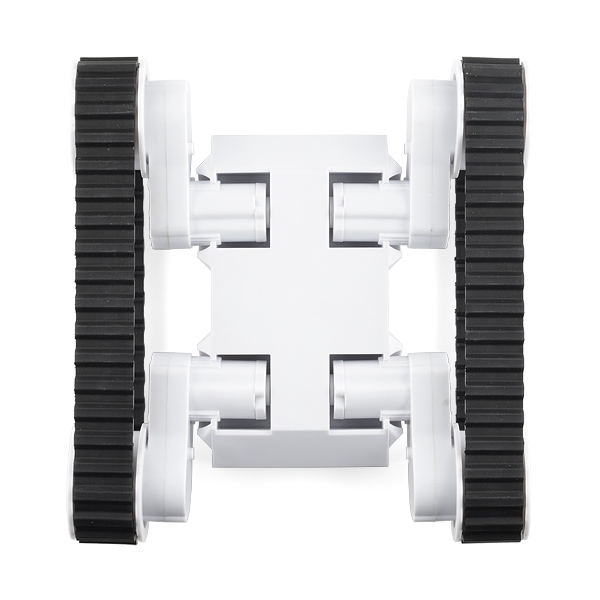
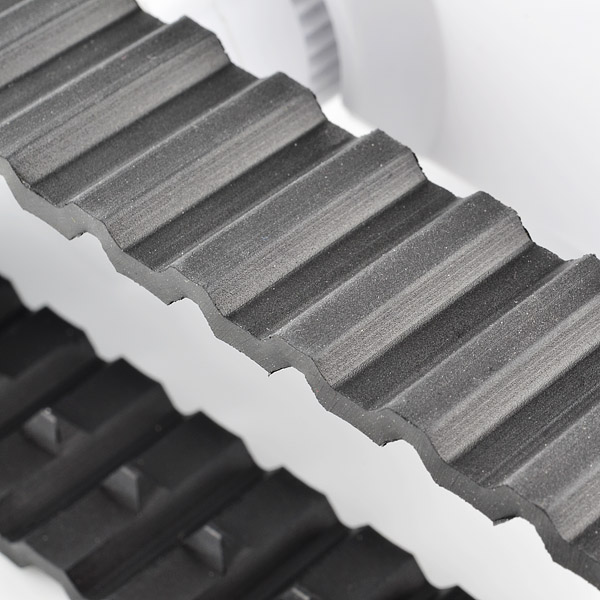
If you're looking for a chassis base for your next robot, look no further than the Rover 5. The Rover 5 uses 4 independent motors, each with a hall-effect quadrature encoder and gearbox. The entire gearbox assembly can be rotated at 5 degree increments for different clearance configurations. You can even replace the tank treads with traditional wheels.
This isn't a wimpy or flimsy robot base. Weighing in at over 2.5 pounds without batteries, this base is heavy duty and can drive over quite a bit. Check the manual below for dimensional drawings.
- Adjustable gear box angles
- 4 independent DC motors
- 4 independent hall-effect encoders
- Thick rubber tank treads
- 10Kg/cm stall torque per motor
Rover 5 Robot Platform Product Help and Resources
Core Skill: Robotics
This skill concerns mechanical and robotics knowledge. You may need to know how mechanical parts interact, how motors work, or how to use motor drivers and controllers.
Skill Level: Rookie - You will be required to know some basics about motors, basic motor drivers and how simple robotic motion can be accomplished.
See all skill levels
Core Skill: DIY
Whether it's for assembling a kit, hacking an enclosure, or creating your own parts; the DIY skill is all about knowing how to use tools and the techniques associated with them.
Skill Level: Noob - Basic assembly is required. You may need to provide your own basic tools like a screwdriver, hammer or scissors. Power tools or custom parts are not required. Instructions will be included and easy to follow. Sewing may be required, but only with included patterns.
See all skill levels
Core Skill: Electrical Prototyping
If it requires power, you need to know how much, what all the pins do, and how to hook it up. You may need to reference datasheets, schematics, and know the ins and outs of electronics.
Skill Level: Rookie - You may be required to know a bit more about the component, such as orientation, or how to hook it up, in addition to power requirements. You will need to understand polarized components.
See all skill levels
Comments
Looking for answers to technical questions?
We welcome your comments and suggestions below. However, if you are looking for solutions to technical questions please see our Technical Assistance page.
Customer Reviews
3.3 out of 5
Based on 3 ratings:
3 of 3 found this helpful:
I Love this chassis
Using this chassis is fun. It was easy to hook up. The only problem I face with it is the tracks keep coming off, but otherwise it works great. Here is a cool project i built with it https://youtu.be/LcFL2Xf_sUM
2 of 2 found this helpful:
Great Cost/Benefit Ratio
It's hard to find a chassis at this price with as much support. It's no space grade chassis but it is great for testing code and playing with sensors. Little loose in the gears, and the wheels still got toe-in from the clearance combines with the tension of the tracks. Still works great for prototyping.
tracks keep coming off
nice concept, but the drive wheel pods aren't perfectly aligned (tension from track bands pulls wheels out of alignment. Tracks slip off during a turn on the carpet. I upgraded mine to 4 motors and mecanum wheels. Works well but there are simpler solutions for a mecanum platform. encoders, gearboxes and motors seam reliable in short to mid life testing.
What would it take to waterproof this rover? I only need to submerse it in about 5-6in. Would it be possible with some kind of silicone gasket to seal the housing?
The Rover 5 motor driver board is retired ?
What would be a good choice to use instead, trying to build an edibot ?
Any leftovers lying around ? :)
The Monster Moto would definitely work. The Serial Controlled Motor Driver should work and would also take the place of the Arduino Block for the EdiBot.
What type of conector is used for the motor's?
I've finally figured out how to keep the treads from coming off! I have some pictures of the process and videos in this thread.
Here's a direct link to the YouTube video.
I'll be posting the Propeller chip source code, used to control the Rover 5, in the above thread soon.
If this comment and links are helpful, click the star to uprate it (so it's not lost in the sea of comments).
FYI, apparently DAGU is switching to hall-effect encoders, rather than optical. Don't freak out when you open the motor case and don't see the black&white encoder wheel on the gear (like I did for about 5 minutes just now)! They say the user shouldn't notice the difference, but I thought it should be put on here in case anyone else opens their motor and notices the absence of stripes!
So do the hall-effect encoders have the same number of pulses per revolution? It would be really nice if they could increase the resolution of the encoders. As it is, it's hard to monitor the speed of the motors (but doable). Monitoring the speed is important for driving Mecanum wheels (Vex's are much better than Fingertech's).
BTW, Controlling a Rover 5 is a great reason to use a Propeller chip as a controller. The Propeller doesn't have a problem monitoring all four quadrature encoders, powering the motors, receiving RC pulses and monitoring sensors (all at the same time). Here's a link to my Mecanum wheeled Rover 5 project.
Does this need a separate driver board, or are the motor drivers included? EDIT: Should have finished reading the comments before I posted
I had it on my wishlist. But now is out of stock :( How long it will take to be available?
hi there sparkfun! last wednesday i won one of the 100 dollar prizes and immediately thought about one of this awesome robot platforms... i have the autonotification for this product, but there´s any idea about when it´s going to be available? THANKS FOR ALL GUYS!YOU ARE THE BEST
Sparkfun Rocks!
+1 I am also hoping these are in stock soon. I noticed everyone else that sells them have them in stock. Any idea when? Have more been ordered?
There should be a four-wheel omni-wheeled version of this. That would be so cool.
Wow that didn't last long, less than a week on the market and SOLD OUT.
What size motors are they, exactly? Smaller than J250?
The quoted 2.5A stall current is per motor, right? So actually for each tread you have two motors...
It looks like the tension from the tracks is eventually going to cause stress problems on the legs unless its counterbalanced. They're already bowing inwards in the lowest clearance configuration. The small teeth which appear to hold the legs in place look like they're going to get the brunt of the force.
I see what you're saying about the tension of the treads tweaking the arms. My guess is that you'll get your 60$ out of it before any serious breakdowns. I think it's a great value for what it is.
Sparkfun, Can you verify that this model really has 4 motors and 4 encoders? I ordered one from another vendor a few months ago and the model they shipped had 2 motors and no encoders. They had used boiler plate description text from the OEM, but the model they were selling was different. They did send me two new motors with encoders, but I still don't have 4 encoders as originally advertised. I have seen models where they have 4 motors, but only 2 encoders - so please verify. I will want one or two more of these.
It comes with multiple configurations. Ours has 4 motors and 4 encoders. I promise :-) Check the homepage post today, we played with it pretty heavily.
Great! Thanks for clarifying!
Another common programming method for the quadrature encoder is to have a state change interrupt monitoring A
When the interrupt is activated:
If A is high we have a rising edge and proceed, else we end here
If B is high, the position in incremented
If B is low, the position is decremented
This code has been tried and tested on an arduino monitoring 7 encoders
I've done this also. It works a champ.
Also note another method in Dagu manual with more details, including encoder wiring here
We used this chassis as part of a robotic project. It is nice but lacks some basic documentation on how to connect it (for us newbies). So, yes you need a separate motor driver stage/shield (we used the Pololu DRV8835-based shield) and w.r.t connections, the red/black wires attached to the big white connectors are for the motors (they are feed DC current by the motor driver) and the other colored cables (smaller header-like connectors) are for the encoders (for each, 2 to power the encoder, 2 to get its signals). I think it would be nice to mention that at least in the product description.
Hey All
I have been working on a step Climbing Robot group project for an Engineering Design Course am taking at University. Just will like to share my progress so far. https://youtu.be/hs1b7qU134s
For those who asked, here is a quadrature encoder tutorial I found. I hope this is what you were asking about: http://letsmakerobots.com/node/24031
Is Pololu the only place selling expansion plates for this chassis? Can you guys make and sell some? The only thing keeping me from buying one is that I'll quickly run out of room for expansion. Thanks
Howdy... I got this rover a while ago, March 2012, and finally thought I was ready to test out the encoders... However I cannot get the Encoders to work, I supply 5V to the Red wire, ground to the Black and then input the white and yellow to my encoder input. After a while when I could not get it to work with my propeller board, I hooked it up to my oscilloscope to check the outputs and there is none, 0v constant... I tried a 10K pullup to 5V, still no pulses... Then tried the other 3 encoders, they seem dead as well... Did I miss something or does it look like all my encoders are dead ?
If I buy the 4 motor version can I remove 2 of the motors in order to use a single L298 controller? Later on I'd like to switch to using mecanum wheels so I'd need 4 motors then.
Has anyone else noticed that the output from the encoders seem to be a bit of a mess (at least my encoders are). I looked at the signals on a scope and found that the two signals don't overlap correctly. I uploaded two excel files with the data for two traces (one for each direction of the motor) and you can find them here:
http://gabytest.com/download/Forward-64.xlsx http://gabytest.com/download/Reverse-64.xlsx
For example if you look at the Forward-64 trace, you will see the the rising edge of the red trace sometimes comes before the falling edge of the blue trace and sometimes after. This inconsistency seems to make it impossible to interpret the streams properly to determine the direction.
Has anyone else experienced this?
Can someone please help? I have looked everywhere for a tutorial, guide, or clue on how to use this. I have this and the dagu motor controller board from SFE. How do you wire this? Or can you please point me in the direction of a good tutorial? Thanks so much :)
I'm pretty bummed that I bought this product (along with the driver.) There is a well-known design flaw that causes the treads to slip off. Representatives from Dagu said there is a new design on the hubs but the model I received from Sparkfun had those hubs but the treads roll off no matter how I adjust the unit.
Alternatives I've been looking at are from Tamiya, Pololu, Orion Robotics & Lynxmotion. I haven't purchased any of these yet so YMMV.
I just got one of these platforms with some mecanum wheels. Unfortunately, it appears that the wheels won't fit onto the motor shafts. Are they supposed to fit or do I need to bore out the hubs on the wheels?
The mecanum wheels need to be drilled out to 4mm diameter. The mecanum wheels are not designed specifically for this chassis, they are simply the right size.
Does anybody know of a better resolution encoder that may fit this platform
dose this need motor controllers... ?
I'm a newbie here but what are the hall-effect encoders for?
To allow you to measure/control wheel rotation.
Hi, on motor's manufactures website(http://www.tecoelectric.com/images/spec_sheet/tf_series/TFK280C.jpg), specs are saying that it runs on 12V!!!!! and not 7.2 V! So, is the datasheet you provided for DIFFERENT motors than those inside Rover5?
some instructions on adjusting the height would just be fantastic if that isn't too much to ask of sparkfun
I know it's a little bit late, but for future users: I have copied the following:
from here.
You need to remove the metal "L" bracket from inside the Rover 5. There's a "U" shaped notch in the bracket that holds the gearbox in place. Once the metal bracket is out of the way, the gearbox may be pulled out from its "hole" and rotated to the desired position.
Reverse the process to put it back together.
HobbyKing is selling these (without the quadruture encoder) for $25 : http://www.hobbyking.com/hobbyking/store/uh_viewitem.asp?idproduct=26273&aff=415634
yes but shipping is almost 20 bucks
I am planning with to make use of this chassis but how is this thing being controlled? please some one help!
Somehow the magic smoke came out of my motors. Do you know where I can find replacement motors without having to purchase a whole new kit?
How is this working for you. Do you regret the purchase (except for the smoke)? What motor driver are you using. I was hoping to use the arduino mega but seems like i would need a driver board too. Have any pointers? Good luck on the motor replacement. I think the manufacturer is in the UK.
I just got this platform but one of the motors is VERY noisy, like a scratching sound. I guess it comes from the gearing itself and I am unsure if it will affect the performance? All the 3 other motors sounds fine. What can I do?
Just purchased one of these in prep for 2013 AUV at Spark fun next year:) Hopefully getting started now gives me enough time to get something in shape to participate:)
I just bought this, in July 2012, and was disappointed to find that the wheels are permanently misaligned. It's as though the plastic deformed under the load of the stretched tracks, while sitting in the box for ages. With the tracks on, each side toes out about 4.5 degrees. If you take the tracks off it drops to a bit over 2 degrees. The effect is that the tracks or wheels are forced to skid sideways when you want to go straight ahead, and one side or the other thus has to slip, probably chosen at random from moment to moment, so it can't be depended on to go straight. The encoders can't help this problem--they don't see sideways slips. Perhaps the body could be cut into quarters, and the quarters fastened together with an adjustable few degrees rotation to compensate, to align the wheels properly. Otherwise, the product sounded like a nice idea. Dave
yes i just purchased the rover 5 also and i noticed that lovely misalignment. mine keeps jogging to the left and the treads like to come off way too easy because of the misalignment. the seemingly impossible to find height adjusting instructions are a big disappointment also
I would like to know the maximum payload capacity of this platform?
http://youtu.be/GNgBcI7Ro5w
I now have two of these platforms. I've been using them to drive Mecanum wheels. I've been keeping notes on my progress here. Using feedback from the encoders helps a lot with driving Mecanum wheels. I attempted an autonomous figure 8. The Vex Mecanum wheels drive over the dinner plates with authority. I'm using a Propeller chip as the controller and a pair of L298N chips as motor drivers (these all work very well).
good afternoon acquired this platform and I'm doing a load moving in the same way I would like to know your exact voltage to move 10kg of torque because it moves straight movement but the movement and even has trouble working it is forced to 9V and 4A .
When will this be back in stock? I'm looking to use this as the base for a new robot build.
Also wondering if this will be in sock soon. Hoping to pick one up and rebuild my robot with this platform.
Ok I got one for Christmas. It is a good unit. question on the connectors for the motor current, are they the JST 3 pin type that will mate up with your sku: PRT-09750 JST Right Angle Connector - Through-Hole 3-Pin ?
I think that is too small look at this: http://www.robotshop.com/productinfo.aspx?pc=RB-Dag-55&lang=en-US
I think that is what I am going to get, too bad SFE doesn't carry it with this platform.
I'm looking for a prototyping board to put on top, what are the dimensions of the body?
Can you RC the rover 5 platform? Because I want to order one and RC it as a summer project.
just buy a servo signal compatible motor controller and a remote/receiver pair and that would be all you need. you could also buy some simple motor controller and program a micro controller to interpret the servo signals from the rc receiver and hook the micro controller to your motor driver or just buy the motor controller that they suggest for the 6wd thumper on this website with a built in atmega chip and an r/c code already programmed onto it
Just ordered myself one for my birthday thats coming up and can't wait to get my hands on it. Thanks Sparkfun.
Nevermind I found the link to the 4 motor drive board on that English site. Thanks for the link. Yes, sparkfun should sell that board if they're offering the 4 motor/encoder version of the Dagu Rover 5.
So what motor driver(s) should I get to work with this platform and my Arduino Uno board? Will you be selling any of these items at the upcoming Maker Faire in NYC in September?
can you use a li-po battery and which should I use + have link to product that can do this
I just got my Rover 5. It looks nice, but I ran into a problem. I removed the wheels from one side with no problem, but when I took the wheels off the other side, one of the drive shafts came off with the wheel. I did not apply any more force to this wheel than to the others. I cannot get the shaft to go back in, and I don't want to try to open the gearbox because that could get messy quickly.
Is there a simple fix for getting the drive shaft replaced? If not, I'd like to exchange this one for another.
No need for an exchange. The shaft is just friction-fit into the gearbox. You should always unscrew the set-screw when taking off the wheels.
The gearbox has 3 screws. If you undo them, it's VERY easy to get everything back together. Trust me, I've done with a couple dozen times and it can be done without a problem.
That's good news - thanks for the quick response.
$59.95 to buy it but the cheapest shipping option to Canada is $48.78!
I like it but it's just not worth paying nearly $50 to ship it.
Is a schematic available for the encoders? I'd like to try and make it work with 3.3v.
No sorry. But check the link above, it explains them pretty well.
Thanks. I disassembled it myself. R1 seems to be the key - it's the current limit resistor into two LEDs. 150 ohms limits the current to 20mA at 5v.
In the friday products video, they show this with the red monster truck wheels on. How well does it turn with those wheels on? It looks like they would fight against each other.
Not very well, but we didn't have enough power to drive it properly. it 'should' drive well with more powerful motor drivers and a bigger battery pack. we were drawing the max that the motor driver could handle.
How much power were you feeding to each motor?
I am considering putting two of your L298N chips on one of these (thus giving ~2A to each motor), but I am worried that will not be enough.
I'm using two L298N chips to control my Rover 5. I'm using a 2-cell 2,650mAh LiPo for power.
I didn't have very good speed control with my robot until I added feedback from the encoders. The motors are a bit under powered to drive the large Vex Mecanum wheels I'm using so the motors require almost full power to start moving slowly but then the power has to be reduced significantly once the wheels start to move (if you don't want turning at full speed). Without the encoder feedback, the motors were really hard to control.
BTW, the Vex Mecanum wheels work much better than the FingerTech Mecanum wheels.
How do I adjust the gear box angle?
I'm having a problem with the treads coming off when I make it turn on the spot. Is anyone else having this problem?
Same problem here. I hope someone could find a solution for this.
Where is the "simple" breakout board for power and the encoders? Do I have to cut all the wires?
Also... what type of plastic is this made from? Will it accept painting? Has anyone painted one yet? Sorry, I don't like white robot platforms...
Quick question.. does anyone see anything wrong with using the 2A dual H-bridge to control all 4 motors?
Woo Hoo! Finally got around to getting mine onto the workbench. That's a lot of motors and encoders!
First thing out of my mouth? Dude! Where's my docs? The way they shipped it kind of bites... the treads are at MAX preload on those poor plastic hubs. There was slight warpage.
Encoders: Red is 5V. No, it will NOT work right on 3.3V. black is ground, white and yellow are the encoders.
The screwdriver in the box? Wrong size. Do not use it on the screws on the robot. But! Perfect size for the screw terminals on the Cana Kit H bridge! The Cana Kit H bridge also has a 5V supply to run the encoders with.
I hooked one motor and it's encoder to a Arduino pro mini 3.3V and a Cana Kit H bridge and got some servo action going.
Oddly, I can't get the single motor to draw more than 250 mA of current (using 6 NiMH) That's with a PWM value of 255 and me trying to break the gearbox. Mt two Cana Kits are going to be in for light duty, it seems.
One odd detail, the encoders don't track with each other. I'm just connecting them to interrupts independently and counting the pulses separately, not using the quadrature feature. They SHOULD count at exactly the same rate, should they not?
I just received mine today (and the Mecanum wheels). I find the manual lacking.
How does one interface with the encoders?
If I were to guess, I'd say red=5V, black=ground, yellow and white=signal.
I'll email tech support but it would be good to have this information here.
I guessed correctly with the encoders. I opened one of the motors and the pcb was clearly labeled.
It's not clear from the manual, but you need to remove the metal "L" bracket before you can rotate the motors.
Another hint: Don't use the little screwdriver that comes with the kit. It too easy to strip the screw heads with it.
It's odd the the wires from the battery holder are much thinner than the motor wires. The battery wire will be carrying four times the current of the motor wires.
There are examples in the link above for the encoders.
I am working on a video for the robot platform to explain some of this, but it's not done yet.
So, you are done with the video? If so, please post the link.
unfortunately, this video never ended up happening. sorry :-(
The example doesn't show (that I could see) which wire is which. Red is frequently power and black is frequently ground but you can't count on this.
The encoder PCB was a little different on my robot than the one in the example. The newer (I assume) PCB has silkscreen labels for each of the wires.
I plan to control my robot with a Propeller chip.
If any of you haven't checked out the Propeller, I'd suggest you do. It's awful nice to have eight processors working together. It should help a lot with this robot since there are four quadratures to read, four motors to control plus any added sensor/weapons to monitor/launch.
I just finished installing (mechanically) mecanum wheels. It looks like this is going to be a lot of fun.
Robert, I look forward to your video explaining the robot. I always look forward to your Thursday videos.
Thanks! The video will come soon, but it's been busy around here. My assistant and I have worked with the robot a lot, and it can be a bit of a pain, but so can everything. With the mecanum wheels, read what I wrote in the "Note:" on them, it's VERY important.
Uhmmm... My first ever robot, just wondering what else I'll need besides a brain and batteries if I make this my base. help?
When will this product be back in stock? I'd like to buy one for a friend's present next month...
I've read the "manual", but can't seem to find a part number for the mating connector to the motor leads. Any ideas (besides cutting them off and putting on a known connector)?
The motor connectors are similar to the WM2101-ND (Digikey) which has a mating 3-pin 0.156 spacing male header for PCB mounting WM4652-ND . There's no free standing male connector for this series. Since the center connector isn't used, an easy hack is to take a 0.1 spacing polarized header (like PRT-08097), and pull out the middle two pins. This leaves a polarized header that fits the motor connectors and has standard 0.1 spacing for mounting to a protoboard.
I'd like to know the same info... I went to a huge electronics superstore but couldn't seem to find the right connector.
ok So this product is well great just got mine today except one problem. there are no pin outs on the servo wires and nothing on the site. Since I know Sparkfun had it running it would be really awesome if they told me what color wires for the servos go to what. however it is really nice that it comes with the right size tools even to change the configuration.
check all documentation above. the big wires are for the motors, and the 4 individuals are for the quadratic encoders.
In the description it says "4 independent servo motors" so I was expecting different connections too. Now I'm trying to decide what motor driver would work best with this or if I want to build my own.
I'm going to change that. It's motors with encoders, which is a servo. I'll change it so it's not confusing.
could you sell one with out the encoders. probably be cheaper
Is there a demo program available for the setup in the autonomous video?
ooOooh purdy.
What is the best motor controller for this platform?
I found this one. It's built by the same firm I think.
http://robosavvy.com/store/product_info.php/products_id/1573
@phobic -- Many thanks for the link to the 4 ch. driver board! Just saved me hours of aggravation and hair-pulling--not to mention over $100, too!
Features:
o Quadrature encoder XOR which doubles QE sensitivity
o Four (count 'em 4!) motor controllers -- no more buying twice the Dual Controllers.
o 4 outputs showing each motor's amperage @ 1V per Amp. No more BBQ'd motors!
I'm really surprised SparkFun isn't selling these boards to go with the robot base seeing as they're a perfect fit, not to mention they're made by the manufacturer of the chassis.
C'mon, SparkFun, I just bought 2, one destined for this robot base, and one more for another 4-wheeled, quadrature-encoded project I'm working on. I would have bought them from you had you carried them...now I have to wait while they're shipped over the pond.
Good fine, url is broken, but is here:
weburl
Grrrr....sparkfun is removing the underscores
Sparkfun REALLY needs to carry THIS controller (and sell the Rover 5 and this combined as a single SKU as well as both seperately).
http://www.dagurobot.com/goods.php?id=86
yes, dagu makes and sells what you need (circa $20-30 delivered, depending upon where you buy from)
until sparkfun starts selling this board themselves it's available from dagu (above) as well as the following places:
http://www.robotshop.com/dagu-4-channel-brushed-dc-motor-controller-5.html http://www.jameco.com/webapp/wcs/stores/servlet/Product_10001_10001_2150539_-1 http://robosavvy.com/store/product_info.php/products_id/1573 http://www.robotgear.com.au/Product.aspx/Details/555
Sparkfun, please add these boards to your inventory. it makes no sense that you sell the thumper chassis and thumper control board (which could set anyone back close to $350 by the time it gets to their door. for about $85 + the cost of an arduino this combo is usable out of the box.
(I usually don't care to make posts that send people to sparkfun's competition, but it's not really competition when Sparkfun doesn't carry the right pieces is it?)
I am wondering about the same thing. Anyone? I've googling for hour. I'd like one thats easy to connect to Arduino.
Looks like the Pololu TReX Jr. might be a good match for this, two channels up to 5A, one driving each side?
Could add to the related section.
http://www.sparkfun.com/products/8900
Here is a video tutorial on how to mod this Rover for wireless computer control:
http://www.youtube.com/watch?v=51TgbvcNwCQ
Apologies if this comes off as self-promotion, I thought it'd be helpful for some people considering how similar it is . . .
This is sweet - unfortunately a week ago I paid $90 to get one from a different vendor. I'll be using it with the Roboclaw 5A controller, which has a killer PID function built in, and will hopefully work perfect with the encoders.
Can the motors be run off a 3S lipo pack (11.1v)? I'm sure the encoders need a 5v signal?
Running the motors on 11.1V will shorten their lives.. drastically!
Basically you are increasing the voltage by about 50%.
This increases the current by about 50%
Since power is voltage x current you would be driving the motors with 2.25 times the rated power.
You could try limiting the PWM to 50% maximum.
Yeah, no big deal limiting the PWM to them. I just have tons of 11.1v lipo packs I bought up for a rover project, and this would be a good use of them ;)
You should use a buck converter (or a bunch of lm7805's) to lower the voltage.
Using a higher voltage at a smaller duty cycle will provide much higher torque capability. That is how they get higher torque out of stepper motors. The windings are rated at 2 to 3 volts, but they use PWM to run at a voltage of 75V. They control the current in the motors and get really high torque out of them.
Using a regulator will shorten battery life.
you could allways use the adjustable voltage regulator http://www.sparkfun.com/products/527
Says nominal 7.2V. You might be able to get by but will probably shorten the life of the motors unless the duty cycle is kept short.
What is the maximum weight capacity and how many minutes of run time can I expect from the 6 AA batteries? Thanks
There are at least two unknowns to solve for. The more weight you add, the more current the motors will draw. In addition, batteries are all different capacity. Also, the speed of the motors will change the current draw as well. You would need to do tests of your own to determine this.
In the features list is says "servo motors". Are these servos or DC motors? If they are servos then the motor driver shield in related products does not apply...right?
More accurately, they are DC motors with optical encoders.
OMG! this is great! so you could make it stand up higher or use the adjustable gear box angles as suspension right?
you have to remove the gear boxes to adjust it. it's not a motorized adjustment. the gearboxes kinda 'lock' into place. I'll get a picture or a video to show it.
Where can I find the pictures are talking about?
I can't readily find the pictures, but the motors are in housings with splines (notched). They fit into mating notches in the body, so you can rotate them and screw them back in place. If that doesn't make sense, I can get a couple pictures up to show you.
That would be great if you could show us a video. I'm interested in making the height (at one "axel") adjustable so the new claw may be attached to the front and pick stuff up. I would consider using mecanum wheels so the track tension wouldn't need to be supported. I also like the fact that it's white so it can be painted.
Aww, that would have been cool, none the less a great robotics platform. And the video would help, Thanks =)
This I love! (will definitely order one)
Or not, since the price has been raised...
Cool platform. Definitely a new take on the tracked design. Why four independent motors tho? Many kudos for keeping the price low.
You can replace the treads with wheels, or use mecanum wheels :-)
Mecanum wheels are the most fascinating thing ever! I wish you guys sold some that were slightly bigger than those below. They are extremely hard to find and tend to be very expensive.
The mecanum setup in the manual picture appears to be the FingerTech wheels. http://www.robotmarketplace.com/products/0-FT-MECANUM-SET.html
Trust me, I have been pushing for some, but we have to find some with the right price. Don't worry, there will be a big announcement if we get some.
As a matter of fact, you could probably go mad scientist, i mean, mad engineer on it if you really want to and create a robot that analyzes it's terrain (maybe with an optical mouse sensor somehow?) and adjusts its tread tension accordingly. It may be hard on the motors, but theoretically if you ran the front slightly slower than the back it would make the bottom of the treads looser (because they stretch) and they would move more easily over bumpy terrain, or for climbing your could do the opposite and tighten the bottom of the treads up... just a thought.