
Bloader and Screamer 877A
Welcome to the wonderful world of boot loading! We started this project with the intention of creating a boot loader for the SerAccel accelerometer. While coding, we discovered the new product called the PICAXE - which scared the snot out of us. So to compete with this new product, it was decided to fully disclose all the information we came across.
We hope that you find this tutorial helpful. It gets rather nitty gritty into machine code, but don't worry! We'll try to make it painless.
Just so you know, we have currently implemented a boot loader of only 168 code words that implements 115200bps download rate with checksum, boot delay, and releases all hardware before booting to user program. Oh yea, it's fancy.
If you use any of this information, or find any of it useful - please let us know! We don't limit the use any of our code, but it's always nice to hear when it does get used.
Get to it!:
Page 1 : What's a boot loader? And problems with the GoGo loader
Page 2 : The simple setup - How to get up and running!
Page 3 : Description of Bloader
Page 4 : The nitty gritty explanation of how Bloader works
Page 5 : The really ugly explanation of custom boot vectorsYou can find the Bloader and Screamer software on the downloads page.
What's a boot loader?
A boot loader is a little program or function running on a PIC that takes incoming input and records the incoming data into the program area of the PIC's memory. In other words, we send the PIC a serial signal of 1s and 0s and the PIC records these into the program memory.
So what?
By using a boot loader, the end user can reprogram a PIC on the fly without the need for a programmer. All you need is a PIC that has been pre-programmed with the boot loader, a DB9 serial cable, and a power supply. An RS232 converter helps clean up the transmissions quite a bit. We opted to use the PIC-P40B development board with the built-in RS232 IC and DB9 header - super handy.
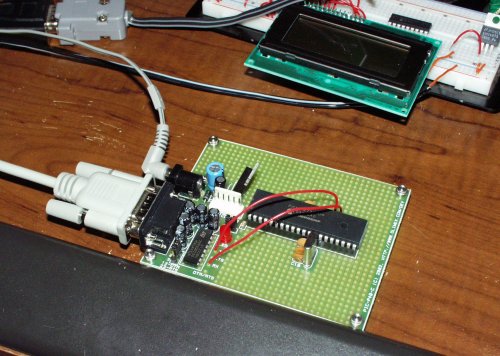
The PIC-P40 board being used with 16F877A loaded with Bloader and connected to the computer and power.
Mkay, now what?
The best kind of boot loader is one that you never see. We have created an incredibly small boot loader with a customized Visual Basic application that communicates serially with the boot load PIC program. For some users, all this stuff doesn't really matter. All that matters is that they will no longer need a hardware programmer (-$$). For others, this tutorial will help shed some light on how other devices (MP3 players, cell phones, even cars) implement boot loaders without expensive hardware.
Credit where credit is due:
I originally got started by googling "PIC boot loader", and the first thing to show up was the GoGo Board created by some folks at the MIT Media Laboratory. A very nice platform with lots of bells and whistles! I loved the site! Nicely laid out with plenty of information and pictures. Go here for their boot loader info (takes some digging from the main site).
We ganked the VB program and pseudo-C code. Our boot loader windows program and PIC program are therefore, very loosely based on these two structures. There were a few problems with GoGo Board boot loader:
1) It's written in CCS-C! We of course love CC5X, but it's more than just compiler debates - the GoGo version does not contain the actual hardware functions such as program memory editing or UART setup. They rely on the CCS functions to do this.
2) The GoGo loader is written for the 16F877. The 877 is a great chip, but there have been significant advancements (and a cheaper price!) with the 16F877A. If you think they are the same, just take a look at the program memory section of the PIC 16F877A datasheet. These chips are very different when it comes to the flash program memory.
3) The GoGo loader does not use error checking! I have found that the serial link is very hardy - ie, there have been very few errors or blips during transmission. However, when one fools with the program space, one should be sure of one's actions! So we do the checksum thing...
4) If it's going to be a boot loader, it's got to be small. Once I actually got the loading processing working, I started squeezing things to make it as lean as possible. It was actually rather difficult to get the PIC to communicate correctly with the windows program. But once the link was created, a lot of code could be removed. As mentioned above, our bloader only requires 168 words versus the GoGo boards' 400 code words. This allows a little more room for the user's program.
5) It's slow! The GoGo board downloads at 9600bps. If the GoGo's 16F877 downloads 1 code word every 2ms (2 bytes w/ start and stop bits @ 9600 = 20bits * 104us per bit), and then requires 4ms to record each code word (16F877 datasheet page 156), it would take a minimum of 6ms * 8000 or 48 seconds to record a full 8K user program. Youch! The SparkFun Bloader requires a maximum of 15 seconds to load a complete 8K user program.
Other Boot loader sites:
CCS-C : A large footprint boot loader - C source available
MicroChipC.com : Another good loader for the original 16F87x Family. They also have good information about getting your compiler/assemble configured correctly.
So if you are a lay-user, you might not care about the HEX files, boot vectors, page jumps, or checksums. All you want to know is how to get an Olimex Dev board to program without a programmer! Not a problem...
Get to it!:
Page 1 : What's a boot loader? And problems with the GoGo loader
Page 2 : The simple setup - How to get up and running!
Page 3 : Description of Bloader
Page 4 : The nitty gritty explanation of how Bloader works
Page 5 : The really ugly explanation of custom boot vectors
You can find the Bloader and Screamer software on the downloads page.
First you will need to get the Bloader program onto the PIC. You can either buy the PIC pre-loaded with Bloader or you can program the PIC yourself with one of our hardware programmers. You will (hopefully) only need to do this once! After that, the bloader will sit forever in the upper atmosphere program space of the PIC.
Next, you'll need to hook up the UART on the 16F877A to the RS232 IC on the dev board. It only takes two wires. This is how it looks:

Two wires connecting the MAX232 IC to the 16F877A's UART. The wires are soldered on the reverse side.
You will need to connect:
-
Pin 26 (RC7/RX) to the TX hole near the RS232 IC and
-
Pin 25 (RC6/TX) to the RX hole near the RS232 IC
Once you have those connected, the PIC can then communicate via the DB9 serial header to the computer.
On the computer side of things, you will need the windows program Screamer v1.1. Screamer is the windows program that takes HEX files and sends them to the PIC. HEX files are created when you 'make' or 'compile' your assembly program under MPLAB. You can also create HEX files using the C language with a compiler such as CC5X or CCS-C.
This is what the latest version looks like. It will most likely change over time, but you get the idea:
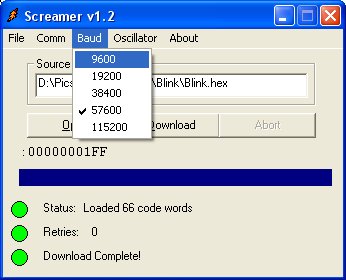
Click the 'Open' button and select the HEX file you would like to load onto the PIC. The file should show up in the Source File box. Select the Comm Port that the board is connected to. Select the baud rate at which you would like to download (try 9600bps for your first try). Select which Oscillator your PIC is running at.
Now click on 'Download'. Nothing happened? It says
'Waiting for PIC boot broadcast'
This is because Screamer is waiting for a response from the PIC.
When the PIC is first powered up, it jumps into the Bloader function. Here it transmits a special character (ASCII Character 5 - Inquiry) and then waits for ~100ms for a response from the computer. So once Screamer is 'Waiting for PIC boot broadcast', you have to cycle power to the development board (unplug/re-plug) or reset the PIC by grounding the MCLR pin (Pin 1 on the 16F87xA family). The PIC will then re-boot, jump into the Bloader function, and transmit this special character. The computer will respond with an acknowledge (ASCII Character 6) and the transfer process will begin.
The great thing about Bloader is that it will start running your program as soon as the transfer is complete! Bloader will also start running your program if it does not detect the special character on boot-up or on reset.
The PIC-P40 board being used with 16F877A loaded with Bloader and connected to the computer and power. The bread board in the background is development on the popular SerLCD product.
Code Bumping -
That's all you will need to get your HEX file onto the PIC. There is one final step that will probably be necessary in order to get your program running on a Bloader PIC - you will need to 'bump' your program by 4 code words.
Bumping is the least technical term we could think of. Because a Bloader PIC does crazy things with the boot vector, you'll need to tell your compiler not to use this space - the first four code words of the PIC program space.
Under CC5X this is done with this command:
#pragma origin 4
This command near the top of your program tells the compiler to start at code word 4 leaving the boot vector open for Bloader use. Here is an example of a Blink program for the PIC-P40B development board (C, Asm, Hex).
If you are using MPLAB's assembler you will need to use this command:
ORG 0x0004
To tell the assembler that your program starts at program location 4.
Take a look at the MicroChipC.com FAQ for more information about setting up your specific compiler/assembler.
That should be it! Your HEX files should now be ready to be dumped onto a Bloader PIC!
When the PIC gains power it begins executing the instruction at program location 0x00. This position usually contains a command like "GOTO MAIN". The PIC then jumps to main and starts running your code.
A boot loader is a simple concept. Instead of jumping to main, the PIC jumps to the boot loader function. This function then checks to see if a new program is available. If it is, the PIC begins to read in data and records the new program to the program memory space. If there is no new program available, then the PIC should jump to main and execute the program that is currently already there.
Get to it!:
Page 1 : What's a boot loader? And problems with the GoGo loader
Page 2 : The simple setup - How to get up and running!
Page 3 : Description of Bloader
Page 4 : The nitty gritty explanation of how Bloader works
Page 5 : The really ugly explanation of custom boot vectors
You can find the Bloader and Screamer software on the downloads page.
Mr. Boot loader meet Mr. Bloader,
Bloader (pronounced bloater) is our version of a boot loader. It was created because the GoGo boot loader had a few problems that were easily solved with some creative software.
It suddenly struck me one day, looking at the GoGo boot loader, why does the PIC take in ASCII values and spend time and energy (and code space) converting those ASCII values to data values? Why not have the big burly computer do all the work?
Our PIC boot loader is very simple compared to the GoGo board version. Conversly, our windows VB program (Screamer v1.2) is much more complex. If you've got a 1.8GHz machine sitting there, why not use its processing power as opposed to the little dwarf of a PIC?
Screamer v1.2 (the windows program) takes the HEX file that contains your program and hacks it up quite a bit. Take a look at the VB source code. If you don't have a program like Visual Basic 6.0, don't worry, you can still look at the code with a text editor like notepad. Instead of transmitting every character in the HEX file, the VB program inputs the various ASCII characters and converts them to direct integer values (such as record length, memory address, program data, and checksum). These integer values are then serially transmitted down the line to the PIC.
The PIC receives these values, and based on things like the checksum, responds with a 'ok' or 'bad' reply. If the checksum was good (0), then the PIC records program data to the program space and then tells the computer to send the next line. If the checksum was bad (>0), the PIC tells the computer to re-send the same line. Thus we have error checking! Wahoo!
Added 2-13-04: Screamer has many new features! When Bloader initially boots, it transmits the broadcast signals at 9600bps. Screamer listens at this speed. Once the pseudo-handshaking occurs, Screamer transmits the new SPBRG value to the PIC via 9600bps.
The SPBRG value is the number that controls the speed on the PIC's UART. Screamer calculates this number based off of your Oscillator setting and the Baud rate selection.
The PIC receives this new value and loads it into its SPBRG register, thus recalibrating the PIC's UART to the computer specified speed. The computer then takes a moment and re-initializes its serial port to the given speed, and the download begins! Likity split.
Screamer v1.2 now remembers the user's settings! It will retain the last used Comm port, Baud rate, Oscillator setting, and last opened file. How nice!
Get to it!:
Page 1 : What's a boot loader? And problems with the GoGo loader
Page 2 : The simple setup - How to get up and running!
Page 3 : Description of Bloader
Page 4 : The nitty gritty explanation of how Bloader works
Page 5 : The really ugly explanation of custom boot vectors
You can find the Bloader and Screamer software on the downloads page.
The Bloader program is provided for you to look at. It was written entirely in C and compiled using the CC5X compiler. It is very compact at 181 code words.
setup_comm(); //Communications occur at ?bps @ 20MHz
First Bloader sets up the onboard UART for the desired speed. In our case, we implement 115200bps communication speed to minimize the amount of time it takes to transfer very large user programs.
putc(5); //PIC tells the world it can be loaded, by broadcasting an Enquiry
TMR1H = 0; TMR1L = 0; TMR1ON = 1; //Setup hardware timer1
while(RCIF == 0)if (TMR1IF) break;
TMR1ON = 0; //Turn off timer1
if (RCREG != 6) goto USER_VECTOR;
Next Bloader transmits the ASCII character 5 - Inquiry - to the computer. The Visual Basic program should be runninng and in the waiting state. If Scream (the windows VB program) sees this character, Scream will respond with the ASCII character 6 - Acknowledge - which will cause Bloader to begin download mode.
Bloader also sets up and turns on hardware timer 1. If the Timer 1 interrupt occurs (ie, the computer did not repsond in time) then Bloader jumps to the User_Vector and begins to run the user's previously loaded program. More about jumping later.
//Send out the starting memory location of the Bloader
putc(BLOADER_START_HIGH);
putc(BLOADER_START_LOW);
Assuming the computer responded correctly, Bloader will then transmit the starting program memory location of the Bloader function. This is received by Scream and stored for later checking. The Scream program uses this information to skip any program data that would otherwise write over the Bloader program. You don't have to worry about this unless your program begins to approach huge proportions - >8000 code words. If this happens, Scream will let you know that your HEX file is too large.
Now the data moving really begins:
//Determine if the last received data was good or bad
if (check_sum != 0)putc(7); //Ascii character BELL
else
putc('T'); //Tell the computer that we are ready for the next line
while(getc() != ':'); //Wait for the computer to initiate transfer
If the check_sum is not zero than there was an error with the last transmission. Bloader will transmit the Bell character and Scream will re-send the last line. If everything was good, Bloader will tell Scream that everything was hunky dory and to send it the next line (via character 'T' for Transmit).
Bloader will then wait for Scream to initiate the transfer with the character ':'.
record_length = getc(); //Get the length of this block
if (record_length == 'S') goto USER_VECTOR;
memory_address.high8 = getc();
memory_address.low8 = getc();
check_sum = getc(); //Pick up the check sum for error dectection
for(i = 0 ; i < record_length ; i++)
{temp = getc();
incoming_buffer[i] = temp;}
Now Bloader will pickup the record length, memory address, and check sum. If the record length is the special case of 'S' (or the equivalent record length of 83) then Bloader will know that it is done loading and will start executing the newly loaded user's program.
Finally, Bloader will read in the various program data words - as many as record length dictates.
for(i = 0 ; i < record_length ; i++) //Check sum calculations
check_sum = check_sum + incoming_buffer[i];
check_sum = check_sum + record_length;
check_sum = check_sum + memory_address.high8;
check_sum = check_sum + memory_address.low8;
Here is where the error checking occurs. A check sum is just a number. When you take that number and add all the other received values to it, you should get a very large number. In the microprocessor world of 8 bits, adding these large numbers together will cause a bit roll over to zero.
For example 243 + 10 + 3 = 256. But because we are dealing with 8 bit numbers (0 - 255), 256 is actually 0. So we just add together all the bytes that were transmitted and look for a value of 0.
if(check_sum == 0) //If we have a good transmission, put it in ink
{onboard_program_write(memory_address, incoming_buffer, record_length);
}
Now if all the added together bytes come out to be 0, then we know that the transmission was (probably) free of errors. There is a chance that multiple bits got corrupted and the checksum still came out correctly, but this is a minute possibility. If it was a good transmission, then record it to memory!
Now Bloader loops back and initiates the next line of program data.
We've already alluded to the boot vector and the user vector but what exactly are these things?
This information is for the true tech heads. Normal users do not need to read, understand, or put up with the following rant.
Get to it!:
Page 1 : What's a boot loader? And problems with the GoGo loader
Page 2 : The simple setup - How to get up and running!
Page 3 : Description of Bloader
Page 4 : The nitty gritty explanation of how Bloader works
Page 5 : The really ugly explanation of custom boot vectors
You can find the Bloader and Screamer software on the downloads page.
This was perhaps the most difficult part of the project. The PIC 16 family has two ways to 'jump' to a given memory location. Call and Goto.
Call is used for function calls. When the program reaches the end of the called function, the return address is popped off the stack and loaded into the program address pointer. We don't want this because it will waste slots on the stack.
Goto, on the other hand, does 'Hail Mary' and blindly jumps to the given memory address. If the user tells the PIC to jump into nothingness, it will. So we must be very careful that we keep track on the memory address. Goto is really what we need for both user and boot vectors.
Boot Vector : Also known as the reset vector. This is generally the first four words of the PIC program space. It takes a total of three code words to do a Goto to the far memory location where the Bloader function is stored. These are three code words (from 0x00-0x02) that do not change and should not be over written. The forth spot (location 0x03) will be used to point to the user's 'main' function and will be over-written every time a new program is loaded.
User Vector : This is the original user's reset vector. What would normally reside in the first four spots of the PIC's program space must now be shifted elsewhere. Upon completion of a HEX file download (or the hardware Timer1 interrupt), the bloader function jumps to memory location 0x03 and the user's main function is run. The User vector normally contains a Goto statement to Main. This is why the code bump (#pragma origin 4) is so important. Otherwise, these first four words might contain random program code words that would not correctly execute from the Bloader program space.
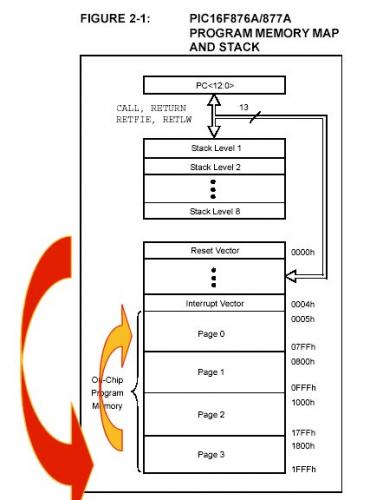
Here is the big ugly memory map of the 16F877A. We want to jump from the reset vector to a very high location in memory - namely, some where above 0x1F48 - and then jump to the 'main' function of the user's program.
All we have to do is tell the PIC to 'Goto' the Bloader function in order to have the Bloader run before the user's program. Easy, except the Goto command is a little complex. Because we are trying to access a high memory address, the PIC has to load the high address bits of the Program Counter (PC) register before we can initiate the Goto command.
How did we do it? We talked to Bengt Knudsen - the guy who wrote the C compiler! He was nice enough to help us with some of the finer compiler control. There are some interesting commands that allow us to 'hard code' commands within CC5X.

The #pragma cdata[] commands tell the compiler to set those specific location in memory to the give code words. In our case, we need to jump to the bloader routine that resides at location LOADER_JUMP.
A quick scan of the 16F87xA datasheet lists the different PIC commands.
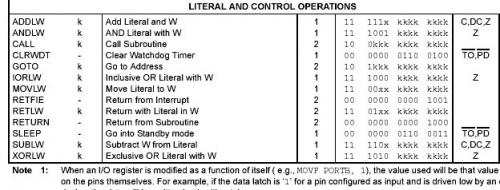
16F87xA datasheet page 160
GOTO : 10 1kkk kkkk kkkk
When the PIC powers up (or resets), the code word at location 0x00 will execute. In our case, the upper bits of the PC register will be set, and then the PIC will Goto the bloader function.
Upon the completion of the Bloader process, we will need to jump to where the user's program starts. How do we do this? Well, we assume some things...
All user programs must use the
#pragma origin 4
statement at the beginning of their program. This will cause the compiler to not use the first four memory locations (0x00-0x03). Instead, the compiler will place a 'goto main' command at location 0x00 that points to the memory location at which the main routine starts (not always 0x04 because this is the interrupt vector). The windows program, Screamer, will see this 'goto main' command within the generated HEX file. Screamer will then take the 'goto main' command and put it at memory location 0x03 - the memory locations 0x00, 0x01, and 0x02 still point to the bloader function. This insures that if the PIC is power-cycled, it will again go into the bloader function before the user's program is executed.
All that is left is to jump from the end of the bloader function to memory location 0x03 - where the user's 'goto main' command resides:
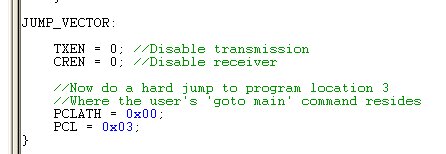
PCL commands to jump from the end of bloader, to memory location 0x03
Everything is now fully contained in the C program and can be compiled without problems. This HEX file now needs to be burned in its entirety to a 16F877A. Once complete, the 16F877A will work seamlessly with the Scream software.
Viola! We have a boot loader.
If you use any of this information, or find any of it useful - please let us know! We don't limit the use any of our code, but it's always nice to hear when it does get used.
Lots of broken links on this tutorial.
Hi, can you provide me with a schematic for the pic-p40 board or tell me where I can find it? I want to use this with the pic16f88 chip.
Thanks
Bill
I've been using the Bloader/Screamer/16F88 combo and finding it great, it's a real timesaver. One thing I'd really like to be able to is reset the PIC from software, so I don't have to press the reset button to reprogram it. Yes, I'm really that lazy. And it's in an awkward place! From looking at the above, I came up with the following, and it works... once. But then it doesn't work again until you restart the PIC the hard way.
bsf PCLATH,3 ; Change the program page to where
bsf PCLATH,4 ; the bloader code is...
goto 0 ; And jump there. (lower bits of location = 0)
Any suggestions?