
The Biggie
This tutorial was developed originally by Joyner Network Solutions, Inc. The tutorial has been offered "as-is" and does not contain (to my knowledge) any proprietary or copyright limitations. The developer may be reached at
Drop them a line at ben@caresweb.com
We have roughly covered how to attach a PIC directly to a computer's serial port. Now we will go over the steps needed to enable a MAX232 IC that comes standard on many of the Olimex development boards. We will then build upon this RS232 communication to include I2C EEProm reading and writing, and finally servo control from the computer keyboard.
For this tutorial, we used the P18 development board equipped with the PIC 16F628 processor. The JFE text editor was used in conjunction with the incredibly powerful Cc5x compiler.
Navigate:
Intro - The code you'll need and how the RS232 IC works.
UART - Setting up the PIC hardware for communication
Debugging - Really good info for output formatting
Receive - How to get the PIC to listen when your talking
I2C - Simple interface to an I2C EEProm
Servo - Move a servo arm using the keyboard!
The code you'll need:
232-comm.c - An example program that has the PIC processor echo whatever is sent down the RS232 line
i2c-expl.c - The example code for the I2C EEProm interface
pwm.c - Controls a standard RC aircraft servo (any servo really) using the '8' and '2' (up/down) buttons on the numeric key padstdio.c - The include file that has all the powerful printf and UART routines
i2c.c - The background routines for starting, stopping, reading, and writing to an I2C bus - used as an include file for i2c-expl.c
So what, exactly, does the MAX232 chip do?
The MAX232 is the industrial standard IC for converting TTL/CMOS level signals to RS232 level signals. Huh? RS232 1s and 0s are at +12 and - 12V. Well the PIC only outputs 0-5V signals, so if you want to speak true RS232, you will need to convert the 0-5V signal pulses to their equivalent +/-12V RS232 pulses.
The MAX232 does exactly that. If you put 5V on the T1IN pin, you will see 12V on the T1OUT pin. This is how you pass data out to the computer. If you press a key in hyperterminal, a signal is sent down the line to the R1IN pin where the 12V signal coming from the computer is converted to a 0/5V signal coming out of R1OUT - a signal that the PIC understands. All fine and dandy. The real magic is how an IC powered with 5V can generate +/- 12V signals. This is done with the external capacitors known as charge pumps - yet another tutorial someday.
Break out the Tasers -
Many of the Olimex development boards come equipped with a MAX232 IC on board, with a DB9 header and external capacitors already in place. This is an incredibly nice feature. But you must connect the MAX232 to the PIC by hand.
Confusion Note: The silkscreen print on the top of the development boards can be misleading at first pass. The pad labeled 'TX' is the pad that must be connected to the 'RX' pin our your uController. The 'RX' pad must be connected to the 'TX' pin of your uC. Why did they do this? The answer is really just one of perspectives. The IC is transmitting to the receive port on the PIC. The MAX232 IC is receiving data from the TX port on the PIC. Hopefully that will clear it up a bit...
Get out your soldering iron and some wire. We used small 30awg wire-wrap wire, but any size should do. Find the 'TX' pad located next to the MAX232 IC. Solder that pad to pin 7 of the 16F628. Solder the 'RX' pad to pin 8 on the 16F628. Don't worry about the CTS and RTS pads.
Your dev board should now be wired for RS232! The RS232 signals should be nice and clean. Now we must setup the PIC to output 9600 baud communications.
Many PICs have a UART (Universale Asyncronous Receieve/Transmit) module. Check the datasheet for your PIC - it should be a big section. The benefit to using the UART in place of software control is that once you have the UART setup correctly, you simply put a byte of data into the outgoing buffer and the hardware takes care of it - no worries.
Read the Datasheet!!!
We can only hold your hand for so long - sooner than later, you are going to have to delve into the datasheet and get the gist of how to operate the UART. But we'll get you started...
Navigate:
Intro - The code you'll need and how the RS232 IC works.
UART - Setting up the PIC hardware for communication
Debugging - Really good info for output formatting
Receive - How to get the PIC to listen when your talking
I2C - Simple interface to an I2C EEProm
Servo - Move a servo arm using the keyboard!
The code you'll need:
232-comm.c - An example program that has the PIC processor echo whatever is sent down the RS232 line
i2c-expl.c - The example code for the I2C EEProm interface
pwm.c - Controls a standard RC aircraft servo (any servo really) using the '8' and '2' (up/down) buttons on the numeric key padstdio.c - The include file that has all the powerful printf and UART routines
i2c.c - The background routines for starting, stopping, reading, and writing to an I2C bus - used as an include file for i2c-expl.c
Transmit -
Take a look at stdio.c - we will first be discussing the enable_uart_TX(uns8) function - transmissions.
The first setting that needs to be addressed is the Serial Port Baud Rate Generator - SPBRG. This register holds the value that is used to generate the timing for communication. In our case (@20MHz) SPBRG = 32. Done!
The next, BRGH - Baud Rate Generator High Speed - is set to zero for this tutorial. BRGH = 0.
SYNC needs to be set to zero, SYNC = 0. The serial port is then ready to be turned on: SPEN = 1.
You may or may not want to enable the transmit interrupts. For now, let's not worry about the TXIE - Transmit Interrupt Enable. Interrupts are a headache, make sure you have the other stuff working, and then twiddle with the interrupts.
The final line of code enables transmission. If anything is sitting in the TXREG - transmission register - it is moved to the TX Buffer and sent down the line.
As soon as a transmission completes, the TXIF - transmission interrupt flag - is set and if the interrupt is enabled, the interrupts vector is run. But not in our example, No Interrupts!
So that should be all the hardware that needs to be setup on the PIC.
Funky compiler notation note: You may notice the various "#ifdef" statements. These are used as pre-compile commands under Cc5x. If there is a definition for the thing "Baud_4800" then the code contained in the #ifdef area is included in the compile. We use these things to quickly change between baud rates and crystal configurations. Rather then digging through all the C code to change the SPBRG register to a different value, we just change the first few lines of our program from "#define Baud_4800" to "#define Baud_9600" and the compiler takes care of the rest. Very handy.
A Few Wires -
For communications to happen, you are going to need a 9-pin straight-through serial cable (male on one end, female on the other). Plug the female end into the comm port on the back of your computer, and the male end to DB9 header on the development board. This should take care of everything.
Start Talking -
As described above, when you send something to the TXREG, it goes out immediately. So all we need to do is wait for the TXIF to be set. At that point, the transmission is complete and we can start sending the next byte.
Take a look at the function rs_out(uns8). We pass the byte that needs to be sent out to the rs_out function. rs_out takes that byte, throws it at the TXREG, and then waits for the TXIF to be set - it waits for the transmission to complete. The UART very obediently shifts out the given byte, one bit at a time to the MAX232 chip. The MAX232 translates the individual bits and sends them down the line to the comp's serial port. And if everyone is happy, then the equivalent ASCII character to the byte you sent should appear on the hyperterminal screen.
That is all that is takes to get the PIC to output an ASCII character to the 'puter. String a few of these rs_out calls together, and you can get whole words like "Hello"...
Hyperterminal Note: All communication describe in this tutorial takes place at 9600 bps, with 8 bits, no parity bit, and one start/stop bit. So be sure to setup hyperterminal to these settings: 9600, 8-N-1.
Compiler Note: Cc5x again proves how handy it is. You can pretty much give it anything - Hex (0xA2), Binary (0b.1010.0010), Decimal(2), or even ASCII ('2') and it will take care of it. Don't worry about it. rs_out('H') works great.
Dunno if the light above your head is flickering or not, but this rs_out stuff can be an extremely effective debugging tool. Wondering how your code is running? Where it is freezing up? Throw some rs_outs in there and see which parts of the code are running by what is output to the hyperterminal screen.
Fine and dandy, but what if you want to see what's stored in a variable. rs_out won't help you much since it prints the ASCII equivalent character - or more likely gibberish. So you will need to convert the variable into ASCII characters like '2' '3' for twenty-three. And what if you want to see things in HEX. You may be uncomfortable with HEX right now, but give it a few days. You will quickly learn to appreciate HEX and its compact display of information.
Navigate:
Intro - The code you'll need and how the RS232 IC works.
UART - Setting up the PIC hardware for communication
Debugging - Really good info for output formatting
Receive - How to get the PIC to listen when your talking
I2C - Simple interface to an I2C EEProm
Servo - Move a servo arm using the keyboard!
The code you'll need:
232-comm.c - An example program that has the PIC processor echo whatever is sent down the RS232 line
i2c-expl.c - The example code for the I2C EEProm interface
pwm.c - Controls a standard RC aircraft servo (any servo really) using the '8' and '2' (up/down) buttons on the numeric key padstdio.c - The include file that has all the powerful printf and UART routines
i2c.c - The background routines for starting, stopping, reading, and writing to an I2C bus - used as an include file for i2c-expl.c
Anyways! Let's get into the printf functions! Take a look at printf(char *, uns8) within the stdio.c file.
This function takes the string you pass it and then parses it to be sent to the serial port a byte at a time.
Example: printf("Hi there!", 0);
This will pass the string "Hi there!" to the printf function. From here, each letter is passed to the rs_out function, and you get whole words!
Now for the real power:
Example: printf("Counter : %h ", my_counter);
This will print the "Counter : " string as before, but when printf comes across the %h, it will take the value stored in my_counter and print it as a hex value ("0xAC" for example) to the hyperterminal screen. It will also print the new line and return characters. All right!
Before you go off and start to hammer out a couple thousand lines of code, heed this warning - the printf routines (rs_out, printf_bb, rs_out_bb, etc) are very space and processor consuming. Many programs we hack out are under 300 code words. But with the stdio.c include file, things get huge - 1000 code words. And remember, we are polling the TXIF - a big waste of processor power. So the stdio.c file is really really helpful for debugging and toying around, but it is rather large and processor wasteful for full blown applications.
A code note: We have been revising and tweaking printf and the stdio.c routines for 18 months. A lot of work has been poured into making it work well. But there are probably lots of people out there that are much more creative/efficient code writers then we are. Let us know if you find anything really weird/ineffecient about our code. We would be happy to add your name to the credits.
It would be really cool to be able to send commands to the PIC from the keyboard. Say, press the 'k' key and get a "Hello", and press the 'w' key and get "Go away" on the hyperterminal screen.
To do this, we will need to setup the receive portion of the UART. It is similar to setting up the UART transmit, with some different registers.
Navigate:
Intro - The code you'll need and how the RS232 IC works.
UART - Setting up the PIC hardware for communication
Debugging - Really good info for output formatting
Receive - How to get the PIC to listen when your talking
I2C - Simple interface to an I2C EEProm
Servo - Move a servo arm using the keyboard!
The code you'll need:
232-comm.c - An example program that has the PIC processor echo whatever is sent down the RS232 line
i2c-expl.c - The example code for the I2C EEProm interface
pwm.c - Controls a standard RC aircraft servo (any servo really) using the '8' and '2' (up/down) buttons on the numeric key padstdio.c - The include file that has all the powerful printf and UART routines
i2c.c - The background routines for starting, stopping, reading, and writing to an I2C bus - used as an include file for i2c-expl.c
You will need to look at the enable_uart_RX(bit) function within the stdio.c file.
The SPBRG baud rate generator is still setup for 9600 baud at 20MHz: SPBRG = 32. The generator is still at normal speeds: BRGH = 0.
Enable the serial port: SPEN = 1. And enable the receive port: CREN = 1. The receive buffer immediately begins to monitor the RX pin for incoming data.
Note: The TRIS buffer must be set accordingly for both the TX and RX pins of the PIC you are using. The RX pin must have the matching TRIS bit set, so that it becomes an input. The TX pin must have the matching TRIS bit cleared so the it becomes an output pin.
For the PIC 16F628, RB1 is the RX pin and RB2 is the TX pin. In order for the UART to operate, you must configure these pins correctly. For example:
TRISB = 0b.0000.0010; //0 - Output, 1 - Input - RB1 is RX for UART
This TRISB command will configure all Port B pins as outputs, with the exception of RB1 which will be an input.
You may wish to poll the incoming RCREG for incoming data. This will work. But because incoming data can not be predicted, and we don't want to miss any data, only interrupts can do the trick. So you will see that we do enable the RXIE bit - receieve interrupt enable, as well as the PEIE - peripheral interrupt enable, and the GIE - global interrupt enable. These bits are well defined under the interrupt section of the PIC datasheet. With these bits enabled, as soon as the receive buffer is full, the RXIF - receieve interrupt flag will be set, and the interrupt vector will commense.
Let's take a look at the Cc5x interrupt vector:
interrupt serverX(void)
{
int_save_registers
char sv_FSR = FSR; // save FSR if required
if(RCIF) //UART Recieve Interrupt
{
data_in = RCREG;
print_it = TRUE;
//No clearing RCIF, must clear RCREG
RCREG = 0;}
FSR = sv_FSR; // restore FSR if saved
int_restore_registers
}
While this may look scary at first - it's not really that bad, and its also super powerful. If you've read anything about PIC interrupts you will quickly discover just how squirrelly they can be. Cc5x takes care of most of the headache for you. The int_save_registers command and sv_FSR will store the current state of the PIC's world. The interrupts will do their thing and effectively mess up the W register and any other register that your interrupt routine may effect. Before the PIC goes back to what it was doing, the state of the world is re-loaded and the PIC is non-the-wiser to what has just happened. You will want to refer to the Cc5x documentation on interrupts for a more detailed explanation. There is an example file that comes with the zip for Cc5x called Int16xx.c that is a good place for examples. Section 6.3 of the main Cc5x.txt file is also very helpful.
The only other thing that must be done is to determine what has caused the interrupt. This is done by testing the interrupt flags. Each interrupt has its own flag, so it just a matter of a few 'if' statements to test which ones are set. For our example, the RCIF should be the only interrupt that could be set. If the RCIF is set, then we remember the incoming data (move the RCREG into a variable) and then clear the RCREG (this is how one clears the RCIF). If you do not clear the appropriate interrupt flag, then as soon as the PIC resumes where it was in the main program, it will see that there is another interrupt and re-execute the interrupt vector. A very bad thing - the PIC hangs in an endless loop.
So now, according to our interrupt handler, if we receieve a byte coming in through the RX pin, then the bit variable 'print_it' will be true, and we will have the appropriate information stored in the variable 'data_in'.
Great!
Take a look at the main routine. While we are still technically polling a bit (we look for a change in print_it as opposed to RCIF), we can easily add more code to the main routine and not have to worry about losing data.
Assuming that print_it = true, the main function will then print both the Hex value of the incoming byte, and the ASCII representation of the incoming byte.
Assuming everything is wired correctly, and you've got the PIC loaded up - when power is applied to the PIC, it will begin to monitor the incoming RS232 signals. If you get into hyperterminal and press the 'h' key, you should get an output that looks like -
Ascii: 0x68
Key: h
Now if you hammer away on the keyboard for a bit, you should get a screen full of such responses. Now press 'Z' - that's a capital z. Whoa! The screen changed and filled with letters. Every time the PIC sees an incoming byte, that byte is stored into the array called 'memory_array'. This 64 byte wide array remembers the last 64 key strokes and is dumped onto the hyperterminal screen when the incoming byte is 'Z'.
While this example is not really that interesting, it's far from impractical. Input and output through hyperterminal and the keyboard can be very useful and time saving.
Let's take it a step further -
You've seen how to store incoming bytes to local PIC memory, but local RAM is fairly limited. Usually 100-300 bytes for the mid-range PICs. What if I need to remember the last 1,000 inputs? It's time for a memory upgrade.
I2C EEProms are probably one of the simplest types of memory to interface to. They also teach a really good lesson in the I2C protcol. We are going to gloss over most of the intricacy of the actual protocol - all of those questions can be answered in any of the datasheets written for the Microchip I2C EEProm line of memories.
Navigate:
Intro - The code you'll need and how the RS232 IC works.
UART - Setting up the PIC hardware for communication
Debugging - Really good info for output formatting
Receive - How to get the PIC to listen when your talking
I2C - Simple interface to an I2C EEProm
Servo - Move a servo arm using the keyboard!
The code you'll need:
232-comm.c - An example program that has the PIC processor echo whatever is sent down the RS232 line
i2c-expl.c - The example code for the I2C EEProm interface
pwm.c - Controls a standard RC aircraft servo (any servo really) using the '8' and '2' (up/down) buttons on the numeric key padstdio.c - The include file that has all the powerful printf and UART routines
i2c.c - The background routines for starting, stopping, reading, and writing to an I2C bus - used as an include file for i2c-expl.c
But anyway, you are going to need 2 lines. One for data, one for clock. The PIC is going to act as the master and control the clock. As for the data line, things get fuzzy. When the master (the PIC) is expecting a response from the I2C slave (the EEProm), the PIC must turn the data line to an input so that it can listen for the EEProm's response. If the PIC is attemping to write something to the EEProm, then the data line must be configured as an output. Take a look at I2C.c. You will see that there are two commands that are defined - WRITE_sda, and READ_sda. Guess what these do? More importantly, why are they defined like they are?
Code Note:
This line of code is a bit easier to understand:
WRITE_sda();
than this line of code:
TRISB = TRISB & 0b.1110.1111;
The PIC never actually goes through the steps of calling a function call WRITE_sda() even though it may look that way. Instead, before the code is compiled, all the of the WRITE_sda() statements are replaced with the TRISB = ... statements because of the define statements at the beginning of the i2c.c file. This makes the code easier to read without wasting valueable processor instructions setting up a function call.
So we've got a good way to handle the data line configuring. Now take a look at the various start(), stop(), read_byte(), and write_byte() commands. Using these functions accordingly, we can now have a conversation with the I2C EEProm.
Take a look at I2C-expl.c. This program is basically identical to the 232comm.c previously discussed with a write_eeprom(~) routine instead of a memory_array[] command. So each of the incoming bytes from hyperterminal are stored on the external EEProm rather than the local PIC memory. To call write_eeprom, you will need to give the function an unsigned integer address (0-255), and thing to store (the data byte), and the page you want to store to (the 16k eeprom we used had 2 pages of 256 bytes of memory per page). Pretty straight forward - but you may have to tweak this function for your specific EEProm.
When you hit the magical 'Z' button, 256 bytes are read from the I2C EEProm and outputted to the hyperterminal screen. Yea!
I2C Note: Sometimes it is best to learn the hard way. The I2C interface can be very tricky at first - just keep hacking at it. Here are a few things to remember as you are debugging:
- Remember the pull-up resistor on the SDA line!
- Depending on your EEProm, A0, A1, and A2 may be NC (no connection) or you may need to drive them high/low. It is a good idea just to tie them to GND until you are sure you do not need them. Check the Microchip datasheet section 'Pin Descriptions' to get a full description.
- Realize that you must transmit to the slave (SDA is output) before you can listen (SDA must then be input).
- Send the EEProm a few wake-up signals before you start hammering it with commands/data. The wake-up signal is just a start command followed by the command byte. The slave should then respond with an Acknowledge. If it does not, start looking at the code or hardware for problems.
Many PIC people have a thing for robots. If you've ever played with robots, RC cars, or RC aircraft (see foamware) you understand the need for simple motor control. Servos are little motors that have amazingly high torque characteristics packed into a small package. You will most likely come across a project where a servo would do the trick beautifully, but how to control it?
Navigate:
Intro - The code you'll need and how the RS232 IC works.
UART - Setting up the PIC hardware for communication
Debugging - Really good info for output formatting
Receive - How to get the PIC to listen when your talking
I2C - Simple interface to an I2C EEProm
Servo - Move a servo arm using the keyboard!
The code you'll need:
232-comm.c - An example program that has the PIC processor echo whatever is sent down the RS232 line
i2c-expl.c - The example code for the I2C EEProm interface
pwm.c - Controls a standard RC aircraft servo (any servo really) using the '8' and '2' (up/down) buttons on the numeric key padstdio.c - The include file that has all the powerful printf and UART routines
i2c.c - The background routines for starting, stopping, reading, and writing to an I2C bus - used as an include file for i2c-expl.c
Servos have three lines - 5V, GND, and Control. When controlled correctly, they will work very hard to maintain their current position based upon the control input. They are controlled by PWM - Pulse Width Modulation. PWM is a constant series of pulses, where the overall period is the same, but the time that the signal is at 5V (high) varies. For most servos the duty cycle must be varied between 5-10%. As you vary the pulse from 5% to 10%, the servo arm will move from 0 degrees to 180 degrees (roughly).
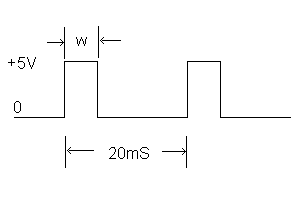
A good starting pulse period is 20ms. So what you do is transmit a 'blip' (the w in the picture) every 19ms. This blip varies in length. If the blip is short - 1000us - then the servo will got to a 0 degree position. If the blip is a bit longer - 1100us - the the servo will advance slightly ~10 degrees. Whatever the blip length, you need to pause for ~19ms before the next blip. Remember, you must constantly transmit blips to the servo for it to hold its position. If you do not transmit to the servo every ~20ms, the servo will go into sleep mode and the servo arm will move freely. If you transmit more often than 20ms, the servo will begin to shake and suck large amounts of current. The overall period is going to change slightly (20ms-21ms) depending upon how long your blip is. But for the most part, basic servos don't care. As always, check the datasheet!
Note on Evil Interrupts : Be aware that things like interrupts can affect the PWM going to a servo. You may experience funny symptoms (like servo jerk) when a time consuming interrupt occurs. Keep your interrupt handlers short and sweet and you should be able to avoid problems.
Get a servo hooked up and load some test code onto the PIC. You should be able to get the servo to go to a given position and hold it. Take a look at pwm.c.
While the 16F628 has a CCP - Capture/Compare/PWM Module onboard, we do not use it. Isn't the 16F628 just amazing? There's all sorts of stuff jammed in there. The problem with the CCP is that we are running at 20MHz. Because we cannot slow down the TMR2 enough for a 20ms period, the CCP cannot be used for servo control. We could be wrong, but the software was a quick and dirty way to get the job done.
Now you should be very familiar with the majority of pwm.c. All we are doing is looking for specific values coming down the RS232 line. If we find a special character (and '8' or '2'), then increment the pulse width variable accordingly. And that's it! You now have keyboard control of a standard servo. Cool.
Take me back to the intro.
Leaving comments is the coolest!
Nice tutorial, helped me a lot.<br />
<br />
One question though; I found a bug in the i2c library, which I have now corrected of course since it was critical to my project (related to the aknowledge part), but who do I ask if I want to distribute this fixed version along with my project on github?<br />
<br />
Will there be any licensing issues?<br />