- Home
- Product Categories
- Machine Learning and AI
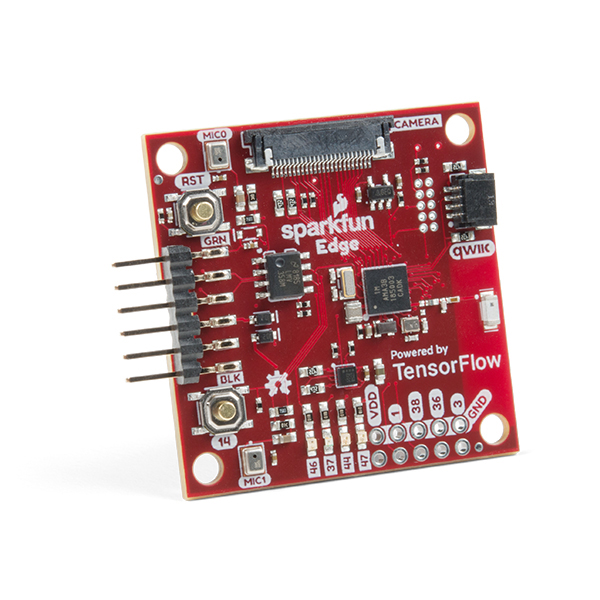
- SparkFun Edge Development Board - Apollo3 Blue

Edge computing is here! You've probably heard of this latest entry to the long lineage of tech buzzwords like "IoT," "LoRa," and "cloud" before it, but what is “the edge” and why does it matter? The cloud is impressively powerful but all-the-time connection requires power and connectivity that may not be available. Edge computing handles discrete tasks such as determining if someone said "yes" and responds accordingly. The audio analysis is done at the edge rather than on the web. This dramatically reduces costs and complexity while limiting potential data privacy leaks.
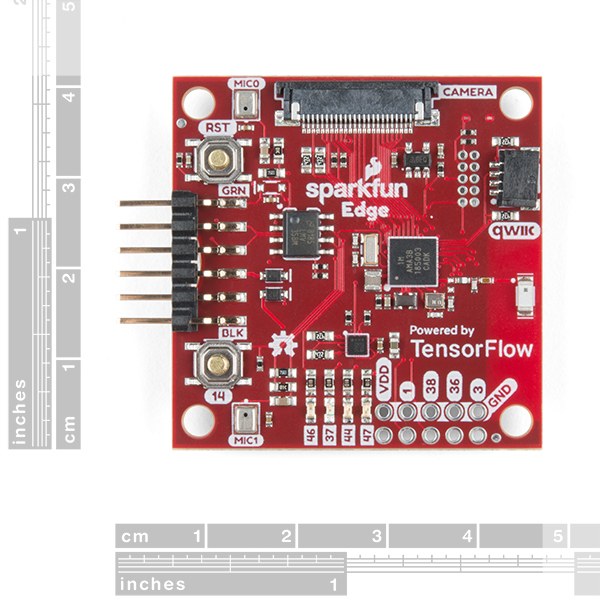
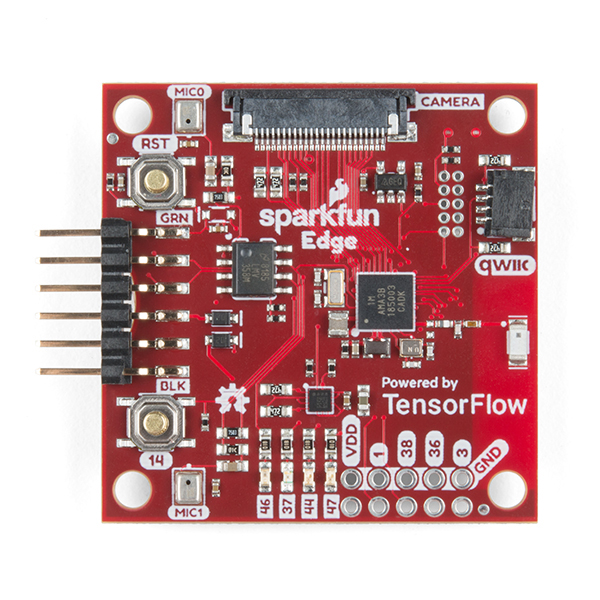
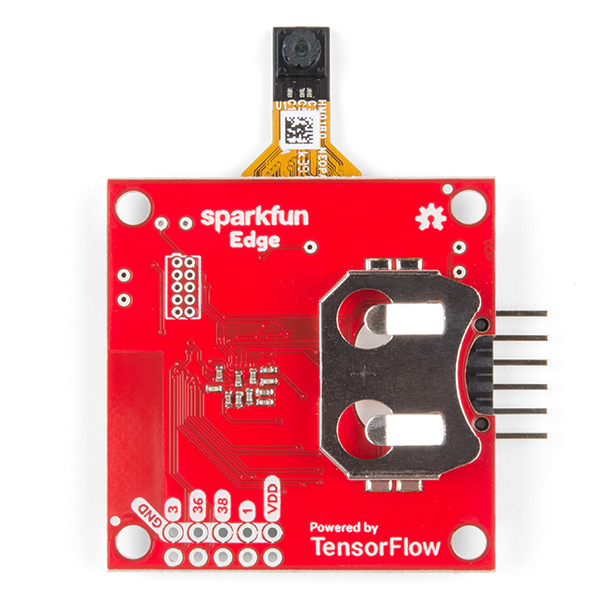
In collaboration with Google and Ambiq, SparkFun's Edge Development Board is based around the newest edge technology and is perfect for getting your feet wet with voice and even gesture recognition without relying on the distant services of other companies. The truly special feature is in the utilization of Ambiq Micro's latest Apollo3 Blue microcontroller, whose ultra-efficient ARM Cortex-M4F 48MHz (with 96MHz burst mode) processor, is spec’d to run TensorFlow Lite using only 6uA/MHz. The SparkFun Edge board currently measures ~1.6mA@3V and 48MHz and can run solely on a CR2032 coin cell battery for up to 10 days. Apollo3 Blue sports all the cutting edge features expected of modern microcontrollers including six configurable I2C/SPI masters, two UARTs, one I2C/SPI slave, a 15-channel 14-bit ADC, and a dedicated Bluetooth processor that supports BLE5. On top of all that the Apollo3 Blue has 1MB of flash and 384KB of SRAM memory - plenty for the vast majority of applications.
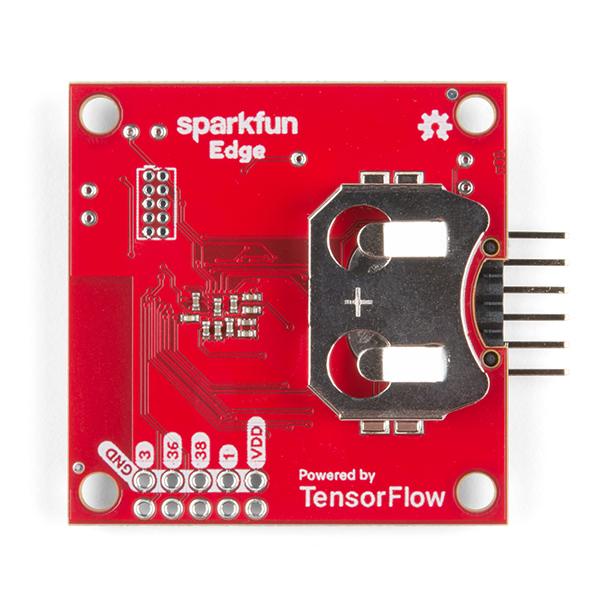
On the Edge you'll have built-in access to sensors, Bluetooth, I2C expansion, and GPIO inputs/outputs. To support edge computing cases like voice recognition the Edge board features two MEMS microphones, an ST LIS2DH12 3-axis accelerometer on its own I2C bus, and a connector to interface to an OV7670 camera (sold separately & functionality coming soon). As TensorFlow updates their algorithms more and more features will open up for the SparkFun Edge. An onboard Bluetooth antenna gives the Edge out-of-the-box connectivity. Also available on the board is a Qwiic connector to add I2C sensors/devices, four LEDs, and four GPIO pins. To boast the low-power capabilities of the board we've outfitted it with battery operation from the CR2032 coin cell holder. Programming the board is taken care of with an external USB-serial adapter like the Serial Basic Breakout via a serial bootloader, but for more advanced users we've also made available the JTAG programming and debugger port.
As a brave explorer of this new technology, you'll have to use some advanced concepts but don't worry. Between Ambiq Micro's Software Development Kit and our SDK Setup Guide you'll have access to plenty of examples to begin working with your hardware.
Now get out there and make something amazing with the latest machine learning technology at your very own fingertips!
Note: The HM01B0 Himax Camera is NOT included with the SparkFun Edge and will need to be purchased separately.
Microcontroller
- 32-bit ARM Cortex-M4F processor with Direct Memory Access
- 48MHz CPU clock, 96MHz with TurboSPOT™
- Extremely low-power usage: 6uA/MHz
- 1MB Flash
- 384KB SRAM
- Dedicated Bluetooth processor with BLE 5
Onboard
- ST LIS2DH12 3-axis accelerometer
- 2x MEMS microphones with operational amplifier
- Himax HM01B0 camera connector
- Qwiic connector
- 4 x GPIO connections
- 4 x user LEDs
- 1 x user button
- FTDI-style serial header for programming
- Bluetooth antenna
- CR2032 coin cell holder for battery operation
What It Does
- High processing to current consumption ratio enables machine learning applications on the 'Edge' of networks, without the need for a central computer or web connection.
- Voice, gesture, or image recognition possible with TensorFlow Lite. (Note: Voice examples are provided. Gesture and image examples hope to be released by TensorFlow soon)
General
- 1.8V - 3.6V supply voltage range
- Small 1.6in x 1.6in x 0.35in (40.6mm x 40.6mm x 8.9mm) form factor
SparkFun Edge Development Board - Apollo3 Blue Product Help and Resources
Programming the SparkFun Edge with Arduino
December 9, 2019
Running low-power machine learning examples on the SparkFun Edge can now be done using the familiar Arduino IDE. In this follow-up to the initial Edge tutorial, we'll look at how to get three examples up and running without the need to learn an entirely new SDK.
Using SparkFun Edge Board with Ambiq Apollo3 SDK
March 28, 2019
We will demonstrate how to get started with your SparkFun Edge Board by setting up the toolchain on your computer, examining an example program, and using the serial uploader tool to flash the chip.
SparkFun Edge Hookup Guide
September 26, 2019
Get to know your Edge board, including both the hardware features for you to utilize as well as how to get talking to it.
Core Skill: Programming
If a board needs code or communicates somehow, you're going to need to know how to program or interface with it. The programming skill is all about communication and code.
Skill Level: Experienced - You will require a firm understanding of programming, the programming toolchain, and may have to make decisions on programming software or language. You may need to decipher a proprietary or specialized communication protocol. A logic analyzer might be necessary.
See all skill levels
Core Skill: Electrical Prototyping
If it requires power, you need to know how much, what all the pins do, and how to hook it up. You may need to reference datasheets, schematics, and know the ins and outs of electronics.
Skill Level: Rookie - You may be required to know a bit more about the component, such as orientation, or how to hook it up, in addition to power requirements. You will need to understand polarized components.
See all skill levels
Comments
Looking for answers to technical questions?
We welcome your comments and suggestions below. However, if you are looking for solutions to technical questions please see our Technical Assistance page.
Customer Reviews
2.7 out of 5
Based on 20 ratings:
3 of 3 found this helpful:
Apollo3
Well, demo sketch on the board only works 5% of the time. Kinda disappointing.
4 of 4 found this helpful:
Nice idea but disappointed
The demo of the Voice regognition is not working and no help from the forum.
Without Tensorflow feature working, this board has no interest
I have done some debugging and I think I have found a workaround. Waiting for confirmation. more details here:
https://github.com/tensorflow/tensorflow/issues/28516
https://forum.sparkfun.com/viewtopic.php?f=153&t=49735
1 of 1 found this helpful:
Not Worth It
Poorly maintained documentation and out of sync repo / library versions! I originally bought the board back in Nov. 2019 and it took quite a bit of messing with to get it to program properly because the documentation did not match the method that eventually worked, I figured maybe because I had an older board so I bought another one in Jan. 2020 since it states in the documentation that it is supposed to come with the SVL bootloader but even this newer one could only upload using the Ambiq secure bootloader setting. After getting uploading working you quickly find that the examples and the dependency libraries don't work well together, you have to try different versions until you find a combination that might work but more than likely you have to go in and edit a bunch of code to fix the issues, you spend so much time just trying to get something to work just to find out that once you finally get it working the examples are pretty crappy and not even worth the time. Total waste of time and money!!
2 of 2 found this helpful:
Quite disapointed
Great price. The promise is nice. But when i put battery in it is difficult to make blink the leds. And no much doc about how to use it. I'd like to use Bluetooth but nothing about that.
3 of 3 found this helpful:
Needs a lot of work
I tried the default program (yes, no) and it worked about 3 times out of 200. I even tried building it from scratch via the tensorflow sites tutorial. This product is essentially unusable in its current state.
4 of 4 found this helpful:
Even worse if you bought the EDGE 2
They dropped the EDGE 2 version shortly after I bought without any notice or explanation. Didn't work anyway. Very disappointed in product and service
By contrast the Adafruit PyBadge is well supported and works. Can use Arduino libs to access Tensorflow Lite and Google says Circuit Python support is coming. And the underlying processor is significantly faster. Costs more than double -$34 but Adafruit is clearly committed to ML so a much better place to invest your money
4 of 4 found this helpful:
Do not buy! Not ready for market!
Preloaded demo doesn't work well... Getting started is basically impossible due to poor documentation at the moment. Needs a lot of TLC to become a product you can actually ask money for. Very disappointed.
6 of 7 found this helpful:
Good platform, steep learning curve
Overall I think this Edge board is good, but "Steep Learning Curve" is the essence of my experience. I decided to really invest the time and learn how to use this board and the capabilities of this nifty Ambiq Apollo3 Blue core & now that I've worked through most of my issues and can easily and reliably build & boatload Ambiq, SparkFun, and TensorFlow Lite for MCU examples to the board, I'm starting to see the promise for this board in all sorts of small low-power, wirelessly connected projects. I think the BLE capabilities are pretty compelling & It really is a nice little product once you get through the learning pains (which I think most people will just give up on, unfortunately).
However, this board is not for the faint of heart, I have spent weeks (yes, weeks!) getting to this point where I'm a bit more comfortable with it and modifying example projects to do my own thing with it.
A couple of notes:
Built-in "Yes/No" speech demo does not work great. Same results when building directly from the TensorFlow tutorial from source-code. I'm not sure if this is a imitation of the MEMS mics, the limitation of the inference model that can be implemented in the Apollo3, or PWB/manufacturing quality;
I had a similar experience with the TensorFlow Magic Wand demo ... buggy and unreliable results (and poorly documented). This leads me to think it is not a great choice for Machine Learning inference ... but I'm really still investigating this.
The documentation and troubleshooting for this board needs lots of work, lots of references and old tool-chains, etc. It took me a while to eventually find the "LTS" Github repo, which is much cleaned up ... but I found this quite by accident.
I had lots of problems initially getting the serial UART boot loader working. The documentation focuses on the CH340 series boards & this caused my numerous headaches (and almost threw out my SF Edge and CH340 board and quit!). Numerous driver problems in MacOSX & Linux (Ubu 18.04LTS), tried compiling from the sources, etc, etc. So frustrating! I eventually found an FTDI-based USB UART breakouts (with 3.3v/5v selection) that works great! and this solved lots of my headaches. However, I still don't think the button bootload process was explained clearly in the original SF tutorial, and endless searches through google, ending up on random forums, trying different baud rates, etc. ... so again - lot's of frustration until I figured out how it works & it is so seamless now.
I wish there was a good bare-metal BLE example in your repo, instead of one based on FreeRTOS. So, now I have to learn a bit about FreeRTOS too (which may not be a bad thing). There may be a good reason for this (task scheduling is crucial to get BLE to work?), but as I'm still new to BLE too, I just don't know & I couldn't find any docs that really break this down for you other than just trying to start from one of the example projects (which I'm glad you guys provide!)
Please update your tutorial (on your learn section for this product) and please steer people to better documentation and support & AWAY from the CH340 and towards a suitable FTDI product instead!
2 of 3 found this helpful:
How to amuse an idiot for an hour
So I was sitting at my desk, repeatedly saying "yes" in the vain hope that the yellow LED would blink (it did, 3 times out of 50) when my wife came in looking very puzzled and wondering just what I was up to. So I told her and gave her the board so that she could try it. With 1 success out of 20 tries, she gave this review its title.
If this is as good as it gets with a professionally developed and supplied application, then we should plan on ignoring the deep learning features and just use it as a low power Arduino replacement.
1 of 4 found this helpful:
Awesome device for offline inference!
This chip is literally the future of AI, it lets you run vocal inference on a chip which isn't even that expensive. Amazing!
Interesting
Had some startup issues with the battery holder not making contact on two boards, resolved by multiple insertions/removals. Initial operation has the yes/no accuracy and sensitivity are pretty low. Have not explored the toolchain yet, that sounds like a very interesting area to poke at.
Lacking debug headers.
Not a comment on the ML capabilities, that is a function of the TensorFlow example code and model together with the quality of the sensors.
I have 3 of these boards but will largely use them only for deploying applications rather than experimentation and development for which they were intended, this is because of the lack of a fitted debug header. The micro headers are not something I usually have to hand and I like having to solder them on even less.
I don't mind using FTDI to program the board but for debugging I want to use a proper debug probe.
So for this reason it makes more sense to me to develop on one of my larger Cortex boards and use this purely for deployment where the size and battery and a distinct benefit.
Perhaps fitting the header on the next version (or at least offering it as a more expensive option) would be good.
Device is good, but default firmware is buggy.
The ML has lots of room to be improved. Maybe there is bugs in the firmware?
I will work it out the bugs and upload my own model to it, but if you don't have the skills to read the code and create your own Tensorflow lite model, then I don't think this device is for you.
Yes... Yes... Yes... Nope
Great little innovation, but functionality? Near zero, as many other customers describe. What annoys me is also that you have to take the battery out. I'm just not playing with toys all day, so ON/OFF switch is just basics like water.
not ready yet
Ran a workshop with these and they were nothing but trouble. The "reset/button 14, let go of reset" process is silly and shouldn't be necessary.
Be Careful about JTAG connector
JTAG connector's pin assignment is inverted !!! Please do NOT implement the pin header on this board when you use J-link debugger.
Thanks for the review, but the connector is used from the other side of the board. If you flip the board over, everything is in the correct order. :-)
Amazing fun and good to go right out of the box
This is a really great tool for using embedded machine learning. The stock speech recognition demo works as advertised, and is tremendous fun to play with. It's very capable hardware.
Don't buy
I think this is an abandoned product. Bought it with a camera. So far, I haven't been able to make it work. To upload the sketch hold 14 down.
ML Speech Recognition works
The SparkFun Edge Micro Speech recognition demo works after adjusting the sensitivity of the app. The SparkFun demo by Nathan Seidle and Pete Warden showed terrible results for recognizing "yes" and "no".
After changing the call (in micro_speech/main_functions.cc around line 125) to:
static RecognizeCommands static_recognizer(error_reporter, 1000, 100, 500, 2);
I now get very good results with "yes" and "no".
The demo code is from https://github.com/tensorflow/tflite-micro
I highly recommend getting the O'Reilly book TinyML (by Pete Warden) that goes over the installation and development of code for ML on the SparkFun Edge.
The Apollo3 chip is going to be worth the time investment to understand and master for ML at the low power micro level. The SparkFun Edge is a nice board to get started with this effort but could use a few more GPIO pins.
SparkFun should update the demo app with the code change above to make the demo work at an acceptable level.
Some useful links:
Is "Yes" the only word that the device understands? Can more words be learned or will there be updates in the future?
The Edge ships with a TensorFlow model that understands the word 'Yes' but it can be changed by creating and loading a new model. Checkout danoved's links above namely Creating your own model.
Can you teach it the words to recognize or you have to use preset commands? If so, how many commands it can handle?
Got the board and played with it a little. Also wish there were more GPIOs broken out.
I have one remark/question: with all LEDs off and the CPU in deep sleep mode, the board draws approx. 1mA. From what I gathered from the schematic, I think it should draw in the order of ~400-500uA instead (the opamp and the 2 microphones making up most of that). Where do the extra 500uA come from? Are the microphones mounted on the board different from those shown on the schematic? (which by the way are not PW2430xx but SPW2430xx, much easier to find them this way ;D )
As a side note, that would have been nice to be able to disconnect the microphones/opamp to lower power draw when not used.
Regarding the 6uA/MHz figure, that's in the most favorable condition (see datasheet) with many things off. Expect something closer to 16uA/MHz in a more realistic condition with a couple peripherals on, at 48MHz, and close to twice that (~30uA/MHz) at 96MHz...
I got the board and followed the directions to load the Tensorflow example. I get the floowing error when I try to flash the code on the board. (Using latest Ubuntu)
wst17@wst17-MacBook:~/tensorflow$ BAUD_RATE=921600 wst17@wst17-MacBook:~/tensorflow$ DEVICENAME=/dev/ttyUSB0 wst17@wst17-MacBook:~/tensorflow$ python3 tensorflow/lite/experimental/micro/tools/make/downloads/AmbiqSuite-Rel2.0.0/tools/apollo3_scripts/uart_wired_update.py -b ${BAUD_RATE} ${DEVICENAME} -r 1 -f main_nonsecure_wire.bin -i 6 Traceback (most recent call last): File "tensorflow/lite/experimental/micro/tools/make/downloads/AmbiqSuite-Rel2.0.0/tools/apollo3_scripts/uart_wired_update.py", line 5, in <module> import serial ModuleNotFoundError: No module named 'serial'
I hit this probably too when I first started with the Ambiq SDK. You need to install pyserial (and probably pycrypto). Checkout the bootloader docs:
I wish I had read the datasheet closer before buying. Ill still play with it, but the problem is 6uA/MHz but MHz is either 24 or 48 not Khz. so 144 or 288ua. Where the competition can get down to 6-10uA total with slower clocks at 1.8V the closest for this part on the datasheet is 80uA but that is with more stuff off than the competition. So a design with a CR2032 should last single digits of time times the length of time this part runs. Now if you get into the very deep sleep modes, without I/O (so how do you wake up gotta read more), then sure you can get a long run on a CR2032. The description says ~1.6mA. So at ~10ua that would be 160 times longer?
Has anyone tried to use the SWD Cortex-M debug port of this board ?. I tried using my JLink (which supports this Ambiq Apollo 3 CPU) and by soldering a non polarized 10-pin header. Couldn't get it to communicate. Upon further investigation I came to the conclusion that the two rows on the board are swapped. To correct this externally the adjacent lines of the ribbon cable need to be swapped and it's not easy to do that. Please investigate.
Based on the outline and the polarity markings on the bottom of the board, this header is designed to be used from the bottom of the board.
Please add this info to the hookup guide. It's easy to make this mistake.
FYI. If anyone is facing a similar situation and does not want to desolder the header a row swapping adapter could be easily built connecting two of the following breakout boards back to back.
https://www.adafruit.com/product/2743
If you place the debug connector at the bottom of the board it should resolve this issue right ?.
Yes the SWD connector must be mounted on the bottom side (same side where the battery holder lies) (can be infered from the Eagle layout and the Cortex debug connector pin-out...)
Hi, I followed the instruction for example1, and did "Now to flash your code to the Edge hold down Button 14, press and release reset, and type make bootload into your Bash shell. .." the compiling went for awhile error-ed out the following error. What to do? I used the Dev 09873 serial connection on COM19.
"... Traceback (most recent call last): File "../../../../../tools/apollo3_scripts/create_cust_image_blob.py", line 6, in <module> from Crypto.Cipher import AES ModuleNotFoundError: No module named 'Crypto' make: *** [bootload] Error 1 bash-3.1$
I see that DEV-15096 breakout board is on back order. I have another serial to USB, DEV-09873. Can it work with the Apollo 3 to connect to USB?
Yep! The FTDI based DEV-09873 is 3.3V by default so you'll be fine. We just don't want folks accidentally sending 5V to this board. (FWIW, we're building more USB Serial Basics; should be posted within a day.)
Thanks. It worked.
I received two boards a few days ago, and was expecting (based on the video) to be able to pop a CR2032 in and see some action (or at least a glowing LED or two). Nada. Was the yes/no demo not actually loaded on the boards? Or am I missing something obvious? I do intend to set up the toolchain, but was hoping for some early indication that the hardware worked as expected.
Yep! All units ship with the voice recognition demo pre-loaded. If you're having issues, double check that the battery is making contact/powering the board. If that's not the issue, please contact customer service and we'll get it fixed.
Working! The problem appears to be that the negative battery contact (the PCB land) needed to be abraded just a bit before it made contact. Removing and inserting the batteries half a dozen times or so and Voila! All is working now. They both behaved this way, by the way. Batch number 119107 if that is of interest.
Amazing. Would have been better with more GPIOs...
Agreed. Checkout the schematic. A lot of the IOs went to camera interface and dedicated I2C but for accel. But I like the idea of a board with more IO. Let me think about it...
Does the BLE transceiver have an FCC-ID? Is this a prequalified module or would I need to go through certification using this in my design?
There is no FCC cert for this device but Ambiq provides a variety of demos in their SDK to get the BLE up and running.
Does this board have inbuilt WiFi or is there any provision to connect any external WiFi shield or module ?
Looks amazing! Do you stock a camera that would work with this ?
This looks cool, but I wish it exposed more than 4 GPIOs, especially since the underlying processor seems to have so many.
Indeed. It was a lot of fun routing the BGA and with 4-layers and buried vias, there was only so many GPIO we could get to.
What kind of camera would work well with this?
I'm not 100% sure since it isn't supported yet, but it looks like the thin camera ribbon that works on a Pi Zero fits.
The link to the SDK Setup Guide (https://learn.sparkfun.com/tutorials/using-sparkfun-edge-board-with-ambiq-apollo3-sdk) doesn't work.
Correct, it isn't ready yet but it will be when we start shipping the Edge at the end of the month.
Amazing!