T³: Heated Blanket Teardown

Sarah takes apart a non-functional heated blanket to have a look around

Favorited Favorite 0

While at a local thrift store recently, I came across a non-functioning heating blanket. The place was willing to give it to me for very cheap since they just wanted it off their hands. I know a thing or two about electronics and was curious to see what was in the guts of this blanket, so I figured that I would take it apart on camera for anyone else that might also be curious.

When I was taking it apart, I found a fuse which I decided to take out and test. It was both broken and a common enough rating that I decided to try and replace it, to see if that would fix the heating element. A lot of the time fuses blow because another electronic piece has stopped functioning, so I knew it might take more than that, but I decided to give it the ol' college try.

Once I opened it up, it was pretty simple, and consisted of what you would expect.

Instides of the heated blanket

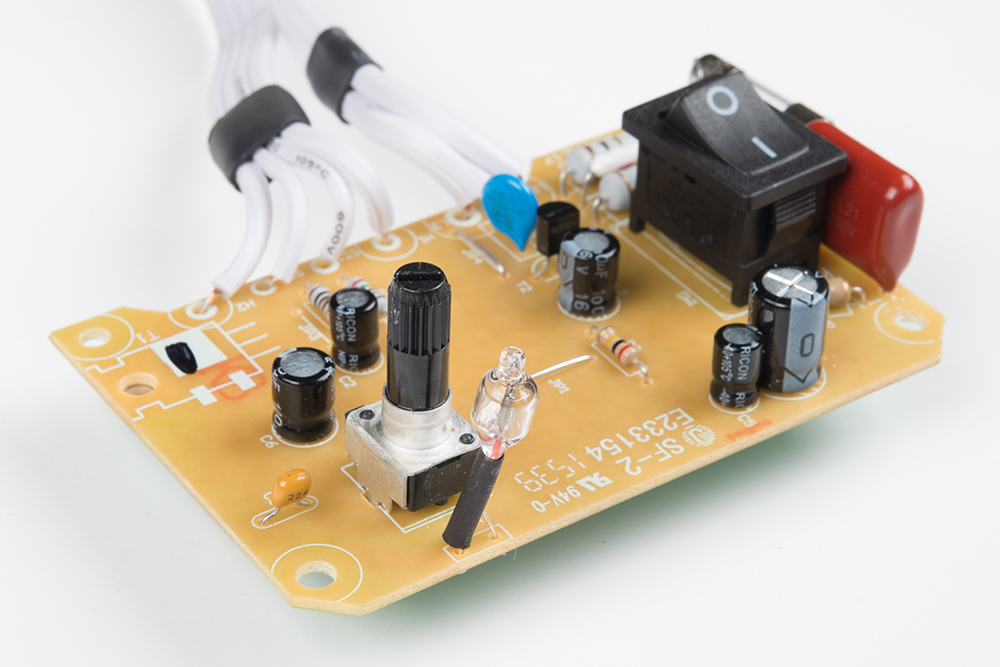
There was a switch for power, a potentiometer for the heat level, an LED indicator and lots of capacitors and resistors of various sizes.

Back side of the heated blanket PCB

On the back there were more resistors in chip form, lots of rectifier diodes, what I assume is another AC to DC converter, regular diodes, a LM339DG comparator chip for dealing with input from the dial, and an MC14541B programmable timer chip for the 10-hour switch-off safety feature.

Photo of the origional fuse and the replacement fuse in the heated blanket

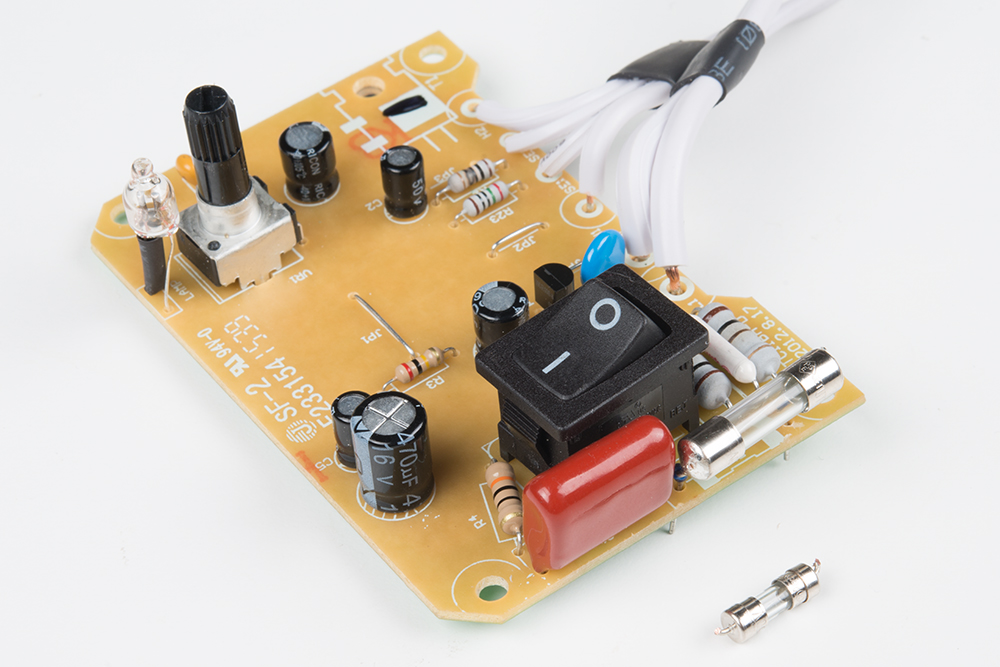
There was a 2A 250V fuse on the board, which I removed and replaced with a fuse with the same rating (although a slightly larger size, since I couldn't find the same size in my toolbox). I didn't think this would fix the blanket, and when I plugged it in after replacing the fuse, the light (which I found out was not an LED but a little bulb) didn't light up, so I figured it wasn't working.

SPOILERS!
However – as we were filming me saying it wasn't working, I felt the blanket heating up! The little bulb just wasn't functional, and may have been what burnt the fuse out. YAY! I am a happy little hacker.

Hope you enjoyed my teardown, let me know what you think and if you have done anything similar. Until next time! ^_^


Comments 14 comments

  • Member #7837 / about 8 years ago / 2

    What's that music?

  • Member #666505 / about 8 years ago * / 1

    oh holy molly... There is much more to fuses than the voltage and current ratings.

    And if you feel the need to play with the AC mains side of stuff, please consider using a variac to gradually apply power while watching input current. I do this whether testing a 5VA or 1000 kVA transformer.

  • Tube light? ARGH! :)

    There was once a world without LEDs :) The Venerable NE2 still lives! :)

    http://www.nutsvolts.com/uploads/magazine_downloads/NeonLamp-Information.pdf

  • OldFar-SeeingArt / about 8 years ago / 1

    Yes - I did something similar once. And it was a career changer! After 4 years of floundering in college changing majors and just not 'finding myself' in general, I stopped at a Goodwill store and saw an FM receiver - tube type from the 50's or so - and it was marked down to 2 or 3 dollars as it was non-working. I bought it, took it home and looked it over. Power on made the rectifier tube begin to overheat so there looked to be a possible shorted component somewhere. Further inspection showed a B+ wire passing through a sheet metal bulkhead had it's insulation cut through. Replacing that fixed it. I felt so great at fixing it that I changed majors to electronics and had a successful 40 year career from that point on.

    So finding old stuff at a thrift store can have hidden unexpected benefits.

  • Madbodger / about 8 years ago / 1

    I had a heating pad once that I was using as a warmer for a sick pet. The automatic 2-hour shutoff wasn't a feature I wanted, so I opened the controller, and found well-marked pads for choosing 2 or 10 hour shutoff and to disable it entirely. I documented it on my website, and I've actually gotten a couple of emails thanking me for doing so, as other people doing similar things could use the information.

  • Member #633356 / about 8 years ago * / 1

    Yes, everyone is correct. The bulb is in fact a neon lamp. The ballast resistor is located next to JP3 and in the photo is clearly damaged (burnt). Probably the rating on this resistor is too low. It looks to be a 1/2 watt. Try replacing it with a 1 watt. The lamp should now light up.

    • Sembazuru / about 8 years ago / 1

      I'm not convinced that burned resistor is for the neon lamp. Following the traces for the neon bulb makes me think that the surface mount R12 (47k) is the ballast resistor.

      It's difficult to tell in the photo where the burnt resistor passes through the board, but I think it is attached to the SE1 wire. (The return for the H1 loop of the blanket?) Maybe the blanket only half works with that resistor blown. What blew that resistor? Maybe the H1 loop of the blanket is suspect? (Suspect electric blankets are fire-hazards, not something I would want to sleep under.)

      • Sembazuru / about 8 years ago / 1

        Or is H1 to H2 the heater loop and SE1 to SE2 is some sort of sensor/feedback loop?

  • Member #193300 / about 8 years ago / 1

    Always nice to find a low cost fix and keep something out of the landfill. If you want to try replacing the little bulb, it looks to be a neon lamp. You can get a replacement for under a dollar - http://www.digikey.com/short/3z2vc1

    • Sarah Al-Mutlaq / about 8 years ago / 1

      That's pretty cool, thanks! I had just never seen one, do you know what kind of life span they have?

      • Sembazuru / about 8 years ago / 1

        Definitely a neon bulb. I'm not sure what life span, but as Member #134773 says they generally only work above 70-80V (depending on the specific model). What is interesting about them is with DC only one of the two electrodes inside will glow. Reverse the DC polarity and the other electrode will glow. I forget which one, but it might be the negative/ground side as electrons would be flying off that end and colliding with the neon atoms causing them to glow. (I could have my reasoning backwards though.)

        If you have a variable DC supply that can supply up to 100VDC you can test this for yourself. Connect the legs of a loose (known working) neon lamp to your supply. Set the output to zero and then turn the supply on. Slowly raise the voltage until you see a little glow on one of the electrodes. Turn off the supply, and switch the lamp around and then turn it back on. The other electrode should glow. Be careful though. With too much voltage you could push too much current through the bulb. This will heat up the gas inside, and if the gas gets too hot it may cause the glass envelope to fail showering the surrounding area with glass fragments. So wear your safety glasses and/or do the testing inside a clear plastic bottle that would contain any glass shrapnel. This happened to a classmate of mine when we were doing a lab on inductive kick. She hooked her circuit up wrong and got a huge kick. Burned up the momentary switch and exploded her neon bulb with a bright flash. We teased her that her shadow was etched on the wall behind her. ;-)

        With AC, each positive and negative peak cause the two electrodes to glow alternately. Persistence of vision causes us simple humans to think both are lit at the same time. (Remember, the DC voltage that causes the lamp to glow would be the AC Peak voltage. That's why the AC and DC ratings for these types of lamps are different on DigiKey.)

        I found this page with a Google search for "neon lamp failure modes". Apparently the normal failure of these lamps is an increasing firing voltage, which translates to a higher resistance. Not something that would trip the fuse, so don't be too confident that you found the source of the fuse failing.

  • boba / about 8 years ago / 1

    I hacked a heating blanket: my wife and I wanted to have a timer so that we could set it, go to bed. and an hour (or whenever) later, the heating level would go down or go off (separate preferences for his side and her side). I wrote about it at http://www.galacticstudios.org/heating-pad/

Related Posts

Recent Posts

Open-Source HVAC?

What is L-Band?

Tags


All Tags