Hardware Hump Day: Cloning your Raspberry Pi

Do you ever need to make a lot of Pi? This trick will save you some time!
I'll be the first to admit I was a latecomer to the Raspberry Pi party, but now that I'm in I have to say, it's one of my favorite pieces of hardware. It's a tiny Linux computer with HDMI out and network capability; what's not to like about it? Well, there is one downside to all that functionality: Configuration can be a pain. If your project only involves one Raspberry Pi, it's honestly not so bad. But things balloon very quickly when you need to have three or more Raspberry Pi boards all running the same software.
Of course you can boot each board, install your software from a thumb drive or online repository and then move on to the next. If you're a little more clever, you might write a script to install your software and set your configurations so you don't have to do it manually. But if your configuration is particularly large or complicated, this might take a very long time. So what's the answer? Simple: Just set up your first Raspberry Pi and then clone the SD card onto the others!
Alright, it's not exactly simple. You can't just copy all the files from your Raspberry Pi SD card and paste them onto another, because there are actually multiple partitions on the card that need to be present for the Pi to boot correctly. Luckily, there is a method for copying both the data and the structure of the card: Disk Imaging. When you create a disk image using a tool like Win32DiskImager, you make an exact copy of the entire storage device, including the unallocated space on the drive. That last bit, unfortunately, is going to make things complicated. Since the disk image will be the same size as the disk that it was imaged from, and since no two SD cards are exactly the same size, the image of one "16GB" card may not fit on another "16GB" card. Also, do you really want to hang on to a 16GB disk image that's mostly unallocated and unused storage space?
So we do need to make an image of our "fully-configured" SD card, and then we'll have to shrink it. But before we make an image, let's make sure that the partitions are as small as they can be and organized properly. Chances are, when you first booted your Raspberry Pi, it asked if you wanted to expand the filesystem and you said yes, which is fine! However, now you're gonna have to remove all of that free space from the Linux partition. The best tool for this job is GParted. If you have access to a Linux machine, you can run GParted there, but if you want to use it on another machine you can also run it from a live USB stick. This process will look slightly different depending on your source SD card, so I'm not going to cover it here, but most of the time it's as simple as clicking and dragging. You can read more about it here!
So now that we've shrunk the free space out of our partition table, let's make an image. (I'm going to assume you're doing all of this in a Windows environment, which I understand isn't a great assumption, but many of the tools have equivalents on other platforms.) There are a lot of disk imaging tools out there, but for Windows, I think the simplest and best is Win32DiskImager. Once you've installed and launched the program, you'll be presented with a very simple interface:
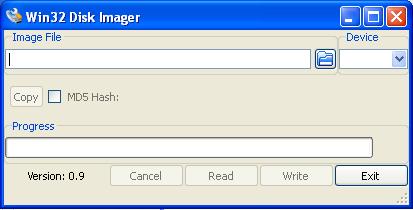
To make an image, first give your image a name. Make sure you select a destination with enough storage capacity for a very large disk image. Now, make sure your source SD card is inserted in the PC and select it from the "Device" menu. It is super important that you double and triple check you've selected the correct device. If you fail to select the correct device, you will cause irreversible damage to whichever device you select. But don't take my word for it:
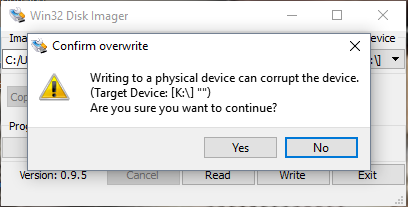
Once you've made sure you have the right device selected, go ahead and press "yes." Once you've stared at this for long enough:
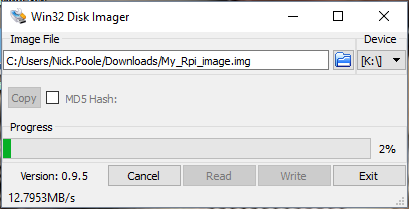
...you'll have an exact image of your source SD card sitting in your destination folder. The temptation at this point is to insert another SD card and press "write," but that won't work yet. First, we need to trim all of that unallocated space off the end of our image. Once again, Linux has the best disk management tools so we're going to use fdisk and truncate. Since I'm on a Windows machine, I'm going to use these tools under Cygwin! Cygwin is a Linux-like environment for Windows with many of the commands and tools that are familiar to Linux users. If you want to manipulate your disk image under Cygwin, you'll need to move it to your Cygwin home folder because Cygwin can't "see" most of your Windows file structure.
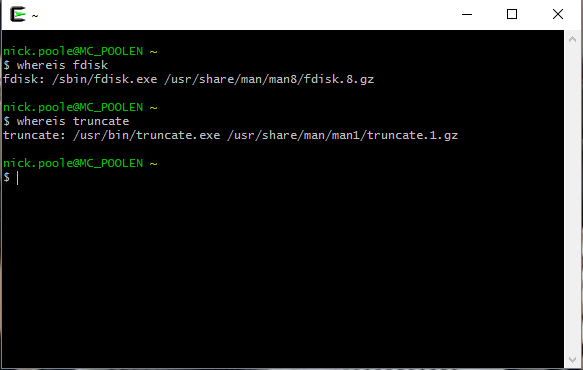
In the Cygwin console, the first thing I like to do is toss a few whereis commands:
Now I know the paths for each of these tools so I can go ahead and use fdisk to look at where my partition table ends and then use truncate to chop off the remainder of the image. First I'll show you what that looks like, then I'll explain what we did.
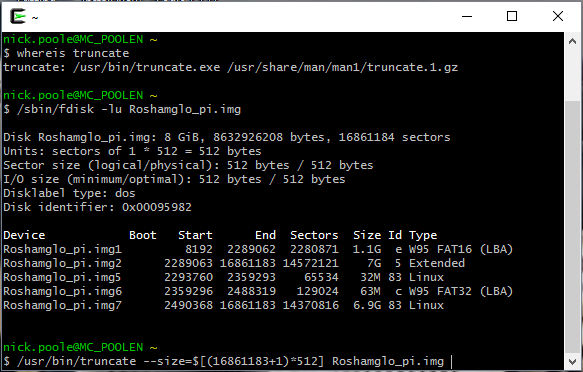
Looking at the above table, you can see all the separate partitions in the image that I was talking about. You can also see the "Start" and "End" sectors of each partition listed out. If we look at the end sector of the last partition, it's about 16 million. If you multiply that out by 512 bytes per sector, that's only half the capacity of our 16GB drive! The rest of the image is unallocated and essentially wasted space. To trim that wasted space from the end of the image, you can see I've written a truncate command on the following line. For clarity's sake, here it is again:
/usr/bin/truncate --size=$[(16861183+1)*512] Roshamglo_pi.img
What truncate is going to do is remove the last n-many bytes from our image file (in this case Roshamglo_pi.img). We want to trim everything back to the ending byte of the last partition, so we set the size to the end sector of the last partition plus one (because sectors are zero indexed) times 512 bytes-per-sector.
After running this command, go check the size of your disk image and you should find it greatly reduced. Now you can put it on as many SD cards as you want. Load up Win32DiskImager one more time and select the freshly trimmed disk image. Insert a fresh SD card, select it in the Device menu and click "write" to create your first clone.
Congratulations, now you can make hundreds of copies of your pre-configured Raspberry Pi SD card! If you have any questions about this process or know of a better tool or process, let's talk in the comment section! Now go forth and create a CLONE ARMY!!!


