3D Printing and Tabletop Gaming

Why pay hundreds, if not thousands, of dollars on expensive tabletop and board game accessories if you can just 3D print or make them yourself?

Favorited Favorite 3

I have been playing a multitude of tabletop and board games since I was about 10 or 11 years old. For as long as I can remember, I've always had a fascination with creating fantasy worlds, characters, powers and races, so when I finally was old enough to be allowed to start dabbling in role play games I already had a strong basis on what I wanted to do.

The only problem I had with it was that I was never really able to convey my ideas or creations to the rest of my group of players that I was trying to lead through the worlds I created for them. This inability frustrated me, which ultimately made me leave the gaming realm for quite a while to focus more on writing (and lucky enough for me I was able to make a career out of it). By the time I was in college, I discovered new ways to help convey my imagination better. This got me back into tabletop gaming, but it wasn't until I got to SparkFun, where I had access to 3D printers, that I fully realized what I could do.

Over the last few years, 3D printing has really exploded (you may have noticed). It has become a pretty big deal especially to people like me, since it allows us to help portray a world of our own creation more accurately. I was surprised by the number of resources available to turn my fantasies into reality!

As you can see from the video above, 3D printing and other forms of crafting can be used not only in the worlds of Dungeons & Dragons and fantasy, but also in science fiction – heck these same ideas can be utilized to help kids making a diorama or model for school projects. For today, though, let's just focus on the former.

To start with, I knew for the past couple of years that I wanted to feature dungeon tiles for the games I typically run but, to be frank, I'm not made of money and couldn't afford paying for a plethora of unique parts for just the right situations, and I never really liked the look of the low-end picture panels that are typically the cheaper option. I knew that there needed to be a middle ground that I could implement.

That's when I discovered OpenForge from Masterwork Tools. The dungeon tiles these wonderful people thought up instantly grabbed my attention and made me want to use their designs for my games, but we also wanted to showcase an alternative way to make your own in case you don't have a 3D printer. So let's take a quick look at how we got to where we are in the video above.

Build in Cura

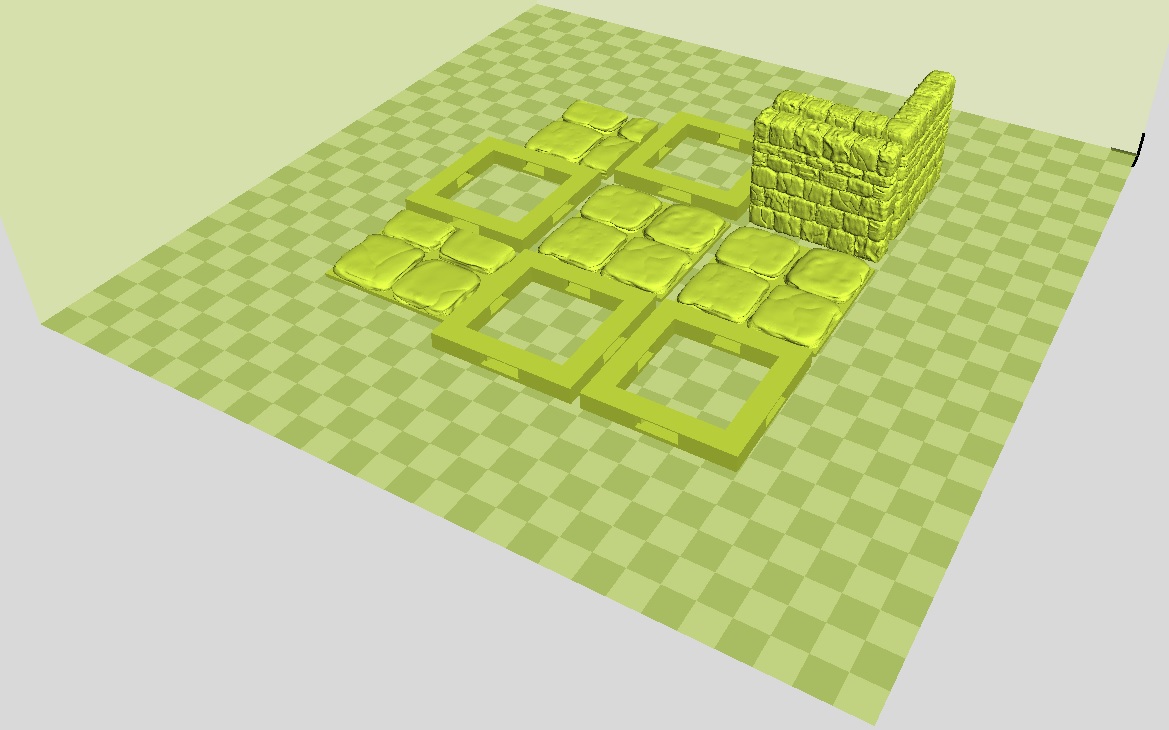
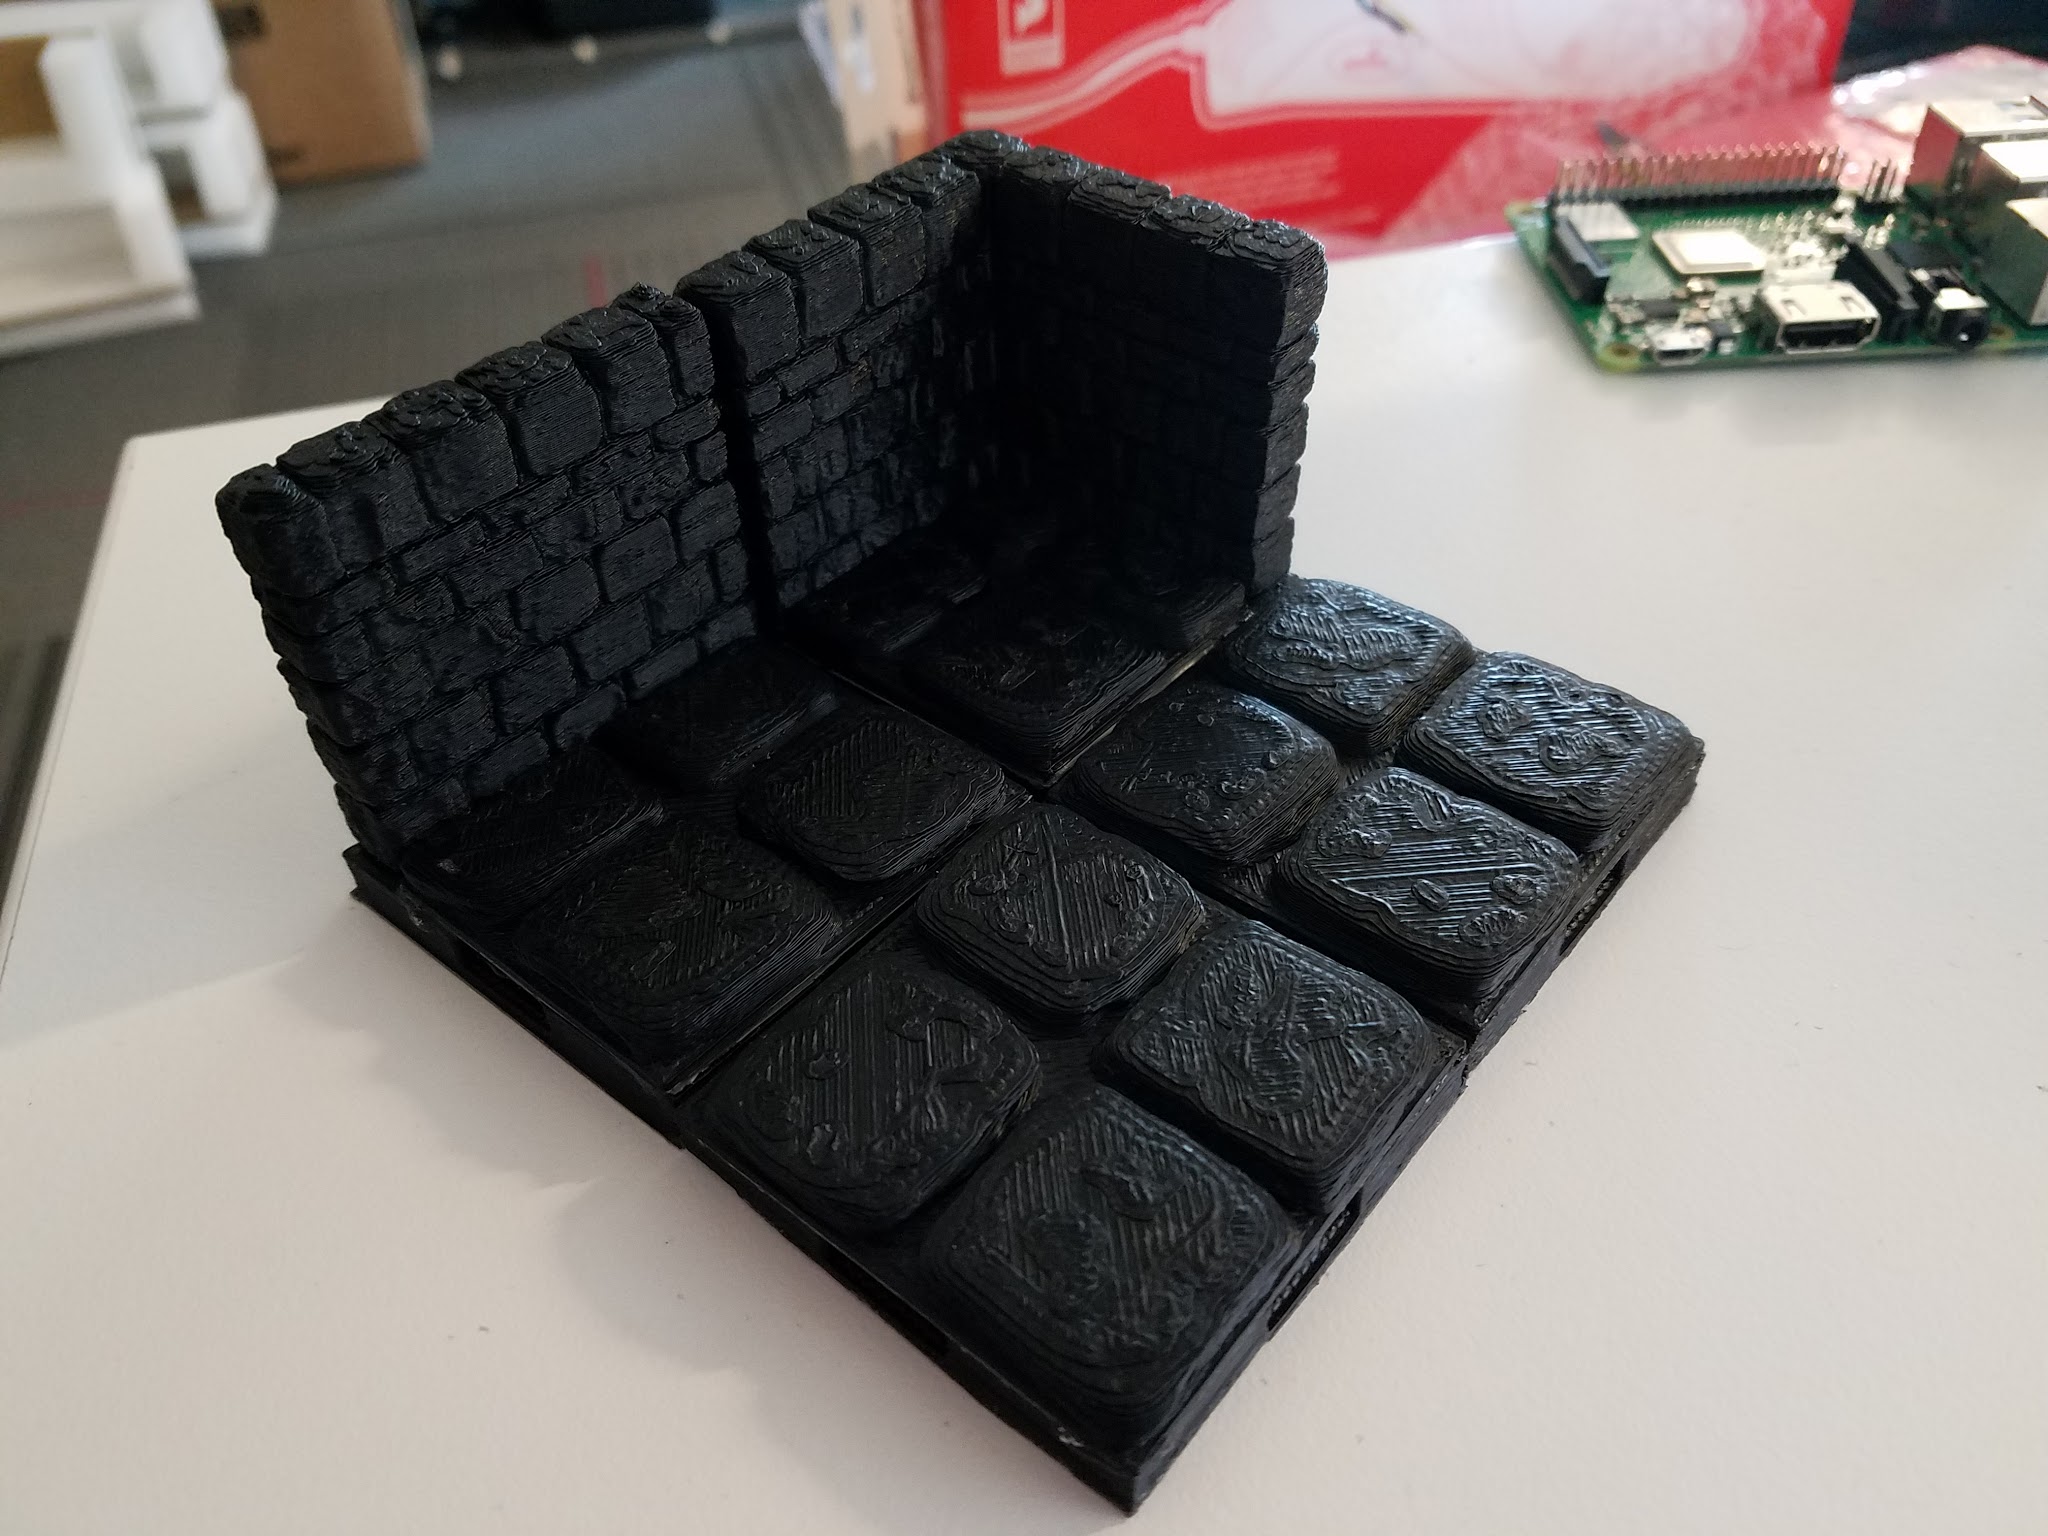
First we needed to get the layout started. I used the LulzBot Edition of Cura to get the designs in and to my specifics before printing. I knew I wanted to print a small quantity of tiles for this initial run, since I had never used OpenForge before and wanted to make sure I liked it (Spoiler alert: I love it). Once I got everything into my desired orientation I printed out the dungeon tiles on a Taz 6 3D Printer using black ABS filament. I made sure that I applied a brim to each object so I didn't have to worry about any of the corners turning up while printing.

Cutting off the brim!

Once everything was printed out, which took about six hours on a standard print setting, I was able to start disassembling all the individual parts from the brim. This was pretty easy to do with a pair of diagonal cutters for backup.

All put together.

Getting the dungeon tiles assembled took a little bit of patience because I really wanted to make sure everything was lined up and neat. Using some Super-T glue and accelerant really made short work of the build process as I was comfortable with getting everything laid out.

Start painting!

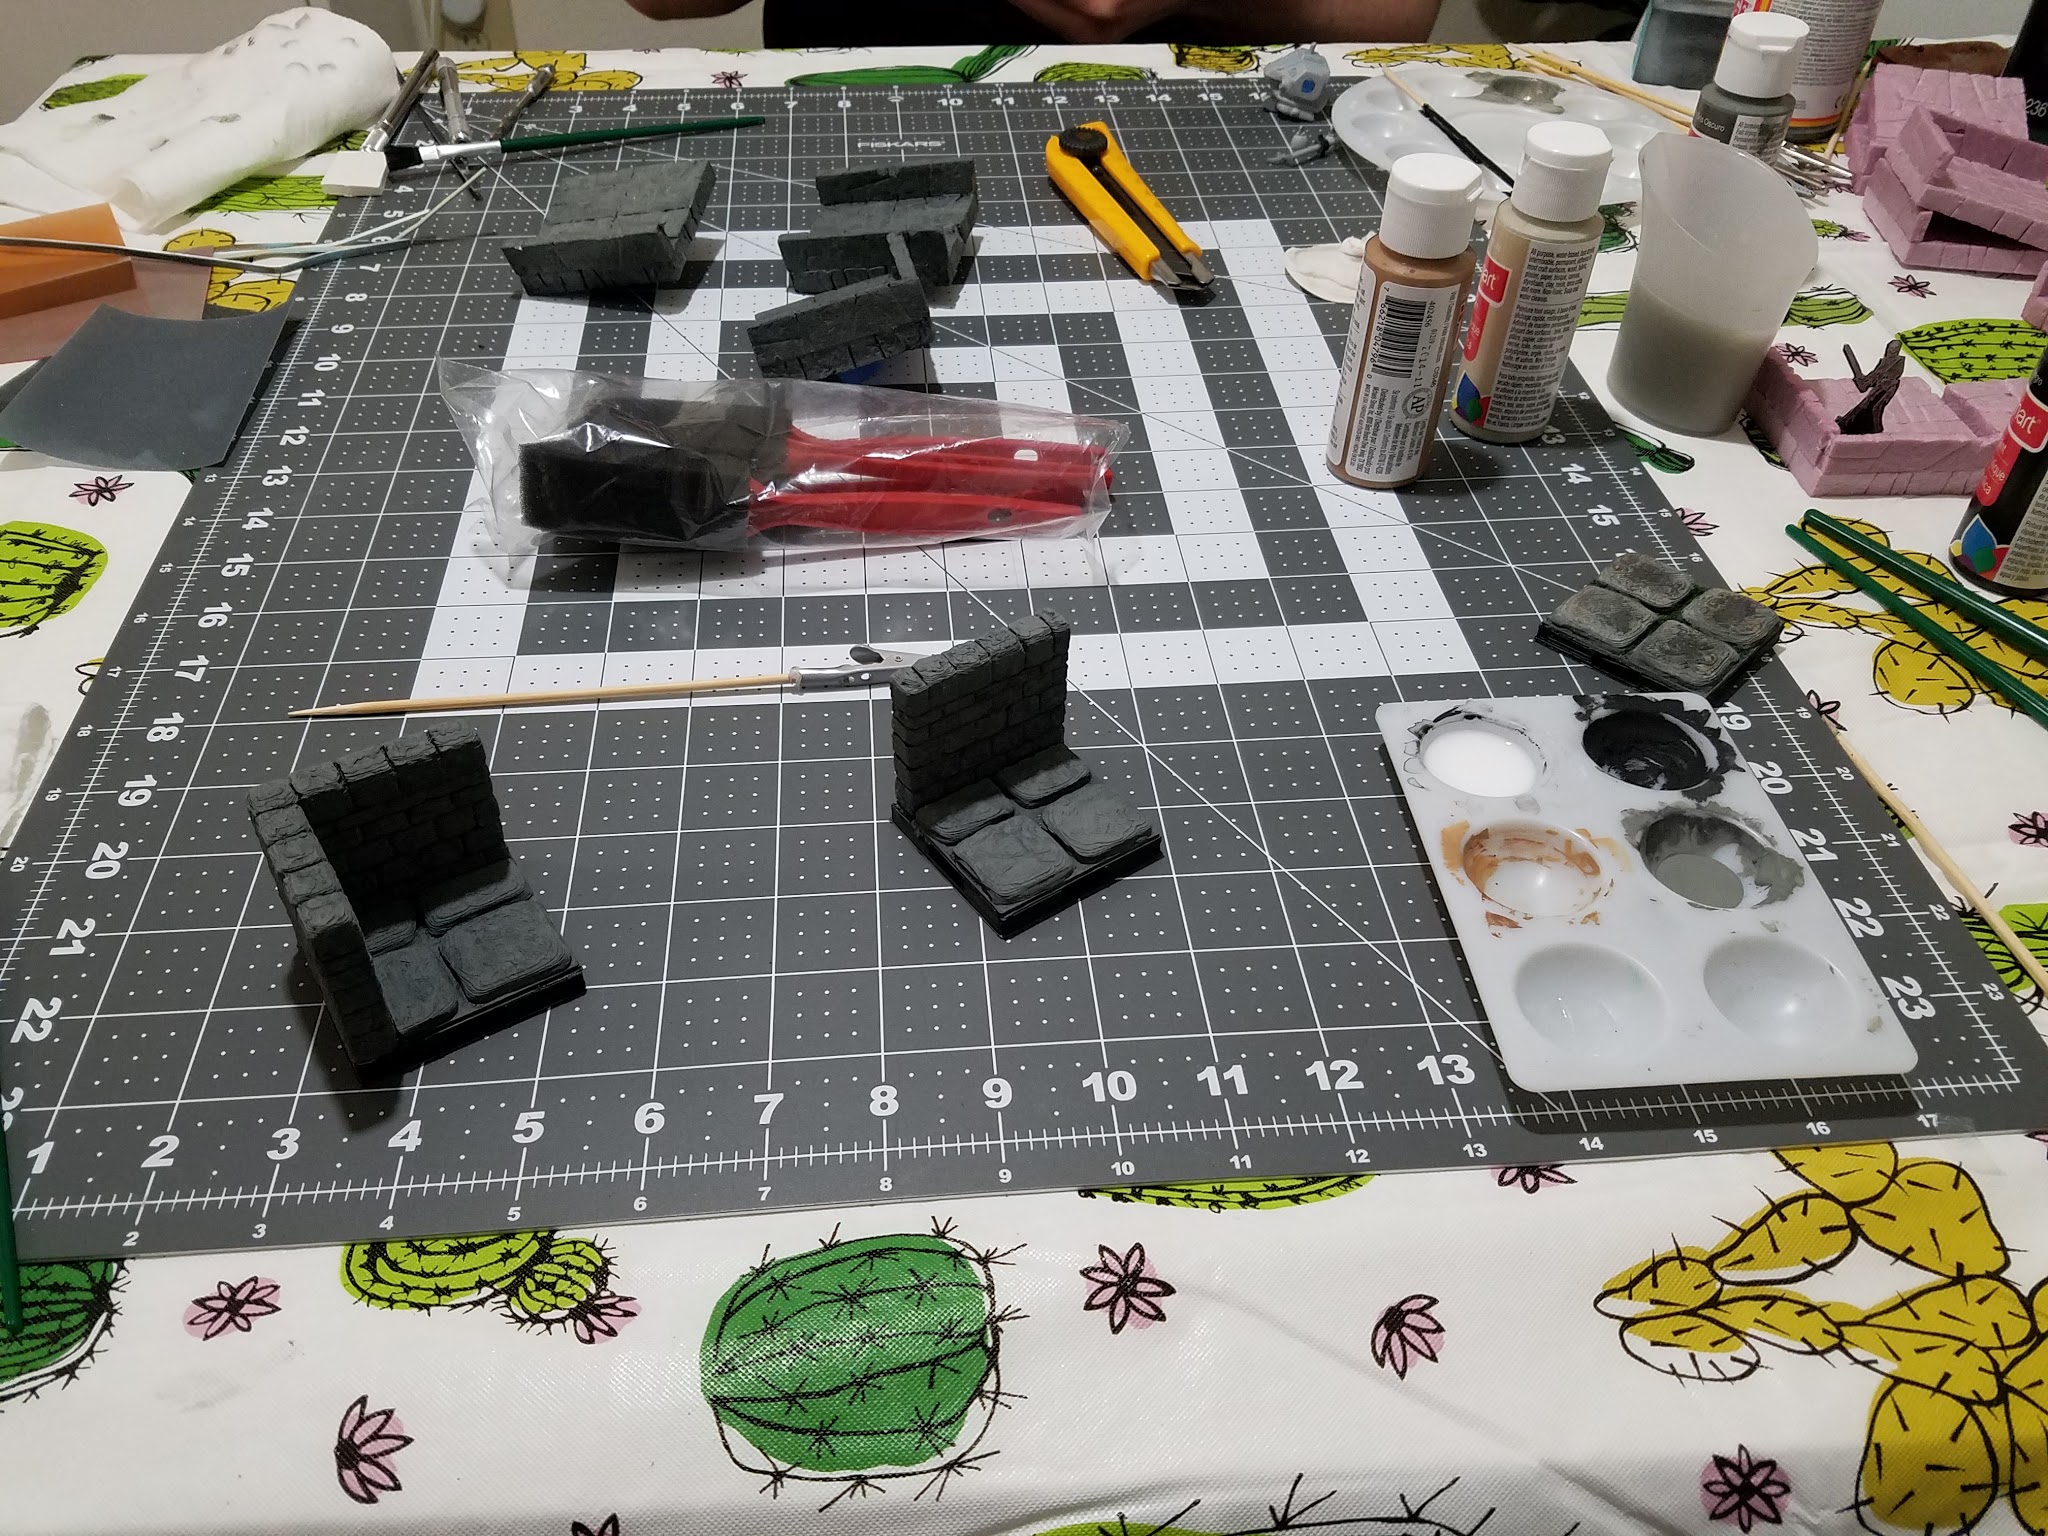
Once I got the dungeon tiles assembled, it was time to start painting. I applied a few layers of gray paint in various shades, starting with darker tones then progressing up to lighter ones to get down a base coat to give them a good stone appearance.

Time for some detail.

Once the base coat was down and I felt good about how it looked, I started adding a bit of brown to accent some of the pieces and to make it appear like the floor was dirty and grimy. From this picture you can also start to see the progress on the expanded polystyrene (XPS) foam that was discussed in the video as well!

Finished!

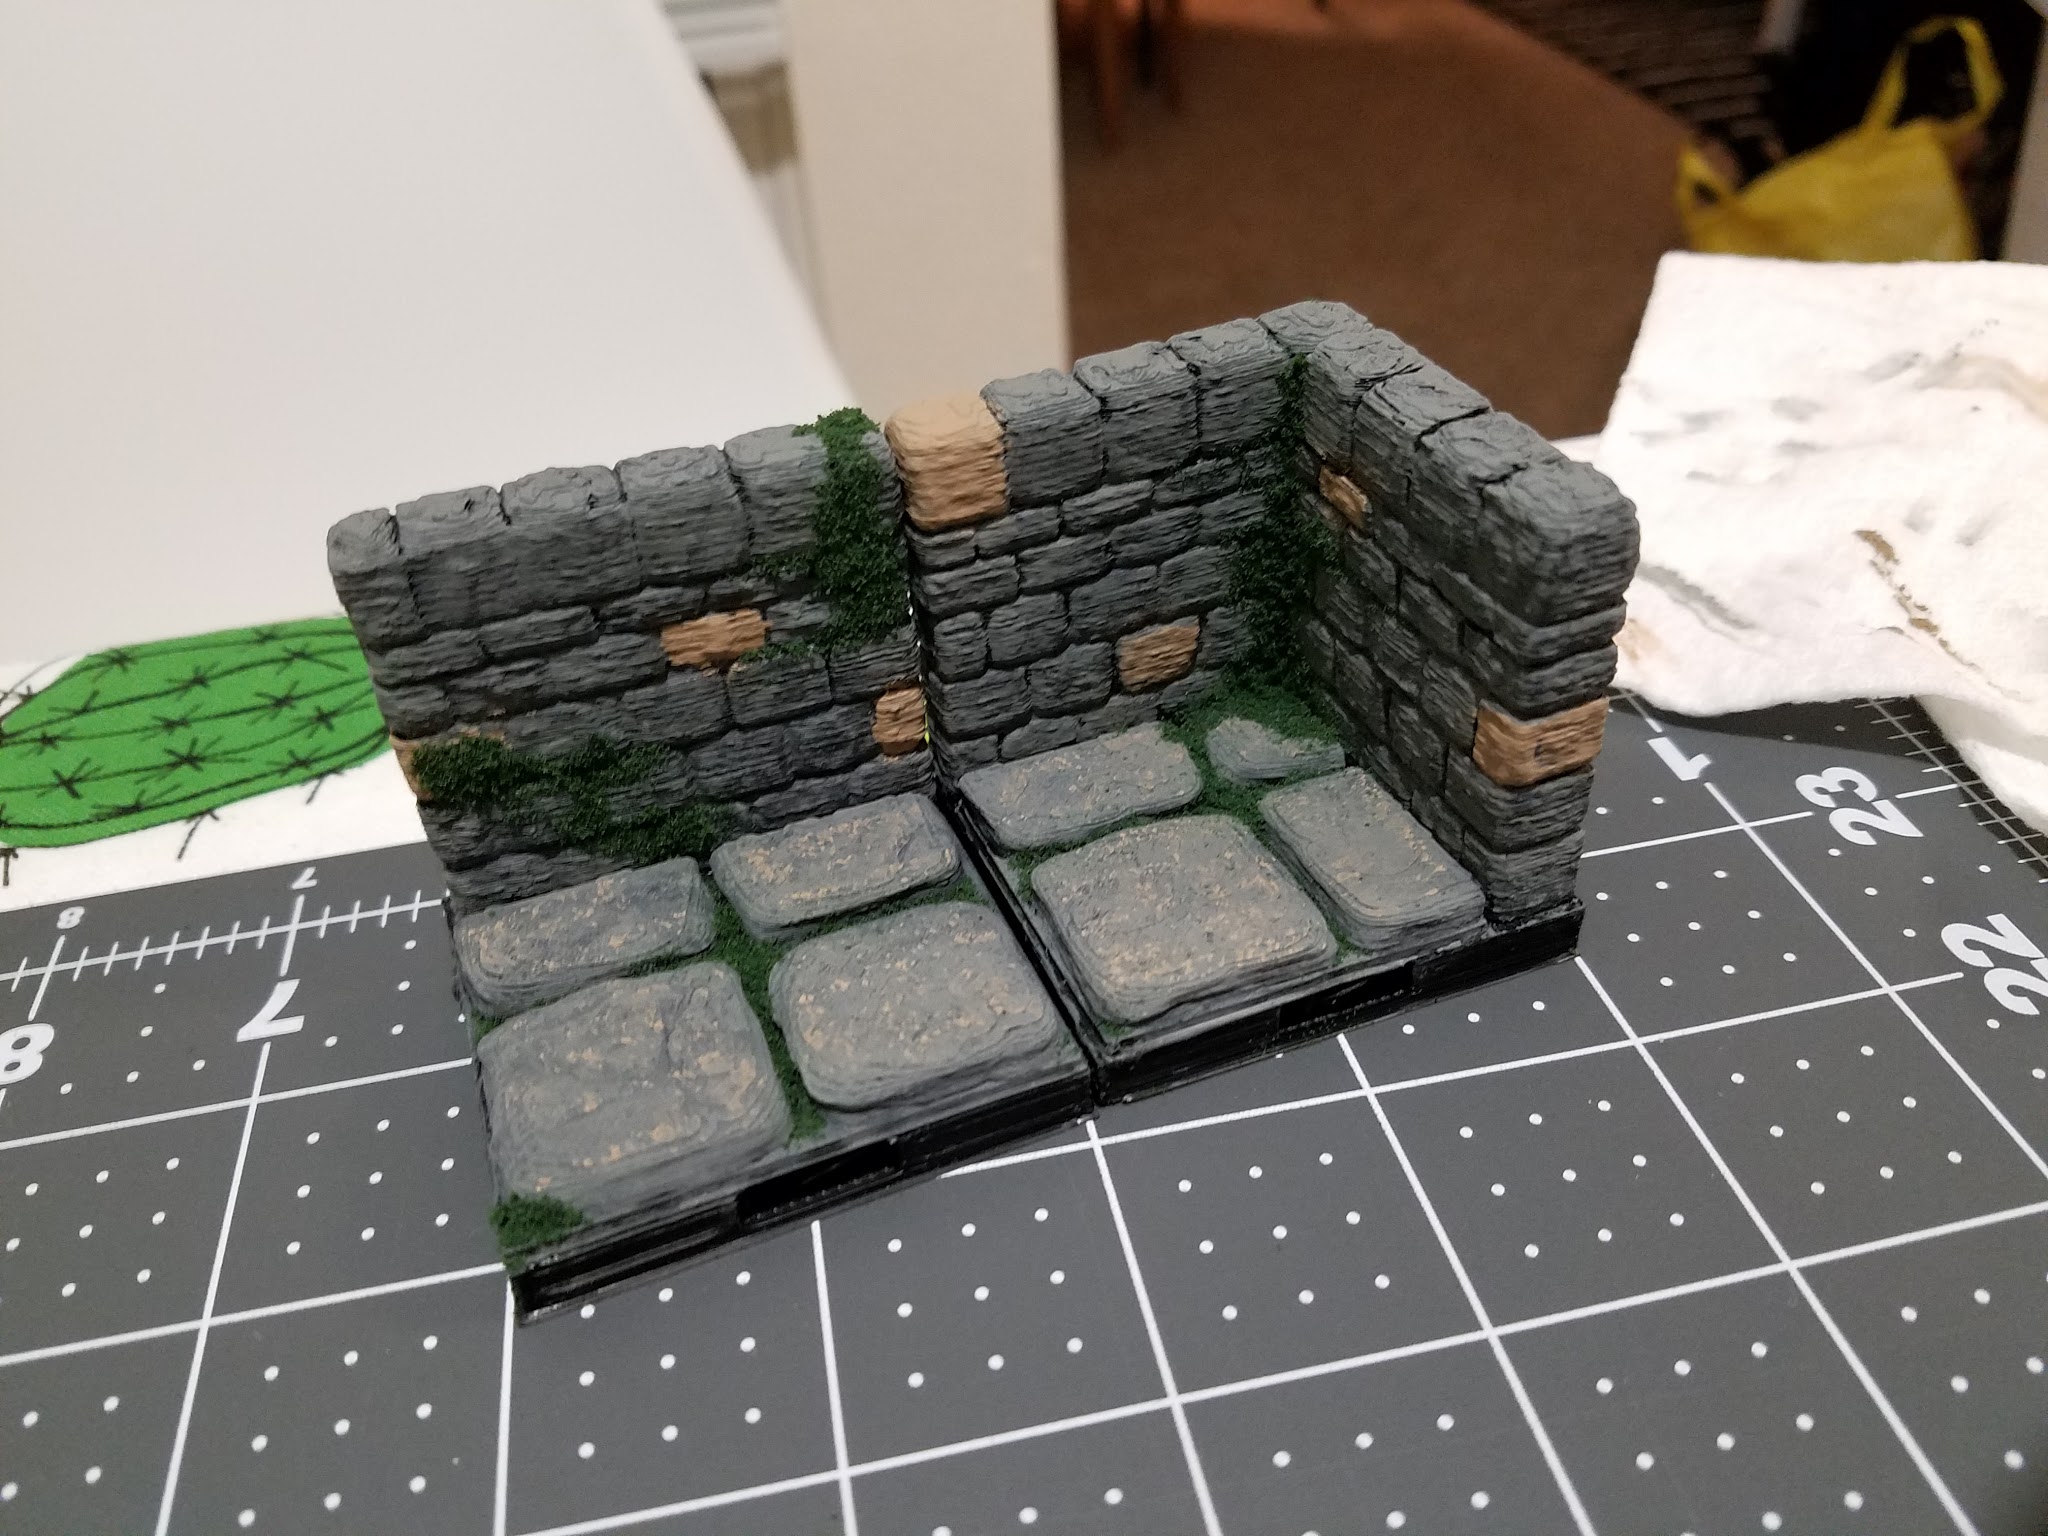
Now that the paint was all applied, I decided to add a little bit of flair to the stone work by adding a bit of moss. To add this effect I just made a 50/50 glue water solution, applied it to some of the crevices, and sprinkled in some some "fine turf" from Woodland Scenics. Once that was all done the tiles received a healthy coat of polyurethane to seal everything in place to reduce the risk of scratching and divots to the fresh paint job.

That's pretty much all there was too it. The whole build and paint process took about eight and a half hours in total, with the longest portion being the actual print process.

If I'm being honest, this whole process was surprisingly uncomplicated and just required a little bit of patience to complete. If you are looking to save a buck or two to give your own game a little bit more of an impact on your players, and you already own a 3D printer (or aren't afraid to invest in one), this is a pretty reliable option to move into. If you don't want to drop the coin on the printer and filament you can just as easily go the XPS foam route instead. If you would like a step-by-step guide on how the 3D-printed ~or~ XPS foam dungeon tiles were made, let us know because we would love to provide!

Thanks a load for stopping by and we'll see you next time!


Comments 16 comments

  • EvilTwin / about 6 years ago / 2

    Cool creations Chris, wanted to share two tips I discovered for working with the polymorph plastic in case anyone reading this uses that medium. First, for creating small things like this with the polymorph, you can use anything you want to as a mold, the secret is to put aluminum foil between your warm polymorph and the shape you want it to take, it could be metal, plastic, glass, wood etc. Don't try to mold it with any plastic shapes without the aluminum foil, it will stick tough. That leads me to tip #2, the way it sticks to regular plastic, you can use it to purposely connect existing plastic pieces, and separate them with hot water when you need to.

  • Bryan M / about 6 years ago / 2

    I appreciate that you showed both the technical way and the old-school way of making the tiles! I love that your tutorials are real people making real stuff that they really like, and not just example products to sell SF inventory.

    When I used to play D&D I would occasionally flirt with the idea of making dungeon tiles. But back in the day (you know, 10 whole years ago), 3D printers weren't a thing and I didn't think I had the artistic talent to make the designs from scratch. And of course now that I have a 3D printer (still in its box in pieces, but I digress), I don't have a regular tabletop game any more :(

    • Thank you, we really appreciate that! I do like to make sure I at least explain which parts I used to make whatever I'm working on since I get so many questions about them when I don't (so I'll at least list that).

      Oh no, I'm sorry to hear that! I was always apprehensive about my design skills until one day I just tried, I thought it looks great (it didn't) but I kept trying until I kept seeing improvements (it was slow going).

      Geek & Sundry had a really good article on how to find a group in any area. When I moved to Colorado a few years ago I used a similar method, but it seems they have much better ideas! You should give it a shot!

  • Member #691323 / about 6 years ago / 2

    I'm Devon Jones, the founder of OpenForge, great writeup :-) If you have any questions, lemme know.

    I'm actually in Colorado, and have a small connection to Sparkfun. I joined NYC Resistor on the same day Alicia Gibb, and used to hang out with her there before we both independently moved to Colorado.

    • First off, let me be the first (here) to say thank you for what you do. Your designs are simply beautiful and I loved using them in this project. I can't wait to use your designs in future products since I have received plenty to keep making more.

      That connection to us is quite entertaining and apt! Thank you for all you do!

  • Member #134773 / about 6 years ago / 2

    Although I'm very impressed by your work, I'm more old-school, remembering days when we'd have to scrounge (sometimes skipping meals) to buy a book or D4, D12, or D20 back in the 70s. Nobody had anything like a "board" for D&D. Once in a while, the Dungeon Master MIGHT sketch something out on paper, but that was rare. [S]he'd usually have a self-drawn map, which wouldn't be shown to the players, to help keep consistency in the adventure.

    There were a few "computer games" around that were text based, assuming that you actually had access to a computer. (Being a college student then, with a CS major, that at least was easy. My parents had bought me a terminal and a 300-baud accoustic coupled modem, so I didn't even have to go to campus...)

    It sort of seems to me that the opportunity to use your imagination within the rules was the best part of RPGs (acknowleging that "RPG" here is "Role Playing Game", and not the programming language "Report Program Generator", which I had to use a couple of times to get my CS degree).

    • Member #134773 / about 6 years ago / 2

      I went over to Thingiverse, and found a couple of "brick stamps" just posted that are relevant. If you happen to have "occasional" access to a 3-D printer, this might simplify making foam (or clay or other "soft" material) walls. Here are the links: https://www.thingiverse.com/thing:2857723 https://www.thingiverse.com/thing:2857719

      • Thanks for checking out the post! Yeah, when I first started in the mid-90's we didn't know too much and really just relied on our own imaginations which makes me love a lot of the role-playing games that Fantasy Flight Games put out since they really encourage players to use every bit of imagination that they have.

        I remember in grade and middle school playing Zork on an "old" green-screen computer by 5 1/4" floppy disc and then Adventure on the Atari 2600 and really relying on my imagination to paint the picture that both games provided. Needless to say, they really shaped my gaming passion to what it is today.

        I can completely agree that an imagination is the most important part in forming characters, stories, worlds, etc. but to actually make that world come to life in today's day and age is a bit surreal but welcome, in my mind.


        That's a really good idea to use a stamp, I hadn't;t even considered it. We actually just used crinkled up tin foil to give the effect of stone on the XPS since the goal was to be as cost-effective as possible. Thanks for the links. I'll make sure to utilize them in the next project!

        • EvilChemist / about 6 years ago / 2

          Nice article!

          I fall in the age group between you and Member #134773. In the early 80's I played AD+D a fair amount (even got my first edition of the DM Manual signed by Gary Gygax at GenCon). Around '85 we started playing BattleTech (NOT MechWarrior) a lot and were using hand-painted miniatures. Last week I was talking with some of the younger guys at work about gaming and brought in my books and a set of miniatures. Between the miniatures and Gygax signature, my Nerd Cred shot through the roof.

          I've been teaching myself Fusion 360, and yesterday I was contemplating making a Mech drawing for my next project then printing it on the Ultinaker 2+ at the local library.

          • My first run in with AD&D is what made me realize that I am terrible at math, but that's awesome that you were able to get the late, great Gygax's signature on one of those books. That's really awesome, my brother and I have been getting into Star Wars Legion and Warhammer 40k and having a 3D printer handy really makes making landscapes a breeze.

            When you finish them you should definitely share your creation!

  • Colecago / about 6 years ago / 2

    Yay! I'm printing similar tiles (Dragonlock from Fat Dragon). That's actually the theme of my booth at Makerfaire Madison in May, 3D printing for boardgames. I did a trial run of this at a Mini Makerfaire at Barnes and Noble and the kids loved to play with these, making their own dungeons and rooms, DnD Legos pretty much.

    • That's such a great way to introduce kids to not only 3D printing but also tabletop gaming. I salute you, sir!

      My main goal is to try and give players the best possible experience I can while at the same time teaching them what they can do on their own as well.

  • Is it like a board game, I am still remembering I used to play this game in my childhood. It was fun as well.

  • Radagan / about 6 years ago / 1

    This is very cool project! Thank you for posting and sharing your design ideas. As one who has also spend more time than I want to admit thinking about this problem, I thought I would throw out another option you might be interested in exploring--if you already haven't. Instead of using a 3d printer, caste them in dental plaster. It is a very inexpensive route if your goal is to produce a large number of tiles in a relatively short amount of time. You will end up with a very high quality product that is easy to paint and mod--add LEDs, etc.. But you do need molds. I've used the ones at Hirst Arts (http://www.hirstarts.com/). They are awesome molds and his tutorials are great. You could also take your current work in this direction, by using the 3d printer to create the positive, then make your own molds in silicone for dental plaster casting. You end up with tiles that feel like rock instead of plastic, and I think the cost per tile would be far less in both time and material.

Related Posts

Recent Posts

Tags


All Tags