Vox Imperium V2.0

Do or do not.

Favorited Favorite 2

For better or for worse, the next five or so holiday seasons will have to share the spotlight with a seemingly endless parade of Star Wars film releases. Rogue One: A Star Wars Story is looming like a spherical superweapon on the horizon, so we thought today would be a good day to tickle your headtails with one of our Star Wars-related projects.

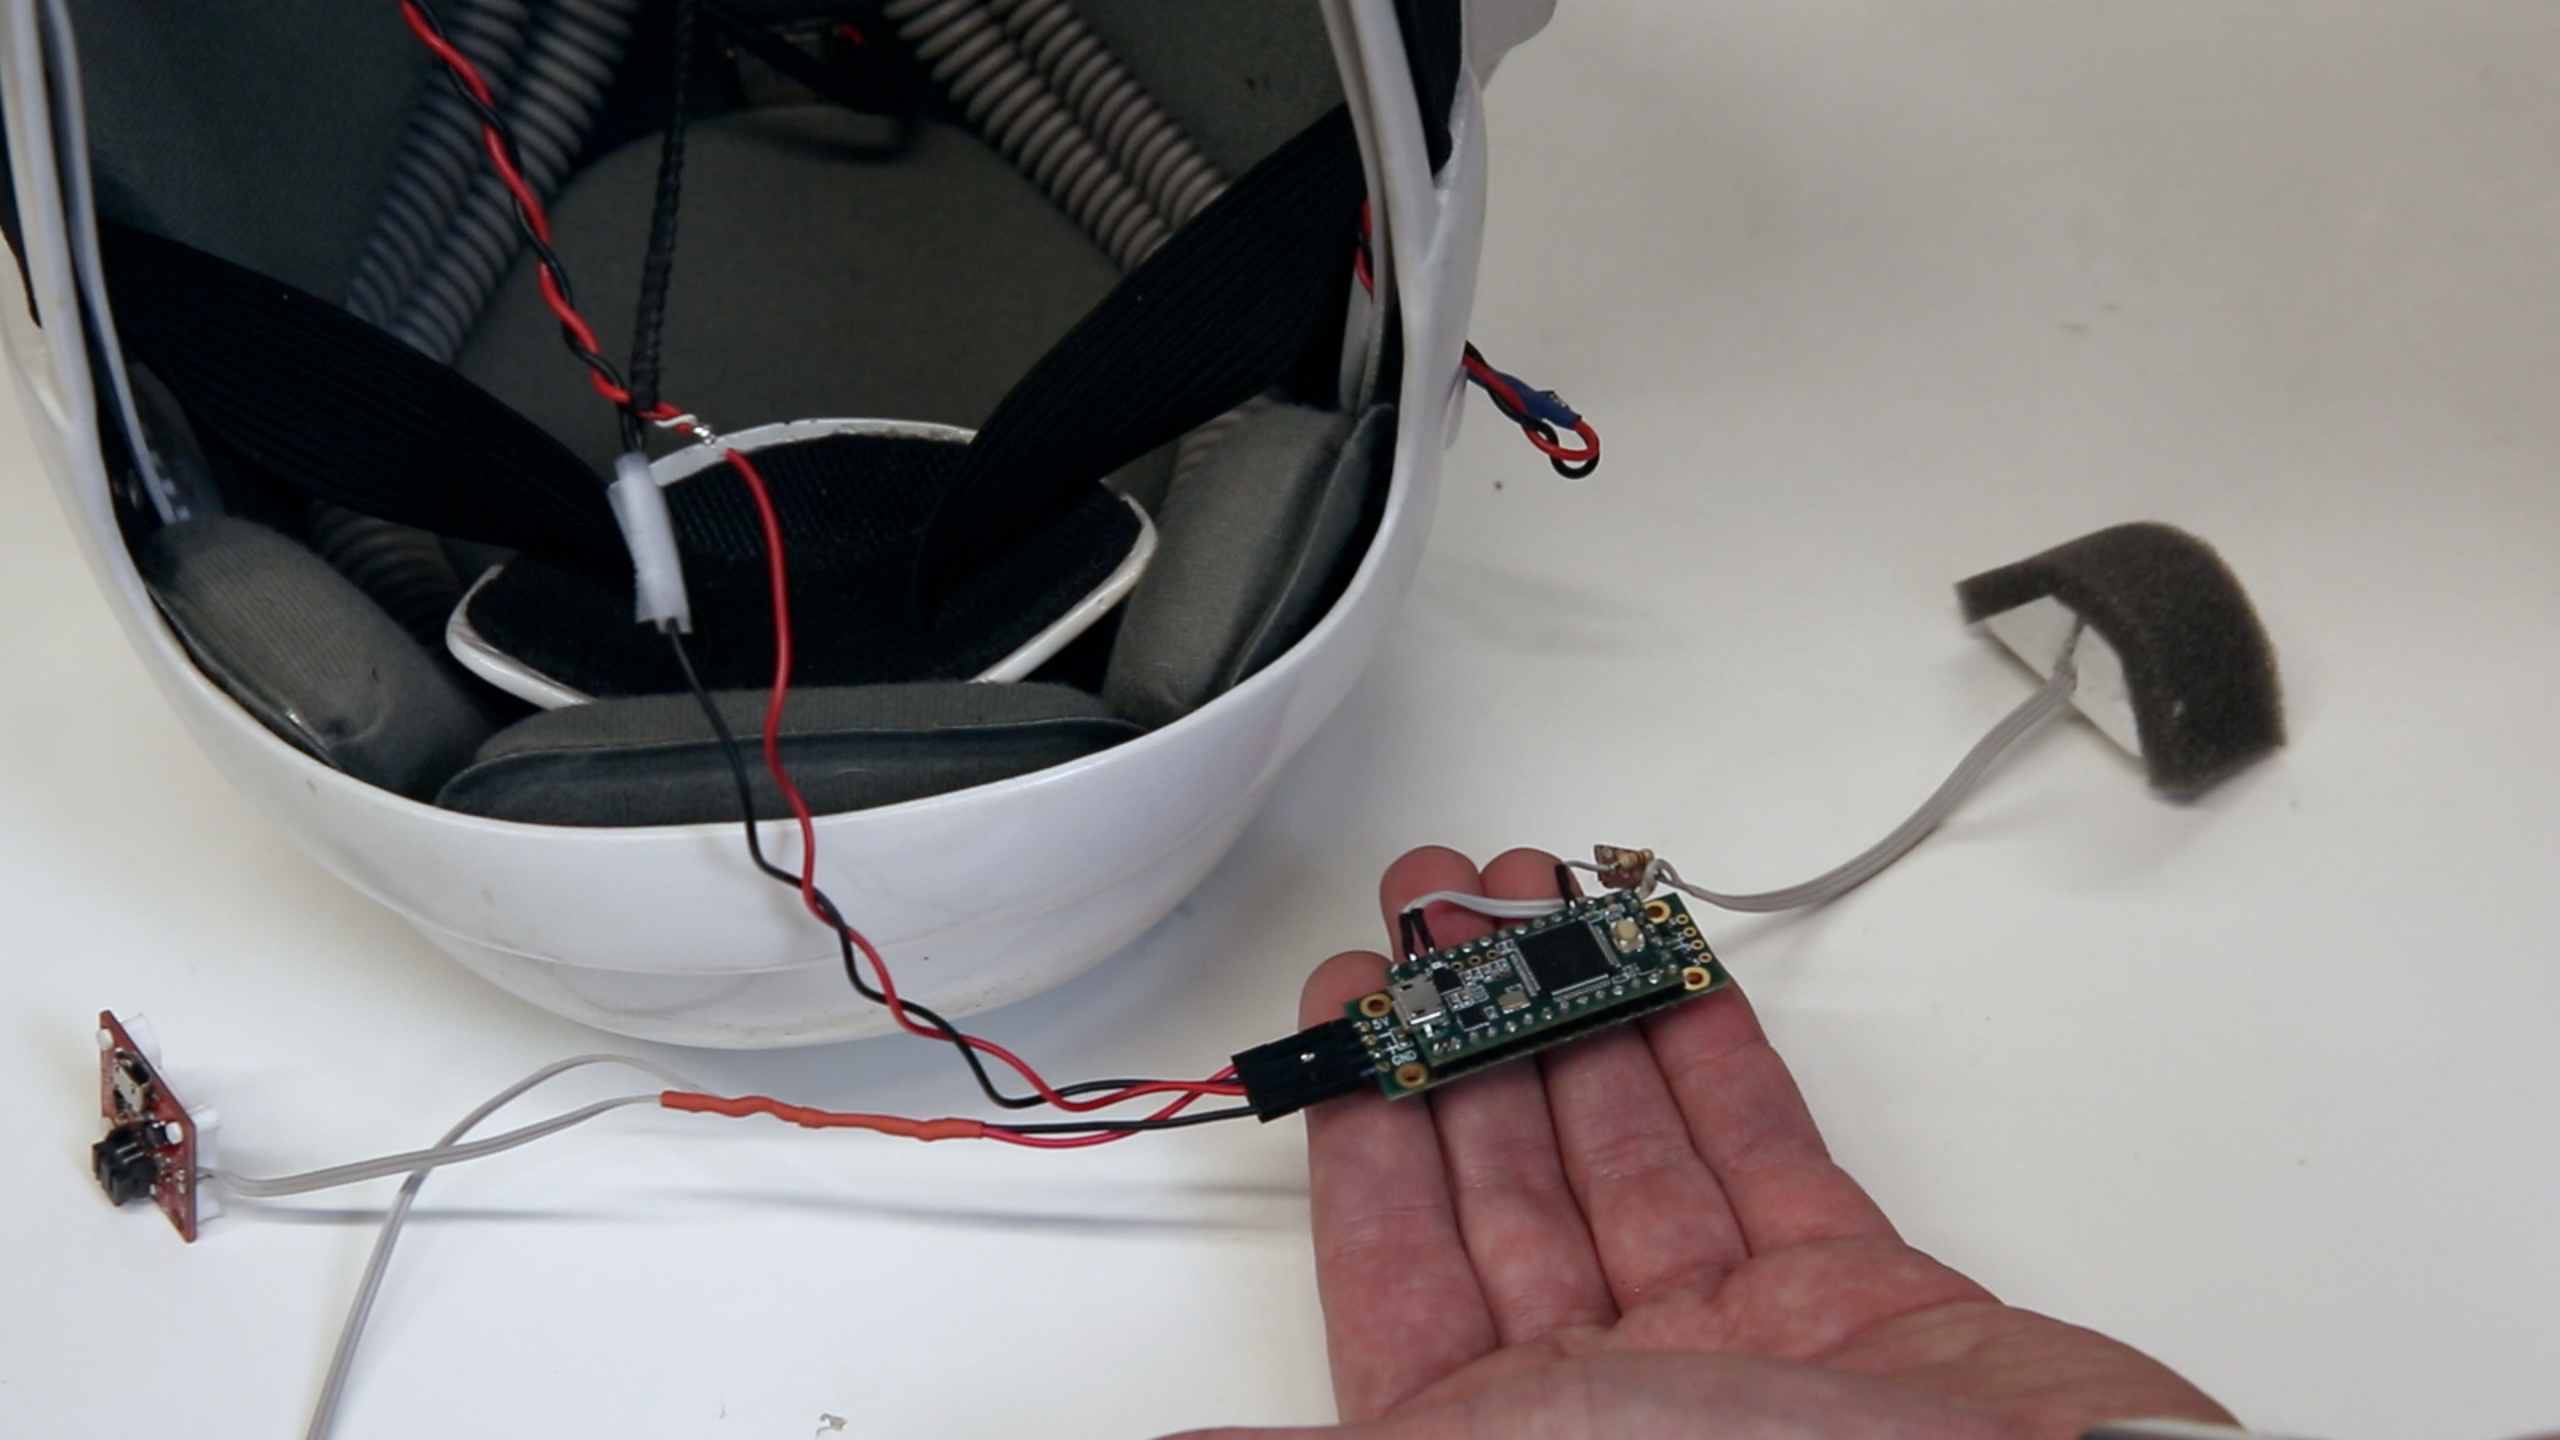
Earlier in the fall, Shawn and I briefly showed you Vox Imperium, the in-helmet voice modulator we put together for my “Return of the Jedi” scout trooper uniform. We got a ton of great feedback from the original post and had some good ideas on how the project could be improved upon. We've made a lot of special modifications ourselves, and they made a big difference.

The circuit for both the fan system and sound system are unchanged with the exception of some of the values in the Arduino sketch running on the Teensy. We found some new smaller fans and relocated them to the back of the helmet in the hope that it would be easier to isolate the MEMS microphone, and we added one of our small surface transducers in the back of the bucket as well, to help fill out some of the mid- and low-range frequencies.

The Teensy and prop shield are no longer connected with a ribbon cable, since it was unnecessary and the added resistance was introducing a lot of unwanted static and false positives into the system. Finally, we tried and tried to isolate the MEMS microphone but, in the end, had to use a throat-microphone style solution which, while not ideal, does solve both our feedback/low volume problems.

alt text

From L to R, SparkFun LiPo Power Cell, The Teensy 3.2 and Prop shield (together) and on the far right the SparkFun MEMS microphone in a 3D printed enclosure.

Check out Shawn's excellent tutorial if you want to assemble a circuit like this yourself.

Have any ideas on how we could take this project even further? BLE connectivity? What about a heads-up display? I’m also completely out of ideas for putting both the mic and speakers inside the helmet, so if anybody has any neat tricks for isolating our MEMS microphone in a small, head-shaped, enclosed chamber, I'm all ears… well, what’s left of them anyway.


Comments 2 comments

  • Member #879757 / about 7 years ago * / 1

    For better sound, I think you've reached the point where electronics are no longer worth the complexity. Instead, I'd start looking at physical solutions. A quick internet search suggests that for sound insulation, open-celled foam works better than closed cell, presumably because it gets added internal friction while otherwise maintaining the same traits: I would try to plastic-wrap it in a ziplock baggie with a plastic welder for sanitary reasons.

    1) Take some sheets of that, use a little wire to give it some shape and guide it's movement, and use them to form a "breath mask" and collar. Try to use a system of balloons and airtubes to automatically move them in and out of place when you take the helmet off or put it on.

    2) The "breath mask" should come as close as possible to surrounding your entire nose and mouth, without blocking off the bottom of the helmet.

    3) The collar should run along the bottom of the helmet, except for where the "breath mask" is, and is there to keep sound from bouncing back UP, by keeping it in the helmet in the first place: adjust the volume appropriately. I suggest that the "deployment balloon" be used to lower some string instead of pushing against the foam. If you aren't blowing the air out of the back of the helmet, then tie a feather boa or similar loose "feathery" material in there as a wind muff to reduce the noise.

    4) You'll probably get a bit of transduction along the helmet from the speakers to the mic: try mounting all of them to something comparatively heavy for a counter-weight instead, and indirectly mount the resulting assembly to the helmet with springs or something. The surface transducer should be mounted on a "free floating" (ala mounted flexibly at the ends) sheet, instead of directly to the helmet. For better subwoofer performance, you might try mounting the transducer sheet directly over some airholes, with the transducer itself mounted directly over the same, to try to get a "pump" behavior out of it: unfortunately, I suspect the performance would be disappointing, and possibly slightly fuzzy, though probably still worth a try.

    If you start worrying about noise from outside the helmet, then complete the "breath mask" by placing some more ziplocked-foam along the inner surface, restrict the airflow to a tube, and use TWO microphones, one on each side of the tube. Run the inner microphone's feed to a delay that you've adjusted for the time-delay between the mics, then run it to the positive side of an "op amp" (I don't know of small or cheap analogue delays that would be good for this, so I assume you'll have turned it into digital already; maybe converting to differential analogue and coiling a bunch of twisted pair into the helmet would work for the delay instead?), run the other mic to the negative side, and that gives you improved (though certainly not perfect)) directionality. If you're getting wind noise from your breath, just add some wind muffs.

    Also, you could probably get away with a better cooling system if you added wind muffs + sound insulation to that too. Water cooling would also help (particularly with size), but I think you need to custom-build the heat exchanger with one of these (https://www.sparkfun.com/products/10080) and a small pump, so maybe outside the zone of your interest.

    As for an actual new feature, try mixing a serial identifier at infrasonic frequencies into the "start" and "stop" sounds (or even just the voice in general), so that a set of helmets with heads-up displays can automatically detect the current speakers.

    For internal displays I don't have a lot of advice, except that using "eyes-up" or "eyes-sideways" displays to take advantage of the helmet's blind spots would probably be best. If you need switches, try performing surgery on some conventional toggles to convert them into photonic switches instead of electric switches: that way you can use your tongue without getting zapped, and can use cheap plastic fiber-optic "wire" to connect them to the "power" leds & photodetectors.

    • Member #879757 / about 7 years ago / 1

      Incidentally, why are you using speakers instead of bone induction and/or retrofit headphones?

Related Posts

Recent Posts

Why L-Band?

Tags


All Tags