Desk of an Engineer: the Shawn Edition
Shawn's swan song
We’re back with more desk details! This is a series where we barge in on our engineers while they’re working and kick them out so we can document their desks in all their chaotic glory. And because we know that just isn’t enough information, we ransom their offices back to them in exchange for some details on what they have on their desks and why. We do this for you!
Clicking the image will enlarge it, so you can experience the full resolution of each engineer’s home away from home.
Today we’ve inconvenienced Shawn...for the last time.
Sad news, everyone. This is my last week at SparkFun. I have had a wonderful time working with some incredibly smart and talented people along with opportunities to make cool products and a few bizarre projects. As a way to take a trip down memory lane, Chelsea the Destroyer offered me the chance to show off my work area as one last goodbye post. I'll show you how my workbench has evolved over the years and link to some of the fun memories associated with parts found around it.
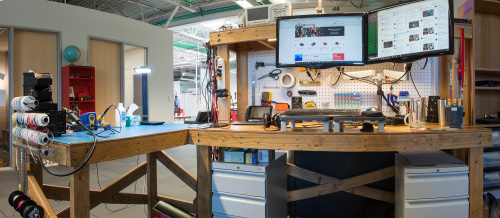
The first noticeable aspect is likely the sheer size of the desk itself. If any of you were around 4 years ago, you might remember a post that I wrote where I talked about designing and building the desk.
When I first moved to Colorado, I knew that I wanted to upgrade from a small, barely-fits-a-laptop desk to something more appropriate for working with electronics. My initial plan was to buy an electronics workbench, which proved mostly fruitless considering most were north of $1,000 (new, at least). Not happy with the design of most commercially available workbenches, I set out designing my own with SketchUp to include all the custom features I wanted:
- L-shape: one side for computer and the other for soldering equipment
- Large surface area on main area for monitor, mouse, keyboard and various in-progress projects -- I went with 72 x 30 inches
- Countertop height (36 inches) so I could sit or stand as needed
- Large enough area under the hutch to house one or more 24-inch monitors
- Deep enough hutch to hold test equipment (e.g. oscilloscope) -- I figured 18 inches was enough
Funny story, I actually made two desks with the same basic design. The first resides at my home, and the second was created to replicate the home setup at SparkFun. I noticed a problem with the first model: It wobbled. Thanks to the gracious help of SFUptownMaker, I added triangles to make the second model far more stable. I eventually went back and upgraded the first model with similar triangles.
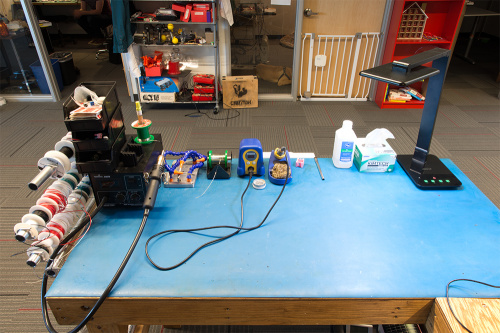
Hanging off the edge of the smaller desk on the left (assuming you are standing at my desk) is a wire holder that I made a couple years back out of Actobotics parts. I got tired of scrounging around in random parts bins for a particular size, type, and color of wire.
Starting with the soldering area on the left , you'll find some familiar equipment:
- Hot-Air Rework Station with some things perched (questionably) safely on top:
- Solder
- Flux pen
- 3-D Printed helping hands
- Bins of various parts, batteries, etc. that don't have a home
- Third hand kit (can't have enough helping hands)
- More solder in a dispenser case
- My trusty Hakko soldering station
- For cleaning flux off boards: isopropyl alcohol, acid brush with trimmed bristles, a small storage box with lid removed, and ever-useful KimWipes
- Funky LED lamp that has two sets of controls for changing brightness as well as color temperature
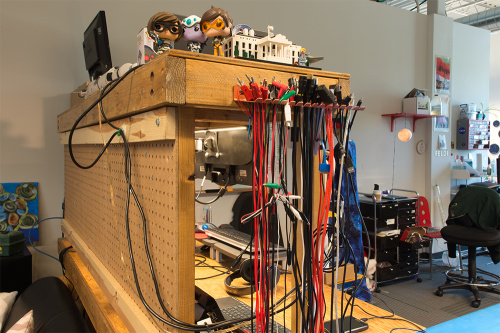
Behind the soldering desk and attached to the larger desk is my growing collection of cables and test leads. I try to keep them mostly organized with a Pomona test lead holder, but I fear it has nearly reached its limits. Coworkers seem to benefit most from my (apparent) organization, as folks will stop by quite often to "borrow" wire from the wire holder or cables from the rack. I'm just glad it's getting used (and to be honest, I don't want the cables back most of the time -- it's already too crowded!).
On top of the hutch, I keep my power supply and oscilloscope for testing various projects (or causing capacitors to explode). You'll also find an old-school lamp, several mugs, a business card holder and a few Lego models (because AFOL).
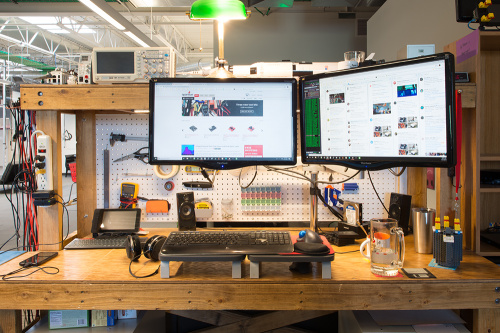
About a year ago, I added pegboard to the back of the desk, which proved incredibly handy for housing everyday items like scissors, a ruler, multimeter, various types of tape, SD card holder and, of course, a Nerf gun.
On the left side under the hutch, you'll see a Raspberry Pi attached to a 7-inch LCD along with a wireless keyboard/touchpad combination. This setup has proved invaluable over the last three months while working on several Python tutorials.
Beneath my dual-monitor setup, you can find an Analog Discovery 2 and some FTDI USB-to-Serial boards scattered about. I switch between the Analog Discovery and larger oscilloscope depending on my needs/mood. All my USB connections go through a hub, which has some buttons on top for enabling/disabling ports. I never thought I would need power buttons on a USB hub, but when you need to reset various 5V electronics and microcontrollers, they are a godsend.
The speakers remained largely unused, mostly due to being in an open office, but also because I recently acquired a set of Sennheiser HD 650 headphones that are fed from a JDS Labs ODAC and Objective2 amplifier. My ears are pretty happy.
The external hard drive nestled in the corner behind my plethora of liquid-holding vessels gets connected to my laptop each morning and stores the (rather large) files needed for video editing. SparkFun has an amazing videographer, Graceflix, who handles almost all of the video work. However, every so often, I will help out by editing my own screen capture before sending her the clips to integrate into the final piece.
I like to keep a few projects around that remind me of the good times, and one of my favorite product/project combos I worked on at SparkFun was BadgerHack. This was a soldering kit that booth attendees (at SXSW 2015 and NoCo Mini Maker Faire 2015) could put together before taking to one of two "programming stations" to upload simple pictures, animations or scrolling words of their choice. BadgerHack was an extremely fun group effort to create an unique experience for SparkFun fans and newcomers. I still keep a BadgerHack badge around for the memories, and you can see it hanging on the right side of my desk (behind the not-quite "Lego" mug).
I skipped over my mouse and keyboard setup, but it's worth mentioning that I moved to a trackball about a year ago (my wrists finally started hurting after years with gaming mice). I still keep a Logitech G602 underneath the keyboard/mouse riser for screen capture moments.
The drawers beneath the desk house mostly basic office items: files, pens, pencils, tape and the like. Two drawers are worth noting, however. The first is the top drawer on the left; it holds a variety of soldering hand tools (cutters, tweezers, wire strippers, solder sucker, solder wick, etc.) laid out in an organized fashion. If I'm soldering, I just need to open the drawer and grab what I need. The second worthwhile drawer is on the bottom left; it holds food. Everyone should have a snack drawer.
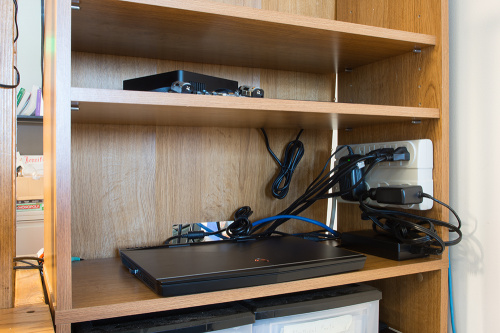
The bookcase to the right of the desk might seem like an odd addition, as it's just placed in-line with the desk. However, it serves an important role: it keeps my laptop off my desk. About two years ago, I bought a high-end laptop with the intention of going to one computer to serve all my needs (no more sharing files between my work desktop, my other aging laptop, and my home desktop) -- everything would be stored on one laptop that I would take with me at all times.
I cut a hole in the back of the bookcase to run a set of wires. Video and USB go to my desk, and an Ethernet cable connects me to SparkFun's network. I mounted a power strip to the side of the bookcase to power my laptop, monitors and various other accessories.
That just about covers everything at my desk, at least everything within arms' reach. Not shown: several shelves with still-growing piles of electronic parts and dilapidated projects. My new goal is to adopt many of the Work Clean habits of chefs to keep my work area free of clutter (or at least organize the clutter). Keeping a workbench clean has proven quite difficult, as I'm sure anyone who has built electronics projects can attest. Oh well, I suppose that will just be another life goal for now.
Thanks Shawn! Bon voyage!
