Data Types in Arduino
 b_e_n
b_e_n Introduction
Computers, including the Arduino, tend to be highly data agnostic. At their core, the heart of the device is an arithmetic-logic unit (ALU), which performs (fairly) simple operations on locations in memory: R1+R2, R3*R7, R4&R5, etc. The ALU doesn't care what that data represents to a user, be it text, integer values, floating point values, or even part of the program code.
All of the context for these operations comes from the compiler, and the directions for the context get to the compiler from the user. You, the programmer, tell the compiler that this value is an integer and that value is a floating point number. The compiler, then, is left trying to figure out what I mean when I say "add this integer to that floating point." Sometimes that's easy, but sometimes it's not. And sometimes it seems like it should be easy, but it turns out to yield results you might not anticipate.
This tutorial will cover the basic data types available in Arduino, what they're typically used for, and will highlight the effects of using different data types on the size and performance speed of your programs.
Suggested Reading
You may want to familiarize yourself with a few concepts before we get started:
Defining Data Types
The Arduino environment is really just C++ with library support and built-in assumptions about the target environment to simplify the coding process. C++ defines a number of different data types; here we'll talk only about those used in Arduino with an emphasis on traps awaiting the unwary Arduino programmer.
Below is a list of the data types commonly seen in Arduino, with the memory size of each in parentheses after the type name. Note: signed variables allow both positive and negative numbers, while unsigned variables allow only positive values.
- boolean (8 bit) - simple logical true/false
- byte (8 bit) - unsigned number from 0-255
- char (8 bit) - signed number from -128 to 127. The compiler will attempt to interpret this data type as a character in some circumstances, which may yield unexpected results
- unsigned char (8 bit) - same as 'byte'; if this is what you're after, you should use 'byte' instead, for reasons of clarity
- word (16 bit) - unsigned number from 0-65535
- unsigned int (16 bit)- the same as 'word'. Use 'word' instead for clarity and brevity
- int (16 bit) - signed number from -32768 to 32767. This is most commonly what you see used for general purpose variables in Arduino example code provided with the IDE
- unsigned long (32 bit) - unsigned number from 0-4,294,967,295. The most common usage of this is to store the result of the
millis()function, which returns the number of milliseconds the current code has been running - long (32 bit) - signed number from -2,147,483,648 to 2,147,483,647
- float (32 bit) - signed number from -3.4028235E38 to 3.4028235E38. Floating point on the Arduino is not native; the compiler has to jump through hoops to make it work. If you can avoid it, you should. We'll touch on this later.
This tutorial will NOT cover arrays, pointers, or strings; those are more specialized datatypes with more involved concepts that will be covered elsewhere.
Time and Space
The processor at the heart of the Arduino board, the Atmel ATmega328P, is a native 8-bit processor with no built-in support for floating point numbers. In order to use data types larger than 8 bits, the compiler needs to make a sequence of code capable of taking larger chunks of data, working on them a little bit at a time, then putting the result where it belongs.
This means that it is at its best when processing 8-bit values and at its worst when processing floating point. To demonstrate this fact, I've written a simple Arduino sketch which does some very simple math and can easily be altered to use different data types to perform the same calculations.
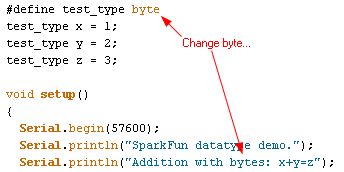
First, up, let's dump the code as-is into an Arduino Uno and see what results we get on the serial console.

Okay, lots of stuff there. Let's take things a bit at a time.
First, if you're following along, check the compiled size of the code. For addition with bytes, we end up with 2458 bytes of code. Not a lot, and, frankly, most of that is taken up with the serial output stuff. This data point will become important later on, however.
Next, let's look at the serial port output. What's the deal with the squares instead of a number for the printed variable values? That happens because the Serial.print() function changes the way it operates based on the type of data which is passed to it. For an 8-bit value (be it a char or byte), it will simply pipe out that value, in binary. The serial console is then going to try to interpret that data as an ASCII character, and the ASCII characters for 1, 2, and 3 are 'START OF HEADING', 'START OF TEXT', and 'END OF TEXT'. Hmm. Not particularly useful, are they, nor easy to display in one character? Hence the square: the serial console is throwing up its hands and saying, 'I don't know how to print this, so I made a square for you'. So, lesson one in Arduino datatype finesse: to get the decimal representation of an 8-bit value from Serial.print(), you must add the DEC switch to the function call, like this:
Serial.print(x, DEC);
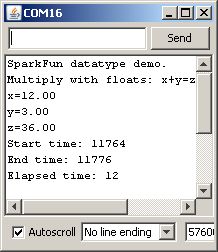
Finally, observe the 'Elapsed time' measurement. Discounting the inaccuracies from using the micros() function to measure elapsed time, which we'll do on all these tests, so we should get a very good RELATIVE measure of the time required for operations, if not a good absolute measure, you can see that adding two 8-bit values requires approximately 4 microseconds of the processor's time to achieve.
Testing Data Types (Addition)
Okay, let's move on to test some more data types. If you're following along at home, you'll want to change your code, as seen below:
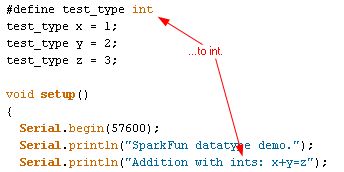
Now, load the code onto your Arduino board. Check the compile size: 2488 bytes for int versus 2458 bytes for byte. Not a lot bigger, but it IS bigger. Again, this is because using data types which require more than 8 bits of storage (like int, long, or float also requires the compiler to generate more actual machine code for the addition to be realized - the processor itself simply doesn't have the capability of supporting larger data natively. Now, open the serial console and you should see something like this:
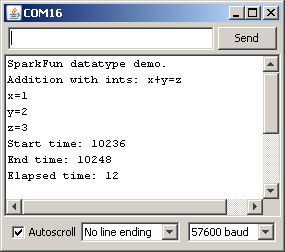
Next observation: this time the values printed correctly. That's because the new datatype we've introduced, the int, is correctly interpreted by the compiler as a numeric datatype, and Serial.print() correctly formats the output data to reflect that in the console. So, second lesson of Arduino datatype finesse: if you WANT to send the binary equivalent of a numeric datatype, say, as a means of sharing data with another computing device rather than a user looking at a console, use the Serial.write() function.
Next, let's check out "Elapsed time" again. We're up to 12 microseconds now - about 3 times as long! Still pretty short, but this is due to the previously mentioned fact that this is an 8-bit processor, so it needs to jump through some hoops to do 16-bit math, which is what's required when adding int variables together.
Onward and upward! Now let's check out the long datatype. Repeat the last code change, except this time replace the two incidents of int with long. Load the code and open your serial console and see what's happened.
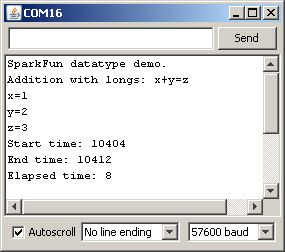
Before we dive into the serial capture, let's revisit the compile size. I got 2516 bytes, this time- 28 bytes more than using int and 58 more than using byte. Still a pretty small difference but a difference nonetheless, and a difference which could add up if you do a lot of math with long instead of int or byte.
Okay, now on to the serial results. Again, notice that the elapsed time changed. This time, however, it DECREASED from 12 microseconds to 8! How does that work? This is your third lesson in Arduino datatype finesse: what you think is happening may not be what is actually happening. I'm not sure why this occurs - it may be due to some compiler optimization, or due to some run-time optimization which saves time on small value additions which is not present in the int code. Regardless, long is faster than int is not necessarily a safe takeaway here, as we'll see when we get into multiplication and division.
Okay, last stop, floating point math. Floating point math on the Arduino is tricky because the Arduino lacks a floating point unit, which is fancy-talk for a dedicated section of the processor which handles math with an arbitrary number of digits after a decimal point. Floating point math is also a sticky concept, because while humans can deal well with arbitrary numbers of zeros after the decimal point, computers can't. This is the origin of the infamous 1 is not 1 bug that some early generation Pentium processors suffered from.
Alter the code as above again, but replace long with float in the two pertinent locations. Load the code and check out the compile size: 3864 bytes! What happened is that by including the floating point data type, you forced the compiler to include the floating point handling code. Clearly, that's a pretty big chunk of code - it increased the size by a fair margin. Datatype finesse lesson four: don't use floating point math unless you really, really have to. Most times, that's going to be limited to giving users feedback about something which is fairly meaningless as an arbitrary integer value: the ADC will return a value like 536, which is cryptic, but converted into floating point it would be something like 2.62V, which is much more useful.
Now look at the run time on this code - back up to 12 microseconds. Also, note that the printed value now includes two zeros after the decimal place. If you want more (or fewer) digits after the decimal, you can add a number of digits into your print command:
Serial.print(x, 3); // print floating point number x with three digits after the decimal.
Testing Data Types (Multiplication/Division)
Now let's look at what happens with 'harder' math - multiplication and division.
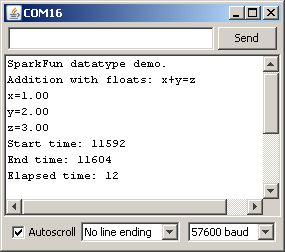
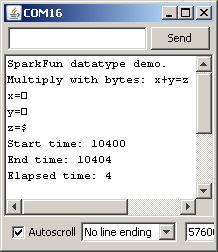
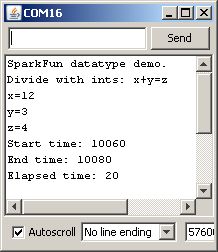
Here are some screen grabs for multiplication:
 [
[
 [
[
Check out the elapsed times: 4µs for byte, 8 for int or long, and 12 for float - longer for larger data types, and also what we expect to see in terms of 'harder' math taking longer. Multiplication is still hardware supported, though - there is a native multiply instruction in the processor which makes multiply operations relatively easy. But what about division?
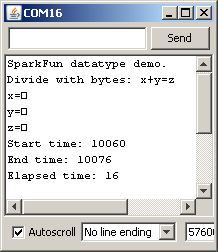


Oh, my. byte division isn't too bad at 16µs, but 48 for long? Ouch. The problem here is that division does NOT have a native instruction in the Atmega instruction set, so the compiler has to do some back flips to create one. So, final lesson: not all mathematical operations are created equal. Divide takes a lot longer than multiply or add (or subtract, but that's really just add with a minus sign), and something like finding a square root or a sine would take even longer. So long, in fact, that it's often easier just to maintain a list of values for square roots or sine/cosine/tangent and look up the value that you want than it is to calculate it.
Resources and Going Further
I'm going to leave it here for now. I hope I've demonstrated clearly the benefits of using appropriate data types for your variables. The next tutorial will go into some of the really ugly pitfalls that are hiding in mixing data types and using INAPPROPRIATE data types - for instance, data types that are too small for the largest number that you may encounter.
All of the context for these operations comes from the compiler, and the directions for the context get to the compiler from the user. You, the programmer, tell the compiler that THIS value is an integer and THAT value is a floating point number. The compiler, then, is left trying to figure out what I mean when I say "add this integer to that floating point". Sometimes that's easy, but sometimes it's not. And sometimes it SEEMS like it SHOULD be easy, but it turns out to yield results you might not anticipate.
Here's some further reading you may want to explore with your new knowledge of data types:
Interested in learning more foundational topics?
See our Engineering Essentials page for a full list of cornerstone topics surrounding electrical engineering.
