Bluetooth Basics
 jimblom
 What is Bluetooth?
Bluetooth is a standardized protocol for sending and receiving data via a 2.4GHz wireless link. It's a secure protocol, and it's perfect for short-range, low-power, low-cost, wireless transmissions between electronic devices.
These days it feels like everything is wireless, and Bluetooth is a big part of that wireless revolution. You'll find Bluetooth embedded into a great variety of consumer products, like headsets, video gamecontrollers, or (of course) livestock trackers.
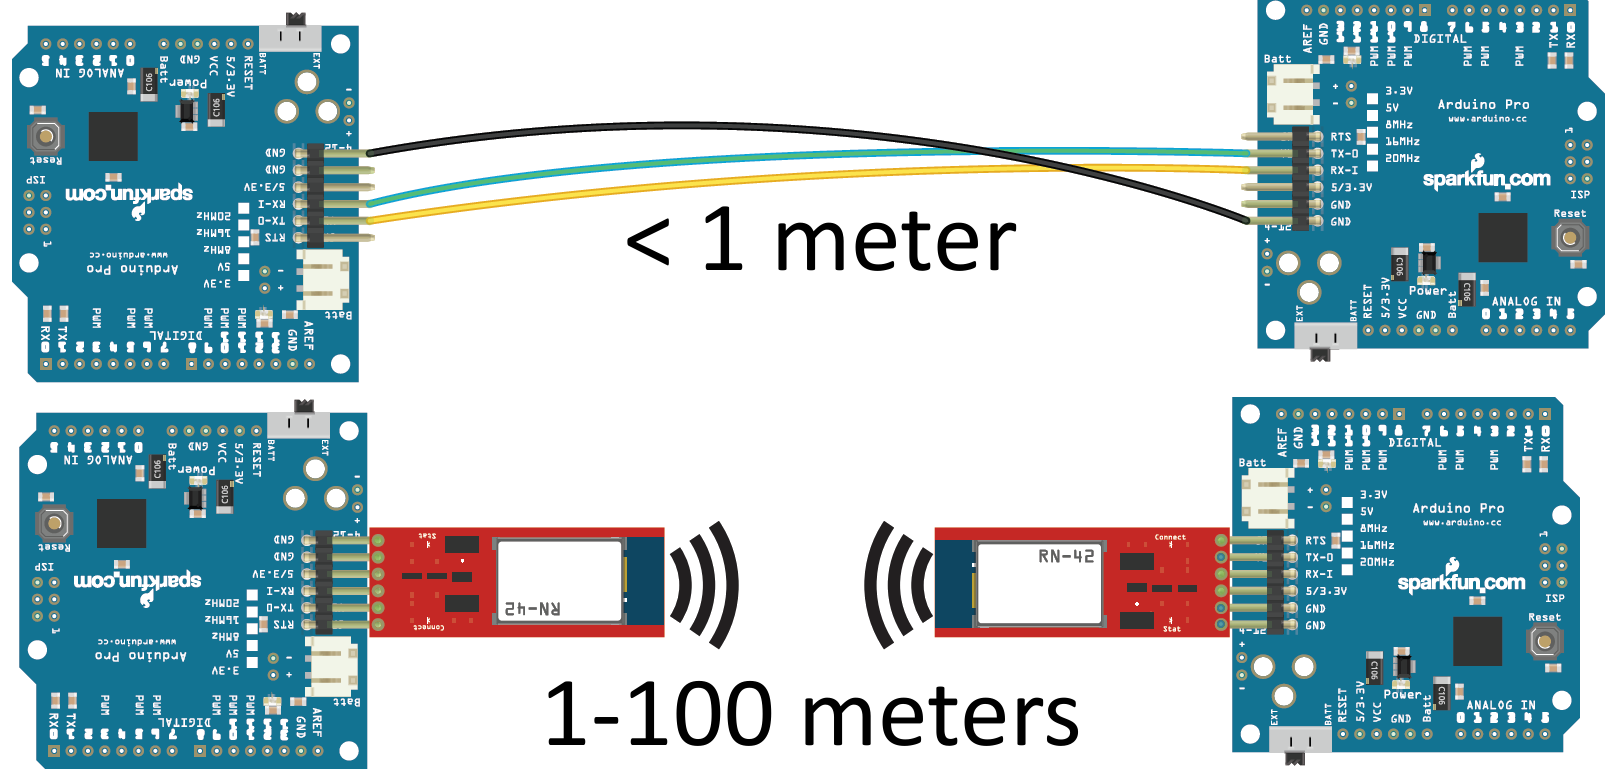
In our world of embedded electronics hackery, Bluetooth serves as an excellent protocol for wirelessly transmitting relatively small amounts of data over a short range (<100m). It's perfectly suited as a wireless replacement for serial communication interfaces. Or you can use it to create a DIY HID Computer Keyboard. Or, with the right module, it can be used to build a homebrew, wireless MP3-playing speaker.
This tutorial aims to provide a quick overview of the Bluetooth protocol. We'll examine the specifications and profiles that form its foundation, and we'll go over how Bluetooth compares to other wireless protocols.
Looking to get hands-on with Bluetooth development?
We've got you covered!

Suggested Reading
- Serial Communication -- Bluetooth is like a RF version of serial communication.
- Hexadecimal -- Bluetooth devices all have a unique address, which is usually presented as a hexadecimal value.
Suggested Viewing
How Bluetooth Works
The Bluetooth protocol operates at 2.4GHz in the same unlicensed ISM frequency band where RF protocols like ZigBee and WiFi also exist. There is a standardized set of rules and specifications that differentiates it from other protocols. If you have a few hours to kill and want to learn every nook and cranny of Bluetooth, check out the published specifications, otherwise here's a quick overview of what makes Bluetooth special.
Masters, Slaves, and Piconets
Bluetooth networks (commonly referred to as piconets) use a master/slave model to control when and where devices can send data. In this model, a single master device can be connected to up to seven different slave devices. Any slave device in the piconet can only be connected to a single master.
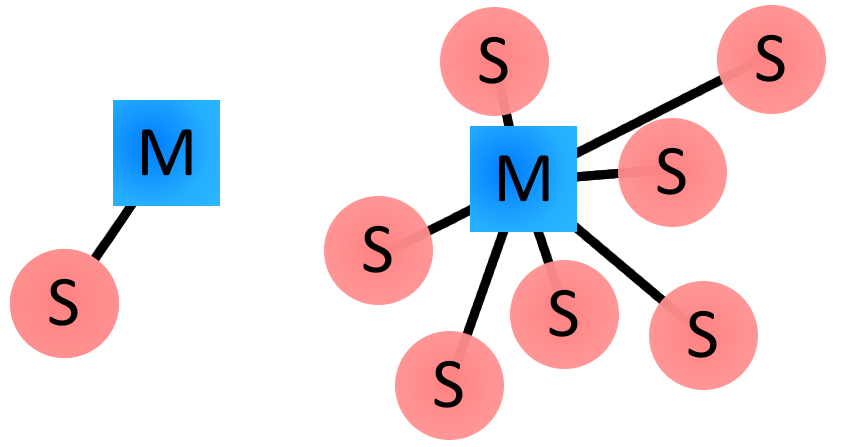
The master coordinates communication throughout the piconet. It can send data to any of its slaves and request data from them as well. Slaves are only allowed to transmit to and receive from their master. They can't talk to other slaves in the piconet.
Bluetooth Addresses and Names
Every single Bluetooth device has a unique 48-bit address, commonly abbreviated BD_ADDR. This will usually be presented in the form of a 12-digit hexadecimal value. The most-significant half (24 bits) of the address is an organization unique identifier (OUI), which identifies the manufacturer. The lower 24-bits are the more unique part of the address.
This address should be visible on most Bluetooth devices. For example, on this RN-42 Bluetooth Module, the address printed next to "MAC NO." is 000666422152:
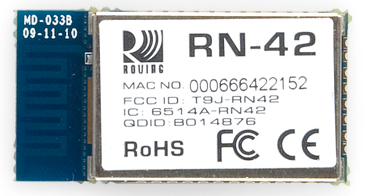
The "000666" portion of that address is the OUI of Roving Networks, the manufacturer of the module. Every RN module will share those upper 24-bits. The "422152" portion of the module is the more unique ID of the device.
Bluetooth devices can also have user-friendly names given to them. These are usually presented to the user, in place of the address, to help identify which device it is.
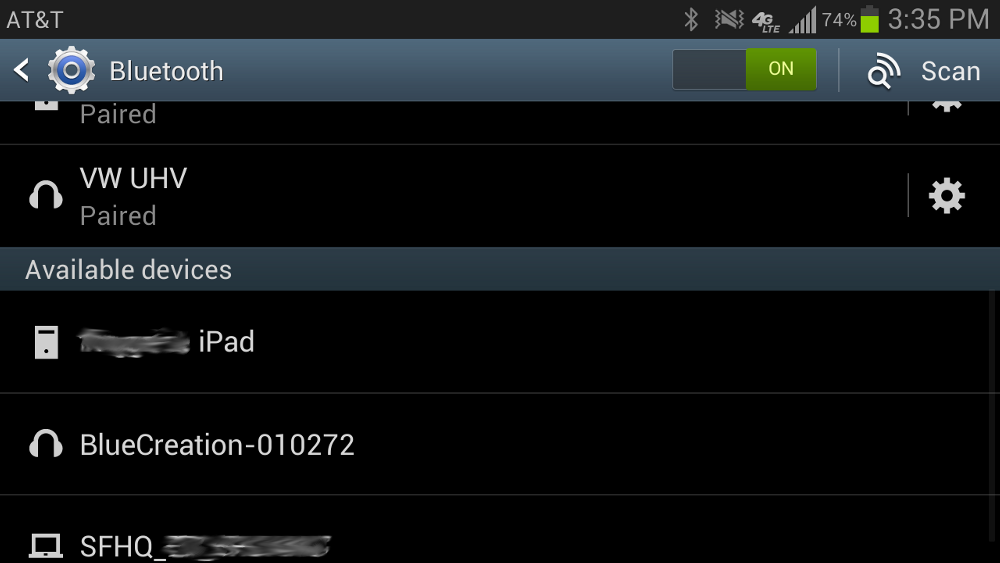
The rules for device names are less stringent. They can be up to 248 bytes long, and two devices can share the same name. Sometimes the unique digits of the address might be included in the name to help differentiate devices.
Connection Process
Creating a Bluetooth connection between two devices is a multi-step process involving three progressive states:
- Inquiry -- If two Bluetooth devices know absolutely nothing about each other, one must run an inquiry to try to discover the other. One device sends out the inquiry request, and any device listening for such a request will respond with its address, and possibly its name and other information.
- Paging (Connecting) -- Paging is the process of forming a connection between two Bluetooth devices. Before this connection can be initiated, each device needs to know the address of the other (found in the inquiry process).
- Connection -- After a device has completed the paging process, it enters the connection state. While connected, a device can either be actively participating or it can be put into a low power sleep mode.
- Active Mode -- This is the regular connected mode, where the device is actively transmitting or receiving data.
- Sniff Mode -- This is a power-saving mode, where the device is less active. It'll sleep and only listen for transmissions at a set interval (e.g. every 100ms).
- Hold Mode -- Hold mode is a temporary, power-saving mode where a device sleeps for a defined period and then returns back to active mode when that interval has passed. The master can command a slave device to hold.
- Park Mode -- Park is the deepest of sleep modes. A master can command a slave to "park", and that slave will become inactive until the master tells it to wake back up.
Bonding and Pairing
When two Bluetooth devices share a special affinity for each other, they can be bonded together. Bonded devices automatically establish a connection whenever they're close enough. When I start up my car, for example, the phone in my pocket immediately connects to the car's Bluetooth system because they share a bond. No UI interactions are required!
Bonds are created through one-time a process called pairing. When devices pair up, they share their addresses, names, and profiles, and usually store them in memory. The also share a common secret key, which allows them to bond whenever they're together in the future.
Pairing usually requires an authentication process where a user must validate the connection between devices. The flow of the authentication process varies and usually depends on the interface capabilities of one device or the other. Sometimes pairing is a simple "Just Works" operation, where the click of a button is all it takes to pair (this is common for devices with no UI, like headsets). Other times pairing involves matching 6-digit numeric codes. Older, legacy (v2.0 and earlier), pairing processes involve the entering of a common PIN code on each device. The PIN code can range in length and complexity from four numbers (e.g. "0000" or "1234") to a 16-character alphanumeric string.
Power Classes
The transmit power, and therefore range, of a Bluetooth module is defined by its power class. There are three defined classes of power:
| Class Number | Max Output Power (dBm) | Max Output Power (mW) | Max Range |
|---|---|---|---|
| Class 1 | 20 dBm | 100 mW | 100 m |
| Class 2 | 4 dBm | 2.5 mW | 10 m |
| Class 3 | 0 dBm | 1 mW | 10 cm |
Some modules are only able to operate in one power class, while others can vary their transmit power.
Bluetooth Profiles
Bluetooth profiles are additional protocols that build upon the basic Bluetooth standard to more clearly define what kind of data a Bluetooth module is transmitting. While Bluetooth specifications define how the technology works, profiles define how it's used.
The profile(s) a Bluetooth device supports determine(s) what application it's geared towards. A hands-free Bluetooth headset, for example, would use headset profile (HSP), while a Nintendo Wii Controller would implement the human interface device (HID) profile. For two Bluetooth devices to be compatible, they must support the same profiles.
Let's take a look at a few of the more commonly-encountered Bluetooth profiles.
Serial Port Profile (SPP)
If you're replacing a serial communication interface (like RS-232 or a UART) with Bluetooth, SPP is the profile for you. SPP is great for sending bursts of data between two devices. It's is one of the more fundamental Bluetooth profiles (Bluetooth's original purpose was to replace RS-232 cables after all).
Using SPP, each connected device can send and receive data just as if there were RX and TX lines connected between them. Two Arduinos, for example, could converse with each other from across rooms, instead of from across the desk.
Human Interface Device (HID)
HID is the go-to profile for Bluetooth-enabled user-input devices like mice, keyboards, and joysticks. It's also used for a lot of modern video game controllers, like WiiMotes or PS3 controllers.
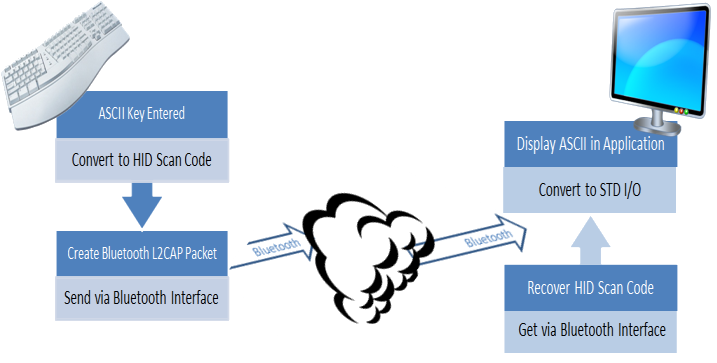
Bluetooth's HID profile is actually a riff on the HID profile already defined for human input USB devices. Just as SPP serves as a replacement for RS-232 cables, HID aims to replace USB cables (a much taller task!).
Hands-Free Profile (HFP) and Headset Profile (HSP)
Those Bluetooth earpieces that makes important business guys look like self-conversing wackos? Those usually use headset profile (HSP) or hands-free profile (HFP).
HFP is used in the hands-free audio systems built into cars. It implements a few features on top of those in HSP to allow for common phone interactions (accepting/rejecting calls, hanging up, etc.) to occur while the phone remains in your pocket.
Advanced Audio Distribution Profile (A2DP)
Advanced audio distribution profile (A2DP) defines how audio can be transmitted from one Bluetooth device to another. Where HFP and HSP send audio to and from both devices, A2DP is a one-way street, but the audio quality has the potential to be much higher. A2DP is well-suited to wireless audio transmissions between an MP3 player and a Bluetooth-enabled stereo.
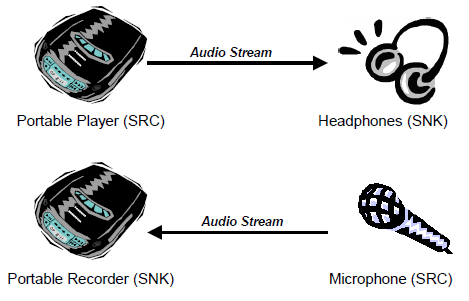
Most A2DP modules support a limited set of audio codecs. In the least they'll suport SBC (subband codec), they may also support MPEG-1, MPEG-2, AAC, and ATRAC.
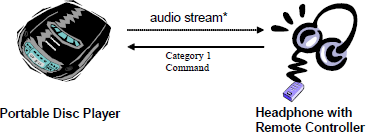
A/V Remote Control Profile (AVRCP)
The audio/video remote control profile (AVRCP) allows for remote controlling of a Bluetooth device. It's usually implemented alongside A2DP to allow the remote speaker to tell the audio-sending device to fast-forward, rewind, etc.
Common Versions
Bluetooth has been constantly evolving since it was conceived in 1994. The most recent update of Bluetooth, Bluetooth v4.0, is just beginning to gain traction in the consumer electronics industry, but some of the previous versions are still widely used. Here's a rundown of the commonly encountered Bluetooth versions:
Bluetooth v1.2
The v1.x releases laid the groundwork for the protocols and specifications future versions would build upon. Bluetooth v1.2 was the latest and most stable 1.x version.
These modules are rather limited compared to later versions. They support data rates of up to 1 Mbps (more like 0.7 Mbps in practice) and 10 meter maximum range.
Bluetooth v2.1 + EDR
The 2.x versions of Bluetooth introduced enhanced data rate (EDR), which increased the data rate potential up to 3 Mbps (closer to 2.1 Mbps in practice). Bluetooth v2.1, released in 2007, introduced secure simple pairing (SSP), which overhauled the pairing process.
Bluetooth v2.1 modules are still very common. For low-speed microcontrollers, where 2 Mbps is still fast, v2.1 gives them just about everything they could need. The RN-42 Bluetooth module, for example, remains popular in products like the Bluetooth Mate and BlueSMiRF HID.
Bluetooth v3.0 + HS
You thought 3 Mbps was fast? Multiply that by eight and you have Bluetooth v3.0's optimum speed -- 24 Mbps. That speed can be a little deceiving though, because the data is actually transmitted over a WiFi (802.11) connection. Bluetooth is only used to establish and manage a connection.
It can be tricky to nail down the maximum data rate of a v3.0 device. Some devices can be "Bluetooth v3.0+HS", and others might be labeled "Bluetooth v3.0". Only those devices with the "+HS" suffix are capable of routing data through WiFi and achieving that 24 Mbps speed. "Bluetooth v3.0" devices are still limited to a maximum of 3 Mbps, but they do support other features introduced by the 3.0 standard like better power control and a streaming mode.
Bluetooth v4.0 and Bluetooth Low Energy
Bluetooth 4.0 split the Bluetooth specification into three categories: classic, high-speed, and low-energy. Classic and high speed call back to Bluetooth versions v2.1+EDR and v3.0+HS respectively. The real standout of Bluetooth v4.0 is Bluetooth low energy (BLE).
BLE is a massive overhaul of the Bluetooth specifications, aimed at very low power applications. It sacrifices range (50m instead of 100m) and data throughput (0.27 Mbps instead of 0.7-2.1 Mbps) for a significant savings in power consumption. BLE is aimed at peripheral devices which operate on batteries, and don't require high data rates, or constant data transmission. Smartwatches, like the MetaWatch, are a good example of this application.
Wireless Comparison
Bluetooth is far from the only wireless protocol out there. You might be reading this tutorial over a WiFi network. Or maybe you've even played with ZigBees or XBees. So what makes Bluetooth different from the rest of the wireless data transmission protocols out there?
Let's compare and contrast. We'll include BLE as a separate entity from Classic Bluetooth.
| Name | Bluetooth Classic | Bluetooth 4.0 Low Energy (BLE) | ZigBee | WiFi |
|---|---|---|---|---|
| IEEE Standard | 802.15.1 | 802.15.1 | 802.15.4 | 802.11 (a, b, g, n) |
| Frequency (GHz) | 2.4 | 2.4 | 0.868, 0.915, 2.4 | 2.4 and 5 |
| Maximum raw bit rate (Mbps) | 1-3 | 1 | 0.250 | 11 (b), 54 (g), 600 (n) |
| Typical data throughput (Mbps) | 0.7-2.1 | 0.27 | 0.2 | 7 (b), 25 (g), 150 (n) |
| Maximum (Outdoor) Range (Meters) | 10 (class 2), 100 (class 1) | 50 | 10-100 | 100-250 |
| Relative Power Consumption | Medium | Very low | Very low | High |
| Example Battery Life | Days | Months to years | Months to years | Hours |
| Network Size | 7 | Undefined | 64,000+ | 255 |
Bluetooth isn't the best choice for every wireless job out there, but it does excel at short-range cable-replacement-type applications. It also boasts a typically more convenient connection process than its competitors (ZigBee specifically).
ZigBee is often a good choice for monitoring networks -- like home automation projects. These networks might have dozens of wireless nodes, which are only sparsely active and never have to send a lot of data.
BLE combines the convenience of classic Bluetooth, and adds significantly lower power consumption. In this way it can compete with Zigbee for battery life. BLE can't compete with ZigBee in terms of network size, but for single device-to-device connectivity it's very comparable.
WiFi is probably the most familiar of these four wireless protocols. We're all pretty familiar with what purpose it's best for: Internet(!). It's fast and flexbile, but also requires a lot of power. For broadband Internet access it blows the other protocols out of the water.
Resources and Going Further
Now that you're familiar with the concepts behind Bluetooth, consider checking some of these related tutorials out:
- RN-52 Hookup Guide -- The RN-52 is a Bluetooth audio module, which supports all sorts of nifty profiles we talked about in this tutorial: HSP/HFP, A2DP, AVRCP, and SPP. Check out this module if you want to add wireless audio to your project.
- BlueSMiRF Hookup Guide -- The BlueSMiRF, using the RN-42 Bluetooth module, is simple-to-use and supports the SPP profile. If you want to replace a serial cable, check this module out.
- MetaWatch Teardown and Hookup Guide -- The MetaWatch is a "smartwatch", and it uses Bluetooth to communicate with and receive notifications from a smart phone. Look at the guts of this watch to see where the Bluetooth module fits in. Or follow along to control the watch from a Bluetooth module connected to an Arduino.
Or, if you're sick of Bluetooth, but still interested in doing something wireless:
- ATmega128RFA1 Dev Board Hookup Guide -- The ATmega128RFA1 sports an RF module which operates on the same standards as ZigBee (802.11.4). If you want to dig down into the nitty, gritty area of RF communication, check out this board.
- Electric Imp Hookup Guide -- The Electric Imp makes connecting to WiFi incredibly easy. Follow along with this tutorial, and you'll have an embedded module able to interact with web pages!
Here are some more great reads, if you want to learn more about Bluetooth:
* Bluetooth.org Specifications -- Thousands of pages covering the specifications of every Bluetooth version and profile known to mankind. * Althos Bluetooth Tutorial -- This is a well done beginner tutorial presented in slide form.
Or check out some of these blog posts for ideas: