Basic Servo Control for Beginners
 El Duderino
Controlling a Servo with Python and Pi Servo pHAT
Our third example demonstrates how to drive a servo using a Raspberry Pi and the SparkFun Servo pHAT for Raspberry Pi with the SparkFun PiServoHAT Python Module. The Servo pHAT can control up to 16 PWM devices so it is a great choice for projects using multiple servos along with other PWM devices like LEDs. The Raspberry Pi also has much more processing power than a development board like the RedBoard we used in the previous example so you can run all sorts of processes in the background for a complex project.
If you have never used a Raspberry Pi or the Servo pHAT before, we highly recommend reading through these tutorials before proceeding. The Getting Started with the Raspberry Pi tutorial is the most important in order to set up your Raspberry Pi as you cannot continue with this example without first configuring your Pi.
Python Programming Tutorial: Getting Started with the Raspberry Pi
June 27, 2018
Pi Servo pHAT (v2) Hookup Guide
July 11, 2019
Required Materials
To follow along with this example, you will need the following materials. Depending on what parts you already have, or if you would like to use a different Raspberry Pi or servo, you can adjust your cart accordingly.
Along with these parts, you will want a keyboard, mouse and monitor to connect to your Raspberry Pi to configure and interact with it. Alternatively, you can use another computer to do a headless setup for your Raspberry Pi. Also, if you already have a suitable SD card you would like to use, you can download and install the Raspbian OS for the Pi from the Raspberry Pi Foundation following the instructions from their Setting up your Raspberry Pi guide.
Hardware Hookup
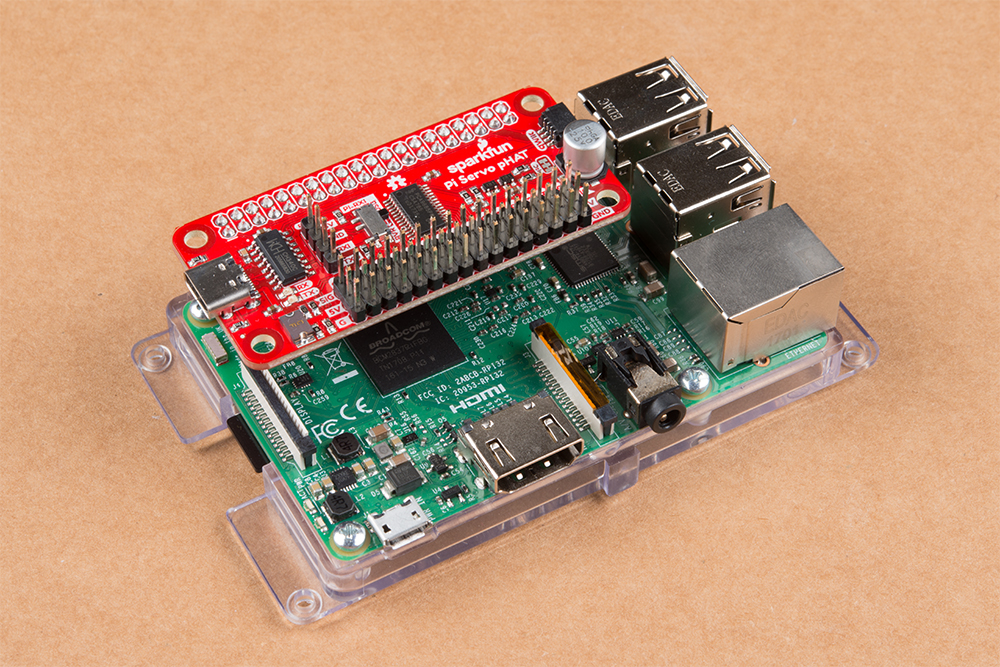
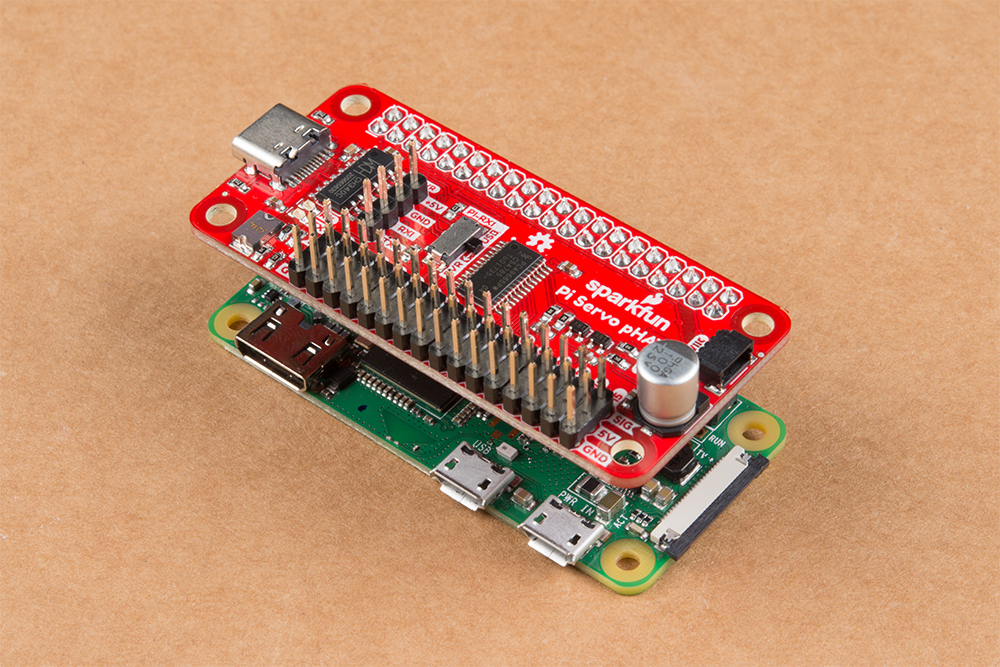
Hooking everything up with the Servo pHAT is pretty straightforward but there are a few things to note. With everything powered off, plug the pHAT on to the Pi's 2x20 GPIO Header, taking care to align it properly so it looks like the photos below.
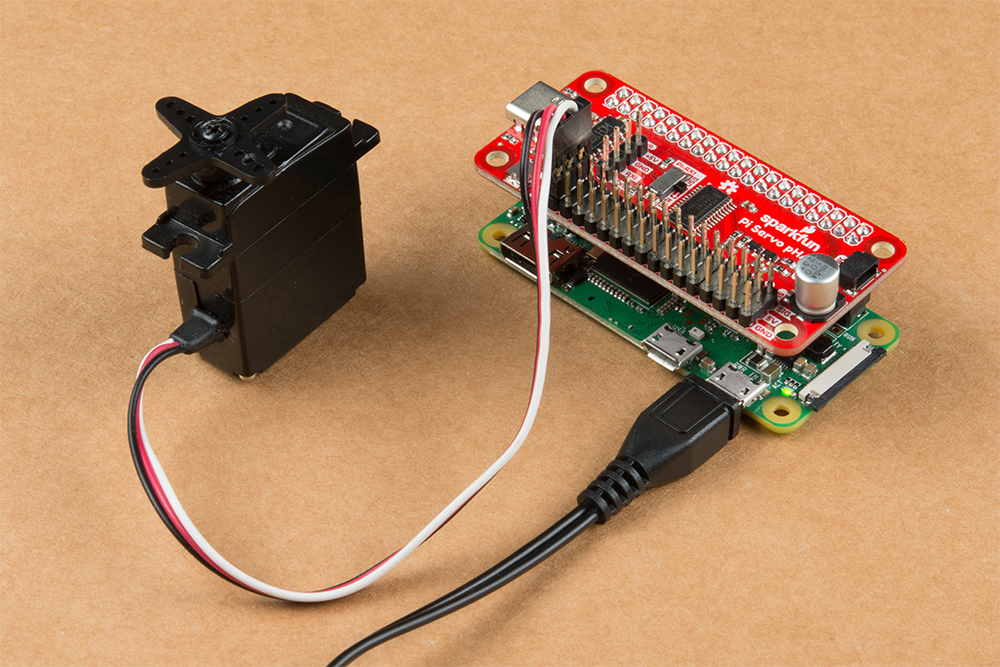
Next, connect your servo to one of the 3-pin channel headers taking care to match the pins on the servo with the silkscreen labels on the Servo pHAT. The example we are using defaults to Channel 0 so, if you use a different channel, make sure to adjust the code accordingly. Do not connect servos to the Pi while it is powered on as the resulting current spike can cause the Raspberry Pi to reset.
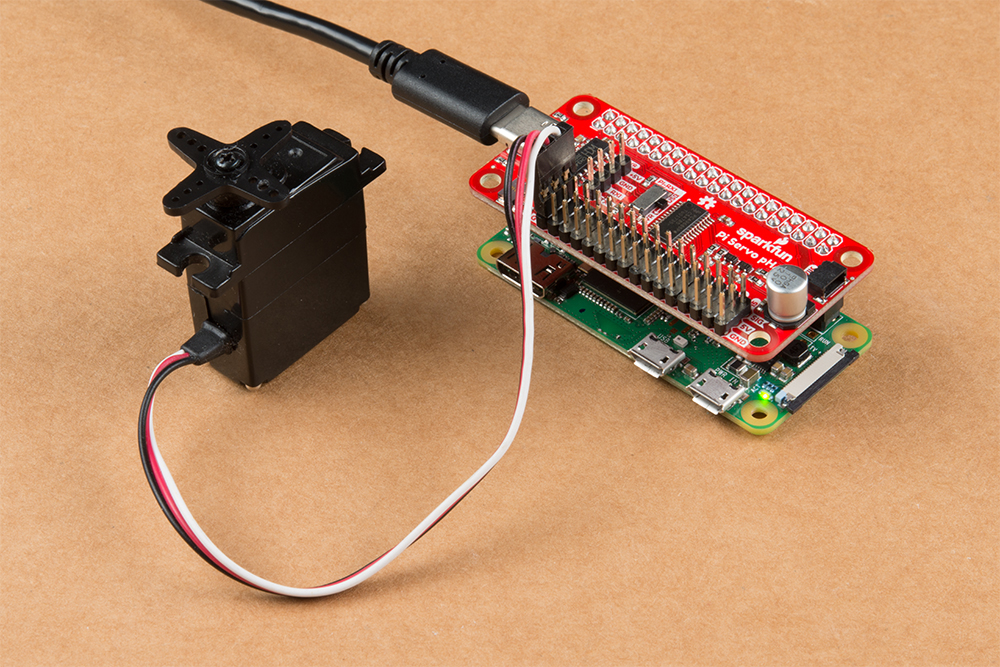
Now, go ahead and plug in your Pi. Then turn it on and we're ready to move on to programming. The photos below show two options for powering the Raspberry Pi and Pi Servo pHAT.
Python Package
With all of the hardware assembled and your Pi configured and ready to go, it is time to install the Python module and run one of the examples. For this particular experiment, we'll use Example 2 - Full Sweep with 180 deg. Servo.
First, we need to install the package to our Pi. For the sake of keeping this tutorial short we'll only cover how to install the entire SparkFun Qwiic Python package. If you would like to install individual parts of the package or install them manually, please head on over to this section of our Hookup Guide for the Servo pHAT for detailed instructions.
The SparkFun Qwiic Python Package installs all the available Python packages for our Qwiic products and includes the required I2C driver package. On systems that support PyPi via pip3 (use pip for Python 2), installation is simple using the following commands:
For all users (note the user must have sudo privileges) enter the following command from your command prompt:
language:bash
sudo pip3 install sparkfun-qwiic
If you just want to install the package for the current user enter this command in your command prompt:
language:bash
pip install sparkfun-qwiic
With the SparkFun Qwiic package installed it is time to create and run our code. You can either download or copy the code below into a file. Then open/save the file and execute the code in your preferred Python IDE. For example, to run the example in the default development environment on Raspbian, IDLE, click Run>Run Module or use the F5 key. To stop the example, use the Ctrl + C key combination.
While the example is running, you should see your servo moving back and forth over a 180 degree arc.
language:python
#-----------------------------------------------------------------------
# Pi Servo Hat - Example 2
#-----------------------------------------------------------------------
#
# Written by  SparkFun Electronics, June 2019
# Author: Wes Furuya
#
# Compatibility:
#     * Original: https://www.sparkfun.com/products/14328
#     * v2: https://www.sparkfun.com/products/15316
#
# Do you like this library? Help support SparkFun. Buy a board!
# For more information on Pi Servo Hat, check out the product page
# linked above.
#
# This program is distributed in the hope that it will be useful, but
# WITHOUT ANY WARRANTY without even the implied warranty of
# MERCHANTABILITY or FITNESS FOR A PARTICULAR PURPOSE. See the GNU
# General Public License for more details.
#
# You should have received a copy of the GNU General Public License
# along with this program.  If not, see <http:www.gnu.org/licenses/>.
#
#=======================================================================
# Copyright (c) 2019 SparkFun Electronics
#
# Permission is hereby granted, free of charge, to any person obtaining
# a copy of this software and associated documentation files (the
# "Software"), to deal in the Software without restriction, including
# without limitation the rights to use, copy, modify, merge, publish,
# distribute, sublicense, and/or sell copies of the Software, and to
# permit persons to whom the Software is furnished to do so, subject to
# the following conditions:
#
# The above copyright notice and this permission notice shall be
# included in all copies or substantial portions of the Software.
#
# THE SOFTWARE IS PROVIDED "AS IS", WITHOUT WARRANTY OF ANY KIND,
# EXPRESS OR IMPLIED, INCLUDING BUT NOT LIMITED TO THE WARRANTIES OF
# MERCHANTABILITY, FITNESS FOR A PARTICULAR PURPOSE AND NONINFRINGEMENT.
# IN NO EVENT SHALL THE AUTHORS OR COPYRIGHT HOLDERS BE LIABLE FOR ANY
# CLAIM, DAMAGES OR OTHER LIABILITY, WHETHER IN AN ACTION OF CONTRACT,
# TORT OR OTHERWISE, ARISING FROM, OUT OF OR IN CONNECTION WITH THE
# SOFTWARE OR THE USE OR OTHER DEALINGS IN THE SOFTWARE.
#=======================================================================

"""
This example should be used with a 180 degree (range of rotation) servo
on channel 0 of the Pi Servo Hat.

The extended code (commented out), at the end of the example could be
used to test the full range of the servo motion. However, users should
be wary as they can damage their servo by giving it a position outside
the standard range of motion.
"""

import pi_servo_hat
import time

# Initialize Constructor
test = pi_servo_hat.PiServoHat()

# Restart Servo Hat (in case Hat is frozen/locked)
test.restart()

# Test Run
#########################################
# Moves servo position to 0 degrees (1ms), Channel 0
test.move_servo_position(0, 0, 180)

# Pause 1 sec
time.sleep(1)

# Moves servo position to 180 degrees (2ms), Channel 0
test.move_servo_position(0, 180, 180)

# Pause 1 sec
time.sleep(1)

# Sweep
#########################################
while True:
    for i in range(0, 180):
        print(i)
        test.move_servo_position(0, i, 180)
        time.sleep(.001)
    for i in range(180, 0, -1):
        print(i)
        test.move_servo_position(0, i, 180)
        time.sleep(.001)

#########################################
# Code below may damage servo, use with caution
# Test sweep for full range of servo (outside 0 to 180 degrees).
# while True:
#     for i in range(-45, 200):
#         print(i)
#         test.move_servo_position(0, i, 180)
#         time.sleep(.001)
#     for i in range(200, -45, -1):
#         print(i)
#         test.move_servo_position(0, i, 180)
#         time.sleep(.001)
Troubleshooting Tips
If you are having any difficulty getting your servo to move or recognize the Servo pHAT on your Pi, here are a few tips to help troubleshoot.
No Available Devices
If you see this error readout: OSError: [Errno 121] Remote I/O error, double check your connections to the GPIO header.
Also make sure that the I2C hardware is enabled on your Raspberry Pi. If it is not enabled, you will probably see this error readout: Failed to connect to I2C bus 1.. If you need help enabling I2C on your Pi, take a look at this section of our Raspberry Pi: SPI and I2C Tutorial.
Check your I2C Connection
A simple method to check if your Raspberry Pi can communicate with the Servo pHAT over I2C is to ping the I2C bus. On the latest releases of Raspbian Stretch, the i2ctools package should come pre-installed. If it isn't run the following command in the terminal:
language:bash
sudo apt-get install i2ctools
With the i2ctools package is installed, you can ping the I2C bus with the following command in the terminal:
language:bash
i2cdetect -y 1
You should see a table printed out in the terminal. If the Servo pHAT is connected and working properly you should see the address space for 0x40 marked with 40.
Current Draw Problems
If your servos are drawing more current that your power supply can handle, your Servo pHAT will not operate correctly and the Raspberry Pi may reboot or brown out intermittently.
If you have a particularly large servo, or many servos driving a heavy load, you might notice the Pi rebooting or browning out when using the USB port on the Pi to power both the Pi and the Servo pHAT. You can try switching to powering the Pi and Servo pHAT directly through the USB-C connector on the pHAT, but a better solution is to sever the Power Isolation jumper and power each device individually. We cover where to locate that jumper and how to modify it in the "Jumpers" subsection of the Hardware Overview section of the Servo pHAT Hookup Guide.