MicroPython Programming Tutorial: Getting Started with the ESP32 Thing
 Shawn Hymel
Experiment 3: Analog Input
The ESP32 has a few pins that can be configured as analog-to-digital converters (ADCs). Unfortunately, they are slightly more complicated to use than some other microcontrollers. Most importantly, know that pins 32-39 are supported in MicroPython as ADCs and that we recommend using pins 36-39 for analog input due to the available preamplifier.
This video and this forum post can help you learn more about how the preamp and ADC work on the ESP32.
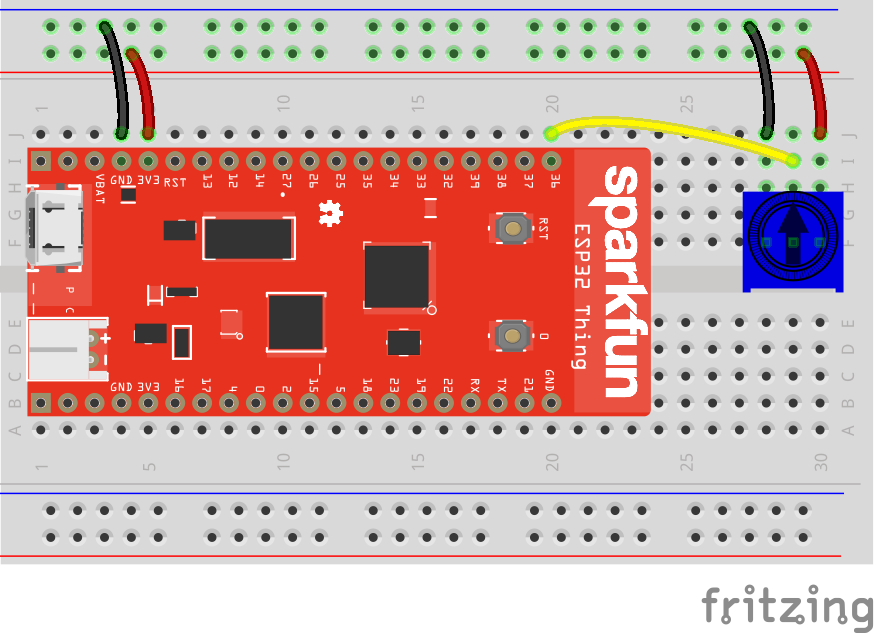
We are going to add a simple potentiometer to the ESP32 and measure the voltage from it. Note that the on-chip ADC is not the best, as it seems to exhibit some non-linear behavior. If you need a more accurate ADC, we recommend something like this SPI ADC chip.
Hardware Connections
Connect a potentiometer to the ESP32 as per the following diagram:
Code: Do the Twist
In a new file, enter the following Python code:
language:python
import machine
import sys
import utime

# Pin definitions
repl_button = machine.Pin(0, machine.Pin.IN, machine.Pin.PULL_UP)
repl_led = machine.Pin(5, machine.Pin.OUT)
adc_pin = machine.Pin(36)

# Create an ADC object out of our pin object
adc = machine.ADC(adc_pin)

# 11 dB attenuation means full 0 - 3.3V range
adc.atten(adc.ATTN_11DB)

# Blink forever
while True:

    # If button 0 is pressed, drop to REPL
    if repl_button.value() == 0:
        print("Dropping to REPL")
        repl_led.value(1)
        sys.exit()

    # Read ADC and convert to voltage
    val = adc.read()
    val = val * (3.3 / 4095)
    print(round(val, 2), "V")

    # Wait a bit before taking another reading
    utime.sleep_ms(100)
Save the code with a name like adc.py. Open a command terminal, and navigate to the directory with your adc.py file. Press button 0 on your ESP32 to drop to REPL, and enter the following commands into your terminal (changing <PORT> to your particular port name/location):
language:shell
cp adc.py main.py
ampy --port <PORT> put main.py
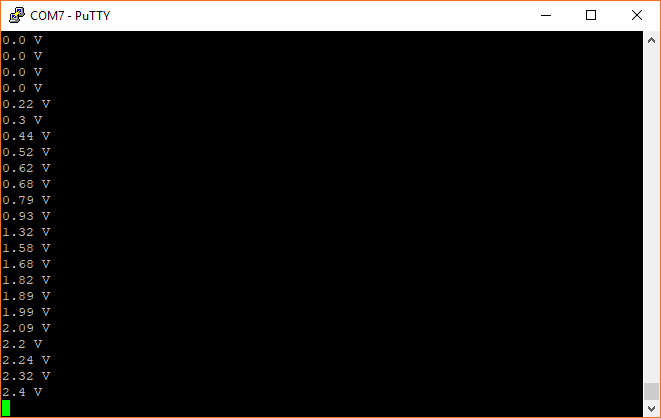
Open a serial terminal connection to the ESP32. You should see voltage readouts being rapidly printed to the screen. Try turning the potentiometer knob to adjust the voltage.

As you turn the knob, the voltages being printed to the screen should update.
Code to Note
Similar to how we created a machine.PWM object in the last section, we create a machine.ADC object here using the pin object we created for pin 36. Because we are using the preamplified ADC pins, we can set the attenuation:
language:python
adc.atten(adc.ATTN_11DB)
Our options for setting attenuation include:
ATTN_0DB- no attenuationATTN_2_5DB- 2.5 dB of attenuationATTN_6DB- 6 dB of attenuationATTN_11DB- 11 dB of attenuation
The ESP32 ADC video at 3:57 gives a great overview of the different attenuation options. Generally, you will want to use 11 dB, as that gives you the full range of values from 0 to 3.3 V. 0 dB is great if you only need 0 to 1 V of analog-to-digital conversion (much like how the ADC on the ESP8266 works).
Note that the ADC is not completely accurate. Even in the full 0 to 3.3 V range, many of the values seem to be around 0.2 V off. You can test this with a multimeter to verify.
In our while loop, we get a numerical value from the ADC with adc.read(). This function returns a whole number between 0 and 4095. Because we know that 0 refers to 0 V and 4095 refers to 3.3 V, we can roughly determine our measured voltage with:
language:python
val = val * (3.3 / 4095)
We start with 0...4095 in val and then multiply that value by the quotient of (3.3 / 4095). This results in the decimal point value of temperature (in Celsius), which we store back into the val variable. Decimal point values are stored as floating point numbers, which you can learn more about here.
We print our floating point number to the screen with the following line:
language:python
print(round(val, 2), "V")
round(val, 2) says that we should round our number to two decimal places. The comma (,) followed by another string tells the interpreter that it should print a space followed by our string ("V" in this case) on the same line as our printed voltage value. This allows us to add units to the printout.
Finally, we wait 100 ms before returning to the top of loop, where we check for button 0 press each iteration.