Pushing Data to Data.SparkFun.com
This Tutorial is Retired!
This tutorial covers concepts or technologies that are no longer current. It's still here for you to read and enjoy, but may not be as useful as our newest tutorials.
 jimblom
Electric Imp
The Electric Imp -- a development platform centered around Internet-of-Things applications -- is a perfect tool for sending data to a Phant stream. If you want to get code on the little SD-card sized module, it already has to be Internet connected. Plus the Imp API already has all of the HTTP-related features you need to send server requests.
If you're unfamiliar with the Electric Imp, check out our Electric Imp Hookup Guide, which will guide you through the BlinkUp process and includes a few example programs to get you started.
The Imp Example Circuit
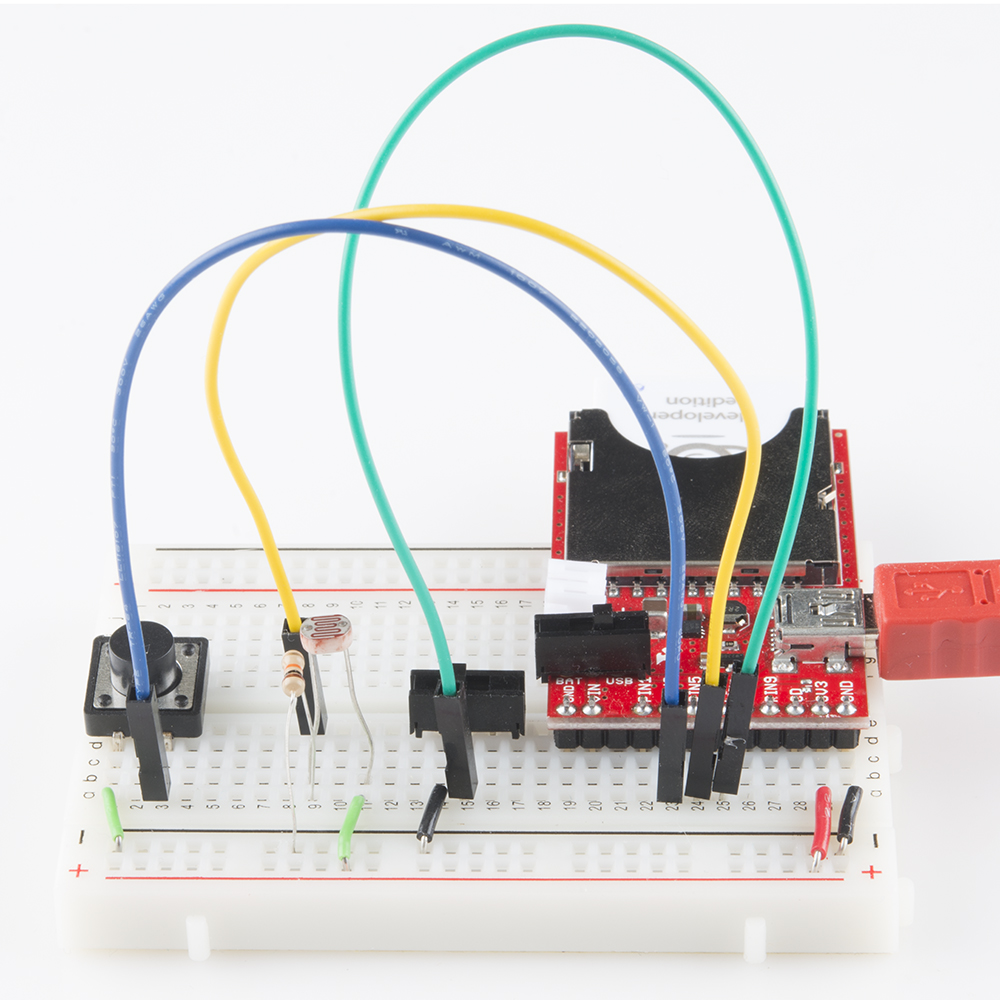
Here's the example circuit for our Imp example:
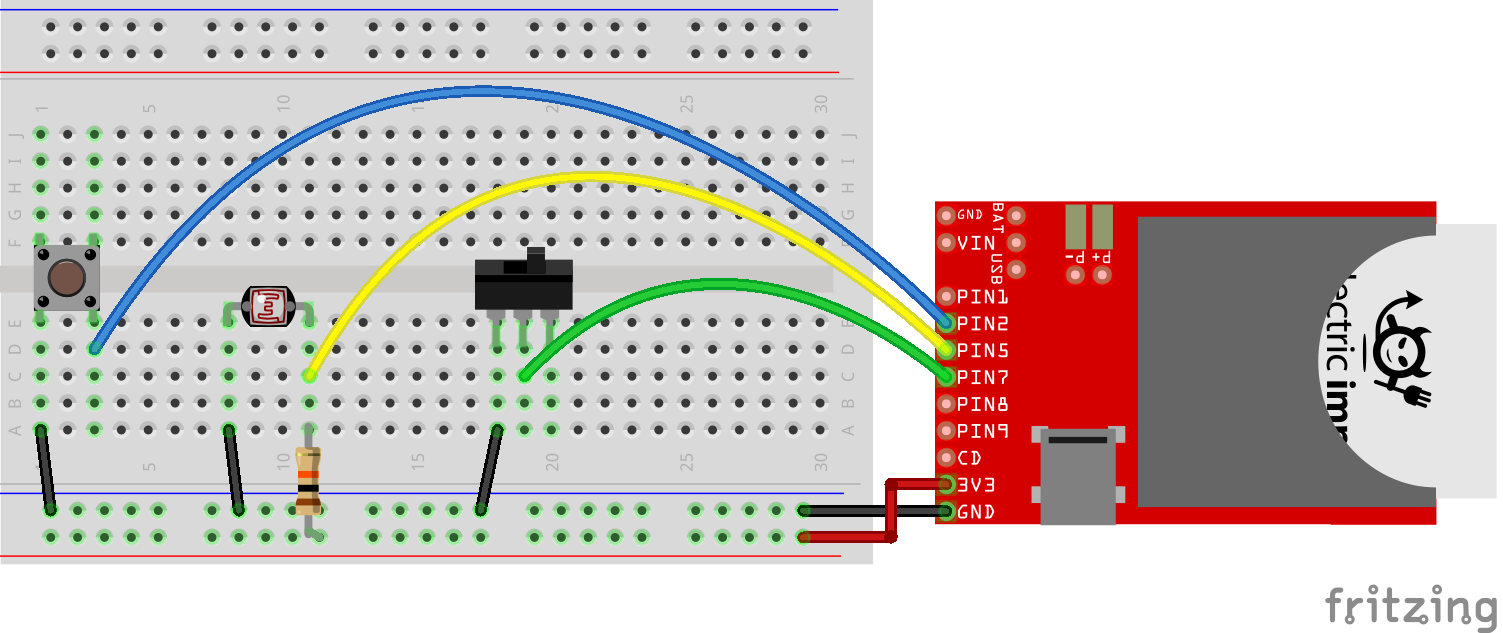
The output of a photocell (voltage divided with a 10kΩ resistor) connects to pin 5. A momentary push-button is connected to pin 2 on one end and ground on the other. And a SPDT switch can connect pin 7 to ground or let it float.
The Imp Example Code
As with most Electric Imp code examples, there are two halves to this puzzle: device code and agent code. Create a new model in your imp IDE -- we called ours "Phant Imp" -- and paste these two bits of code into their respective half.
Device Code
The Imp device itself is responsible for reading the button, switch, and light inputs, packaging them into a string and sending that off to the agent. Here's the code:
language:JavaScript
/*****************************************************************
Phant Imp (Device)
Post data to SparkFun's data stream server system (phant) using
an Electric Imp
Jim Lindblom @ SparkFun Electronics
Original Creation Date: July 7, 2014

Description

Hardware Hookup:
  * These components are connected to the Arduino's I/O pins:
    * Pin 1 - Active-low momentary button (pulled high internally)
    * Pin 2 - Photoresistor (which is combined with a 10k resistor
           to form a voltage divider output to the Arduino).
    * Pin 5 - SPST switch to select either 5V or 0V to this pin.

This code is beerware; if you see me (or any other SparkFun
employee) at the local, and you've found our code helpful, please
buy us a round!

Distributed as-is; no warranty is given.
*****************************************************************/

/////////////////
// Phant Stuff //
/////////////////
const FIELD_COUNT = 3; // Number of fields in the stream
local fieldNames = ["light", "switch", "name"]; // Exact names of each field

/////////////////////
// Pin Definitions //
/////////////////////
buttonPin <- hardware.pin2;
lightPin <- hardware.pin5;
switchPin <- hardware.pin7;

// This name will be sent to the stream each update:
local impName = "Imp%20" + imp.getmacaddress();

////////////////////////////
// Button Press Interrupt //
////////////////////////////
// This function will be called each time the button (connected to pin 2) is
// pressed or released.
function sendData()
{
    // Only do this if the pin is low (pressed)
    if (buttonPin.read() == 0)
    {
        // Collect Data
        local lightValue = lightPin.read();
        local switchValue = switchPin.read();

        // Populate fieldData array with respective data values
        local fieldData = [lightValue, switchValue, impName];

        // Create a data string to send to the agent. Should be of the form:
        // "fieldName0=fieldData0&fieldName1=fieldData1&fieldName2=fieldData2"
        local data = "";
        for (local i=0; i<FIELD_COUNT; i++)
        {
            data += fieldNames[i] + "=" + fieldData[i];
            if (i < FIELD_COUNT - 1)
                data += "&";
        }
        server.log("Sending Data!");
        agent.send("postData", data);

        imp.sleep(1); // Wait for a second (lazy debounce, update rate control)
    }
}

///////////////
// Pin Setup //
///////////////
buttonPin.configure(DIGITAL_IN_PULLUP, sendData); // Button -- input w/ pull-up
lightPin.configure(ANALOG_IN); // Light sensor -- Analog input
switchPin.configure(DIGITAL_IN_PULLUP); // Switch -- Input w/ pull-up

server.log("Phant Imp has started"); // Hello, world.
The very first few lines of that code, under the "Phant Stuff" heading, determine the field names of your data steram. Make sure to set the FIELD_COUNT variable to the number of data fields in your stream, and stick the exact name of each field in the fieldNames array.
Agent Code
Paste this code into the left, agent half of your Imp IDE.
language:JavaScript
/*****************************************************************
Phant Imp (Agent)
Post data to SparkFun's data stream server system (phant) using
an Electric Imp
Jim Lindblom @ SparkFun Electronics
Original Creation Date: July 7, 2014

Description

Before uploading this sketch, there are a number of vars that need adjusting:
1. Phant Stuff: Fill in your data stream's public, private, and
data keys before uploading!

This code is beerware; if you see me (or any other SparkFun
employee) at the local, and you've found our code helpful, please
buy us a round!

Distributed as-is; no warranty is given.
*****************************************************************/

/////////////////
// Phant Stuff //
/////////////////
local publicKey = "6JZbNolApzF4om2l9yYK"; // Your Phant public key
local privateKey = "Ww0vPW1yrkUNDqWPV9jE"; // The Phant private key
local phantServer = "data.sparkfun.com"; // Your Phant server, base URL, no HTTP

/////////////////////
// postData Action //
/////////////////////
// When the agent receives a "postData" string from the device, use the
// dataString string to construct a HTTP POST, and send it to the server.
device.on("postData", function(dataString) {

    server.log("Sending " + dataString); // Print a debug message

    // Construct the base URL: https://data.sparkfun.com/input/PUBLIC_KEY:
    local phantURL = "https://" +  phantServer + "/input/" + publicKey;
    // Construct the headers: e.g. "Phant-Priave-Key: PRIVATE_KEY"
    local phantHeaders = {"Phant-Private-Key": privateKey, "connection": "close"};
    // Send the POST to phantURL, with phantHeaders, and dataString data.
    local request = http.post(phantURL, phantHeaders, dataString);

    // Get the response from the server, and send it out the debug window:
    local response = request.sendsync();
    server.log("Phant response: " + response.body);
});
The agent is responsible for receiving data from the Imp and sending it off to a server in the form of an HTTP POST. The public and private keys of your stream are stored in this half of the model. Update those, under the "Phant Stuff" heading, to the hashes in your stream.
In this example, the agent is totally ignorant of the data being passed to the stream. It's relying on the device to construct that string exactly as the server wants to see it. That seemed to be the easiest way to handle this, as the device can only send a single string at a time to the agent.
With those two halves of code copied and pasted, upload them to your Imp. Then, whenever you press the button, it should post its data to our example stream. Update the variables under the "Phant Stuff" headings to configure it to your stream.