WiFi Controlled Robot
 Alex the Giant
Controlling the Motors From a Web Page
Now that we know the motors are working correctly, we'll next try to control them from a web page hosted by the ESP32 Thing. To do this, we'll load the Arduino code on to the ESP32. Copy and paste the following code into Arduino and upload it to the board. All of the libraries come with Arduino and the ESP32 bootloader core except for ESP32WebServer.h which you can download from the link below:
language:cpp
/*
 *  Alex Wende SparkFun Electronics
 *  ESP32 Web Controlled Motor Test
 *
 *  To use this code, download the ESP32WebServer library from:
 *  https://github.com/Pedroalbuquerque/ESP32WebServer
 *
 *  In this Example we'll use the arrow keys from our keyboard to send commands to the Serial
 *  Controlled Motor Driver. When the ESP32 connects to the WiFi network, the ESP32 sends the
 *  IP address over the Serial to the terminal window at 9600 baud. Copy and paste the IP
 *  address into your brower's window to go to the ESp32's web page. From there, use the arrow keys
 *  to control the motors.
 *
 *  UP Arrow - Drive Forward
 *  DOWN Arrow - Drive in Reverse
 *  LEFT Arrow - Turn Left
 *  RIGHT Arrow - Turn Righ
 *
 *  If the motors aren't spinning in the correct direction, you'll need to to change the motor
 *  number and/or motor direction in the handleMotors() function.
 */

#include <WiFiClient.h>
#include <ESP32WebServer.h>
#include <WiFi.h>
#include <SPI.h>
#include <SD.h>

const char* ssid = "*************";
const char* password = "*********";

ESP32WebServer server(80);  //Default port number

void handleRoot()
{
  /* we load the index.html from microSD */
  File myFile = SD.open("/index.html");
  if (myFile)
  {
    /* respond the content of file to client by calling streamFile()*/
    size_t sent = server.streamFile(myFile, "text/html");
    /* close the file */
    myFile.close();
  }
  else
  {
    Serial.println("error opening index.html");
  }
}

//XML page to listen for motor commands
void handleMotors()
{
  String motorState = "OFF";
  String t_state = server.arg("motorState"); //Refer  xhttp.open("GET", "setMotors?motorState="+motorData, true);

  Serial.print("D\r\n"); //Disable motors
  delay(50);

  if(t_state.startsWith("U"))  //Drive Forward (UP Arrow)
  {
    Serial.print("M0F70\r\n");
    delay(50);
    Serial.print("M1F70\r\n");
    delay(50);
    Serial.print("E\r\n");
  }
  else if(t_state.startsWith("D")) //Reverse (DOWN Arrow)
  {
    Serial.print("M0R70\r\n");
    delay(50);
    Serial.print("M1R70\r\n");
    delay(50);
    Serial.print("E\r\n");
  }
  else if(t_state.startsWith("R")) //Turn Right (Right Arrow)
  {
    Serial.print("M0F50\r\n");
    delay(50);
    Serial.print("M1R50\r\n");
    delay(50);
    Serial.print("E\r\n");
  }
  else if(t_state.startsWith("L")) //Turn Left (LEFT Arrow)
  {
    Serial.print("M0R50\r\n");
    delay(50);
    Serial.print("M1F50\r\n");
    delay(50);
    Serial.print("E\r\n");
  }

   server.send(200, "text/plain", motorState); //Send web page
}

// cannot handle request so return 404
void handleNotFound()
{
  server.send(404, "text/plain", "File Not Found\n\n");
}

void setup(){
  Serial.begin(9600); //SCMD + debug messages
  WiFi.begin(ssid, password); //WiFi network to connect to

  Serial.println();

  // Wait for connection
  while (WiFi.status() != WL_CONNECTED) {
    delay(500);
    Serial.print(".");
  }
  Serial.println("");
  Serial.print("Connected to ");
  Serial.println(ssid);
  Serial.print("IP address: ");
  Serial.println(WiFi.localIP());

  /* register the callbacks to process client request */
  /* root request we will read the memory card to get
  the content of index.html and respond that content to client */
  server.on("/", handleRoot);
  server.on("/setMotors", handleMotors);
  server.onNotFound(handleNotFound);
  server.begin(); //Start the web server

  Serial.println("HTTP server started");
  Serial.print("Initializing SD card...");

  /* initialize microSD */
  if (!SD.begin(33)) {
    Serial.println("initialization failed!");
    return;
  }
  Serial.println("initialization done.");
}

void loop(){
  server.handleClient();
}
The Arduino code doesn't include any of the HTML code that your browser needs to display the web page. For that we'll need to load the HTML file on to a microSD card. You could also directly load the HTML code into the handleRoot() function, but by keeping the HTML code on a microSD card, we can eject the SD card and change the code, faster than it would take to recompile the ESP32 code and re-upload it to the board.
To put the code on the SD card, we'll plug the card into our computer and create a file called "index.html", which will have the following code saved to that file:
<!DOCTYPE html>
<html>
    <head>
        <meta charset="UTF-8">
        <title> Web Server Motor Control Test </title>
        <script type="text/javascript">
            var sendCommand = 1;

            //Key Pressed
            document.addEventListener("keydown", function (evt) {
                if (evt.keyCode == "38" && sendCommand) {   // up arrow
                    sendData("U")
                    sendCommand = 0;
                }
                else if (evt.keyCode == "40" && sendCommand) {  // down arrow
                    sendData("D")
                    sendCommand = 0;
                }
                else if (evt.keyCode == "37" && sendCommand) {  // left arrow
                    sendData("L")
                    sendCommand = 0;
                }
                else if (evt.keyCode == "39" && sendCommand) {  // right arrow
                    sendData("R")
                    sendCommand = 0;
                }
            });

            //Key Released
            document.addEventListener("keyup", function (evt) {
                if(evt.keyCode == "37" || evt.keyCode == "38" || evt.keyCode == "39" || evt.keyCode == "40") {
                    sendData("STOP");
                    sendCommand = 1;
                }
            });

            function sendData(motorData) {  //Send data for ESP32 to resond to
                var xhttp = new XMLHttpRequest();
                xhttp.onreadystatechange = function() {
                    if (this.readyState == 4 && this.status == 200) {
                    }
                };
                xhttp.open("GET", "setMotors?motorState="+motorData, true);
                xhttp.send();
            }
        </script>
    </head>
    <body>
        <h2>SparkFun ESP32 Thing Motor Control Test</h2>
        <ul>
            <li>Use the arrow keys send commands to the motors.</li>
            <li>When a arrow key is pressed, this page sends a XML request for the ESP32 to respond to.</li>
            <li>The ESP32 responds by sending a motor command to the Serial Controlled Motor Driver. </li>
            <li>By sending a XML request, we're able to control the motors without having to reload the page!</li>
        </ul>
   </body>
</html>
Once you have that file saved as a .html, you can eject the SD card and plug it into the Motion Shield and open the your terminal window. You may need to press the reset button on your ESP32 Thing to view the debug messages. If all goes well you should see the following in your terminal window:
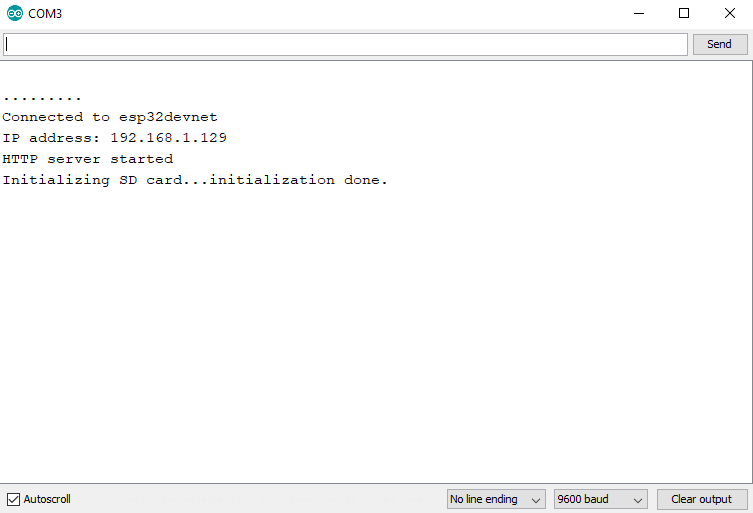
If you only see "...", it means that it's not connecting to your WiFi network. Make sure the SSID and password is correct. If the SD card failed to initialize, it could be that you forgot to plug in the SD card, or it could be that the chip select pin is incorrect. For the Motion Shield it should be GPIO pin 33.
Once the ESP32 has connected to the network, and the SD card is initialized, you can try to access the web page. Make sure your computer is on the same network as the ESP32, and enter the IP address of the ESP32 into the address bar of your browser. It should display the following page:

From this page, when you press the arrow keys you should see the motors respond. As you press the arrow keys, check to make sure the motors respond correctly to the arrow keys. If not, you'll need to modify the code in the handleMotors() function to move forward when the up arrow key is pressed, reverse when the down arrow key is pressed, and so on.