The Stepoko runs Grbl software and is able to connect to your computer, accept G-code and translate that to stepper motor commands (complete with stepper motor drivers). The Shapeoko on the other hand is a complete 3-axis gantry. Together you are on your way to a complete CNC Machine. Check out our various Stepoko and Shapeoko products along with various support parts. If this paragraph is incomprehensible to you check out the definitions below.
Stepoko and Shapeoko Products
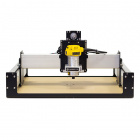
Shapeoko v3 - With the exception of the trim router, this framework has just about everything you need to get started with your own desktop CNC machine. Based on a custom aluminum extrusion that serves as both the frame and the motion system, it comes with NEMA 23 stepper motors for motion control, GT2 Belting, and a Carbide Motion Controller to run both G-Code and GRBL.
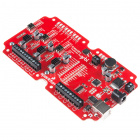
Stepoko Board - This is the bare Stepoko board. It has 3 stepper motor drivers as well as an Arduino compatible processor running the GRBL software. Do you have your own gantry with its own steppers and just need a controller? If so this board is for you. The board can accept G-code commands from your computer and control your motors. Just make sure your motors are the correct size and start playing. This board now includes thermal gap filler to help with ESD issues.
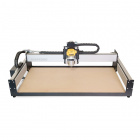
Shapeoko XL - The Shapeoko XL nearly doubles the cutting area of the Shapeoko v3. Each Shapeoko XL has a cutting area of 838mm x 425 mm x 75mm (33" x 16" x 3") and an overall footprint of 1137mm x 607mm (44.8" x 24"). It uses a 1.25hp spindle and NEMA 23 stepper motors for motion control with an accuracy of about 0.005". This version of the Shapeoko XL does NOT include a trim router, this will need to be purchased separately. The folks at Shapeoko recommend the DeWalt D26200 or Makita RT0700C to use with the machine.
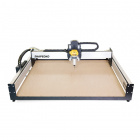
Shapeoko XXL - This is the Shapeoko XXL, nearly FOUR times the cutting area of the Shapeoko v3. Each Shapeoko XXL has a cutting area of 838mm x 838mm x 75mm (33" x 33" x 3") and an overall footprint of 1137mm x 1023.62mm (44.8" x 40.3") It uses a 1.25hp spindle and NEMA 23 stepper motors for motion control with an accuracy of about 0.005". This version of the Shapeoko XXL does NOT include a trim router, this will need to be purchased separately. The folks at Shapeoko recommend the DeWalt D26200 or Makita RT0700C to use with the machine.
Add-On Ideas
The v3, XL, and XXL kits contains just the basics, so here are a few other products you might find helpful in getting your Shapeoko and Stepoko running the way you want to.
Shapeoko Maintenance Kit - Keep your Shapeoko up and running with this maintenance kit. Broke a v-wheel? Need a new belt?, eccentrics worn out? Regardless of what you need it for, the Shapeoko Maintenance Kit will get you fixed up and running in no time! This kit includes everything you might need to repair your Shapeoko v3, Shapeoko XL, or Shapeoko XXL. The belt length in this maintenance kit has been suited to fit the Shapeoko XXL (1 for x-axis @ 1200 mm, 2 for y-axis @1200 mm), but each can be cut to size in order to fit the v3 or XL instead.
Cable Carriers - Help keep your cables contained and not in the way of moving parts.
Limit Switches - Limit switches are good for mounting to the end of your rig, if the head hits these something went wrong and it is about to try to run off the track. Hook these up to shut down the system if this happens. Check out the web for professional limit switches, but in a pinch these should work as well.
Emergency Switch - Similar to the limit switches we don't carry a standard Emergency Switch. You can try using one of our Concave buttons although they are momentary and not locking. You can also try a toggle switch (the covers make a nice bright thing to hit in an emergency).
Safety Glasses - Please be safe, no one likes wood splinters in their eyes.
Screwdriver - With screw terminals and other things you will probably need a good screwdriver. While you probably already own a few here is a good one with a few different tips that will work will on small jobs like screw terminals.
Router - We don't currently carry a router to go on your CNC. The folks at Shapeoko recommend the Dewalt DW611, the Porter Cable 450, or the Makita RT0701C to use with the machine. We ended up using a cheap Harbor Freight one that we 3D printed an adapter for to make it fit. Don't forget you can put whatever you want on the end, whether that's a laser, 3D print extrusion head, or a marker. Get creative!
Tutorials and Videos
We have quite a few tutorials, videos and projects to help you get started. Check out the hookup guides for an overview of the products including features, set up, and project ideas.
Tutorials
Stepoko Hookup Guide - This tutorial will give you a good idea of how to use the Stepoko board and it's features.
Shapeoko Assembly Guide - These are the basic instructions from Carbide3D for assembling the Shapeoko. Please keep in mind that this Guide lists items for the Carbide3D version of the complete Shapeoko kit, not the SparkFun version. Be sure to reference the hard copy guide that comes with your kit.
Videos
- Shapeoko Assembly Videos - Videos from Carbide3D, the makers of the Shapeoko.
Projects
- Make a Coaster - The basics of getting your CNC up and running and making your very own coaster (drinks not included).
More Information and Help
Note: If you are looking for information on the older red version of the Shapeoko, refer to the Shapeoko Assembly Guide.
Definitions
We've been using some fairly high tech terms and if you've never had the chance to use a CNC or do much with mechanical engineering they may be foreign to you. Here are a few definitions we came up with to help you understand the processes a bit more.
CNC stands for Computer Numeric Control. The short definition a mechanical device where a certain number of axes are controlled by computer code as opposed to manually. This definition includes traditional CNCs such as a mill, laser cutter and pick and place machines, but also things you don't normally thing of as CNCs such as a printer or scanner (which both have automated x axis and either a y axis or an automatic feeder).
CAD stands for Computer Aided Design. This is basically just a piece of software that lets you design something. Eagle is a CAD program we use to design PCBs, Solidworks is a popular CAD program used to do 3-D modeling, and Inkscape can be used as a CAD program to design paths for a laser cutter. Even your computer's native painting program can technically be CAD software (although probably not very good software), it all depends on your needs and what you are designing.
CAM stands for Computer Aided Manufacturing. This is where CNC means CAD. When we are done designing our PCBs in Eagle we have to run a "CAM Job" which basically takes all the information in the file and turns it into gerber files. A typical PCB has 5-10 gerber files, 1 for drill hits, 1 for the top layer of copper, 1 for the bottom layer of copper, one for silk screen, etc. These gerber files are what the machines at the fab houses use to actually make the boards. Similar processes need to be done for other types of CAD programs to translate a full featured design file into more basic information. In some cases this is done behind the scenes, for example when I take my Corel Draw file and send it to our laser cutter I don't manually run a CAM job, but somewhere between Corel Draw, and the laser cutter drivers, the correct information gets to the laser cutter.
G-Code is basically a programming language used to tell a CNC machine how to move. Commands such as turn on drill, wait 1 second, move 2mm on the x-axis, change tool, and set speed gives the machine all the information to do what it needs to. While you can technically do this by hand the process will most likely be long and tedious.
Grbl is actually an Arduino based G-code translator. With the uptick in the Maker Movement and Arduino based controllers people were wanting to translate G-code on their own. Grbl is the software that takes those G-code commands and sends the correct pulses and exactly the correct time to the stepper motors (or stepper motor drivers), as well as controlling other features such as turning on the CNC or leveling a bed.
Software
While we do not tend to make a lot of software suggestions - to run a CNC - you will need a few software programs. We've tried to give a quick overview of some of the more popular paid, free, and open source software options including what we've tried (and know works with this setup). We have provided links to the software in our tutorials for your convenience.
CAD - This is where you will be doing most of your work and you will want a good solid program. Professional CAD software is not cheap though. SolidWorks and Inventor are 2 well known CAD programs, just keep in mind that a license will set you back about $4000. There are also some reasonably priced options out there including Autodesk Fusion 360 (free for hobbyists and between $25-$40/month otherwise) which do have built in CAM functionality. Fortunately, there are a few decent Open Source options. FreeCAD is pretty popular and what we tend to use around here.
**CAM **- This is a tricky area in that there are few good Open Source options. For free programs you can try PyCAM. Also check out CamBam which is about $150 but does have a trial version that gives you 40 free uses. Lastly is MakerCAM, this is what we've been using with our Shapeko and we've been pretty happy with it.
G-code sender - This is fairly straight forward software, that takes the G-code and sends it over USB to your device. We are using Universal G-Code Sender which seems to be a standard, although I was able to find various options with a quick Google search.